
You bought a dedicated server. The provider sent over the IP, root password, and a control panel link. Now what?
Here's the honest answer: most people skip the first hour of work that actually matters, jump straight to installing WordPress or a game server, and then wonder why their box gets compromised in a week. Setting up a dedicated server from scratch isn't hard but the order matters more than any single command you'll run.
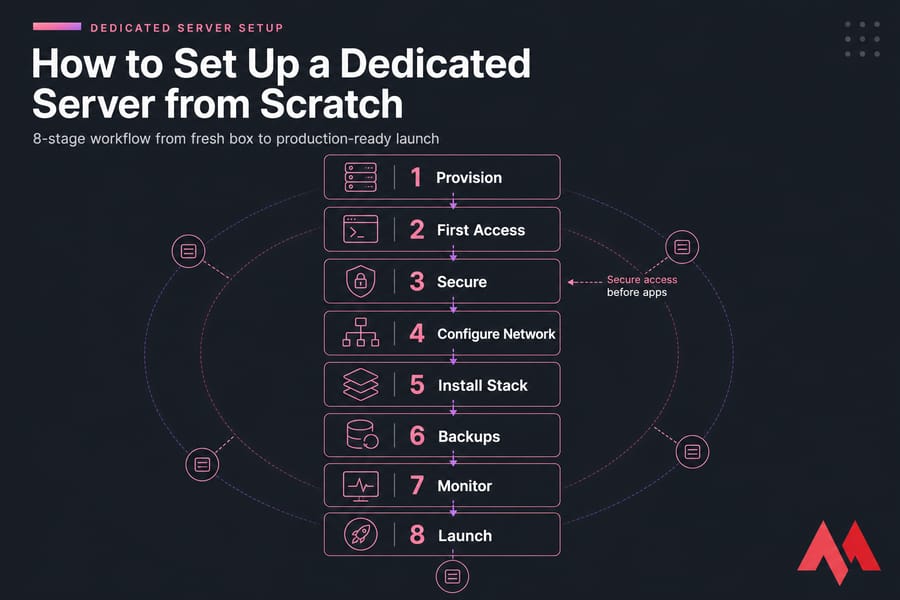
This guide walks you through the exact sequence I use when I provision a fresh box, whether it's running Ubuntu, AlmaLinux, or Windows Server. We'll cover first login, security hardening, networking, the application stack, backups, and the final go-live checks. No hardware assembly, no marketing fluff. Just the steps.
What a dedicated server setup actually involves
Let's clear up a confusion I see constantly. "Setting up a dedicated server" doesn't mean racking hardware or installing RAM. When you rent a dedicated server from a host like MonoVM, the physical machine is already running in a data center. Your job is to turn that bare or pre-installed box into something usable — and ideally something that won't fall over the moment real traffic hits it.
Dedicated server setup vs server building
Building a server means assembling hardware: CPU, RAM, drives, RAID controllers, the whole bit. Setting one up means configuring an existing machine remotely. If you're reading this, you almost certainly want the second thing.
For background on the underlying product, see what is a dedicated server.
Dedicated server setup vs VPS setup
The steps overlap a lot. SSH, firewall rules, user creation — same idea on both. But dedicated servers usually give you IPMI/KVM access, real RAID controllers, and a fatter pipe. The stakes are also higher: you own the whole box, so a misstep here costs more than misconfiguring a $10/month VPS.
If you're still deciding between the two, here's VPS vs dedicated server.
What "production-ready" actually means
A server is production-ready when it's been patched, locked down, monitored, backed up, and tested. Not when it boots and responds to ping. Keep that distinction in mind — it's the whole point of this guide.
Key takeaway: Setting up a dedicated server safely means securing access before you install applications. Reverse that order and you'll regret it.
Choose the right operating system for dedicated server setup
Before you touch a single command, decide what OS you're running. This isn't a trivial choice. The OS dictates your tooling, your security model, your licensing costs, and how easily you can hire someone to help later.
Best Linux options for dedicated servers
Four distros cover roughly 95% of real-world dedicated server use:
- Ubuntu Server (LTS) — the default pick for most teams. Big community, excellent docs, predictable five-year support window. If you're not sure, start here.
- Debian — stable to a fault. Slightly older packages, but rock-solid. Popular for long-lived servers and minimalists.
- AlmaLinux — the spiritual successor to CentOS. Binary-compatible with RHEL, great for cPanel and enterprise workloads.
- Rocky Linux — same family as Alma. Pick based on which community you trust more; they're functionally similar.
For a deeper rundown, see the best Linux server distros guide and our take on the best server OS choices.
When Windows Server makes more sense
Windows Server costs money in licensing, but it's the right answer when you need IIS, MSSQL, .NET Framework apps, Active Directory, or a Remote Desktop services environment. Game servers and certain ERP/CRM platforms also lean Windows.
Read Windows Server vs Linux Server if you're still on the fence.
How your workload affects OS choice
| OS | Best For | Pros | Cons | Skill Level |
|---|---|---|---|---|
| Ubuntu Server | Web apps, Docker, general use | Huge community, frequent updates | Faster release cadence | Beginner |
| Debian | Long-lived production boxes | Extremely stable | Older packages | Beginner–Intermediate |
| AlmaLinux | cPanel, enterprise apps | RHEL-compatible, free | Smaller community than Ubuntu | Intermediate |
| Rocky Linux | RHEL workloads, regulated environments | Stable, predictable | Smaller ecosystem | Intermediate |
| Windows Server | .NET, MSSQL, AD, IIS | Native MS ecosystem | License cost, heavier resources | Beginner (GUI) / Intermediate (PowerShell) |
Pro tip: pick the OS your team already knows. A familiar OS you can troubleshoot beats an "ideal" one nobody on your team has used.
Dedicated server setup checklist before first login
Before you even open your SSH client, gather a few things. This sounds boring. Skip it and you'll waste an hour searching emails mid-setup.
Information you should get from your provider
- Primary IPv4 address (and IPv6 if assigned)
- Root or Administrator password
- Any additional IPs allocated to the server
- IPMI/KVM URL and credentials (for emergencies and OS reinstalls)
- Reverse DNS settings interface link
- RAID configuration notes (RAID 1, RAID 10, etc.)
- Data center location and rescue mode instructions
Root access, admin access, and IPMI/KVM details
IPMI (Intelligent Platform Management Interface) is your safety net. It's how you reach the server when SSH dies or you lock yourself out with a bad firewall rule. Bookmark the URL. Test logging in before you change anything. For background, see what IPMI is.
Plan your hostname, users, and workloads
Decide three things on paper before logging in:
- The hostname (e.g.,
web01.example.com) - The name of your primary non-root user
- The list of services you intend to run (web, database, mail, game server, etc.)
Knowing this upfront saves redoing work later.
How to access a dedicated server for the first time
Time to log in. The path splits here depending on your OS.
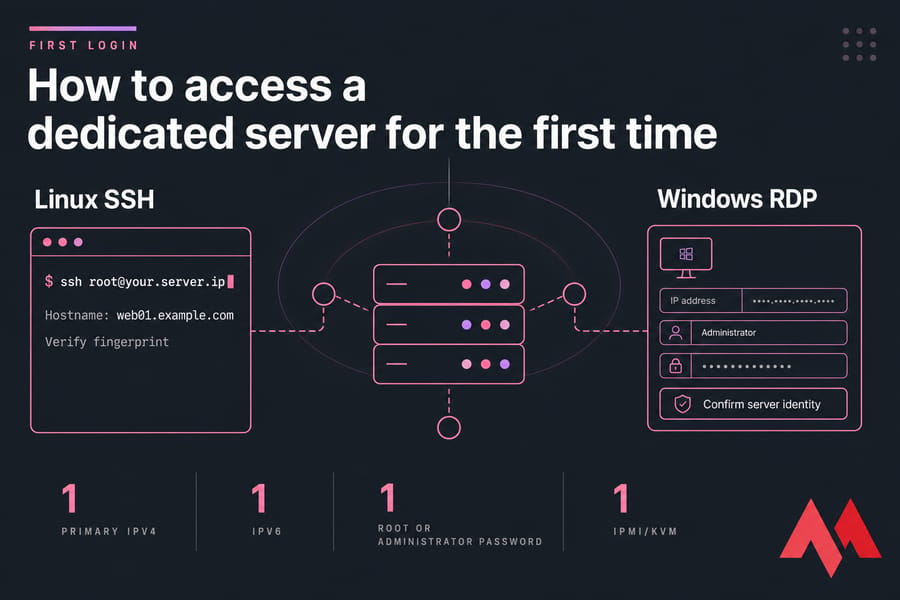
Connecting over SSH on Linux servers
On macOS or Linux, open a terminal. On Windows, use PuTTY, Windows Terminal, or the built-in OpenSSH client.
ssh root@your.server.ipThe first time, you'll get a fingerprint prompt. Don't blindly accept it. Cross-check the fingerprint against what your provider's control panel shows. This protects you against man-in-the-middle nonsense. Walk through the basics in how to SSH into Linux and the broader how to connect to your server remotely guide.
Connecting over RDP on Windows servers
For Windows Server, fire up Remote Desktop Connection (Windows) or Microsoft Remote Desktop (macOS). Enter the IP, the Administrator username, and the password. Accept the certificate warning the first time only after confirming the server identity.
See connecting to a Windows Server for the full walkthrough.
Verifying server identity and changing default credentials
Once logged in, do three things immediately:
- Change the default root/admin password to something long and random. A password manager is your friend here.
- Verify uptime, OS version, and disk layout. Run
uname -a,df -h, anduptimeon Linux. On Windows, check Server Manager. - Confirm network reachability. Ping out, check the public IP matches what your provider shared.
Quick summary of first login tasks: verify identity, change credentials, run system update, create a non-root user.
Secure a dedicated server before deployment
This is the section most tutorials get wrong. They jump straight to "install LAMP." Don't. A fresh server on a public IP gets scanned within minutes — sometimes seconds. Lock it down first.

Update packages and patch the OS
On Ubuntu or Debian:
apt update && apt upgrade -yOn AlmaLinux or Rocky:
dnf update -yOn Windows Server, run Windows Update through Settings and reboot. Yes, the first round of updates can take 30+ minutes. Let it finish.
Create a sudo user and disable direct root login
Running as root all day is a bad habit. Create a regular user with sudo privileges:
adduser alex
usermod -aG sudo alex   # Ubuntu/Debian
usermod -aG wheel alex  # AlmaLinux/Rocky
Test that the new user can SSH in and run sudo commands. Then, and only then, disable root login over SSH.
Set up SSH keys, change ports, and harden access
SSH key authentication is non-negotiable. Generate a keypair on your local machine, then copy the public key to your server:
ssh-copy-id alex@your.server.ipThen edit /etc/ssh/sshd_config:
PermitRootLogin noPasswordAuthentication noPubkeyAuthentication yes
Restart SSH (systemctl restart sshd) and test from a new terminal before closing your current session. I learned that one the hard way years ago.
Changing the SSH port from 22 to something else is a debated topic. It cuts down on log noise from drive-by scanners, but it's not real security — keys are. Do it if it helps you sleep.
For the full breakdown, see secure SSH configuration and changing the SSH port on Linux.
Configure firewall rules and brute-force protection
Default-deny is the rule. Allow only what you need.
| Service | Port | Open? |
|---|---|---|
| SSH | 22 (or custom) | Yes, ideally restricted by IP |
| HTTP | 80 | Yes if hosting a website |
| HTTPS | 443 | Yes if hosting a website |
| SMTP | 25, 465, 587 | Only if running a mail server |
| MySQL/PostgreSQL | 3306 / 5432 | No — bind to localhost |
| RDP (Windows) | 3389 | Yes, restricted by IP |
On Ubuntu, use UFW:
ufw default deny incoming
ufw allow OpenSSH
ufw allow 80/tcp
ufw allow 443/tcp
ufw enable
On AlmaLinux/Rocky, firewalld does the same job. On Windows, configure Windows Firewall with Advanced Security. Then install Fail2Ban (Linux) to auto-ban IPs that hammer SSH or web logins.
For the bigger picture, read how to secure a Linux server and what a firewall actually does.
Warning: Don't expose a fresh server to the internet with default credentials or wide-open ports. Bots find unconfigured boxes in minutes. Lock things down before installing your first app.
Configure hostname, IP, DNS, and network settings
Now that the box is locked down, give it a proper identity on the network.
Set the hostname correctly
A clean hostname matters for logs, mail reputation, and clustering later. On Linux:
hostnamectl set-hostname web01.example.comUpdate /etc/hosts too. For the full guide, see changing the hostname in Linux.
Configure IPv4, IPv6, and additional IPs
Most providers preconfigure the primary IP. If you've been allocated extra IPs (for SSL on multiple sites, mail separation, or virtualization), you'll need to bind them.
See adding an extra IP on Ubuntu or adding an extra IP on Windows Server.
Enable IPv6 if your provider supports it. It's 2025 — there's no excuse to ship IPv4-only anymore.
Point your domain and verify DNS propagation
If you're hosting a website, set up DNS records at your domain registrar:
| Record | Example | Purpose | Required? |
|---|---|---|---|
| A | example.com → 192.0.2.10 | IPv4 mapping | Yes |
| AAAA | example.com → 2001:db8::10 | IPv6 mapping | Recommended |
| PTR | 10.2.0.192.in-addr.arpa → mail.example.com | Reverse DNS (mail) | Only for mail |
| NS | ns1.example.com | Nameserver delegation | If running own DNS |
DNS changes take anywhere from 5 minutes to 48 hours to propagate worldwide. Use the DNS checker to verify. For deeper context, see what DNS is.
Add reverse DNS if needed
Reverse DNS (PTR records) matters if you're sending mail. Without it, expect your messages to go straight to spam. Most providers let you set PTR through their control panel. Match it to the hostname you set earlier.
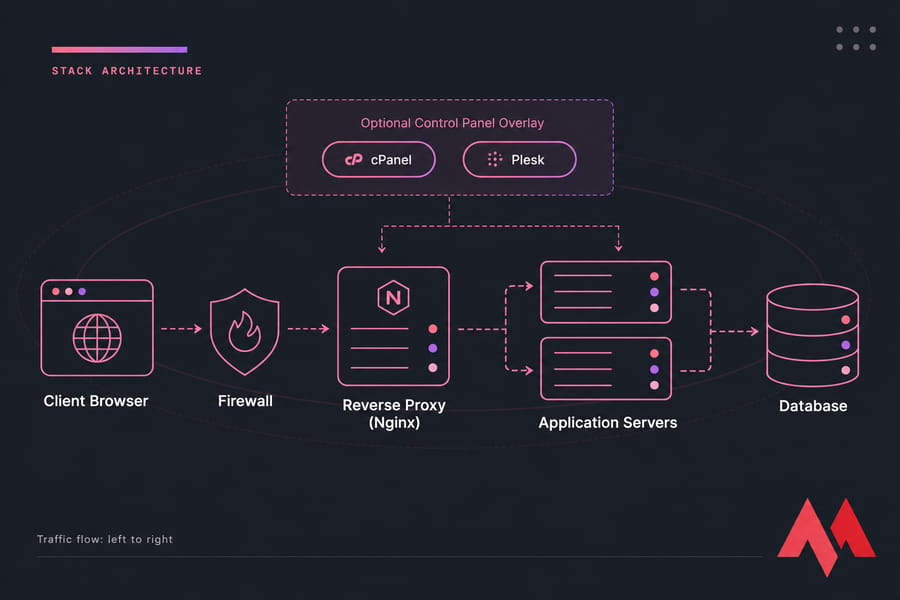
Install a web server stack or hosting control panel
Server's hardened, networked, named. Now you can install software.
Apache vs Nginx for dedicated servers
Quick decision rules:
- Nginx for high-traffic static sites, reverse proxying, and modern app stacks. Lower memory footprint.
- Apache for traditional PHP hosting with
.htaccessrequirements, shared hosting environments, and legacy apps. - Both (Nginx in front of Apache) when you want the best of each. Common in cPanel deployments.
For a hands-on walkthrough, see hosting a website with Nginx or Apache.
When to use cPanel, Plesk, or DirectAdmin
Control panels save time if you host multiple sites, multiple clients, or just hate the command line. They also cost money (cPanel especially) and add their own attack surface.
- cPanel — industry standard, AlmaLinux-friendly, expensive. Install guide here.
- Plesk — works on Linux and Windows, slick UI, good for mixed environments.
- DirectAdmin — cheaper alternative, lightweight. Install guide here.
If you're hosting a single app and you're comfortable in the terminal, skip the panel entirely. Compare options in best server control panels.
Basic stack examples for web, app, or database hosting
- WordPress / PHP sites: Nginx + PHP-FPM + MariaDB + Redis
- Node.js apps: Nginx reverse proxy + PM2 + PostgreSQL
- Containers: Docker + Docker Compose, optionally behind Traefik. See installing Docker on Linux.
- .NET apps (Windows): IIS + MSSQL + ARR for load balancing
Install the minimum viable stack first. Get one thing working. Then add components.
Need a dedicated server without the setup headaches?
If you'd rather skip OS provisioning, hardening, and ongoing maintenance, MonoVM's managed dedicated servers handle the heavy lifting for you. Full root access if you want it, expert hands-on if you don't. Explore dedicated server plans
Set up backups, RAID awareness, and server monitoring
This section is where a lot of "almost-production" servers die. Don't be that admin who learns the importance of backups during an outage.
What RAID does and does not protect
RAID protects against drive failure. That's it. It does not protect against:
- Accidental
rm -rf - Ransomware
- Corrupted database files
- A bad config push that nukes
/etc - The data center catching fire
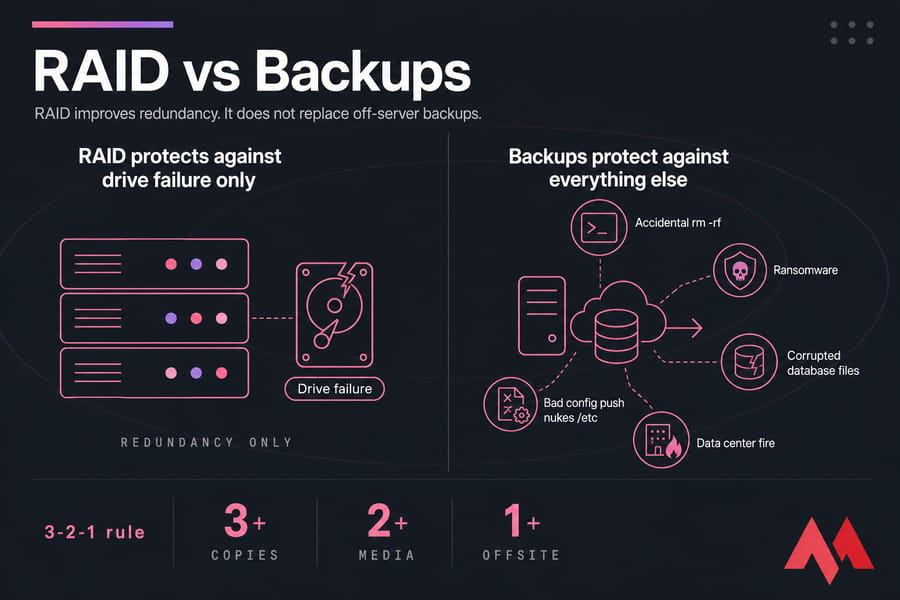
Warning: RAID improves redundancy. It does not replace off-server backups. Plan both.
Backup strategy for files, databases, and full server recovery
Follow the 3-2-1 rule: three copies of your data, on two different media, with one copy offsite. Practically, this means:
- Files: nightly
rsyncor restic snapshots to a separate backup server or object storage. - Databases: automated dumps (
mysqldump,pg_dump) plus binary log retention for point-in-time recovery. - Full server images: if your provider offers snapshot backups, enable them. They're a lifesaver during OS upgrades.
For step-by-step instructions, see backing up a server properly and the Windows Server backup guide.
Monitoring CPU, RAM, disk, uptime, and services
You can't fix what you can't see. Set up basic monitoring before you go live:
- System metrics: Netdata, Zabbix, or Prometheus + Grafana
- Uptime checks: external HTTP/TCP pings from a third-party service
- Log aggregation: at minimum, rotate logs and review weekly. Better, ship them to Loki or a SaaS
- Alerts: email or Slack notifications for disk > 85%, CPU sustained > 90%, services down
Quick sanity-check commands: check disk space and check CPU usage. For tooling, see server monitoring tools.
Test your dedicated server before going live
Before pointing real traffic at the box, run through a launch checklist. This takes 15 minutes and catches embarrassing mistakes.
Check ports, services, and login methods
- Scan your own server with
nmapfrom an external machine. Only the ports you opened should respond. See checking open ports on Linux. - Log in via SSH/RDP using the non-root user. Root SSH should fail.
- Confirm services start on reboot (
systemctl is-enabled nginx, etc.).
Validate SSL, DNS, and application response
- Install and verify SSL via Let's Encrypt or your CA of choice. SSL install guide.
- Confirm DNS resolves correctly from multiple geographies.
- Load your app in a browser. Check for mixed-content warnings, broken redirects, 500 errors.
- Run a basic speed test to catch obvious bottlenecks.
Run a basic hardening and performance review
Re-verify firewall rules. Trigger a Fail2Ban ban manually to confirm it works. Reboot the server and make sure everything comes back up cleanly. Yes, reboot it now — better to find a broken systemd unit on a Wednesday afternoon than at 3 AM Saturday.
Common dedicated server configuration mistakes to avoid
I've seen these break production more times than I can count:
- Leaving default credentials active. Yes, people still do this. Change them in the first five minutes.
- Opening too many ports "just in case." Every open port is a door. Close what you don't use.
- Skipping OS updates after install. A six-month-old kernel has six months of public CVEs.
- No backups, or untested backups. An untested backup is a hope, not a backup. Restore drills once a quarter.
- No monitoring. If you're learning about an outage from a customer, you've lost the game.
- Zero documentation. Six months from now, you won't remember why you opened port 8443. Write it down.
- Installing too much, too fast. Resist the urge to load every tool you've ever heard of. Minimum viable stack first.
For a longer maintenance perspective, see how to manage a dedicated server.
Managed vs unmanaged dedicated server: which setup path is better?
Be honest with yourself about your time and skill level. There's no shame in choosing managed if your business doesn't run on sysadmin work.
| Factor | Unmanaged | Managed |
|---|---|---|
| Setup effort | You handle everything | Provider handles OS, hardening, panel |
| Security & patching | Your responsibility | Included |
| 24/7 support | Hardware/network only | OS and application level |
| Monthly cost | Lower | Higher (the labor is real) |
| Flexibility | Total control | Some guardrails |
| Best for | Experienced admins, dev teams | Founders, agencies, non-technical owners |
Who should choose unmanaged
You're comfortable in a terminal. You can troubleshoot a misbehaving service at 11 PM. You want every dial accessible. Unmanaged is yours.
Who should choose managed dedicated hosting
You don't want to learn iptables. You'd rather ship features than patch kernels. Or — most common — your team is small and you don't have a dedicated ops person yet. Managed buys you time. Managed vs unmanaged server: the deeper comparison
How MonoVM helps with dedicated server deployment
MonoVM offers dedicated servers across 40+ global locations, with flexible OS choices, full root or admin access, and managed options for teams that want production-ready hosting without the hands-on setup.
Launch faster with the right dedicated server
Whether you want full root access or expert help with deployment, MonoVM has you covered. View dedicated servers or see managed dedicated hosting to find the right fit.
Wrapping up
Setting up a dedicated server from scratch comes down to a sequence: secure first, configure second, deploy third, manage continuously. Skip any of those and you'll feel it eventually — usually at the worst possible time.
If you remember nothing else from this guide, remember the order. Login → update → user → SSH keys → firewall → hostname → DNS → stack → backups → monitoring → test → launch. Tape it to your monitor if you have to.

An experienced tech and developer blog writer, specializing in VPS hosting and server technologies. Fueled by a passion for innovation, I break down complex technical concepts into digestible content, simplifying tech for everyone.