
Although just about anyone who’s reading this blog is probably well acquainted with how to efficiently use the Windows operating system, complex control panel configuration does not fall under the parameters of daily use. Therefore, when presented with a task such as adding an additional IP to a Windows server, most will need to resort to Google.
Well, if that is what you did and arrived here, then you are in the right place. This article will show you how to add an additional IP address to a Windows VPS Server. The steps are nearly considered the same for Server 2008 and any later version of the software. Before we dive into the tutorial, however, let us quickly catch you up on what is an IP address.
What is an IP Address?
IP stands for Internet Protocol and is the addressing system that computers use to communicate with one another on any network, including the internet. Think of it as the address you write on a letter when you send it somewhere by post. Without knowing the address of the receiver, the postal service will not be able to deliver the letter. Likewise, in order to send and receive packets, computers need to know each other’s IP addresses, otherwise, they will not know where to send the packets. This is what a typical IP address looks like:
127.0.0.1
Currently, there are two versions of the internet protocols that are being used: IPv4 (i.e., Internet Protocol version 4) and IPv6 (i.e., Internet Protocol version 6). The latter was introduced because although IPv4 allows for 4.3 billion unique addresses, we are still running out of ones that are free. This is due to the fact that not only computers use the IP addressing system, but literally any device that connects to the internet. The main difference between the two IP versions is that IPv4 is an 8-bit address that uses the decimal numbering system, while IPv6 is a 16-bit address that uses the hexadecimal system.
If you wish to learn more about the internet protocol and the different types of IP addresses that exist, please check out this article.
How to Add Extra IP on Windows Server? [Step by Step Guide]
Despite this task being very simple to execute and taking only a minute, without someone showing you how to do it, it might take hours for you to figure it out on your own. So, save your time and follow these simple illustrated steps to add an extra IP address on Windows.
Step 1: Log in to your RDP server via ‘Remote desktop connection’ (How to connect to Windows server)
Step 2: Press the Win Key + R
Step 3: In the Run window, type the ‘ncpa.cpl’ and click OK

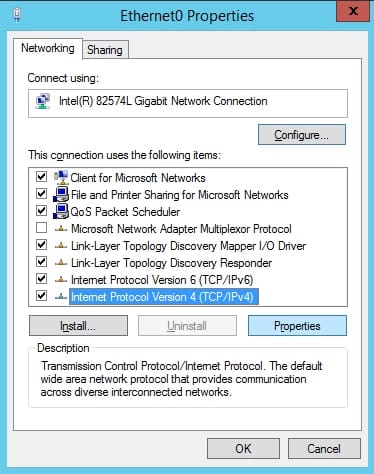
Step 4: Right-click on ‘Local Area Connection’ (your selected interface) and select ‘Properties’

Step 5: Click ‘Internet Protocol Version 4 (TCP/IPv4)’ then click ‘Properties’
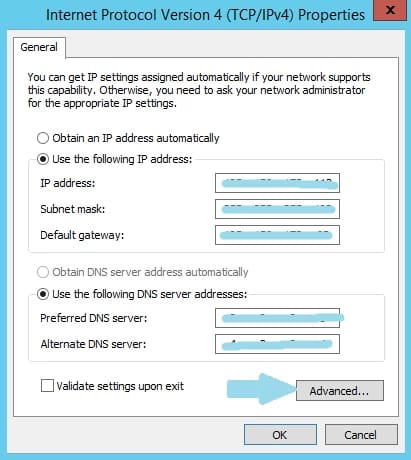
Step 6: In the General tab, click the 'advanced' button.
Step 7: Click the ‘Add’ button under the IP addresses section of the IP Settings tab.

Step 8: Enter the IP address & and subnet mask and click the ‘Add’ button.
Step 9: Click the ‘OK’ button to close the Advanced TCP/IP Settings window.
Step 10: Click the ‘OK’ button to close the Internet Protocol Version 4 (TCP/IPv4) Properties window.
Step 11: Click the ‘Close’ button to close out of the Local Area Connection Properties window.
Please note that If you would like to add another IP address, simply repeat steps 7 and 8 for each new IP. Adding an IPv6 address is just as simple, just select “Internet Protocol version 6(TCP/IPv6)” in step 5 and follow the same steps.
Conclusion
We hope that with the help of this article you learned a little more about the internet protocol, IP address versions, and how to add an extra IP to a Windows server. If you have any questions or suggestions, please leave them in the comment section below.

My name is Sophia H. My degree is MS in Information Technology Engineering. I have been working for 5 years on Java developing (j2ee), Computer Networking (Optical Networks), Virtualization and Hosting.