![How to Connect to VPS? [Windows + Linux Guide]](/wp-content/uploads/2020/06/90241-main.webp)
Dealing with servers could be quite a complex task, and we are not even talking about being a server administrator. Something as simple as just connecting to a remote server could be difficult for complete beginners. While servers running Windows Server OS could be remotely controlled using Microsoft’s proprietary remote desktop protocol, the majority of the servers on the entire world wide web run on Linux distributions. Connecting to a Linux server or VPS is not something that requires a lot of technical knowledge; however, it is not as self-explanatory as connecting their Windows counterparts. Therefore, without someone showing how to accomplish it, most novice users will see it as a roadblock. This article is intended to help you figure out how to connect to your remote Linux VPS and Windows VPS, however, let us cover some bases first.
3 Ways to Connect to a Virtual private server
Before we mention the steps on how to connect to your VPS, you should be familiar with RDP and SSH. So, let's take a short look at both of these protocols. Understanding Remote Desktop Protocol (RDP) and Secure Shell (SSH) will allow you to select the best solution for your specific VPS operating system.
What is Remote Desktop Protocol (RDP)?
The Remote Desktop Protocol (RDP) is a Microsoft-developed technology that allows you to connect to another computer via a network connection as if you were sitting right in front of it. It effectively sets up a remote desktop environment in which you can view the other computer's graphical user interface (GUI), interact with apps, and access files.
Some key points about RDP
- Functionality: RDP creates a secure connection between two devices and sends user inputs (mouse clicks, keystrokes) and graphical data (screen refreshes) between the devices.
- Benefits: RDP is an easy method to access and administer computers remotely. System administrators commonly use it for server maintenance and for individuals to access work computers from home.
- Security: RDP encrypts communication between devices. However, activating strong passwords and firewalls for added security is important.
- Common Use: RDP is typically used for connecting to Windows workstations. While third-party clients allow RDP access on other operating systems like Linux and macOS, Secure Shell (SSH) is the preferred technique for those environments because of its inherent security.
What is Secure Shell (SSH)?
Secure Shell (SSH) is a network protocol that makes a safe and protected connection between a client and a server across a public network such as the Internet. It is typically used for remote access and management of Linux and Unix-based systems. You can widely use it for many purposes like remote system management, safe data transfer, and network communication.
Some key points about SSH
- Security: Unlike RDP which relies on the graphical interface, SSH does not require a graphical interface. Interaction is based on a command-line interface (CLI). SSH also encrypts all communication between the client and server, preventing data from interception on unprotected networks.
- Authentication: SSH provides more authentication beyond simple passwords. Public key encryption is a popular method in which a key pair (public and private) is used for verification. The public key is stored on the server, and the private key is protected on the client system.
- Functionality: SSH allows for secure remote access to a server's command line. This enables administrators to run commands, manage files, and customize settings on the remote system. You can also use SSH for securely transferring files such as SFTP (SSH File Transfer Protocol) and SCP (Secure Copy).
- Common use: SSH is the preferred protocol for remote access and management of Linux and Unix servers. It is also gaining popularity for secure access to other settings because of its strong safety features.
What is PuTTY?
PuTTY is a free software application for Microsoft Windows operating systems that can be used to make an SSH connection to your server. PuTTY is an SSH and telnet client, developed originally by Simon Tatham for the Windows platform. PuTTY is open-source software that is developed and supported by a group of volunteers.
Please note that the IP addresses and usernames used in the following sections of this article, are purely meant to serve as an example and do not represent any actual servers owned by Monovm or any other entity (as far as we know).
![]()
How to Connect to a Virtual Private Server?
Knowing how to connect to your Virtual Private Server (VPS) unlocks its capabilities! It gives you immediate access and control over the server's resources. There are two basic methods: Remote Desktop Protocol (RDP) for a graphical interface on Windows VPS and Secure Shell (SSH) for secure command-line access, which is commonly used for Linux VPS but can also be used to improve security on other systems. If you learn how to connect to a VPS, you can handle files, install software, and modify your VPS to meet your requirements. Let`s discover these 2 methods.
Connecting Your VPS via RDP
Connecting to your VPS using RDP provides you with a user-friendly option to instantly access and administer your Windows VPS. This solution is great for those who prefer a Windows-like interface to manage their VPS.
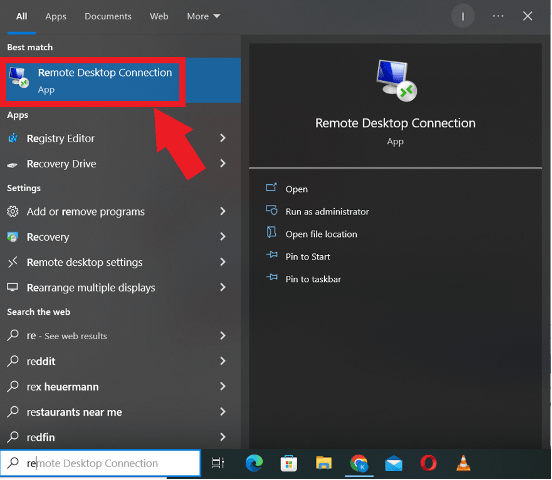
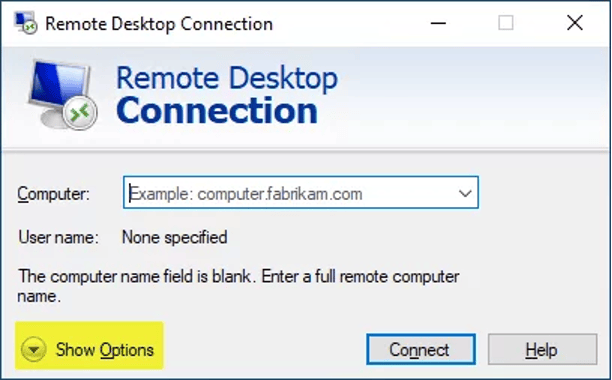
Step 1: Launch Remote Desktop Connection
On your local computer, access the Remote Desktop Connection application. You can usually find it by searching for "Remote Desktop Connection" in the Start menu search bar.
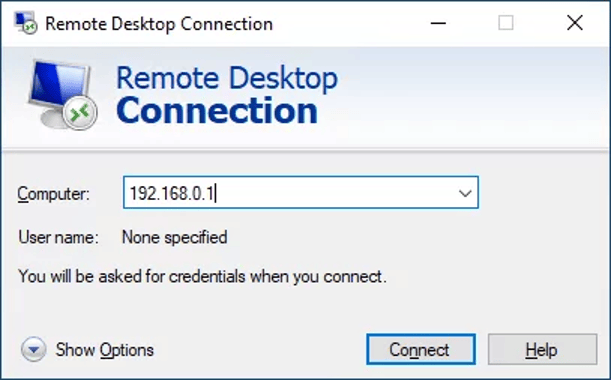
Step 2: Enter Your VPS IP Address
In the Remote Desktop Connection window, locate the field labeled "Computer Name" or "IP Address." Here, enter the VPS IP address provided by your hosting provider. This IP address acts like the unique online location of your virtual server.

Step 3: Connect and Verify
Click the "Connect" button to connect to your VPS. You may be asked to validate the server's identity by confirming a fingerprint or certificate. If so, follow the on-screen steps to make sure you're connecting to the correct server. Once verified, select "Yes" or "Accept" to continue.
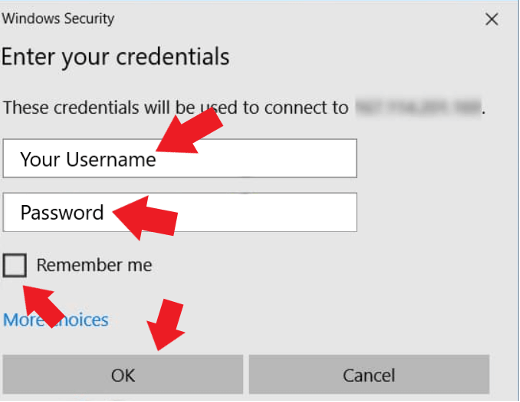
Step 4: Unlock Your VPS
You will now see a login window. When setting up your VPS, enter the username and password provided by your hosting service. These credentials are usually distinct from your main account login and provide administrative access to your VPS. Once you've input everything correctly, click "OK" to set up the entire remote desktop connection.
By following these steps, you will be able to manage your Windows VPS via Remote Desktop Connection (RDP)! RDP has a familiar graphical interface that allows you to install applications, modify settings, and perform multiple management tasks easily.
Accessing your VPS via SSH connection
SSH is a wonderful alternative if you need greater security or want to install a custom control panel on your VPS. Here's a step-by-step guide for creating an SSH connection to your VPS server:
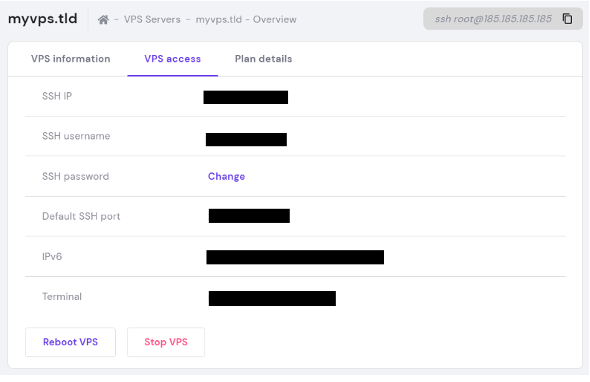
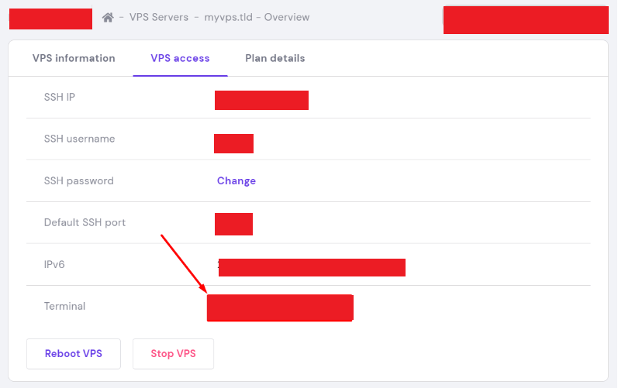
Step 1: Gather Your SSH Details
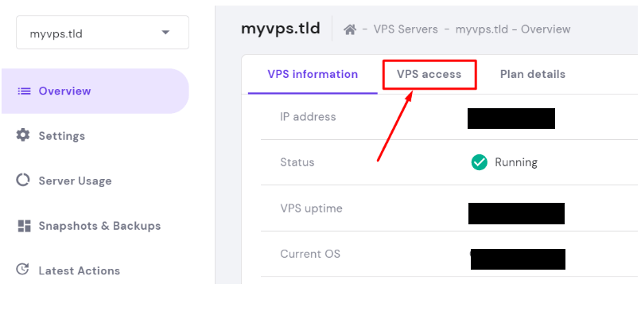
To establish your secure SSH connection, first log in to your VPS dashboard. Locate the server you want to manage.
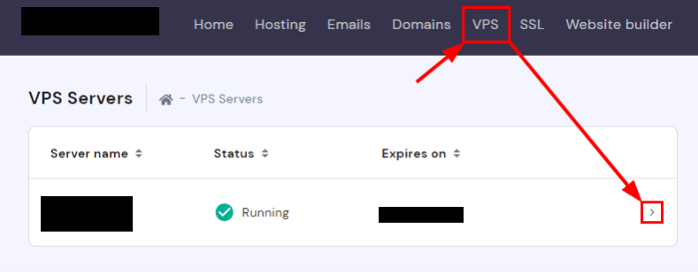
Then click on the section labeled "VPS access" or something similar. This will display the essential SSH details you'll need for the connection process.
Step 2: Gear Up for the Connection
The tool you'll use depends on your operating system:
- Linux and macOS: Most likely, you already have a built-in terminal application. Simply search for "Terminal" (Linux: Ctrl + Alt + T) and it'll be ready to go.
- Windows: You have two options. You can download a popular SSH client like PuTTY, or use the built-in Command Prompt (open the Run dialog with Win + R and type "cmd").
Step 3: Connect and Secure Your Session
Now, let's establish a secure connection! You can do it by using a Terminal Emulator for Linux and macOS or using PuTTY for Windows.
Using a Terminal Emulator (Linux/macOS):
- Copy the SSH command from your VPS dashboard's "VPS access" section.
- Paste the command into your terminal window. You can usually right-click and choose "Paste" or use keyboard shortcuts specific to your terminal app.
- Verify the server's fingerprint: The terminal may display a fingerprint to confirm the server's identity. Type "yes" and press Enter only if you recognize and trust the fingerprint. (This step helps prevent connecting to imposter servers).
- Enter your SSH password: When prompted, type your secure SSH password. Remember, it won't be displayed on the screen for security reasons.
Using PuTTY (Windows):
- Launch PuTTY and enter your VPS IP address in the "Host Name" field.
- Paste the copied SSH command.
- Click the "Open" button.
- Similar to the terminal method, you might see a fingerprint verification step. Follow the same process as above.
- Type your password when prompted. It won't be displayed on screen.
Note 1: For more security, use SSH key authentication instead of passwords. In this way, you don’t need to type your password each time you connect.
Note 2: If you have connectivity problems, double-check your information or contact your hosting provider for help. Resetting your password or examining firewall/SSH configurations may be required.
How to connect to a Windows VPS?
You can take control of your Windows VPS in two ways: with the built-in Remote Desktop Connection (RDC) or a separate program called a 2X RDP client. We'll walk you through both methods to get you connected in no time! Let`s start:
Remote Desktop Connection (RDC)
On your Windows computer, just search for "Remote Desktop" in the search bar (usually next to the Start button). You'll see an icon labeled "Remote Desktop Connection". Click that to get started!
Now enter the VPS address. In the Remote Desktop window, type the IP address of your VPS. You can find this address in your VPS control panel (usually under "secure client panel" or similar wording).
Or you can enter the computer name:
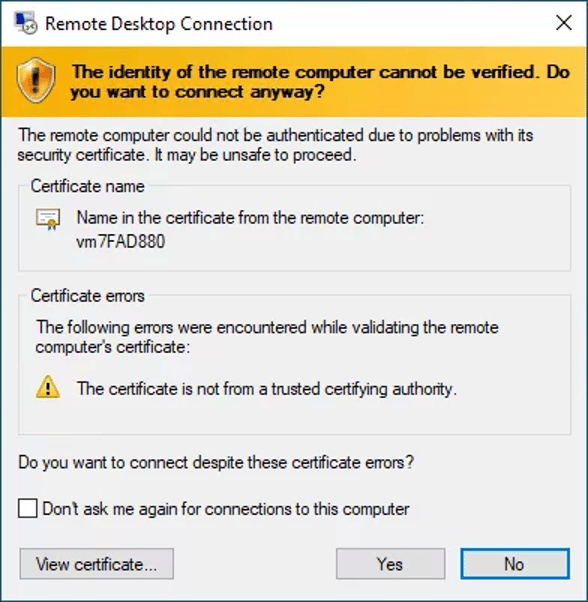
Security check: Sometimes, you might see a warning from Remote Desktop because it can't quite recognize the VPS you're connecting to. This is normal, especially if your VPS uses a special security certificate it created itself. If you trust the connection to your VPS (which means you're sure it's the right one), go ahead and click "Yes" to continue.

Now you`ll see a new window, prompting you to enter your VPS account username and password.
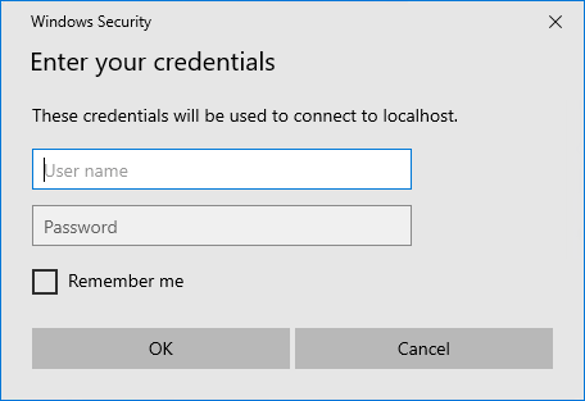
Type in your VPS username and password. Once connected, you will be able to control your VPS desktop remotely! If you have any troubles, it could be because the VPS is down or unavailable for any reason. Don't worry, you can connect again later.
2X Remote Desktop Protocol (RDP) client
If you're comfortable with additional software, you can also connect to your Windows VPS using a separate program called a 2X RDP client. This might offer some extra features compared to the built-in Remote Desktop Connection.
Here's how:
- Download and install: First, download and install the 2X RDP Client application. You can get it online, but make sure you get it from a reliable source.
- Create a New Connection: After installation, launch the 2X RDP Client. Look for "New Connection" or "Standard RDP" and select that.
- Enter Details: In the new connection window, fill in the following:
-
- IP Address: Enter the IP address of your VPS (same as with Remote Desktop Connection).
- Port: Most likely, the port will already be filled in with "3389" (the standard RDP port). Leave this number unless instructed otherwise.
- Username and Password: Enter your VPS username and password.
- Connect: Click "OK" and you should be connected to your VPS desktop.
How to Login to Windows VPS through Windows OS?
Already, we explained how to connect to Windows VPS using RDP. But there`s another way you can do it by Windows OS. If you're using Windows 10, follow these steps to connect to a Virtual Private Server (VPS) successfully:
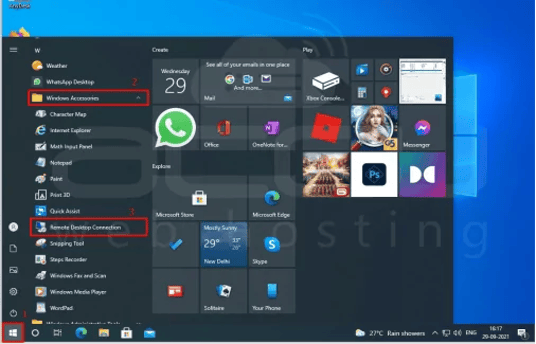
- Log in to your local Windows 10 system and press the Windows key or click the Start menu.
- In the programs menu, navigate to "Windows Accessories" and select "Remote Desktop Connection".
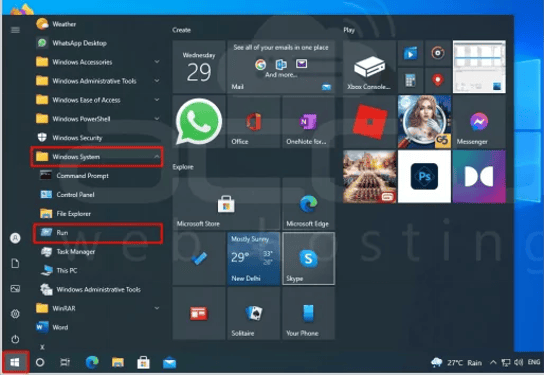
As an alternative way, it is possible to choose Windows systems>Run from the programs menu.
A text box will appear and you should put this text on it and press OK button: mstsc
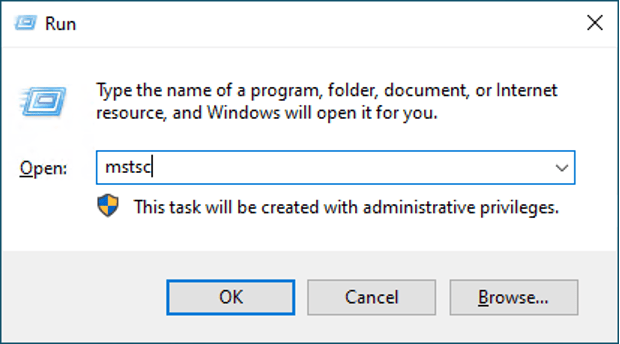
You will next be asked to provide your server IP address or computer name, after which you will click Connect.

A new window will appear. This window will ask you to enter your VPS username and password.
Save time! To avoid entering your credentials each time, you can check the "Remember me" option. However, be mindful that storing passwords on a public or shared computer is a security risk. Choose this option only on trusted devices. Click "OK" to connect.

Again, you might encounter a security certificate warning. This is important because it helps verify the identity of the server you're connecting to. Ignoring these warnings can expose your connection to security risks. If you trust the server and understand the risks, you can check the "Don't ask me again for connections to this computer" box and click "Yes" to proceed. We recommend verifying the server's certificate validity and ensuring a secure connection before proceeding.
After answering the security prompt and entering your login information, you will be successfully signed in to your Windows VPS and able to use the remote desktop.
Login to VPS through Linux OS
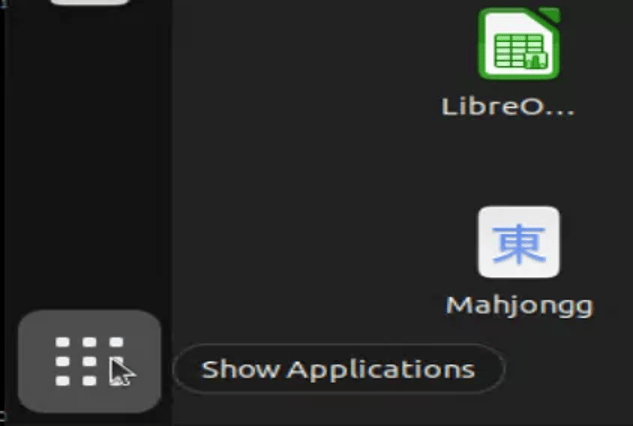
Even on Linux, you can access your Windows VPS! To connect remotely using RDP (Remote Desktop Protocol), you'll need a remote desktop client called Remmina. Installing Remmina is easy. You can get it from the Snap store. Once installed, you'll find it accessible through the "Show applications" button in the bottom left corner.
You'll receive a separate welcome email with your login credentials, including the server IP address, username, and password.
- To create a new connection profile, launch Remmina and initiate the process of creating a new connection profile.
- Locate the section related to selecting the connection type. Choose RDP (Remote Desktop Protocol) from the available options.
- Provide the server's identifying information. This might be the hostname or IP address of the Windows VPS that you want to access remotely.
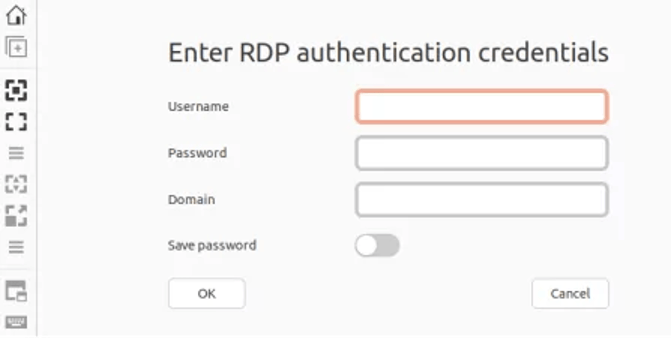
- After connecting, you will be required to enter the username and password you received in your welcome email. These login details must be entered to enable you access to the server.
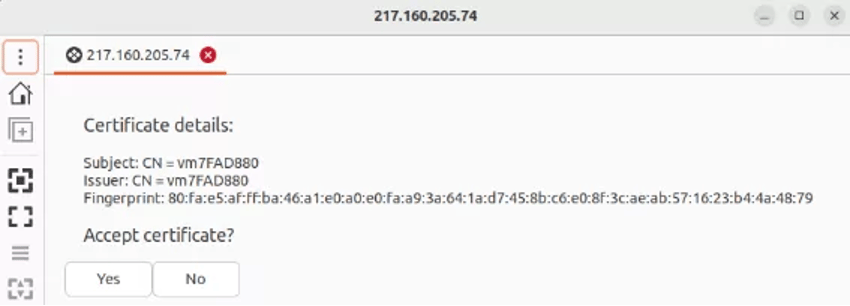
- You may receive a security warning regarding the server's certificate on your initial connection attempt. To proceed with the connection, select "Yes" or "Accept" (depending on the interface).
- After successfully registering and resolving any security prompts, you can access the RDP server and desktop environment.
How to log into Windows VPS through MAC OS?
Now it`s Mac user's turn! You can also access your Windows VPS, just like folks on Windows and Linux can.
Download Microsoft Remote Desktop (MRD): Head over to the App Store and download the free Microsoft Remote Desktop app. Install it on your Mac like any other program.
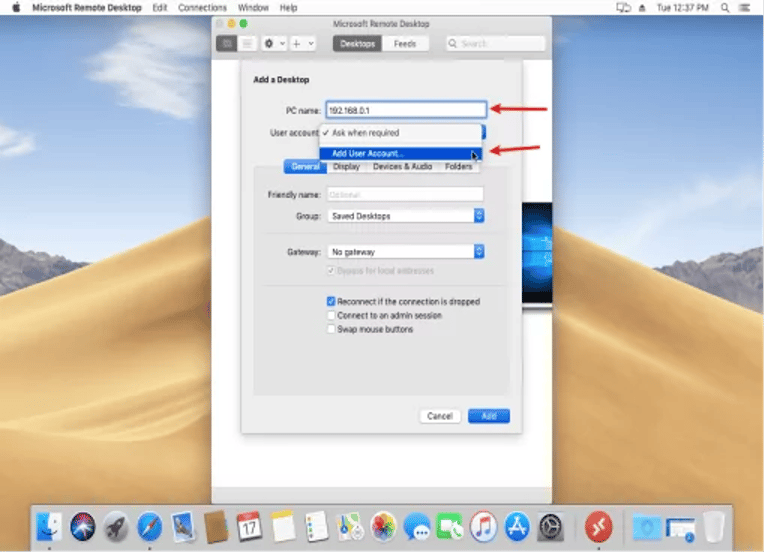
Set up your connection: Open the MRD app. Click the "New" button (it might look like a plus sign) and choose "Desktop" to create a new connection.
Tell it where to go: Enter the name of your Windows VPS or its IP address. This information should have been included in a welcome email you received when you set up your VPS.

Login: Click "Add user account" and enter your username and password. These are also from your welcome email. You can usually set the username as "Administrator" unless you created a different one. Leave the other settings alone and click "Add." Your new connection should appear in the app's list.
You're in: Click the connection you just created, and MRD will automatically configure itself to connect to your Windows VPS. Now you'll see the remote desktop and can access it anytime you open the MRD app.
Note: While Microsoft Remote Desktop is an excellent choice, you do have other options! Some Mac users prefer other RDP clients, such as PuTTY (a free program for secure connections) or 2X RDP Client. It's all about figuring out what works best for you.
How to connect to a Linux VPS?
Calling all Windows, Linux, and Mac users! This post will show you how to connect to your Linux VPS and control your remote desktop, no different from what operating system. We`ll separate the steps for each platform:
Ready to Unlock the Full Potential of Your MonoVM Linux VPS? Watch Our Latest Tutorial!
Are you wondering how to activate your MonoVM Linux VPS and get it up and running smoothly? Look no further! In our latest YouTube video, we guide you through the entire activation process, ensuring that your VPS is ready to serve your needs in no time.
Whether you're new to VPS management or just need a refresher, this step-by-step tutorial is designed to be user-friendly and efficient. Don’t miss out on this essential guide to getting your VPS fully operational.
👉 Click the video below to watch now and start harnessing the power of your MonoVM Linux VPS today!
📺 Subscribe to our YouTube channel for more expert tutorials and tips—and never miss an update on making the most of your VPS!
Connecting to a Linux server from Windows
To connect to your Linux VPS, you'll need a free program called PuTTY. This creates a secure tunnel (called SSH) between your computer and the server. Follow the steps below for doing this:
Download PuTTY: Head over to the download link for PuTTY and download the installer. Run it to install PuTTY on your machine.
Launch and connect: Open PuTTY. In the "Host Name" box, enter the hostname or IP address of your Linux VPS (this info should be in your welcome email). Leave the "Port" number at 22 (the default for SSH connections) and choose "SSH" as the connection type. Click "Open" to initiate the connection.
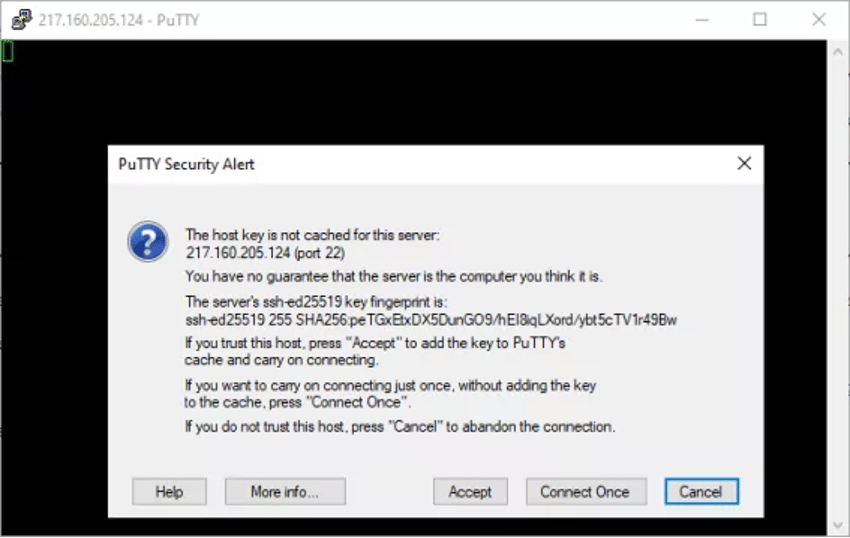
Security Check: The first time you connect from this computer, you might see a security alert. This is normal! Just click "Accept" to proceed.
Login: Now, PuTTY will ask you to enter your username and password for the Linux server which all are in your Welcome email. Type them in and press Enter. If everything's correct, you'll be connected to the server!
Using mRemoteNG
Another popular choice for Windows users is mRemoteNG. It's a handy app that lets you manage multiple remote connections in one place. If you want to use this method, follow these steps:
- Grab mRemoteNG from the web and install it like any other program.
- Open mRemoteNG and click the "New" button.
- Choose "SSH Version 2" as the connection type. Then, enter your server's IP address, username, and password (same info as with PuTTY).
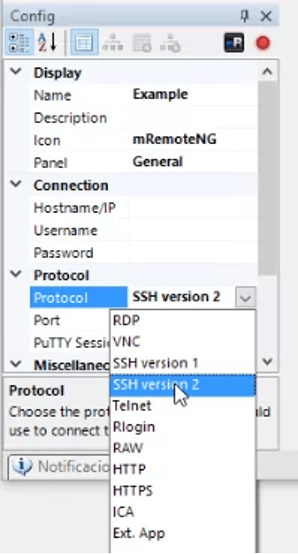
- Click "Connect" and that`s it! You'll be logged into your Linux VPS through mRemoteNG.
Connecting to a Linux server from Linux
For Linux users, connecting to your Linux VPS is very easy! Here's how to do it using the built-in SSH functionality:
Go to your terminal emulator, the program you use to interact with your Linux system through text commands, and type the following command, replacing the bracketed info with your details:
ssh [username]@[server IP address]
For example, if your username is "linuxfan" and your server IP is "192.168.1.100," you'd type:
ssh linuxfan@192.168.1.100
After that, enter the password provided in your welcome email and press Enter. If everything's good, you'll be connected to your server!
Connecting with Remmina
There's another option for Linux users who prefer a graphical interface: Remmina.
- You can usually find Remmina in your software manager or package installer.
- Open Remmina and click the green plus sign (+) to add a new connection.
- Enter your server's hostname or IP address. Change the protocol from the default to "SSH."
Type in your username and password (the same ones you used for the SSH command). Click "Connect".
How to connect to a Linux server from MAC OS
You can connect to your Linux VPS using the same method as Linux users: SSH through the terminal. After all, macOS is built on a Unix foundation, making it a natural fit for SSH connections. Here's how to do that:
In the command line, enter the following command replacing information with your details:
ssh [username]@[server IP address]
After that, enter the password provided in your welcome email and press Enter. If everything checks out, you'll be connected to your Linux VPS!
Configuration and Connection
We hope you've successfully connected to your VPS using one of the methods described earlier. Now, it's time to configure the server to match your needs.
1- Accessing the server via SSH
If it is your first time using SSH, you'll need the root login credentials. For Linux users, this involves a simple command in your terminal:
ssh [root username]@[server IP]
2- Securing your server with a Firewall
For monitoring incoming and outgoing traffic, consider using a firewall as a security guard for your server. It identifies and blocks any suspicious activity. Since it's usually disabled by default, you'll need to activate it after accessing your server. You can do it by following the steps below:
Log in and navigate to the VPS section.
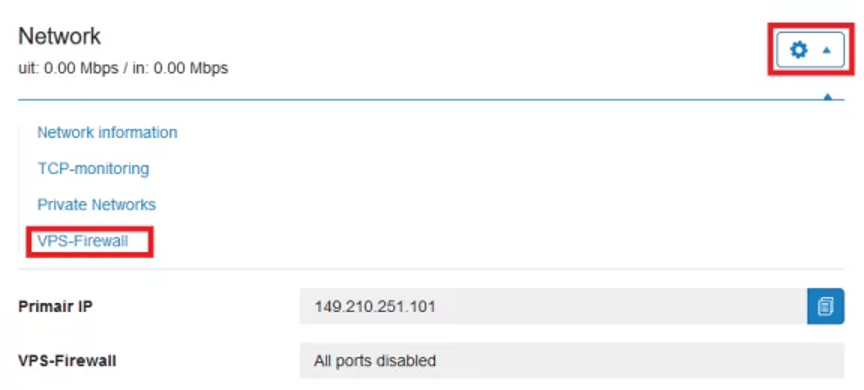
Under "Network," find "VPS-Firewall." Flip the switch "ON" next to "Enable VPS firewall for this VPS."

For future convenience, you can also enable the switch for "all new VPSes in this account."
If you want to add an extra layer of security, we recommend Public key authentication. It allows you to log in using a unique key instead of a password. Setting it up involves editing the SSH configuration file through your terminal. Locate the option "PubkeyAuthentication" and switch it to "Yes" to enable, or "No" to disable. Remember to restart the server for the changes to take effect.
Secure your domain with an SSL certificate
After you've secured your server with a firewall, consider protecting your domain as well. An SSL certificate encrypts communication between your website and visitors, thereby protecting important data. You can manually install it on your VPS.
- Obtain an SSL certificate from a provider, specifying your domain name and server type.
- Verify your SSL and download it from the provider's dashboard.
- Install the certificate on your server and redirect your website visitors from the standard HTTP address to the secure HTTPS version.
How to connect to a Linux server from Windows?
As mentioned previously, in order to log in to the Linux server from a Windows device, we will be using a third-party software named PuTTY. If you don't already have it installed, you can download the application here.
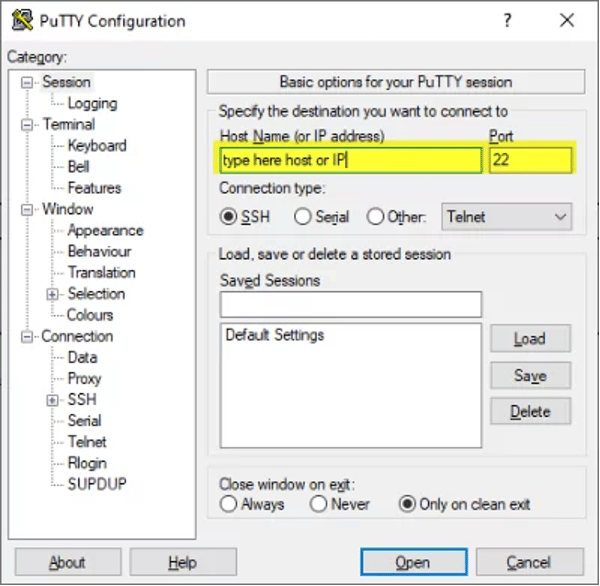
Step 1: Open PuTTY Terminal client. You will be greeted with the following window:
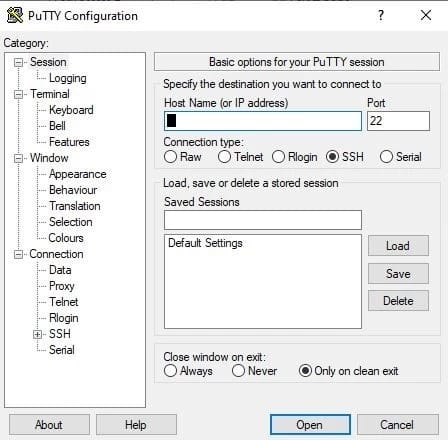
Step 2: Enter your connection settings:
- Host Name: enter the IP of your server here
- Port: 22 (leave as default)
- Connection Type: SSH (leave as default)
Step 3: Click "Open" to start the SSH session.
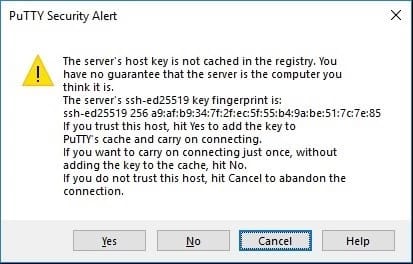
If this is your first time connecting to the server from your computer, you will see the following output. Accept the connection by clicking "Yes".
Once the SSH Connection is open, you should see a terminal prompt asking for your username.
Step 4: Enter your server's root username as "root".
Step 5: Next, enter your password. You can find it in the Clients Portal. After you typed it in, hit “Enter”.
Please note that you will not see your cursor moving, or any characters typed, when typing your password. Do not worry, this is a standard PuTTY security feature.
How to connect to a Linux server from Linux
Step 1: Open Terminal. To do so, press Ctrl+Alt+T at the same time or type in Terminal into the search function.
Step 2: Type in the following command ssh username@serveripaddress where the username is the user you are connecting to (use root if you wish to have root access) and serveripaddress is the IP address of the server you are connecting to. Then press “Enter”.
For Example: Considering a user ID of “user1” and a URL of server1.com(82.149.65.12), the following syntax should be entered to connect to the server:
ssh user1@server1.com
OR
ssh user1@82.149.65.12
Step 3: Enter the password for the selected user and press “Enter”.
How to connect to a Linux from macOS?
Step 1: Open Terminal. To do so, go to Applications > Utilities, and then open Terminal.
Step 2: Type in the following command ssh username@serveripaddress where username is the user you are connecting to (use root if you wish to have root access) and serveripaddress is the IP address of the server you are connecting to. Then press “Enter”.
For Example: Considering a user ID of “user1” and a URL of server1.com(82.149.65.12), the following syntax should be entered to connect to the server:
ssh user1@server1.com
OR
ssh user1@82.149.65.12
Step 3: Enter the password for the selected user and press “Enter”.
Conclusion
Linux server management can be quite a handful to inexperienced users. We hope that today’s article gave you some insights into what a virtual server and SSH are. We also wish that this detailed guide helped you take the first step in learning how to connect to and take control of your Linux. If you have any questions or suggestions, please leave them in the comment section down below.

My name is Linda, I have Master degree in Information Technology Engineering. I have some experiences in working with Windows and Linux VPS and I have been working for 2 years on Virtualization and Hosting.