
So you want to set up a KVM VPS for web hosting with Nginx, Apache, or LiteSpeed. Good call KVM gives you the kind of isolation and control that shared hosting just can't match. But before you start firing off install commands, let's make sure you've got the basics covered.
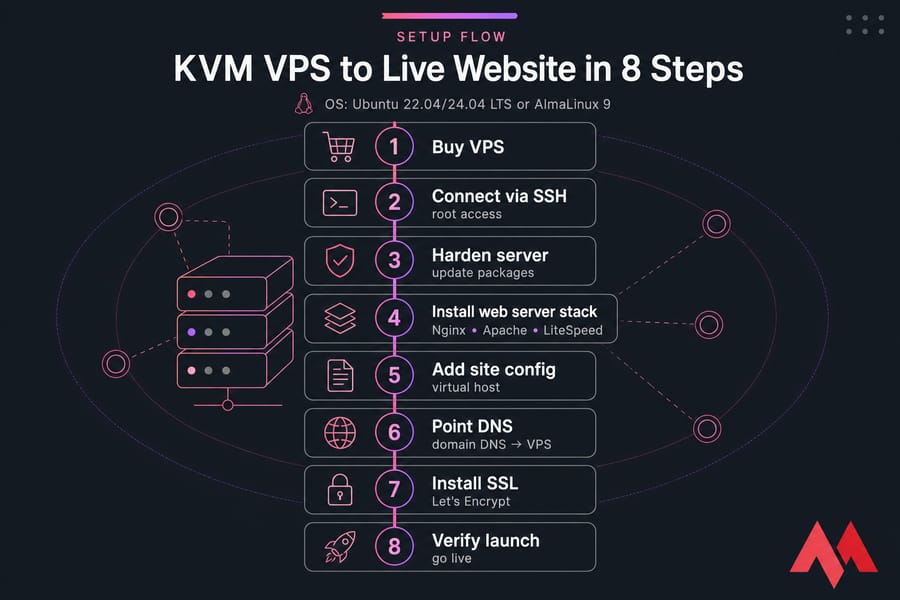
Here's the short version: pick a Linux OS like Ubuntu 22.04/24.04 LTS or AlmaLinux 9, secure SSH access, update your packages, install Nginx, Apache, or LiteSpeed, create a virtual host, point your domain's DNS to the VPS, enable HTTPS with Let's Encrypt, and verify everything before going live. That's the whole arc. The rest of this guide fills in the details.
Minimum VPS specs for a small website
You don't need a beast of a server for most sites. But underprovisioning RAM will hurt you faster than anything else, especially on PHP-heavy stacks. Here's a realistic starting point:
| Use case | CPU | RAM | Storage | Suggested stack |
|---|---|---|---|---|
| Static site / portfolio | 1 vCPU | 1 GB | 20 GB SSD | Nginx |
| WordPress (low traffic) | 1–2 vCPU | 2 GB | 30 GB SSD | LiteSpeed / OpenLiteSpeed |
| WooCommerce / mid-traffic | 2–4 vCPU | 4 GB | 50 GB SSD | LiteSpeed or Nginx + PHP-FPM |
| Multi-site / agency | 4+ vCPU | 8 GB+ | 80 GB+ SSD | Nginx or Apache + panel |
Best operating systems for KVM VPS hosting
Stick with Ubuntu LTS or AlmaLinux. Ubuntu is the easier ride for most beginners — bigger community, more tutorials, friendlier package names. AlmaLinux is the spiritual successor to CentOS and a solid pick if you want long-term RHEL compatibility.
What you need before you start
- An active KVM VPS hosting plan with root access
- Ubuntu 22.04/24.04 LTS or AlmaLinux 9 installed
- A domain name you control
- An SSH client (Terminal on macOS/Linux, PuTTY on Windows)
- A public IPv4 address (IPv6 optional)
- Basic comfort with the Linux command line
- Your website files or a test
index.html
Need help getting in for the first time? Our guide on how to connect to your VPS walks through SSH from any OS.
Why KVM VPS is a strong choice for web hosting
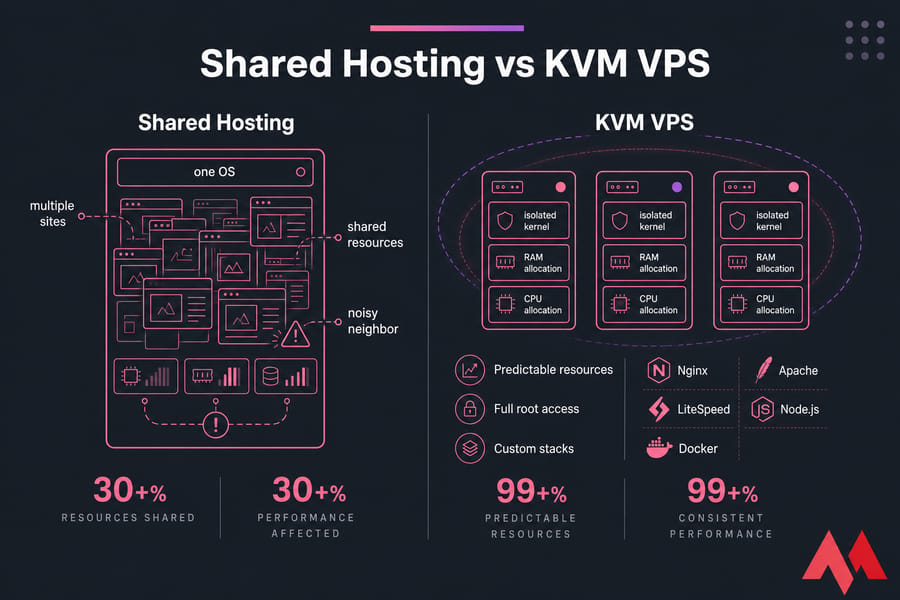
KVM stands for Kernel-based Virtual Machine. It's a full virtualization technology built into the Linux kernel meaning each VPS gets its own dedicated kernel, RAM allocation, and CPU time. Not shared. Not borrowed when "available." Yours.
This matters more than people realize. With container-based virtualization (like OpenVZ), one noisy neighbor can drag down everyone on the host. KVM doesn't have that problem.
Want the deeper comparison? Read up on what KVM virtualization is and the differences between KVM vs OpenVZ.
How KVM virtualization improves isolation and performance
Three things stand out for web hosting:
- Predictable resources. Your 4 GB of RAM is your 4 GB. No surprise throttling.
- Full root access. Install any web server, kernel module, or PHP version you want.
- Custom stacks. Nginx, Apache, LiteSpeed, Node.js, Docker — all fair game.
KVM VPS vs shared hosting for website owners
Shared hosting is fine for a brochure site that gets 50 visitors a week. The moment you need a custom PHP version, a specific Nginx module, or consistent response times under load — shared hosting falls apart. A Linux VPS hosting plan with KVM gives you headroom and predictability.
When a KVM VPS may be overkill
If you're hosting a single static landing page with no traffic, you don't need a VPS at all. Honestly. A managed shared plan will do. KVM VPS hosting earns its keep when you need root access, custom stacks, or real isolation.
Nginx vs Apache vs LiteSpeed for VPS hosting
Here's where most tutorials punt. They tell you to "pick one" without explaining why. Let's fix that.
| Server | Best for | Strengths | Limitations | Cost |
|---|---|---|---|---|
| Nginx | Modern stacks, reverse proxies, static + Node.js | Lean memory use, high concurrency, fast static delivery | No .htaccess, steeper config learning curve |
Free |
| Apache | Legacy PHP apps, shared environments, .htaccess users |
Huge module ecosystem, per-directory configs | Heavier under high concurrency | Free |
| OpenLiteSpeed | WordPress, WooCommerce, small/mid sites | Excellent caching, friendly GUI, free | One worker process limit, no full Apache config compatibility | Free |
| LiteSpeed Enterprise | High-traffic WordPress, commercial hosting | Drop-in .htaccess support, multi-worker, LSCache |
Paid license required | From ~$10/mo |
Which web server is best for WordPress
LiteSpeed wins for WordPress, honestly. The LSCache plugin integration is hard to beat. Nginx with a well-tuned cache layer (like FastCGI cache or Redis) is the next best thing. Apache works fine but tends to chew more RAM under the same load.
Which option is easiest for beginners
Apache. It's forgiving, well-documented, and .htaccess rules let you tweak behavior without touching the main config. OpenLiteSpeed comes close because of its admin GUI, but Apache has 20+ years of tutorials behind it.
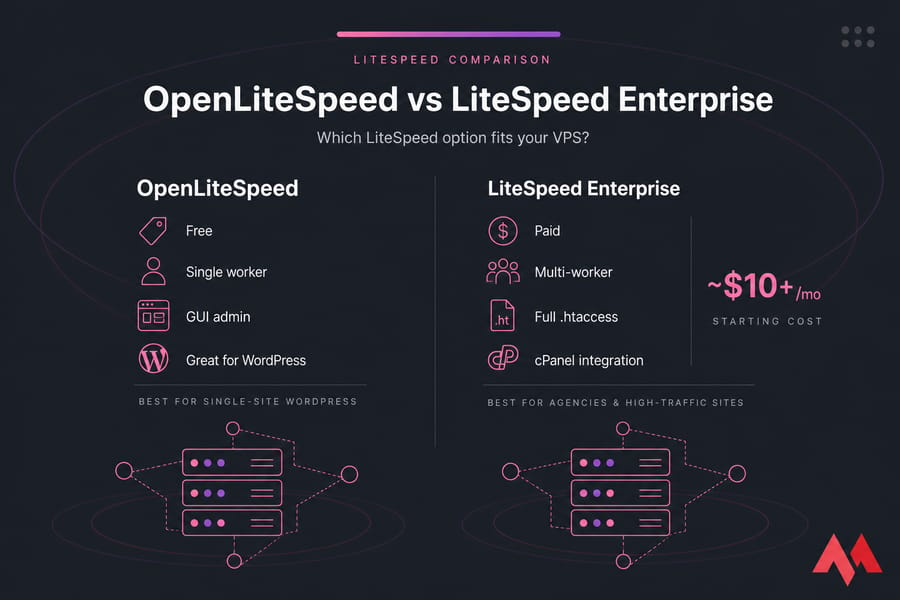
OpenLiteSpeed vs LiteSpeed Enterprise explained
They're related but not identical. OpenLiteSpeed is open source and free. LiteSpeed Enterprise is paid and adds full .htaccess compatibility, multiple worker processes, and integration with control panels like cPanel. For most single-site WordPress users, OpenLiteSpeed is enough. Agencies and high-traffic sites usually want Enterprise.
Secure your KVM VPS before hosting a website
Don't skip this. I've seen too many "successful installs" turn into compromised servers within 48 hours because someone left root SSH wide open. Lock it down first.
Update packages and set the hostname
On Ubuntu:
sudo apt update && sudo apt upgrade -y
sudo hostnamectl set-hostname web01.yourdomain.com
On AlmaLinux:
sudo dnf update -y
sudo hostnamectl set-hostname web01.yourdomain.com
Create a sudo user and harden SSH
Never run your web stack as root. Create a regular user with sudo privileges:
adduser deploy
usermod -aG sudo deploy   # Ubuntu
usermod -aG wheel deploy  # AlmaLinux
Copy your SSH key to the new user, then test the login from a second terminal before doing anything else. I cannot stress this enough — don't close your root session until you've confirmed key-based login works for your sudo user. Locking yourself out of a fresh VPS is a rite of passage nobody enjoys.
Once verified, edit /etc/ssh/sshd_config:
PermitRootLogin no
PasswordAuthentication no
Then reload SSH: sudo systemctl reload sshd.
For more depth, see our guides on how to secure SSH connection to VPS and secure your Linux VPS.
Configure UFW or firewalld for HTTP and HTTPS
Open only the ports you actually need: 22 (SSH), 80 (HTTP), 443 (HTTPS).
Ubuntu (UFW):
sudo ufw allow OpenSSH
sudo ufw allow 80/tcp
sudo ufw allow 443/tcp
sudo ufw enable
AlmaLinux (firewalld):
sudo firewall-cmd --permanent --add-service=ssh
sudo firewall-cmd --permanent --add-service=http
sudo firewall-cmd --permanent --add-service=https
sudo firewall-cmd --reload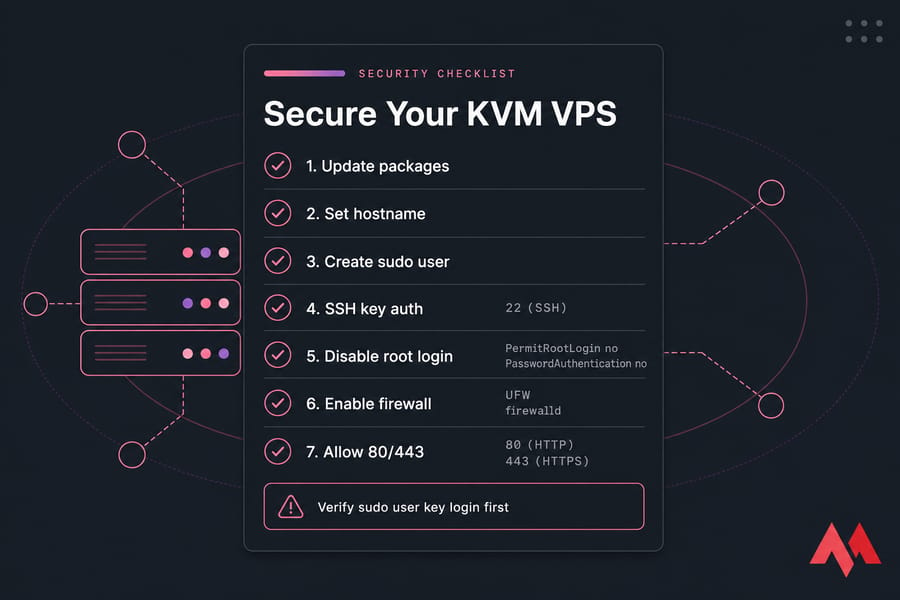
Warning: Do not disable root SSH or password authentication until you've verified your sudo user can log in with their SSH key. Verify twice.
Install Nginx on a VPS for web hosting
If you chose Nginx, this section is for you. It's lean, fast, and pairs beautifully with PHP-FPM.
Install Nginx and PHP-FPM
Ubuntu:
sudo apt install nginx php-fpm php-mysql -y
sudo systemctl enable --now nginx php8.3-fpm
AlmaLinux:
sudo dnf install nginx php-fpm php-mysqlnd -y
sudo systemctl enable --now nginx php-fpm
Open http://your-vps-ip in a browser. You should see the Nginx welcome page. If not, double-check the firewall.
Create an Nginx server block
Make a directory for your site and a server block file:
sudo mkdir -p /var/www/yourdomain.com/html
sudo chown -R $USER:$USER /var/www/yourdomain.com
sudo nano /etc/nginx/sites-available/yourdomain.com
Drop this inside:
server {
    listen 80;
    server_name yourdomain.com www.yourdomain.com;
    root /var/www/yourdomain.com/html;
    index index.php index.html;

    location / {
        try_files $uri $uri/ =404;
    }

    location ~ \.php$ {
        include snippets/fastcgi-php.conf;
        fastcgi_pass unix:/run/php/php8.3-fpm.sock;
    }
}
Enable the site:
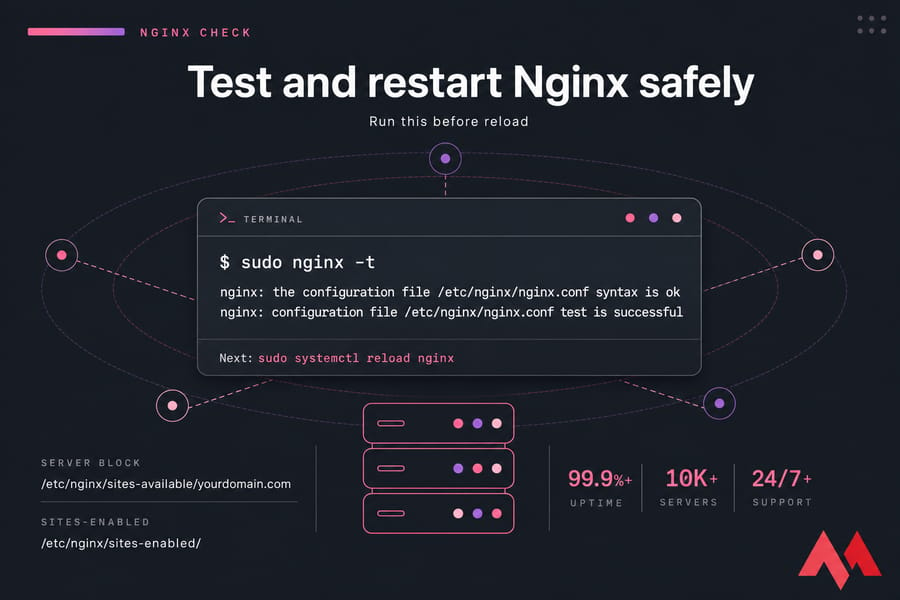
sudo ln -s /etc/nginx/sites-available/yourdomain.com /etc/nginx/sites-enabled/Test and restart Nginx safely
Always run sudo nginx -t before reloading. If the syntax check passes, run sudo systemctl reload nginx.
For a deeper walkthrough on Ubuntu specifics, our install Nginx on Ubuntu guide covers edge cases.
Install Apache on a VPS for website hosting
Prefer Apache? Here's the path.
Install Apache and PHP
Ubuntu:
sudo apt install apache2 php libapache2-mod-php php-mysql -y
sudo systemctl enable --now apache2
AlmaLinux:
sudo dnf install httpd php php-mysqlnd -y
sudo systemctl enable --now httpd
Create an Apache virtual host
On Ubuntu, create /etc/apache2/sites-available/yourdomain.com.conf:
<VirtualHost *:80>
    ServerName yourdomain.com
    ServerAlias www.yourdomain.com
    DocumentRoot /var/www/yourdomain.com/html

    <Directory /var/www/yourdomain.com/html>
        AllowOverride All
        Require all granted
    </Directory>

    ErrorLog ${APACHE_LOG_DIR}/yourdomain-error.log
    CustomLog ${APACHE_LOG_DIR}/yourdomain-access.log combined
</VirtualHost>
Enable modules and reload Apache
sudo a2ensite yourdomain.com.conf
sudo a2enmod rewrite
sudo systemctl reload apache2
The AllowOverride All directive is what makes .htaccess work — handy for WordPress permalinks and quick redirects. Running into issues?
Our guide on how to restart Apache safely covers common gotchas.
Install LiteSpeed or OpenLiteSpeed on a KVM VPS
LiteSpeed shines for WordPress thanks to LSCache. Most users start with OpenLiteSpeed since it's free, and that's what I'll outline.
When to choose OpenLiteSpeed on VPS
Pick OpenLiteSpeed if:
- You host WordPress or WooCommerce and want LSCache
- You want a GUI admin panel without paying for cPanel
- Your budget rules out a LiteSpeed Enterprise license
- You don't need full
.htaccesscompatibility on a per-directory basis
Basic LiteSpeed installation flow
The fastest way on Ubuntu or AlmaLinux is the official one-liner:
wget -O - https://repo.litespeed.sh | sudo bash
sudo apt install openlitespeed lsphp83 lsphp83-mysql -y   # Ubuntu
sudo dnf install openlitespeed lsphp83 lsphp83-mysqlnd -y # AlmaLinux
The admin panel runs on port 7080 by default. Set the admin password:
sudo /usr/local/lsws/admin/misc/admpass.shThen open https://your-vps-ip:7080 in your browser. Don't forget to allow port 7080 through the firewall — temporarily, at least.
Configure PHP and document root in LiteSpeed
Inside the WebAdmin GUI, head to Virtual Hosts → Add, set the document root to /var/www/yourdomain.com/html, and bind the listener on port 80 to that vhost. The defaults work for most sites.
Honestly, if you want LiteSpeed without the manual config grind, deploy CyberPanel VPS — it ships with OpenLiteSpeed pre-configured and handles vhosts, SSL, and email through a clean UI.
Warning: OpenLiteSpeed and LiteSpeed Enterprise are not feature-identical. Don't pick based on brand name alone — Enterprise unlocks multi-worker processing and full
.htaccesssupport that OpenLiteSpeed lacks.
Need a KVM VPS Before You Start?
Launch your website on a MonoVM KVM VPS with full root access, fast NVMe storage, flexible OS choices, and headroom to grow with Nginx, Apache, or LiteSpeed. Pick a datacenter close to your audience and deploy in minutes.
Set up domain DNS on VPS hosting
Your web server is running. Now your domain needs to know about it.
Add A and AAAA records for your domain
Log in to your domain registrar's DNS panel and add:
| Type | Host | Value | TTL |
|---|---|---|---|
| A | @ | your.vps.ipv4.address | 3600 |
| A | www | your.vps.ipv4.address | 3600 |
| AAAA | @ | your:vps:ipv6::address | 3600 |
That's it. If you want a step-by-step with screenshots from common registrars, see how to set up a domain on VPS.
Verify DNS propagation before SSL
Run dig yourdomain.com +short or nslookup yourdomain.com. If it returns your VPS IP, you're good. Propagation usually takes 15 minutes to a few hours — sometimes up to 24 in stubborn cases.
Common DNS mistakes that delay launch
- Forgetting the
wwwrecord - Setting TTL too high while testing (use 300–600 during setup)
- Confusing nameservers with DNS zone records
- Trying to issue SSL before DNS resolves to the VPS
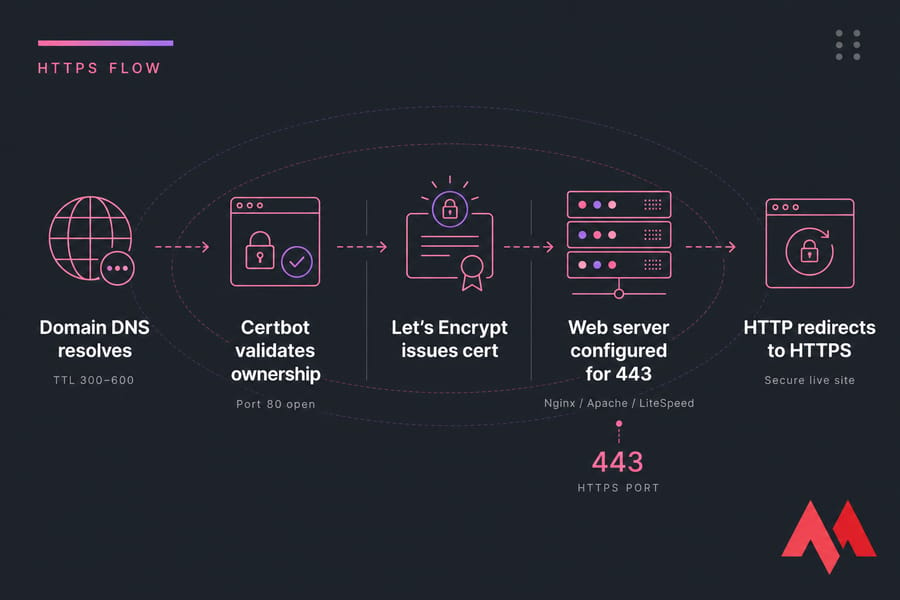
Install SSL on VPS with Let's Encrypt
HTTPS isn't optional anymore. Browsers flag HTTP sites as "Not Secure," and search rankings reflect that. Let's Encrypt makes it free.
Certbot for Nginx
sudo apt install certbot python3-certbot-nginx -y
sudo certbot --nginx -d yourdomain.com -d www.yourdomain.com
Certbot for Apache
sudo apt install certbot python3-certbot-apache -y
sudo certbot --apache -d yourdomain.com -d www.yourdomain.com
SSL options for LiteSpeed and OpenLiteSpeed
For OpenLiteSpeed, the easiest route is Certbot in standalone or webroot mode, then point the SSL listener to the generated fullchain.pem and privkey.pem. CyberPanel users get a one-click SSL button — much less fiddly.
Test auto-renewal with sudo certbot renew --dry-run. Certbot installs a cron job or systemd timer automatically, so you shouldn't need to babysit renewals.
For commercial certs (EV, wildcard, multi-domain), check our SSL certificate options. And if you want a deeper dive, see how to install SSL on a VPS.
Improve VPS performance and troubleshoot web hosting issues
Things go wrong. Here's how to figure out what and where.
Check open ports, services, and logs
Quick diagnostic toolkit:
sudo systemctl status nginx     # or apache2, lsws
sudo ss -tlnp                   # what's listening?
sudo tail -50 /var/log/nginx/error.log
sudo tail -50 /var/log/apache2/error.log
sudo journalctl -u php8.3-fpm --since "10 min ago"
Fix 502, 403, and SSL issues after setup
| Symptom | Likely cause | Where to check | Fix |
|---|---|---|---|
| 502 Bad Gateway | PHP-FPM not running or wrong socket path | PHP-FPM status, Nginx config | Start PHP-FPM, match socket path in server block |
| 403 Forbidden | File permissions or missing index file | document root permissions | chown -R www-data:www-data /var/www/... |
| SSL issuance fails | DNS not resolving or port 80 closed | dig, firewall rules | Verify DNS, open port 80 temporarily |
| Site won't load | Firewall blocking 80/443 | UFW or firewalld status | Allow HTTP and HTTPS services |
| Service won't start | Config syntax error | nginx -t or apachectl configtest |
Fix syntax, reload |
Need more on specific errors? See our deep dives on the 502 bad gateway error and the 403 forbidden error.
Basic optimization for PHP, caching, and backups
Quick wins after launch:
- Enable gzip or Brotli compression in your web server config
- Use the latest stable PHP version (8.2 or 8.3 for most apps)
- Add Redis or Memcached for object caching on WordPress
- Set up automated backups — read how to back up your VPS
- Monitor RAM and disk with
htopanddf -h
For a broader optimization checklist, our guide on how to improve VPS performance goes further.
Best VPS control panel options if you want easier management
Manual setup gives you control. A control panel saves you time. Both are valid — depends on your patience and how many sites you'll juggle.
| Panel | Best for | Web server | Cost |
|---|---|---|---|
| cPanel VPS hosting | Agencies, resellers | Apache + LiteSpeed | Paid (subscription) |
| DirectAdmin VPS | Budget-conscious admins | Apache / Nginx | Paid (lower cost) |
| CyberPanel VPS | WordPress, OpenLiteSpeed users | OpenLiteSpeed | Free / paid tier |
| Plesk VPS hosting | Mixed Windows/Linux shops | Nginx + Apache | Paid |
Want a deeper comparison? See our roundup of the best VPS control panels.
Launch checklist for hosting a website on a KVM VPS
You're nearly there. Run through this before you call it live:
- Web server (Nginx, Apache, or LiteSpeed) is active and enabled at boot
- DNS A/AAAA records resolve to your VPS IP
- SSL certificate is installed and HTTP redirects to HTTPS
- Firewall allows only 22, 80, 443 (plus admin panel ports if needed)
- Root SSH disabled, sudo user with SSH key works
- Test page loads on both
yourdomain.comandwww.yourdomain.com - Automated backups configured
- Basic monitoring or alerts in place
When traffic grows or response times start creeping up, that's your cue to scale. Bump RAM first, then CPU. Add a caching layer before adding more servers.
Ready to Host Your Website on a KVM VPS?
Choose a MonoVM KVM VPS and deploy your preferred stack with the control, isolation, and scalability your site needs. Want easier management instead? Explore our CyberPanel, cPanel, DirectAdmin, and Plesk VPS options. For broader context, our guide on how to host a website on Linux VPS covers more scenarios.

An experienced tech and developer blog writer, specializing in VPS hosting and server technologies. Fueled by a passion for innovation, I break down complex technical concepts into digestible content, simplifying tech for everyone.