
Want the short version? To install mods on a Minecraft server, you need Minecraft Java Edition, a compatible mod loader (Forge, NeoForge, or Fabric), and mod .jar files that match both your Minecraft version and that loader. Stop the server, install the loader, drop the mods into the mods folder, restart, then check the console. Most content mods also have to be installed on every player's client.
That's the whole job in five lines. The rest of this guide is about doing it without breaking your world, and fixing it when something does go sideways.
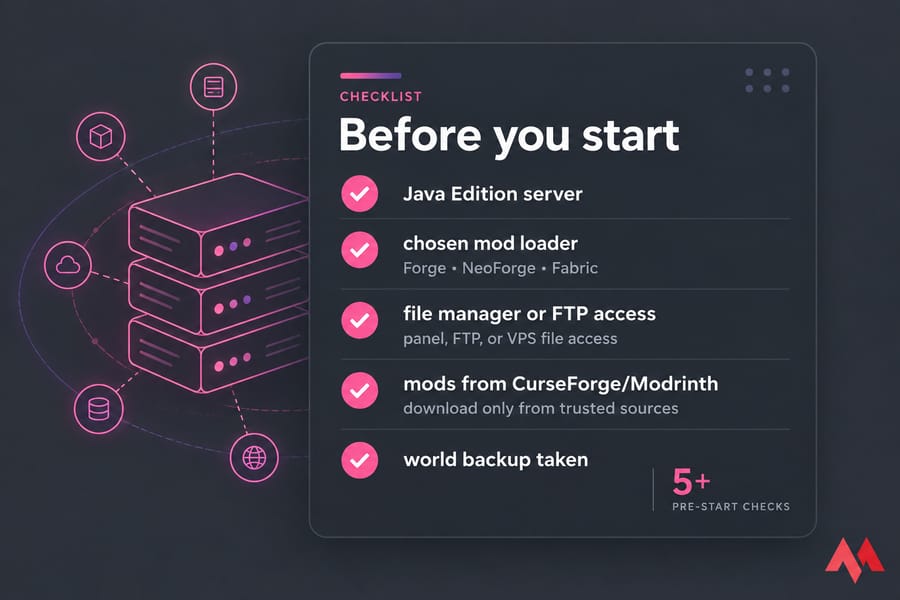
What you need before installing Minecraft server mods
This is a Java Edition guide. Bedrock (console, mobile, Windows 10/11 edition) doesn't support .jar mods at all — it uses add-ons and behaviour packs, which is a completely different system. If your friends play on Xbox or a phone, they can't join a Forge server. Sorry.
Second thing: mods aren't plugins. Plugins run on Spigot/Paper and are server-side only, so players join with a vanilla client. Mods change the game itself. If you're still deciding which route fits your community, read the breakdown of plugins vs mods first — it'll save you a rebuild later. And if you don't have a server running yet, start with how to make a Minecraft server.
Access you need: panel, FTP, or VPS file access
You need to be able to see and edit the server directory. On a managed host that usually means a web file manager or FTP credentials. On a VPS, it means SSH plus SFTP — see how to connect to a VPS if that part is new. You also need Java installed if you're managing the server yourself; NeoForge's docs are explicit that Java is a separate install, not something the loader bundles for you.
Back up your world first. Seriously.
Warning: take a full backup before you touch anything. Mods write data into chunks and player inventories. Remove a mod later and those blocks can vanish — sometimes taking the chunk with them. I've watched someone lose a three-month base because they swapped a tech mod mid-season. Set up automatic Minecraft server backups once and stop thinking about it.
Download mods only from CurseForge or Modrinth. Those are the two repositories official loader documentation points to, and random "mod download" mirrors are a well-known malware vector.
Choose the right mod loader for Minecraft server mods
Forge, Fabric, and NeoForge are not interchangeable. A Fabric 1.21.x mod will not load on Forge. A NeoForge mod won't load on Forge either, even though NeoForge is a Forge fork. Mixing them crashes the server. Pick one loader, then pick mods that list that loader.
| Loader | Best for | Typical versions | Common gotcha |
|---|---|---|---|
| Forge | Older, established modpacks | 1.12.2, 1.16.5, 1.19.2, many 1.20.1 packs | Still maintained, but new mod development is drifting away |
| Fabric | Performance mods, lighter servers, fast version updates | Tracks the newest snapshots and releases quickly | Most mods also need Fabric API installed separately |
| NeoForge | New 1.21+ content-heavy servers | 1.20.2 onward | Not drop-in compatible with Forge mods unless the author says so |
My default advice in 2026: use NeoForge for new 1.21+ modded servers unless your pack explicitly requires Forge. Most current big packs have already moved — by 2025 nearly all major new modpacks had adopted NeoForge. Fabric stays the pick if your priority is TPS and optimisation mods rather than sprawling tech-and-magic content.
Pro tip: if you're running a published modpack, don't choose a loader at all. Use whatever the pack's page says. That decision is already made for you.
Match Minecraft version, loader version, and mod version
This is where nine out of ten failed installs actually happen. Four things have to line up.
| Checkpoint | Must match? | Example |
|---|---|---|
| Minecraft version | Yes, exactly | A 1.21.1 mod can break on 1.21.4 |
| Mod loader | Yes, no exceptions | Fabric mod on a Forge server = never loads |
| Loader build | Usually | Some mods require a minimum NeoForge build |
| Dependencies / API | Yes | Fabric API, Architectury, Cloth Config |
Fabric's own documentation makes the version point bluntly: a mod that worked on 1.21.8 might not work on 1.21.11. Treat every number as literal.
How to install mods on a Minecraft server step by step
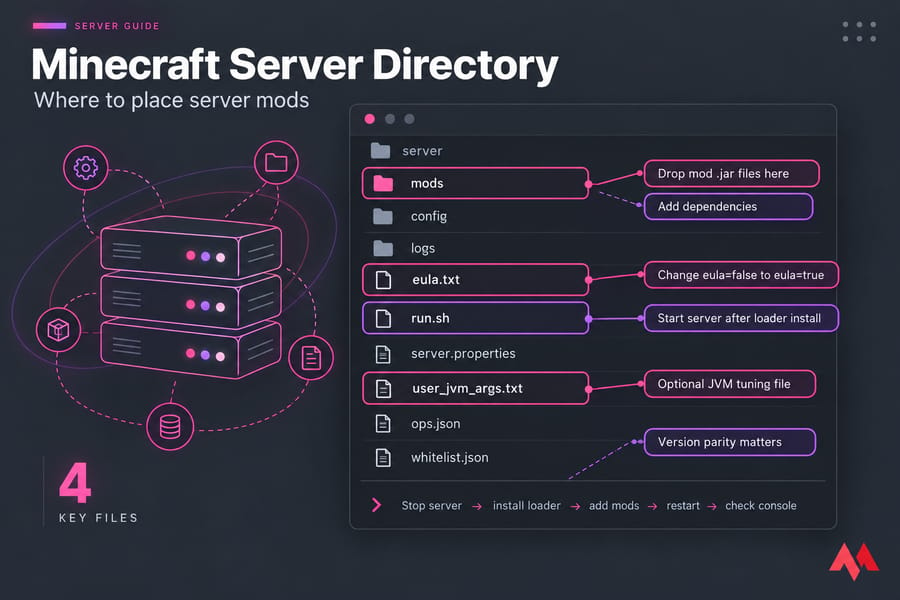
- Stop the server. Not restart — stop. Adding files to a running server either does nothing or corrupts the write.
- Install or switch the mod loader. Upload and run the loader installer in server mode, or select the loader version in your host's panel. A vanilla or Paper jar will never load mods.
- Start once to generate files. The first boot creates
mods,config, andeula.txt. Openeula.txt, changeeula=falsetoeula=true, save. - Upload your mod
.jarfiles. Straight intomods. Not into a subfolder, not zipped, not renamed. If you downloaded a.zip, something's wrong — check the file again. - Add dependencies. Every mod page lists required libraries. Missing one is the single most common startup failure. Add them all before the first modded boot.
- Restart and watch the console. Don't just look for "Done". Scroll the log. Warnings about duplicate mod IDs or unsupported versions show up long before a crash does.
- Give players the client list. Most content mods need to be on both sides. Share the exact mod names, versions, and loader build — a pinned Discord message with the download links works fine.
Key takeaway: if an install fails, check version parity before you change anything else. It's almost always that.
How to install Forge mods on a Minecraft server
Grab the installer from the official Forge files listing for your exact Minecraft version. Run it with the Install server option pointed at your server directory (or java -jar forge-installer.jar --installServer on a headless box). Boot once, accept the EULA, boot again.
Then drop Forge-tagged mods into mods and restart. Check the log line that reports how many mods loaded — if it says two and you uploaded seven, five of them are wrong-loader or wrong-version files.
Forge is still the right call for 1.12.2, 1.16.5, and 1.19.2 packs, which remain hugely popular. Just don't expect brand-new mods to target it.
How to install Fabric mods on a Minecraft server
Fabric's server path is the lightest of the three. Download the Fabric Server Launcher jar for your Minecraft version, drop it in an empty directory, and run it — it pulls the missing loader and Minecraft files itself.
- Install Fabric API first. The majority of Fabric mods require it, and it goes in
modslike any other jar. - Use Java 21 for 1.20.5 and newer; Java 17 is the recommendation for 1.17 through 1.20.4.
- Upload Fabric-tagged mods only, restart, confirm in the log.
One correction to a common assumption: plenty of Fabric mods are client-only. Sodium, Iris, and most shader-adjacent mods do nothing on a server. Uploading them isn't harmful, but it isn't helping either.
How to install NeoForge mods on a Minecraft server
NeoForge documents a clean, scriptable install. Run the installer in server mode:
java -jar /path/to/neoforge-installer.jar --installServerThen adjust RAM and JVM flags in the generated user_jvm_args.txt, start with ./run.sh (or run.bat on Windows), set eula=true in eula.txt, and start again. Mods go in mods, same as always.
Don't forget the network side: port 25565 needs to be open in your system and network firewall, and a scheduled restart is worth setting up for any 24/7 server.
Modpack installation vs manual mod installs
If you're installing more than about 15 mods, a modpack is usually the smarter move. Pack authors have already resolved the dependency graph and version conflicts — work that takes you an evening and takes them months.
The rule: if the pack offers a server pack, use it. Server packs ship with client-only mods stripped out and a startup script included. Uploading your client instance folder to a server instead is how people end up with rendering mods crash-looping a headless machine.
Manual installs still make sense for curated servers — a handful of quality-of-life mods, a specific theme, or anything you want full control over. For a deeper walkthrough of that route, see how to make a modded Minecraft server, and browse the best Minecraft mods if you're still building your list.
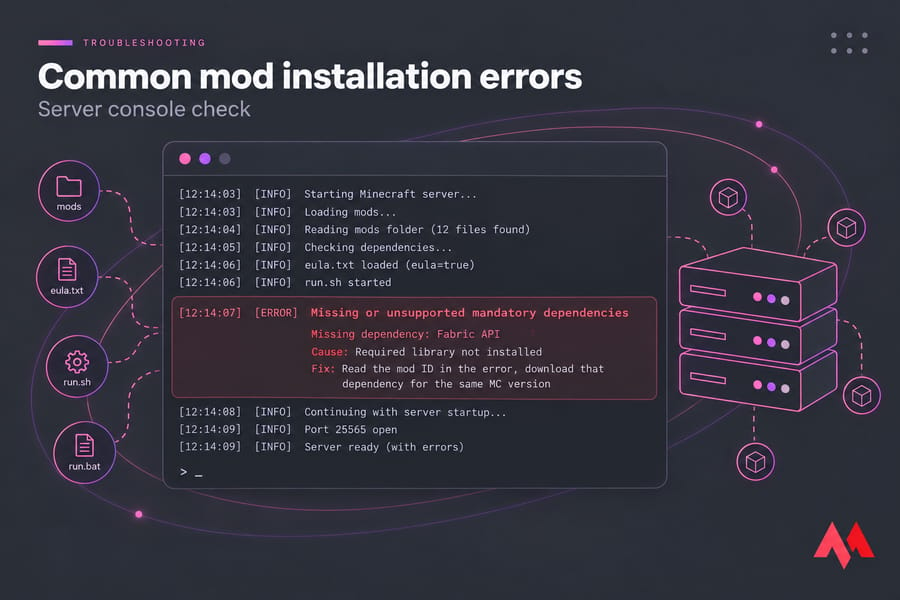
Common mod installation errors and how to fix them
| Symptom | Likely cause | Fix |
|---|---|---|
| Server starts in vanilla | Startup script points at the vanilla jar | Launch via run.sh/run.bat, or select the loader jar in your panel |
| "Missing mandatory dependencies" | Required library not installed | Read the mod ID in the error, download that dependency for the same MC version |
| Mod ignored entirely | Wrong loader or wrong MC version | Re-download the file tagged for your loader and exact version |
| Players kicked on join | Client mod list doesn't match the server | Share the exact mod + version list; have players use the same loader build |
| Crash on world load | Two mods conflicting, or world-gen mod added to an existing world | Remove mods in halves until it boots, then narrow down |
| Boots, then dies after a few minutes | Out of memory during chunk generation | Raise heap size, or move to a plan with more RAM |
Read the log. Don't guess, and don't reinstall everything as a first move — that just destroys the evidence. The crash report names the offending mod ID roughly 80% of the time. If the box itself looks unhealthy rather than the game, check Linux memory usage and run through a standard VPS troubleshooting pass.
How much RAM does a modded Minecraft server need?
| Server type | Mod count | Suggested RAM | Notes |
|---|---|---|---|
| Light | 10–30 | 4–6 GB | QoL and performance mods, small friend group |
| Medium | 60–150 | 6–8 GB | Most tech/magic packs stabilise here |
| Heavy | 250+ | 10–12 GB+ | Packs like All the Mods 10 realistically need 12 GB or more |
Mod count is a weak predictor on its own. One world-generation or entity-heavy mod can cost more memory than fifty small ones. Single-thread CPU performance matters just as much for tick rate — see the best server CPU for Minecraft and how much RAM Minecraft needs for the full picture.
Already maxed out? Here's how to add more RAM to your Minecraft server.
Big packs and world-gen mods flatten low-resource servers fast. MonoVM's Minecraft VPS hosting gives you dedicated resources, full file access, and the freedom to swap loaders whenever your pack does — no panel restrictions, no support ticket to change a jar.
Best practices after you add mods
- Back up before every change. Loader updates especially — NeoForge's docs say the same thing.
- Add one mod at a time when you're testing something new. Batch uploads make diagnosis miserable.
- Keep a changelog. Date, mod name, version, why. A plain text file is enough, and future-you will be grateful.
- Lock your versions. Don't auto-update mods mid-season.
- Test on a copy if the server has an active community. Clone the world, try the change there first.
- Keep client instructions current in one pinned place. Half your join failures are players on a stale mod list.
Planning a version jump? Read how to update a Minecraft server before you start — loader and mod updates need to happen in the right order.
Next step
You now know the full workflow: pick a loader, match every version, upload to mods, add dependencies, restart, sync your players. The remaining variable is the hardware underneath it.
View Minecraft VPS hosting plans and pick the RAM, CPU, and control level your modpack actually needs.

An experienced tech and developer blog writer, specializing in VPS hosting and server technologies. Fueled by a passion for innovation, I break down complex technical concepts into digestible content, simplifying tech for everyone.