List of content you will read in this article:
- 1. What is a Minecraft server?
- 2. How to Make a Minecraft Server Quick Guide
- 3. How does a Minecraft server work?
- 4. How Much Does Making a Minecraft Server Cost?
- 5. Which service providers are the best for Minecraft servers?
- 6. How to Make Minecraft Server on Windows?
- 7. How to create a Minecraft Server on Linux?
- 8. Hardware Considerations
- 9. Optimizing Your Minecraft Server Performance
- 10. Common Problems and Troubleshooting
- 11. Minecraft Realms For beginners
- 12. Server Maintenance
- 13. Epilogue
- 14. FAQ
Setting up a Minecraft server can be difficult, but not with the right advice. This article is meant to present a simple and informative guide on how to make a Minecraft server for Windows and Linux [How to create a Minecraft server].
As of 2024, Minecraft continues to be among the most popular and successful video games of all time. With over 300 million copies sold worldwide and a consistently large active player base, Minecraft remains the best-selling video game ever. This trend is likely to remain strong for years to come.
What is a Minecraft server?
Minecraft is a brilliantly crafted sandbox game that allows people to fight, survive, explore, and build virtually anything they want. One of the best features of the game is the multiplayer option that allows you to go co-op with your friends and other people.
Not only can you connect to other worlds on your friends' and family's devices through LAN, but you can also purchase one of Microsoft’s Minecraft Realms which are worlds where ten players can play simultaneously.
By far, the best option, however, for multi-playing on Minecraft is through servers, where, theoretically, an infinite number of players can share the playfield with other Minecrafters. Minecraft servers are like upgraded sandboxes where modifications can be made to the game, making the playing experience way more enjoyable.
On servers, players can engage in minigames, meet new people, explore, build, and compete in challenges with other Minecrafters. Every year, thousands more Minecraft servers are created and grow rapidly.
The largest Minecraft servers have millions of fans all across the globe and hundreds of players on a daily basis; which makes creating your own Minecraft server an attractive choice.
Creating a Minecraft server’s price depends on how many players you want in the world at a time. So, in this article, we’ll explain how to make Minecraft server in 2024 and invite friends to join your world!
We hope this article helps you! But before diving into that, let’s first understand how mc servers work, the costs associated, and the best 3 options to choose from. So, let’s get started.
🌐 Discover the Minecraft Hypixel IP Address: Connect to the Ultimate Gaming Experience 🎮
How to Make a Minecraft Server Quick Guide
- How does a Minecraft Server Work?
- How Much Will it Cost?
- Best Service Providers for Minecraft Servers
- How to Make a Minecraft Server on Windows?
- How to Make a Minecraft Server on Linux?
How does a Minecraft server work?
A server on the popular game Minecraft works very much the same way as really any other server or computer that is connected to the internet and communicates with other devices. Essentially the internet is one huge network where computers communicate data. Web servers are huge computers that process a lot of requests and display web pages or multiplayer game content to anyone who makes a request.
However, just because servers typically involve a lot of computers and processing power, this doesn't mean that you need to invest in a huge server computer to host your own amazing Minecraft multiplayer world.
Since servers can process many requests at once, they make it possible for a world to be played on by numerous Minecraft players simultaneously and update automatically, making for an excellent experience.
Although most people who want to make Minecraft servers usually buy one from a specialized service provider who owns their own server computers, which servers can be hosted on, it is not uncommon for amateurs to host servers on their own devices.
For example, if you have a spare laptop or PC lying around that is relatively fast, you can configure it to act as a server, add more RAM to your Minecraft server, and hold a Minecraft world that many other people can connect to.
On the internet, computers and servers (which are really just computers themselves) use unique strings of digits interspersed with periods called Internet Protocol, or IP, addresses to identify themselves and establish safe connection pathways with other devices on the World Wide Web.
To connect to a server on Minecraft, you need to find its server address, enter it, and you’ll be connected and sent straight through to the Minecraft world! This concept also applies to how to create a Minecraft server.
If you run it on a spare laptop or desktop computer, it’ll run on the IP of your Wi-Fi network. However, if you do it with a qualified and reputable Minecraft server provider, they’ll have servers that can provide you with a unique IP address that will allow your players to connect to your multiplayer world!
How Much Does Making a Minecraft Server Cost?
Now that you understand what a Minecraft server is, why people love to play on them, and how they work, you probably have the question - how much will setting up my own Minecraft server cost me?
Well, this can be a tricky question to answer because it depends so much on your requirements and which path you will take to set one up. There are basically two ways you could go.
Purchasing a Minecraft Server
The first is purchasing from a reputable and qualified service provider who owns a lot of powerful computers for Minecraft server hosting your server and providing a monthly service.
Of course, with this option, you have a lot less control over your server and a lot less flexibility, but it is much easier than manually setting up your own one and may even cost you less, at least in the short term.
With a purchased server, you can expect to pay anywhere from 5$/month to 100$/month, or even more depending on how many players you want to get on your server and how intensive you want the processes in the world to be!
Setting up Your Own Minecraft Server
You could go down the alternative option of setting up your own server on a spare laptop or desktop PC. This is a lot trickier than if you were to just purchase a server from a provider.
However, this gives you greater control, and you can also manually upgrade your computer and setup if you get enough players and need more processing power.
Setting up your own Minecraft server will cost around 90$ for the minimum requirements which can handle 1 or 2 players. However, if you want your Minecraft server to be optimal and be able to handle more than 9 players simultaneously, you’ll have to spend at least 1650$ for an Intel Xeon W5590 running at 3.3 GHz, 8 GB of DDR3 RAM, and a 120 GB Western Digital HDD.
If you want to know how to do this exactly, there is a helpful tutorial that can give you a few great pointers and instructions for self-hosting your own Minecraft server multiplayer world!
Which service providers are the best for Minecraft servers?
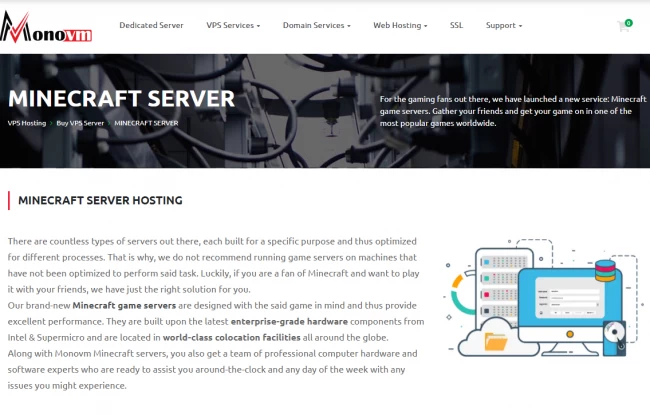
If you’ve decided to go with the purchasing option and buy a Minecraft multiplayer world service from a reputable provider, then there are many options you can pick from. It’s best to stick with the major, reputable ones because these are the companies that you can actually trust to provide you a consistent, powerful, and high-quality service!
Depending on your requirements and budget, which business you decide to go with will vary. Here are three of our favorite options that are well worth considering:
Believe it or not, our own company (shameless, pitching our own products), offers not only Dedicated and VPS servers but can offer Minecraft Servers as well, upon request. In fact, we have widened our services to include Minecraft servers and all-inclusive setups at extremely affordable prices.
It’s really easy to get started and done properly; you can get your multiplayer Minecraft world off the ground and up and running for people to join it in an afternoon!
Did you know that you can get your own Minecraft server on the internet up and running extremely quickly and effectively at a price just for a few dollars per month? It’s true, and 1GBits is the company that you’ll want to get this insane service. Their server computers are extremely powerful, and they have very helpful guides for going through the process, which we highly recommend you to use.
How to Make Minecraft Server on Windows?
Now, here we are giving a step-by-step guide which will brief you on how to make a Minecraft server on windows with screenshots.
Step 1: First, you must log into your Mojang account, which you should already have Minecraft purchased. Then head over to https://www.minecraft.net/en-us/download, scroll down to Server Software, and select Java Edition Server.
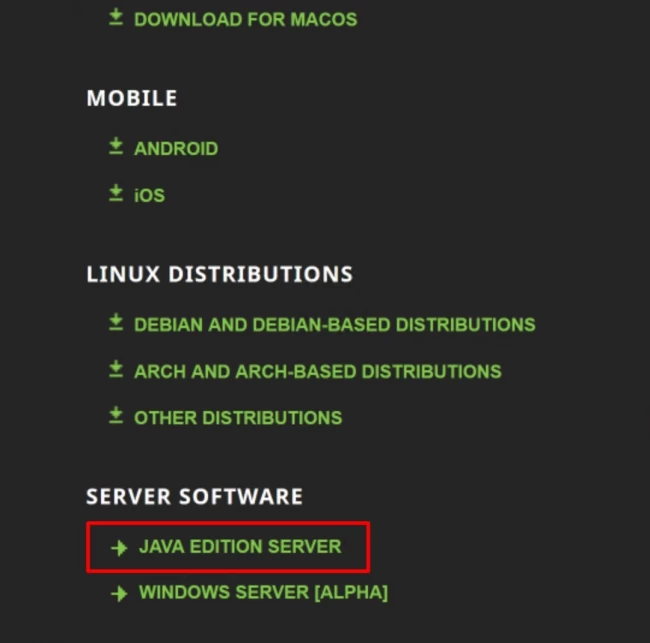
Step 2: Head over to the official Minecraft Java Edition server download page and press the download link.
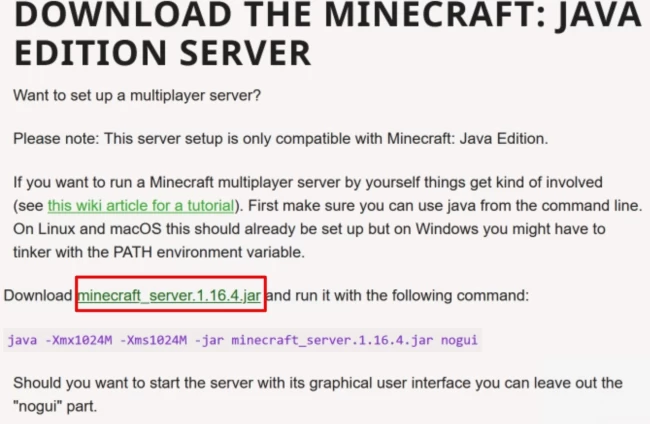
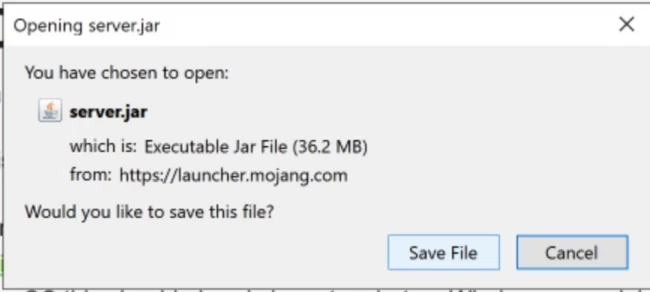
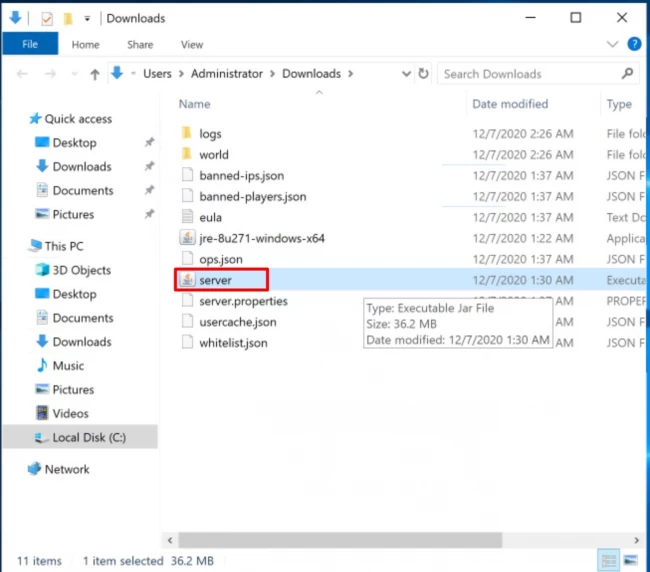
Step 3: In the pop-up window, click Save File and wait for it to download. Once the download is complete, open the server.jar file.
Step 4: Windows will prompt you with the “Open Executable File?” warning message. Click OK.

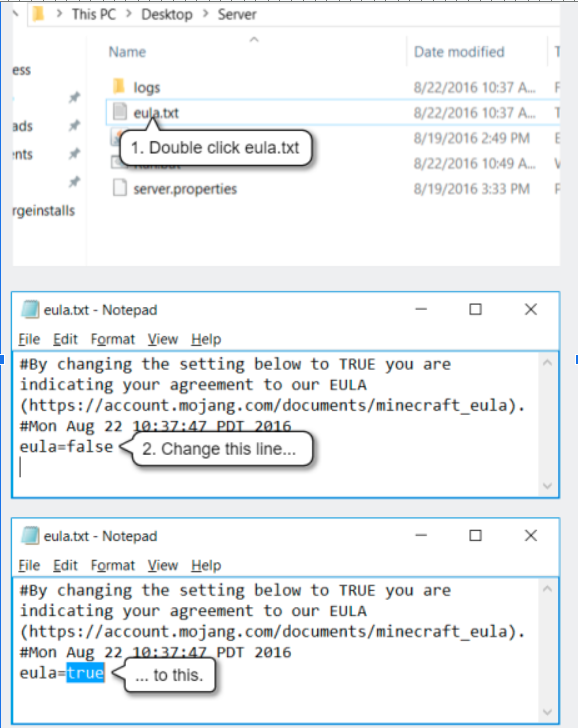
Step 5: Once the server.jar file has been run, you will see a new text file called eula.txt. Open it with notepad or any other desired text editor.
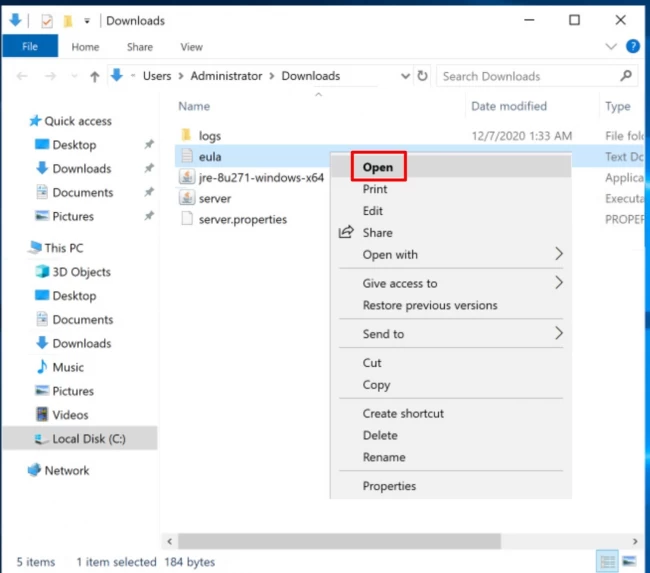
Step 6: In the opened text file, you will see a line that reads eula=false. Delete it and write eula=true.
Step 7: Now run the server.jar again.
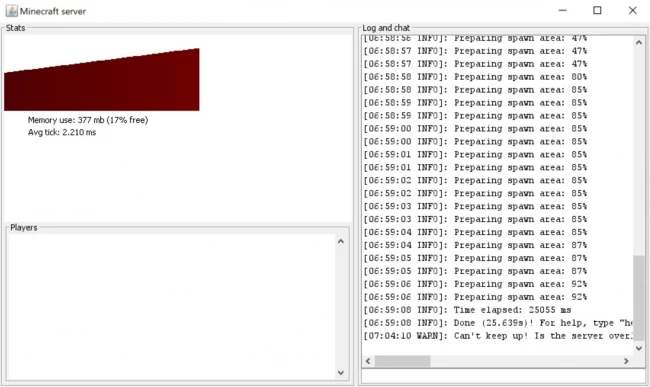
Step 8: The server will take a bit of time to load and be ready to use.
How to create a Minecraft Server on Linux?
Here you will get to know a step-by-step guide on how to make a Minecraft server on Linux?
Step 1: To run a Minecraft server on Linux requires Java. First, check if you have it installed on the server by running this command:
java -version
If you get an error message, proceed to step 2; if java is already installed, however, skip to step 4.

Step 2: Run the following commands to install Java:
sudo yum update
Press Y and enter,
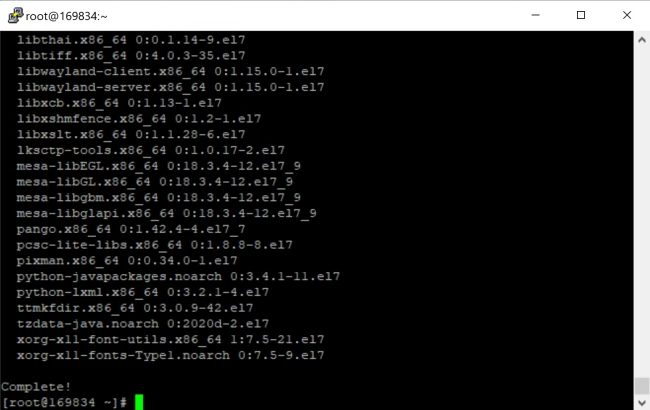
sudo yum install java -y
You should see the following screen when it is installed.
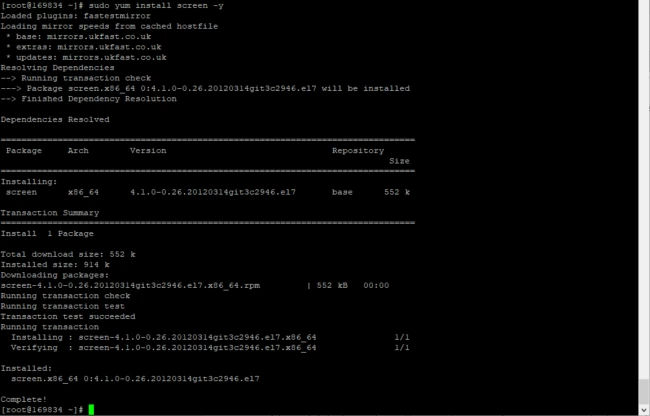
Step 3: Now you should install Screen.
sudo yum install screen -y
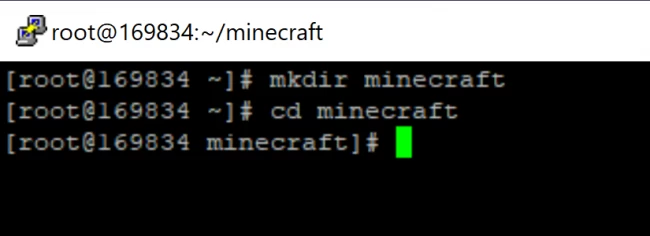
Step 4: Create a new directory where you will store all the Minecraft configuration files and enter it.
mkdir minecraft
cd minecraft
Step 5: Before downloading the needed configuration files, wget should be installed first.
sudo yum install wget -y
Step 6: Use the wget command to download Minecraft server files.
wget https://launcher.mojang.com/v1/objects/35139deedbd5182953cf1caa23835da59ca3d7cd/server.jar
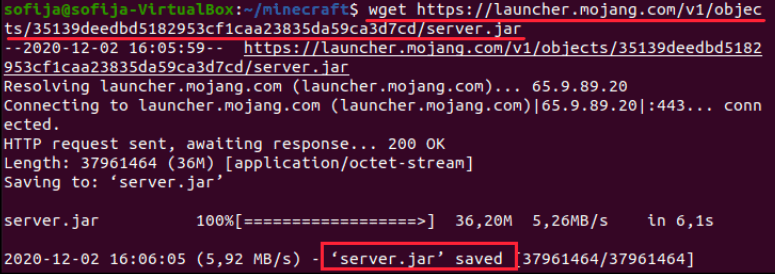
Please note that this link works for Minecraft Server 1.16.4. To look for a newer version, follow this link. If there is one, replace the link in the command with the newer one.
Step 7: Once the download is finished, run the server.jar file with the following command.
java -Xmx1024M -Xms1024M -jar server.jar nogui
This should give you an error as the end-user license agreement is not accepted.
Step 8: To accept the end-user license agreement, open eula.txt with a text editor and change eula=false to eula=true then save and close the file.

Step 9: Once that is done, run the following command to make sure that the server can run in the background.
screen -s “Minecraft server 1”
Now you should have the Minecraft server successfully up and running on Linux.
Hardware Considerations
The hardware you'll need for a smooth-running Minecraft server depends mainly on how many players you expect to join. Here's a general guideline:
- CPU (Processor): Minecraft benefits significantly from a CPU with high single-core performance. Look for a processor with a strong clock speed (e.g., 3 GHz or higher).
- RAM (Memory): Allocate enough RAM to handle the game world and player data. Here's a basic estimate:
- 1-5 players: At least 2GB RAM
- 6-10 players: 4-6GB RAM
- 10+ players: 8GB RAM or more
- Storage (Hard Drive): A fast SSD (Solid State Drive) is ideal for better world load times and overall performance. Consider the size of your world, any mods, and backup storage when choosing your capacity.
- Network Connection: A strong, stable internet connection with decent upload speeds is crucial for a lag-free experience, especially with multiple players.
Scaling with Players
As the number of players on your Minecraft server increases, so do the demands on your hardware. If you anticipate a large player count, consider:
- More CPU Cores: Additional players put more strain on the processor. Consider a CPU with more cores for larger servers.
- Even More RAM: More players mean more data to store and process. Invest in additional RAM to prevent performance bottlenecks.
- Advanced Storage Options: For extensive worlds or complex server setups, you might want to explore faster NVMe SSDs.
Optimizing Your Minecraft Server Performance
Optimizing the performance of your Minecraft server is essential for delivering a smooth and enjoyable gaming experience to players. By implementing effective strategies and configurations, you can enhance server stability, reduce lag, and maximize resource utilization. Here are some tips and techniques to optimize your Minecraft server's performance:
-
Server Configuration:
- Fine-tune server settings such as view distance, tick rate, and entity activation range to balance performance and gameplay experience. Adjusting these parameters can significantly impact server performance and resource consumption.
-
Plugin and Mod Management:
- Evaluate the resource usage of installed plugins and mods regularly. Remove or replace resource-intensive plugins/mods with lightweight alternatives to reduce server overhead. Utilize plugin optimization tools and profiling plugins to identify performance bottlenecks and optimize resource utilization.
-
Chunk Loading and Generation:
- Optimize chunk loading and generation settings to minimize server strain during world exploration and terrain generation. Limit excessive chunk loading by configuring view distance and pre-generating chunks in explored areas to reduce server load and improve responsiveness.
-
Hardware and Resource Allocation:
- Allocate sufficient hardware resources, including CPU, RAM, and storage, to meet the demands of your Minecraft server. Consider upgrading server hardware or migrating to a more powerful hosting environment to accommodate increasing player populations and resource-intensive gameplay activities.
-
Network Optimization:
- Optimize network settings and bandwidth allocation to ensure smooth communication between the server and connected clients. Implement network optimizations such as reducing latency, optimizing packet routing, and prioritizing game traffic to minimize lag and improve player connectivity.
-
Performance Monitoring and Tuning:
- Monitor server performance metrics, such as CPU usage, memory usage, and tick rate, using monitoring tools and plugins. Identify performance issues and bottlenecks through performance profiling and analysis. Fine-tune server configurations based on performance data to optimize resource utilization and enhance overall server performance.
-
Regular Maintenance and Updates:
- Perform regular maintenance tasks, including software updates, plugin/mod updates, and server optimizations, to keep your Minecraft server running smoothly. Stay informed about the latest updates and optimizations for server software and plugins/mods to ensure compatibility and performance improvements.
By implementing these optimization techniques and best practices, you can enhance the performance, stability, and scalability of your Minecraft server, providing players with an immersive and lag-free gaming experience. Continuously monitor and fine-tune server configurations to adapt to changing player dynamics and evolving gameplay requirements.
Common Problems and Troubleshooting
Setting up and running a Minecraft server can sometimes lead to unexpected issues. Here's a quick guide to tackle some common problems:
-
EULA Agreement Issue: If you see an error message about the End User License Agreement (EULA), follow these steps:
- Locate the eula.txt file in your Minecraft server directory.
- Open it with a text editor.
- Change eula=false to eula=true.
- Save the file and restart your server.
-
Firewall Blocking Connection: Check your firewall settings. Make sure the Minecraft server port (the default is 25565) is allowed through the firewall on both your computer and your router. You might need to configure port forwarding on your router.
-
Java Memory Errors: If you encounter "out of memory" errors, you'll need to allocate more RAM to your server.
- Edit the startup script or command for your server.
- Find parameters like -Xmx and -Xms, which control memory allocation.
- Increase these values (e.g., -Xmx2G -Xms2G to allocate 2GB of RAM).
-
Other Issues: For other problems, try the following:
- Consult the Minecraft Server Documentation: Check the official Minecraft server documentation for detailed help.
- Search Online Forums: Many dedicated online Minecraft communities can offer support and specific troubleshooting advice.
Important Note: Always refer to the specific error message you're encountering for more targeted solutions.
Minecraft Realms For beginners
For beginners seeking a simple way to set up a multiplayer world, Minecraft Realms is an excellent option. Realms are official servers hosted by Mojang and are perfect for small groups of players. Here's why someone might choose Realms:
- Ease of Use: Realms are incredibly easy to set up and manage using a simple in-game menu.
- Reliability: Mojang maintains Realms servers, ensuring high uptime and smooth performance.
- Cross-Platform: Realms allow players on different versions of Minecraft (Java & Bedrock) to play together.
Server Maintenance
Keeping your Minecraft server healthy and secure is crucial for its longevity and the enjoyment of your players. Here's what you should focus on:
- Regular Backups: Create frequent backups of your Minecraft world, server configuration, and player data. This protects you from data loss due to accidents or corruption.
- Software Updates: Keep both Minecraft and any plugins or mods up to date. This ensures that you benefit from the latest features, bug fixes, and security patches.
- Security Measures:
- Use a strong password for the server admin account.
- Consider using a whitelist to control who can join your server.
- Be cautious of plugins/mods from untrusted sources.
Epilogue
In this article, we have covered Minecraft servers, what is it, why they are so popular among Minecraft players, how does Minecraft work, and how much will it cost you, if you want to create your own Minecraft server. We concluded with two recommendations of great server providers that can help you create your world.
If this article helped you to understand how to make a Minecraft server in 2024, consider sharing it with other Minecrafters who might want to make their own server. We’re sure they will appreciate it. We also recommend you to follow this same guide for how to create a Minecraft server on Linux and Windows.
![How to Make a Minecraft Server? [The Ultimate 2024 Guide]](/wp-content/uploads/2020/12/cover996-main.webp)