
Arch Linux is a lean, rolling-release Linux distribution that hands you a blank canvas and trusts you to build it your way. There’s no installer wizard, no preselected desktop environment, and no opinionated defaults. Instead, you build the system package by package until it does exactly what you want.
That might sound intimidating at first. While Arch does require more manual setup than beginner-focused distributions like Ubuntu or Fedora, the process is also one of its greatest strengths. By installing and configuring the system yourself, you gain a deeper understanding of how Linux works behind the scenes and end up with a lightweight, highly customized environment tailored to your needs.
If you're new to Linux and aren't yet familiar with concepts like distributions, kernels, package managers, or desktop environments, it's worth starting with our guide on What Is Linux? before continuing. A solid understanding of the Linux ecosystem will make the Arch installation process much easier to follow.
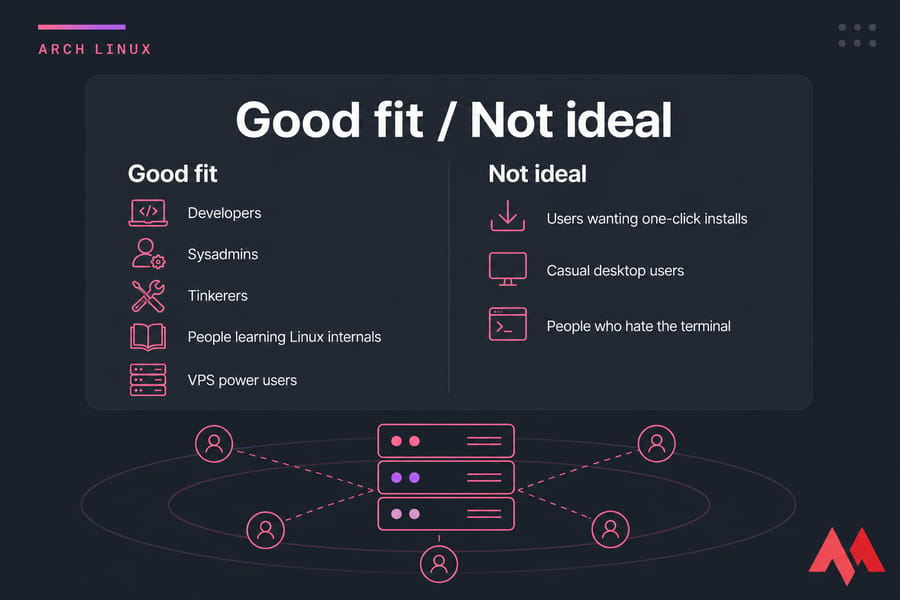
Why developers and power users choose Arch Linux
Three reasons keep coming up. First, the rolling release model means you always run current packages no waiting six months for a new kernel. Second, the package manager (pacman) is fast and predictable. Third, the is the best Linux documentation on the internet, full stop. Even Ubuntu users borrow from it.
When Arch Linux is not the best first distro
If you've never opened a terminal, start with something else. Seriously. Try Ubuntu or Manjaro first, get comfortable with the shell, then come back. There's no medal for diving in too early — just a lot of frustration.
If you want a structured path, our guide on how to learn Linux is a better starting point.
Now let's get the install media and system settings ready before we touch the disk.
Arch Linux requirements and pre-install checklist
Before you boot anything, get your ducks in a row. The install itself goes faster if you don't have to stop halfway to download something or hunt for a USB stick.
Here's what you actually need:
- A 64-bit machine (Arch dropped 32-bit support years ago)
- At least 2 GB RAM for a comfortable install; 512 MB is the bare minimum
- About 20 GB of disk space if you want room to grow
- A working internet connection — the installer downloads packages live
- The latest Arch ISO from
archlinux.org - A USB stick (8 GB is plenty) or a VM with the ISO attached
- A backup of anything important on the target disk
What you need before starting the Arch Linux installation
Grab the ISO. To write it to USB, you've got three solid choices: Rufus (Windows, simple), balenaEtcher (cross-platform, foolproof), or Ventoy (drop ISOs onto a partition and boot any of them — my personal favorite). Any of these work. Don't overthink the tool.
Bare metal vs VirtualBox vs VPS installation differences
The install commands are basically identical across all three. What changes is how you boot the ISO and how you handle the disk. Here's the breakdown:
| Scenario | What you need | Special notes |
|---|---|---|
| Bare metal | USB stick, BIOS/UEFI access | Verify UEFI is enabled; disable Secure Boot before booting the ISO |
| VirtualBox / VMware | ISO file, virtual disk (20 GB+) | Enable EFI in machine settings; use a single virtual disk |
| KVM / VPS | Provider ISO console or boot mount | Use a KVM VPS with custom ISO support; access through web console |
For VirtualBox specifically, check our What is a Linux virtual machine guide for the EFI toggle it's hidden under Settings → System → Motherboard.
UEFI vs BIOS: which mode this guide uses
This guide uses UEFI. That's the modern firmware standard, and pretty much every machine made after 2012 supports it. UEFI installs use GPT partitioning and an EFI system partition. Legacy BIOS still works, but it's a different command path and I'm not going to muddy this guide trying to cover both. If you're stuck on a BIOS-only system, the Arch Wiki has you covered.
Quick test: if your firmware splash screen mentions "UEFI" or you can disable Secure Boot in firmware settings, you're on UEFI.
Once the ISO is ready, boot into the live environment and check that networking actually works.
Boot the Arch Linux ISO and verify internet access
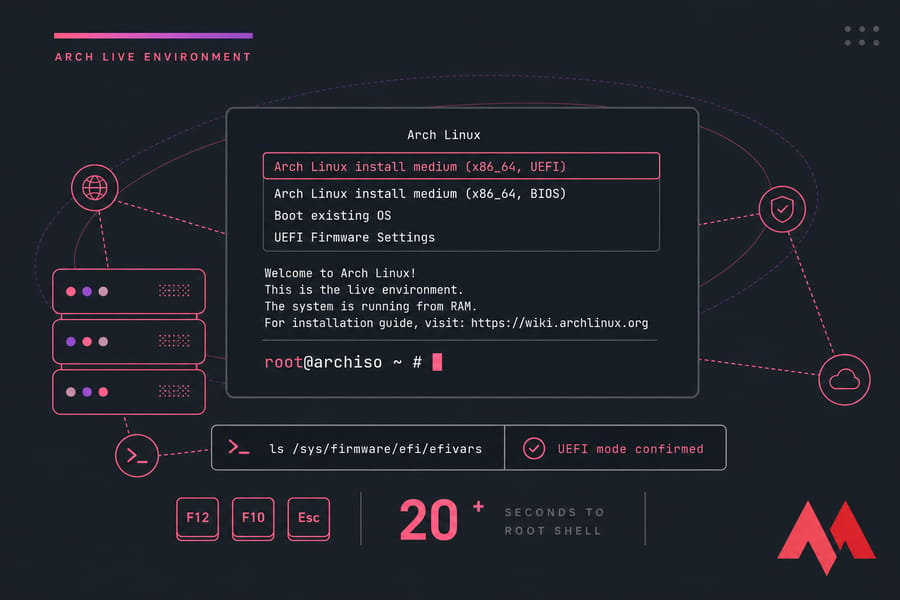
Plug in the USB (or attach the ISO in your VM), reboot, and select the Arch boot media from your firmware boot menu. You'll see a boot menu — pick "Arch Linux install medium (x86_64, UEFI)" and wait. About 20 seconds later you'll land at a root shell.
How to boot into the Arch live environment
If your machine doesn't boot from USB automatically, hit the boot menu key (usually F12, F10, or Esc — varies by manufacturer) and pick the USB drive. The first thing you'll see is the Arch boot menu. Press Enter on the default UEFI entry.
How to check UEFI mode
Confirm you actually booted in UEFI mode. Run:
ls /sys/firmware/efi/efivarsIf you get a directory listing, you're good. If it says "No such file or directory," you booted in legacy BIOS mode. Reboot, fix it in firmware, try again. Don't skip this check — it determines everything about partitioning and the bootloader.
How to connect Arch Linux to Ethernet or Wi-Fi
Wired Ethernet usually works automatically. Verify with:
ip addr show
ping -c 3 archlinux.org
If pings come back, skip the Wi-Fi section. If you're on Wi-Fi, use iwctl:
iwctl
[iwd]# device list
[iwd]# station wlan0 scan
[iwd]# station wlan0 get-networks
[iwd]# station wlan0 connect YourNetworkName
[iwd]# exit
Replace wlan0 with whatever your wireless device shows up as. Once connected, run the same ping test. For more on basic network checks, see our quick refresher on the Linux ping command.
Sync the system clock so package signatures verify correctly:
timedatectl set-ntp trueInternet works, clock is set. Time for the most sensitive step: partitioning.
Arch Linux partitioning guide for UEFI systems
Warning: Partitioning erases data. Triple-check which disk you're targeting. If you wipe the wrong drive, that's it. Use lsblk first, every single time.
lsblkYou'll see something like sda (a SATA drive), nvme0n1 (an NVMe SSD), or vda (a virtual disk in a VM). Identify your target by size and confirm it's empty or expendable.
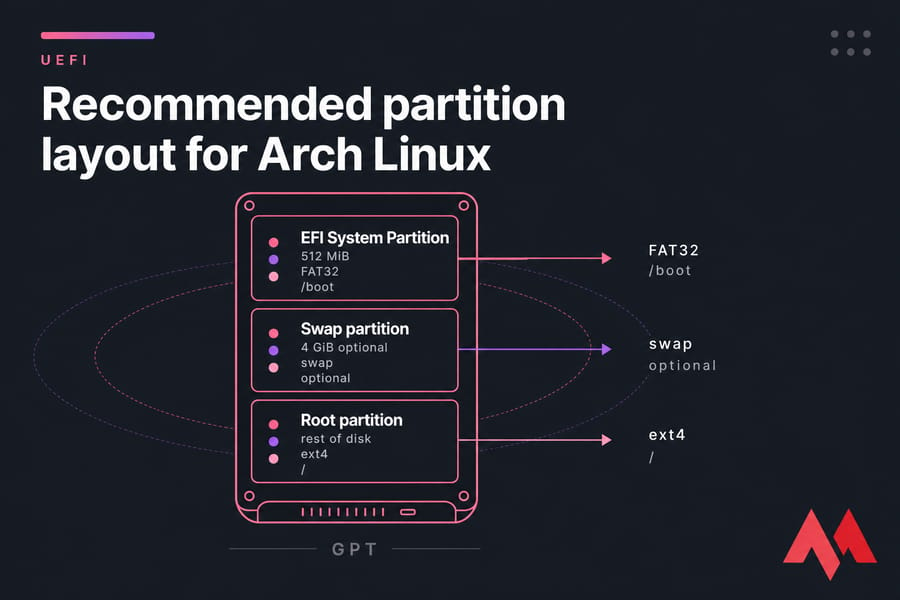
Recommended partition layout for Arch Linux
Keep it simple. For a typical UEFI install:
| Partition | Size | Filesystem | Mount point | Required? |
|---|---|---|---|---|
| EFI System Partition | 512 MiB | FAT32 | /boot | Yes |
| Swap | 2–8 GiB | swap | — | Optional |
| Root | Remainder | ext4 or btrfs | / | Yes |
If you have 8 GB+ RAM and don't plan to hibernate, you can skip swap or use a swapfile later. For laptops or low-RAM systems, give swap roughly the size of your RAM.
How to create GPT partitions with fdisk
Replace /dev/sdX with your actual disk (e.g., /dev/sda or /dev/nvme0n1).
fdisk /dev/sdXInside fdisk:
- Press
gto create a new GPT partition table - Press
nfor new partition, accept defaults, set size to+512M, then change type withtto EFI System (code 1) - Press
nagain for swap, size+4G, type Linux swap (code 19) - Press
nfor root, accept all defaults to use the rest of the disk - Press
wto write changes
Run lsblk again to verify the new layout looks right.
ext4 vs btrfs for Arch Linux installs
Ext4 is boring, stable, and bulletproof. It's what I use on servers. Btrfs gives you snapshots and subvolumes — great for desktops where you might want to roll back after a bad update. If you're new to Arch, start with ext4. You can always reinstall with btrfs later when you actually need snapshots. Curious about how filesystems and volume managers compare?
Our piece on LVM vs ZFS covers the broader storage landscape.
Format and mount partitions in Arch Linux
Now that partitions exist, format them. Assuming partition 1 is EFI, 2 is swap, and 3 is root:
mkfs.fat -F32 /dev/sdX1
mkswap /dev/sdX2
swapon /dev/sdX2
mkfs.ext4 /dev/sdX3
For NVMe drives, partitions look like /dev/nvme0n1p1, not /dev/nvme0n11. Watch the naming.
How to format the EFI partition
EFI must be FAT32. The mkfs.fat -F32 command above handles it. Don't format an existing EFI partition if you're dual-booting — you'll wipe the Windows boot files and ruin your day.
How to format the root partition
If you went with btrfs instead, swap the last command for mkfs.btrfs /dev/sdX3. Either way, this is the partition Arch will actually live on.
How to enable and verify swap
The swapon command above activates the swap partition immediately. Check it worked:
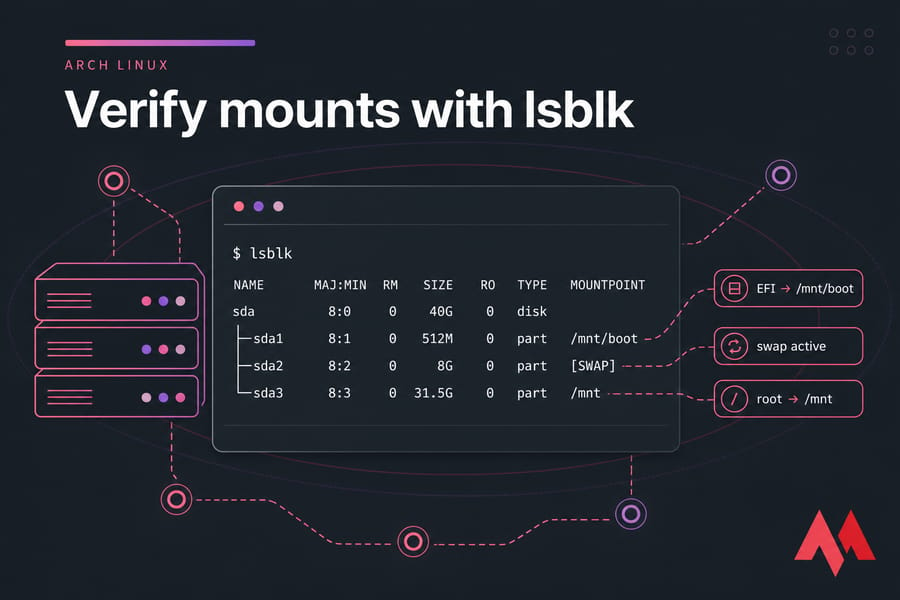
free -hYou should see swap with a non-zero total. Now mount everything. Root goes to /mnt, EFI goes to /mnt/boot:
mount /dev/sdX3 /mnt
mkdir -p /mnt/boot
mount /dev/sdX1 /mnt/boot
Verify with lsblk — you should see mount points listed next to your partitions.
If you need to check disk usage later, our quick reference on checking disk space in Linux covers the essentials.
Install Arch Linux with pacstrap
This is the moment the install actually starts. Optional but worth it: refresh the mirror list so you pull from fast servers near you. The installer ships with reflector already enabled, so you can usually skip this step.
Now run pacstrap to install the base system plus a handful of essentials. Skipping these now means painful first-boot fixes later — trust me, I've been there.
pacstrap /mnt base linux linux-firmware networkmanager sudo nano vim grub efibootmgrHere's why each one matters:
- base — the minimal Arch system
- linux — the kernel (use
linux-ltsfor long-term support) - linux-firmware — drivers for Wi-Fi cards, GPUs, etc.
- networkmanager — so you have internet after first boot
- sudo — non-root privilege escalation
- nano / vim — pick one editor; you'll need it. If you're unsure, our breakdown of nano vs vim vs emacs helps
- grub / efibootmgr — for the bootloader (skip if you're going with systemd-boot)
Download takes a few minutes. Once done, generate the filesystem table:
genfstab -U /mnt >> /mnt/etc/fstabOpen /mnt/etc/fstab in nano and confirm it lists your partitions correctly. UUIDs should match. If something looks off, fix it now — a broken fstab means the next boot fails.
Now drop into the new system:
arch-chroot /mntThe prompt changes. You're now operating inside the new Arch install, not the live ISO.
Configure timezone locale hostname and users in Arch Linux
Inside the chroot, five things make the install bootable and usable: timezone, locale, hostname, root password, and a regular user. Knock them out one at a time.
Set timezone and hardware clock
ln -sf /usr/share/zoneinfo/Region/City /etc/localtime
hwclock --systohc
Replace Region/City with yours — e.g., America/New_York, Europe/London, Asia/Tokyo. List options with ls /usr/share/zoneinfo.
Generate locale and language settings
Open /etc/locale.gen with nano and uncomment your locale — usually en_US.UTF-8 UTF-8. Save, then run:
locale-gen
echo "LANG=en_US.UTF-8" > /etc/locale.conf
Set hostname hosts file and root password
echo "myarchbox" > /etc/hostnameThen create /etc/hosts with these three lines:
127.0.0.1   localhost
::1         localhost
127.0.1.1   myarchbox.localdomain myarchbox
If you want to change the hostname later, our guide on changing hostnames in Linux walks through it without a reboot.
Set the root password:
passwdCreate a sudo user and enable wheel access
Don't log in as root day-to-day. Make a normal user:
useradd -m -G wheel -s /bin/bash yourusername
passwd yourusername
The -G wheel adds them to the wheel group, which we'll grant sudo. Edit sudoers safely with visudo:
EDITOR=nano visudoFind this line and uncomment it (remove the #):
%wheel ALL=(ALL:ALL) ALLSave and exit. For more on user management, see creating users in Linux, and on privilege escalation our sudo guide.
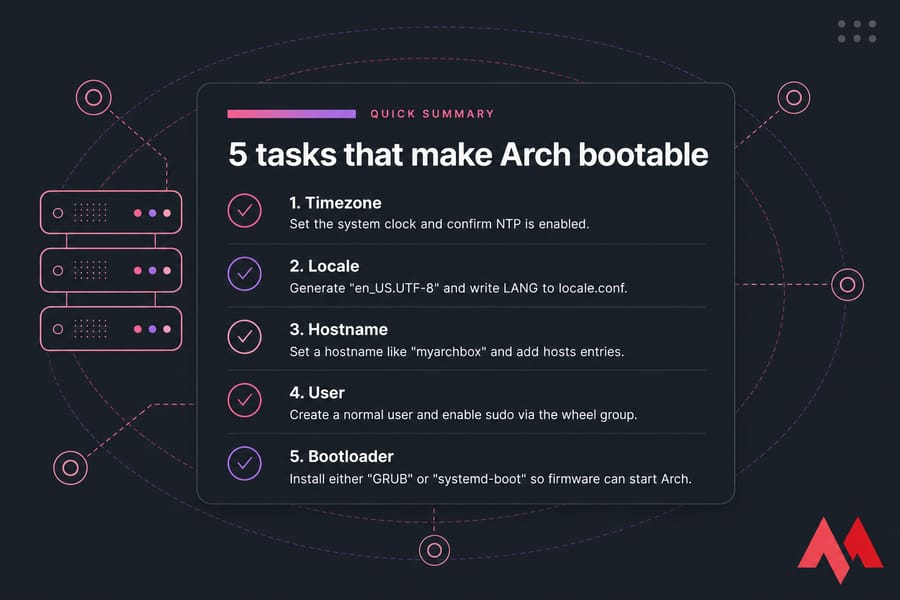
Arch Linux bootloader setup with GRUB or systemd-boot
Without a bootloader, your firmware has nothing to hand control off to. Arch supports several, but you really only need to pick one of two: GRUB or systemd-boot. Choose one, follow it through, don't mix steps.
| Option | Best for | Pros | Cons |
|---|---|---|---|
| GRUB | Multi-boot, dual-boot with Windows, BIOS/UEFI mix | Flexible, ubiquitous, well-documented | More complex, more files, slower boot |
| systemd-boot | Single-boot UEFI systems | Simple, fast, fewer moving parts | UEFI only, less flexible for multi-OS |
When to choose GRUB
If Windows lives on the same disk, or you might add other Linux distros, pick GRUB. It handles complexity gracefully.
How to install GRUB on UEFI systems
You already installed grub and efibootmgr with pacstrap. Now:
grub-install --target=x86_64-efi --efi-directory=/boot --bootloader-id=GRUB
grub-mkconfig -o /boot/grub/grub.cfg
If both commands finish without errors, GRUB is installed. The grub-mkconfig output should mention finding your Linux kernel and initramfs.
How to install systemd-boot instead
Skip this if you went with GRUB. For systemd-boot:
bootctl --path=/boot installCreate /boot/loader/loader.conf:
default arch.conf
timeout 3
console-mode max
editor no
Create /boot/loader/entries/arch.conf:
title   Arch Linux
linux   /vmlinuz-linux
initrd  /initramfs-linux.img
options root=UUID=YOUR_ROOT_UUID rw
Get the root UUID with blkid /dev/sdX3 and paste it in. Typos here equal a non-booting system — proofread.
Final reboot checklist before first boot
Before exiting the chroot, enable NetworkManager so you actually have internet on first boot:
systemctl enable NetworkManagerThen exit, unmount, and reboot:
exit
umount -R /mnt
reboot
Pull the USB stick (or detach the ISO from your VM) before the system comes back up. Otherwise it'll boot the live environment again and you'll wonder what went wrong.
For a refresher on shutdown options, see how to reboot Linux.
Test Arch Linux safely on a VPS
Want to practice the install without risking your laptop or desktop? Spin up a Linux VPS with full root access and run through the steps in an isolated environment. If anything breaks, you wipe and redeploy in minutes — no recovery USB, no lost data.
Arch Linux post-install steps for a usable system
Welcome to your new system. Log in as your regular user. The first thing you'll notice is that there's no desktop, no taskbar, just a login prompt. That's normal. You build up from here.
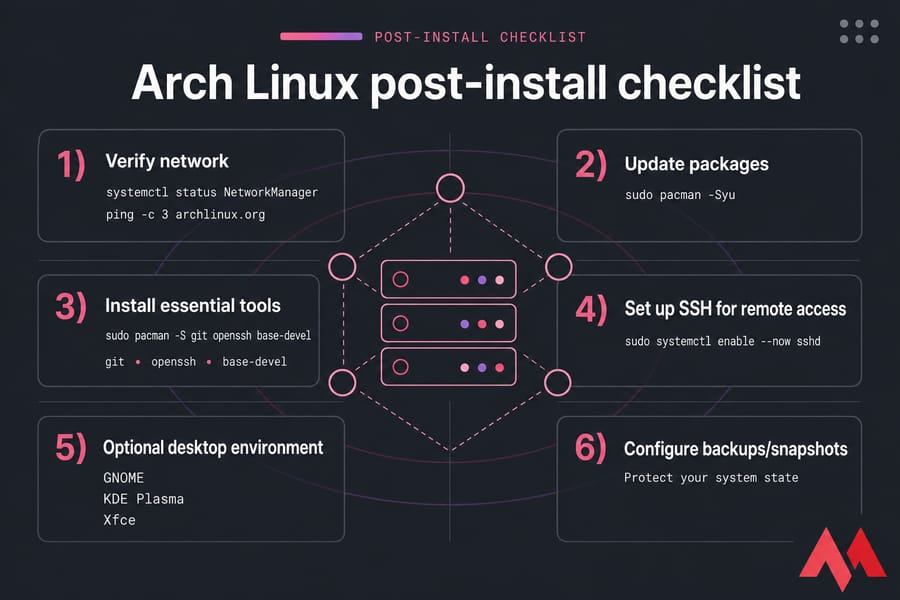
Install NetworkManager and enable networking
If you enabled NetworkManager before reboot, networking should be live. Confirm:
systemctl status NetworkManager
ping -c 3 archlinux.org
For Wi-Fi, use nmtui — it's a friendly text UI for managing connections.
To check your kernel version after first boot, see how to check your kernel version.
Update packages and install essential tools
sudo pacman -Syu
sudo pacman -S git openssh base-devel
The -Syu flag syncs the package database and upgrades everything. Run it regularly — that's the rolling release lifestyle.
Optional desktop environment and SSH setup
Want a graphical desktop? Pick one:
- GNOME —
sudo pacman -S gnome gnome-extrathensudo systemctl enable gdm - KDE Plasma —
sudo pacman -S plasma kde-applicationsthensudo systemctl enable sddm - Xfce — lightweight, great on VMs and older hardware
For server or VPS use, enable SSH instead:
sudo systemctl enable --now sshdFrom there, lock it down. Our guide to securing a Linux server covers key-based auth, fail2ban, and firewall basics all things you should do before exposing the box to the internet.
Common Arch Linux installation errors and troubleshooting
Stuff breaks. That's installation. Here are the issues I see most often, with fast fixes.
| Problem | Likely cause | Fix |
|---|---|---|
| pacstrap fails on package download | Slow or broken mirrors | Run reflector --country YourCountry --save /etc/pacman.d/mirrorlist then retry |
| Bootloader not detected after reboot | EFI partition not mounted at /boot during install | Boot ISO, mount partitions, chroot, reinstall bootloader |
| No internet after first boot | Forgot to enable NetworkManager | sudo systemctl enable --now NetworkManager |
| System boots to UEFI shell or firmware | Boot entry missing or disk not registered | Check efibootmgr output; reinstall bootloader if entry is missing |
| fstab errors on boot | Wrong UUIDs or typos | Boot ISO, chroot, regenerate fstab with genfstab -U |
| Locale errors everywhere | Forgot to run locale-gen |
Chroot, uncomment locale, run locale-gen again |
The universal recovery trick
If anything goes wrong, you don't reinstall. You boot the Arch ISO, mount your partitions back to /mnt, and arch-chroot /mnt into the broken system to fix it. Same chroot you used during installation. Re-run the offending command, fix the typo, regenerate the bootloader — done.
mount /dev/sdX3 /mnt
mount /dev/sdX1 /mnt/boot
arch-chroot /mnt
This single workflow saves more failed Arch installs than anything else. Memorize it.
If you see permission errors during recovery, our permission denied in Linux reference will save you time.
Arch Linux vs Ubuntu and Manjaro for new users
Should you actually run Arch? Honestly, it depends on what you want from a Linux system.
| Distro | Install effort | Release model | Best for |
|---|---|---|---|
| Arch Linux | Manual, terminal-based | Rolling | Power users, learners, custom builds |
| Ubuntu | GUI installer, ~10 minutes | LTS (2 years) / regular (6 months) | Beginners, production servers, daily desktops |
| Manjaro | GUI installer, Arch base | Rolling (with delay) | People who want Arch packages without the manual install |
Is Arch Linux worth installing as a beginner
If you want to learn how Linux works under the hood, yes. If you just want a working desktop today, no. Ubuntu boots you to a desktop in 15 minutes. Arch takes an hour even when nothing breaks.
When a VPS user should choose Arch instead of Ubuntu
Mostly when you want current packages without backports, or when you're building something custom. For typical production workloads web apps, databases, mail Ubuntu VPS with LTS support is the safer pick. Arch on a server means you maintain it actively. Skip a month of updates and you'll regret it.
Launch a Linux VPS for your next project
Whether you're testing Arch workflows, comparing distributions, or running production workloads, MonoVM offers Linux VPS with full root access, fast NVMe storage, and global datacenter locations. Spin up an environment in minutes, experiment freely, and tear it down when you're done. For users who want Arch-style flexibility with KVM virtualization, our KVM VPS plans support custom ISOs so you can install Arch directly. And if you need something more predictable for production, the Ubuntu VPS route gives you LTS stability without the manual setup overhead.

An experienced tech and developer blog writer, specializing in VPS hosting and server technologies. Fueled by a passion for innovation, I break down complex technical concepts into digestible content, simplifying tech for everyone.