![How to Create User in Linux [Linux Create User Command]](/wp-content/uploads/2021/03/cover265-main.webp)
As you know, Linux is a system where multiple people can interact with one system simultaneously. To reach this objective, you can use useradd command in Linux. This command’s primary aim is to Create User in Linux.
If you are a system administrator, you have the authority to manage users and the groups of the system. You can create or remove the users as well. Here, we are going to talk about creating several new accounts with the use of the Linux useradd command. Along with that, you will see many more functions.
Let’s begin!
How to Create User in Linux? [useradd Command]
The useradd Command
Here is the general syntax to begin with useradd command, which is Linux Create User Command:
sudo useradd test_user

The useradd command here creates a new account. It runs according to some of the default values mentioned in the /etc/default/useradd file.
Along with this, the command also runs through the /etc/login.defs file. This file imbibes certain information like the range of user IDs, password expiration policies, and much more.
To log in as a new user, you must set the user password first. How do you do that?
Simply write this command:
passwd username
After you execute this command, you need to enter the details. Always set a secure password with alphanumerics.
Output:
Changing password for user username.
New password:
Retype new password:
passwd: all authentication tokens updated successfully.
Now, have a look at the list of commands to fulfill several other requirements.
How to create user Linux with a specific home directory?
The useradd command automatically creates a home directory of the user in /home. If you want to change the location, use -d option.
Now, look at the following command to create a user having /opt/username as the home directory.
sudo useradd -d /home/test_user test_user

How to creating users in Linux with a specific group ID?
When we talk about groups in Linux, they are primarily used in the administration and the usage of several user accounts.
Groups generally define certain privileges. For instance, read, write, and execute permissions. These permissions are given to a particular resource to be shared among other users.
The useradd command automatically creates a group with the name as that of the username. With the exact copy of the GID as that of the UID.
Now, -g (- -gid) helps create a user with a certain login group. You have to mention the GID number or the group name.
useradd -g 1000 test_user

How to create users in Linux with a specific user ID?
As you know, the users are known by their respective UID and username.
When we talk about a User Identifier, UID, it is simply a positive integer that is allocated to every user in the Linux system. It helps to understand the different types of actions that a user can perform on the system.
In the login.defs file, a range of user IDs is mentioned. The system automatically allocates the available user identifier from this range.
To execute the command, use the following syntax:
useradd -u 1234 test_user

If you further want the verification of the user UID, type this:
id -u username
Output:
1234
How to add a user in Linux and assign multiple groups?
The Linux operating system inhibits two kinds of groups. Primary group and secondary group. The secondary group is also called a supplementary group.
Every user can be assigned to only one primary group. Whereas in the case of secondary groups, the number is either zero or more.
Look at the below-stated command mentioning the primary group ‘users’ and secondary group ‘wheel’ and ‘docker.’
sudo useradd -g users -G wheel,developers username
If you want to check the user groups, type the following command:
id username
Output:
uid=1002(username) gid=100(users) groups=100(users),10(wheel),993(docker)
How to create a new user Linux with a changed login shell?
For your information, a new user’s login shell is always set according to the one depicted in /etc/default/useradd file.
You will notice that in some cases, the default shell is /bin/sh, whereas, in others, it is specified in /bin/bash.
If you want to mention the login shell of a new user, kindly use -s (- -shell) option.
Now here is a syntax to create a user we change the login shell:
-s /bin/sh test_user

How to make user in Linux with an expiry date?
There are certain times when you would want to know the expiry date of the user accounts. To do that, use the following option: -e (- - expiredate). You can also create temporary accounts with this option.
Here is the syntax to create a user with an expiry date:
useradd -e 2021-03-05 test_user
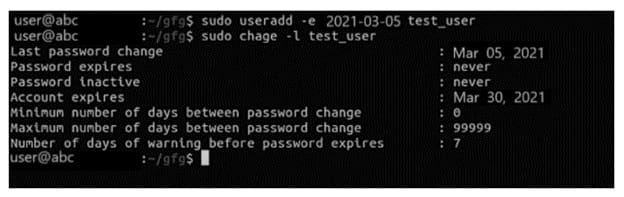
Using this command, you can create a user with an expiry date of March 30, 2021.
If you want to verify the user account expiry date, then use the following command:
sudo chage -l username
How to create a user with a comment?
In case you need to add a description for a new user, use -c (- - comment) option.
For instance,
sudo useradd -c “This is a test user” test_user

How to create a user without mentioning the home directory?
To full fill this needs, type the following command:
sudo useradd -M test_user

This command helps you to create a user without a specific home directory.
How to set an unencrypted password for the user?
To set an unencrypted password, use the following command:
sudo useradd -p test_password test_user

How to create a system user?
Particularly there is no solid technical difference between a regular user and the system user. When we talk about system users, they have created while installing the operating system.
To create a system user account, use the -r (- - system) option.
Syntax:
sudo useradd -r username
For your information, the system users do not have an expiry date.
How to change the default useradd values?
You can do that using -D, (- - defaults option).
Manually, just edit the values in /etc/default/useradd file.
Use the following command to view the default option type:
useradd -D
Output:
GROUP=100
HOME=/home
INACTIVE=-1
EXPIRE=
SHELL=/bin/sh
SKEL=/etc/skel
CREATE_MAIL_SPOOL=no
How to display help?
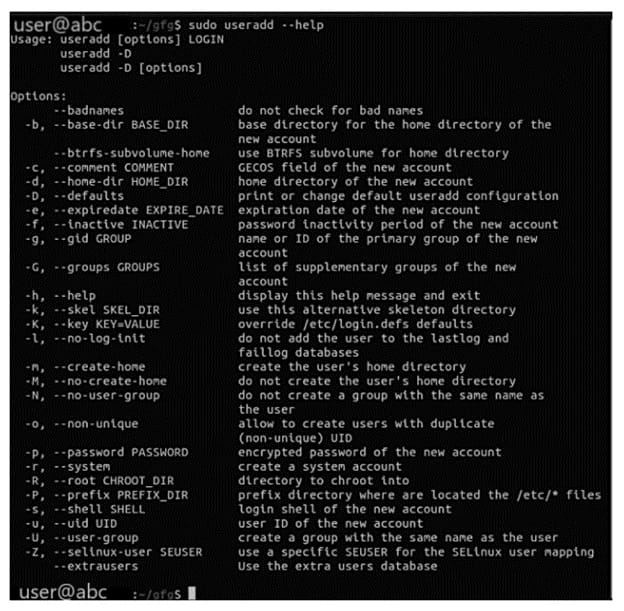
Using the following command, you can retrieve the help section of useradd command.
sudo useradd --help
Conclusion
We have presented information about using useradd command in Linux to create several user accounts. The above-stated article showcases numerous ways to make your working easier in the Linux system.
We hope the information adds value to your knowledge and widens your horizons.
People are also reading:
