List of content you will read in this article:
If you’re on to Linux, you must’ve heard about the Sudo command. But the real question is, are you aware of what a Sudo command is and how you can use it on Linux distros like Debian, CentOS, and FreeBSD? Fret not if you don’t because you’re not alone, only a few people have a clear picture of the Sudo command.
In Linux, there are two ways to run administrative applications. One can either go with su command login as administrator or super user (root), else they can take advantage of sudo.
Sudo or SuperUser DO is a command that runs applications that require elevated privileges and is widely helpful in running restricted files and operations. It allows users to complete sensitive tasks without logging in as the root user.
The blog will walk you through the steps required to use Sudo on Debian, CentOS, and FreeBSD along with all the necessary details you need to know about the same.
What is Sudo?
As defined on the official website of Sudo:
Sudo allows a system administrator to delegate authority by giving certain users the ability to run some commands as root or another user while providing an audit trail of the commands and their arguments.
Sudo command is typically used as a prefix of some command that only administrators or super users are allowed to run. By adding the prefix “sudo” with any command, it will start running with elevated privileges, or we can say that the person can run with the proper permissions to execute a command as another user, such as the superuser.
This option in Linux allows users to make multiple administrators and is equivalent to the “run as administrator” option in Windows. However, the users who can use the sudo command need to have themselves listed in the sudoers file located at “/etc/sudoers”.
Also, users have to use the sudo command if they want to edit or view the sudoers file. then you have to use the sudo command. To edit the sudoers file it is recommended to use the “visudo” command. By default, users have to authenticate themselves with a user password, which is not the root password itself.
The Sudoers File
The configuration of Sudo files is done through a file which is located in /etc/, that file is known as the sudoers file. Its syntax is: vi /etc/sudoers.
You can give administrator-level privileges to regular users by adding them here. Also, you can configure other users as well to run the sudo command through editing the sudoers file.
However, editing these files should be done carefully. Even the slightest of errors or bad syntax can result in locking out every user on your distribution.
Syntax
To get started with sudo, you have to use the following syntax:
sudo [command]
Right after running the Sudo command, a timestamp will be automatically entered. Thus, a user can only run commands with elevated privileges for the selected time, it is 15 minutes by default. You can use this command with some extra options as well:
- -h - help. It displays command options.
- -l - list. It lists down the user’s privileges or verifies a specific command.
- -V - version. Presents the current version of the sudo application.
- -k - kill. Use to end the current sudo privileges.
- -v - validate. It refreshes the time limit.
People often get confused between the Sudo command and su command because of their kind-of similar functioning, but there are differences.
How Sudo is different from the su command (sudo vs su)
The su command is used to gain root privileges. You can even use this command to log in as the root (root’s home becomes your home). The su command allows you to become another user by logging in.
However, with the sudo command, an individual doesn’t have to log in as a root user. Therefore, no one is allowed to become the root user. Instead, it enables users to issue and run commands and gain administrative privileges instead of logging in completely.
Steps to use Sudo on Debian, CentOS, and FreeBSD
The following step-by-step guide will cover all the basic steps required to create a sudo user, set up the sudo group, and use the sudo command on Linux distributions, namely Debian, CentOS, and FreeBSD.
Before proceeding, make sure you have a text editor installed on your Linux server whether it be nano, vim, vi, or emacs.
Step 1: Installation
Debian
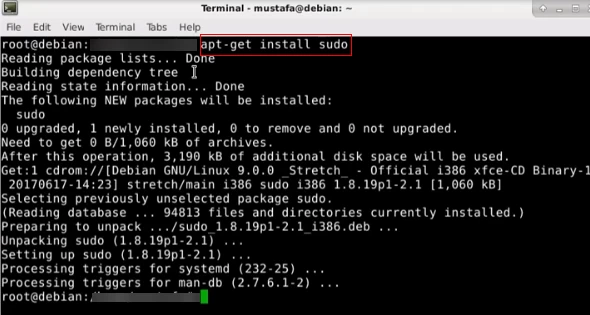
To Install Sudo on Debian, you have to use: “apt-get install sudo -y”
CentOS
Similarly, for CentOS, you have to write: “yum install sudo -y”
FreeBSD
Place the text “cd /usr/ports/security/sudo/ && make install clean” or “pkg install sudo” to run sudo on FreeBSD.
Step 2: Adding a Sudo user
To add a Sudo user, you have to use “adduser mynewusername” for all the 3 distros i.e. Debian, CentOS, and FreeBSD.
Note: A sudo user is a normal account on Linux.

Step 3: Verifying sudoers file
Ensure that your sudoers file is located at /etc/sudoers to allow sudo users to effectively execute the commands. For this, we have to view the contents of /etc/sudoers and edit them if required.
For all 3 Linux distros, you can run the “visudo” command to open “/etc/sudoers” using the default text editor.
To verify, start from “# Allow members of group sudo to execute and command” and edit below this line as per the need.
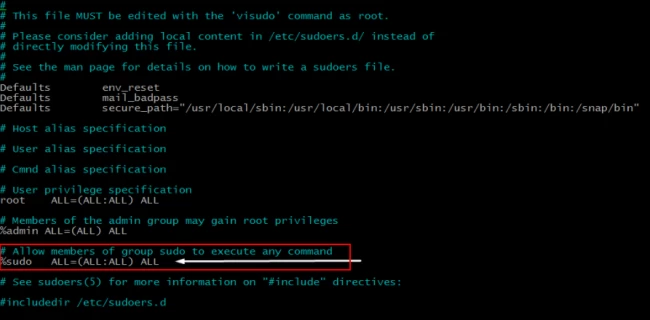
If the line starting with %sudo is not prefixed by #, then it means that sudo is already enabled. In this case, you can skip this step and move to the next one.
Step 4: Allowing an outside user to execute the command
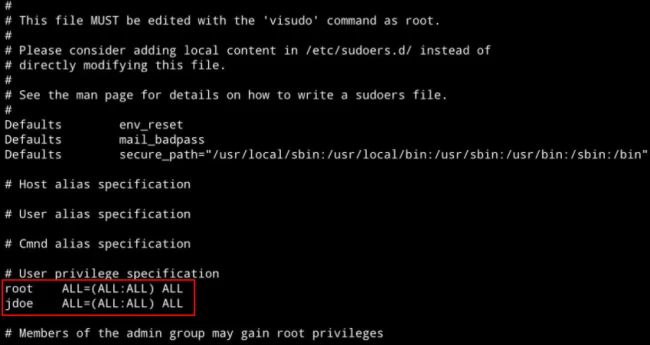
You can enable a user who doesn’t belong to the sudo group to run sudo commands. To achieve this, you have to simply add the same to “/etc/sudoers” through the following text:
username ALL=(ALL) ALL
Step 5: Applying the changes
To apply the changes made to the sudoers file, you need to restart the SSHD server by placing the following text on Debian, CentOS 6, and FreeBSD.
/etc/init.d/sshd restart
However, if you’re using CentOS 7, you have to use “systemctl restart sshd.service”
Step 6: Test
It is necessary to test whether or not you’ve executed the correct commands. Right after restarting your SSHD server, you have to logout then login as a sudo user. After this, you have to run few commands:
- sudo uptime
- sudo whoami
Moreover, commands like “sudo su -”, “sudo -i”, and “sudo -S” can make ‘sudo users’ become ‘root’.
Disabling the Direct Root Access
Since sudo users can run administrative commands without logging in as an administrator, it is suggested to disable the root access.
The first step is to open “/etc/ssh/sshd_config”

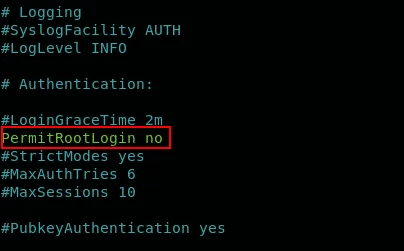
Right after entering, you have to find the string which contains the text “PermitRootLogin” prefixed with #.
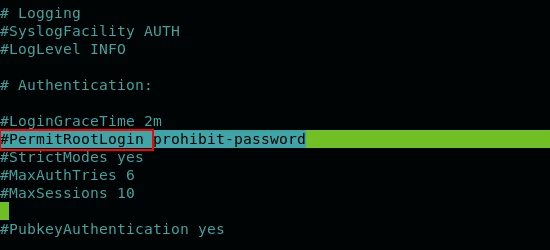
Change this text with “PermitRootLogin no” to disable the root access.
Conclusion
The blog must’ve helped you know - more - about the Sudo command and its dynamics along with clear and precise knowledge on how to use the same on Debian, CentOS, and FreeBSD. Now you also know the difference between the sudo command and the su command.
Drop your questions or suggestions in the comments section below.
