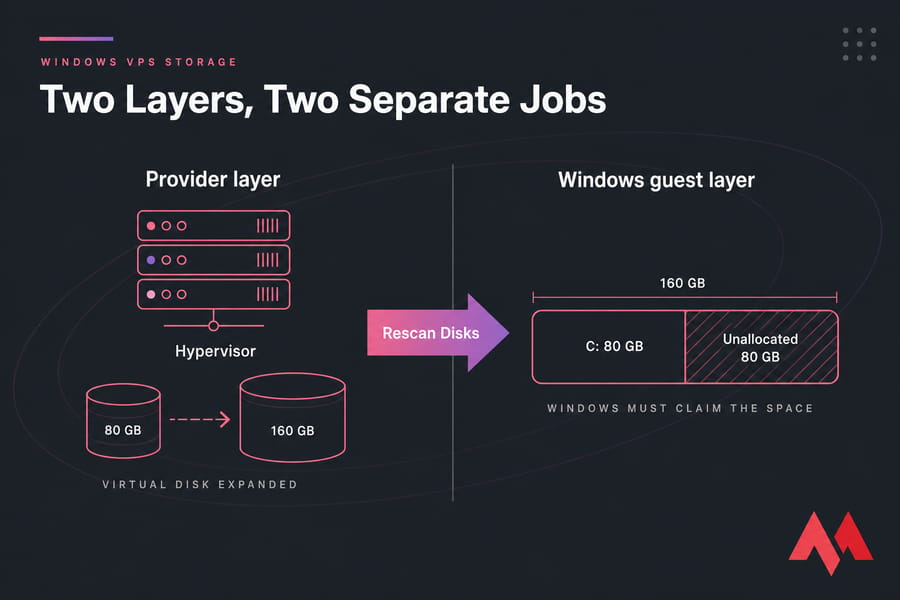
Here's the thing most people miss when they try to resize disk and add storage on a Windows VPS: there are two layers involved, and paying for extra capacity only touches the first one. The hosting platform allocates the virtual disk. Windows then has to claim that space.
Two Layers, Two Separate Jobs
So if you upgraded your plan and C: still shows 80 GB, nothing is broken. Windows just hasn't been told to grow.
Quick definitions, because precision matters here:
- Disk — the virtual storage device the hypervisor presents to Windows (Disk 0, Disk 1).
- Partition — a defined region on that disk.
- Volume — a formatted partition with a drive letter, like C: or D:.
- Filesystem — NTFS or ReFS, the structure holding your files.
Expand C: or attach a new disk?
Decide this before you click anything. An attached second disk will never make C: bigger — it shows up as D:, and that's a different thing entirely.
| Requirement | Expand existing disk | Add new disk |
|---|---|---|
| C: is running out of room | Best fit | Only if you move data |
| Separate OS from app data | Limited | Best fit |
| Keep existing file paths intact | Best fit | Needs new paths |
| Isolate SQL data, logs, or backups | No | Best fit |
| Partition layout blocks extension | Not always possible | Usually easier |
My rule of thumb: expand C: when Windows and installed applications are cramped. Add a data disk for databases, backup repositories, media, or anything that grows unpredictably. If you're new to this platform, the guide on how to set up a Windows VPS covers the groundwork.
Back Up First. Seriously.
Extending a volume into valid unallocated space is designed to preserve data. "Designed to" is not the same as "guaranteed to." Take a snapshot or a full backup, and verify it's restorable — an unverified backup is just a hope.
Read up on how to back up your server or VPS before you touch the partition table, and check the Windows Server backup and restore options if you're running Server 2019 or later.
Then record your current layout. Open PowerShell as Administrator (here's how to run PowerShell as Administrator if the prompt keeps refusing commands) and save this output somewhere:
Get-Disk | Format-Table Number, FriendlyName, PartitionStyle, OperationalStatus, Size
Get-Partition | Format-Table DiskNumber, PartitionNumber, DriveLetter, Size, Type
Get-Volume | Format-Table DriveLetter, FileSystem, HealthStatus, Size, SizeRemaining
Get-BitLockerVolume
If BitLocker isn't in use, that last command returns nothing useful — fine. If it is enabled, know your recovery key location before proceeding. Also pause or account for write-heavy services: SQL Server, IIS logging, backup agents. And schedule a maintenance window even if your provider supports online expansion. Reboot requirements depend on the hypervisor, the virtual controller, and guest drivers, so nobody can honestly promise zero downtime.
Allocate the Storage at the Provider Level
Windows can't use capacity that doesn't exist yet. The workflow is provider-neutral:
- Sign in to your hosting account and select the Windows VPS.
- Open the upgrade, resize, or storage settings for that server.
- Increase the existing disk allocation, or order additional block storage.
- Check the pricing and — importantly — whether the change can be reversed.
- Wait for the operation to report completion.
- Reboot only if the provider says it's required.
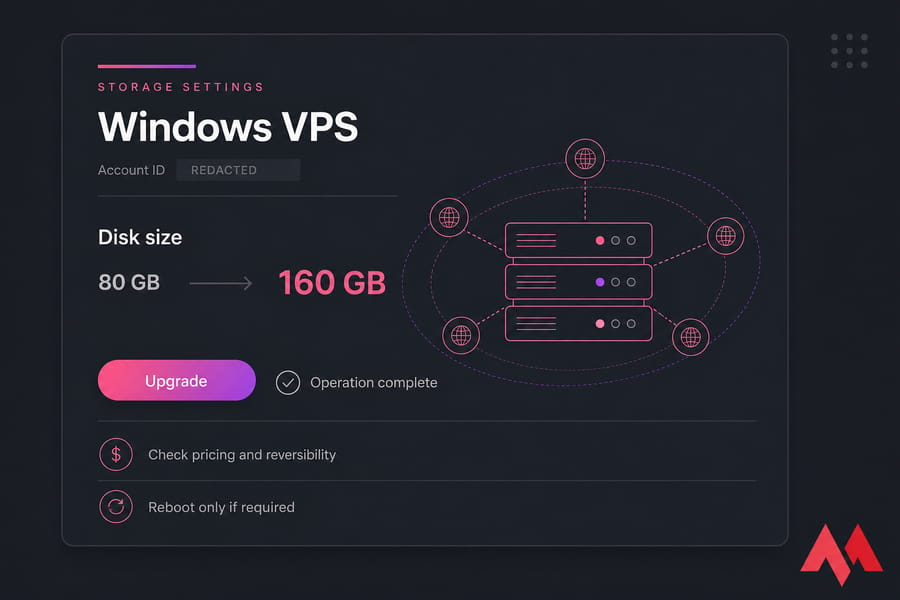
Once that finishes, connect over RDP (see how to connect to your VPS if RDP is misbehaving) and make Windows look again. Open Disk Management and choose Action > Rescan Disks, or run Update-HostStorageCache in PowerShell. If Disk 0 still reports the old size after a rescan and an approved reboot, stop here and contact MonoVM support — don't start reshuffling partitions to compensate.
Extend the Volume with Disk Management
Press Win + R, type diskmgmt.msc, hit Enter. You can also reach it via Server Manager → Tools → Computer Management.
In our running example, Disk 0 went from 80 GB to 160 GB. Windows now shows an 80 GB C: partition followed by 80 GB of unallocated space sitting immediately to the right of it. That adjacency is the whole game.
- Run Action > Rescan Disks.
- Identify the correct disk by number and total size, not just by drive letter.
- Confirm the unallocated block is directly right of the target volume.
- Right-click the volume → Extend Volume.
- Accept the maximum available size (81,920 MB here) unless you're deliberately reserving space.
- Finish the wizard and confirm the volume reads 160 GB and Healthy.
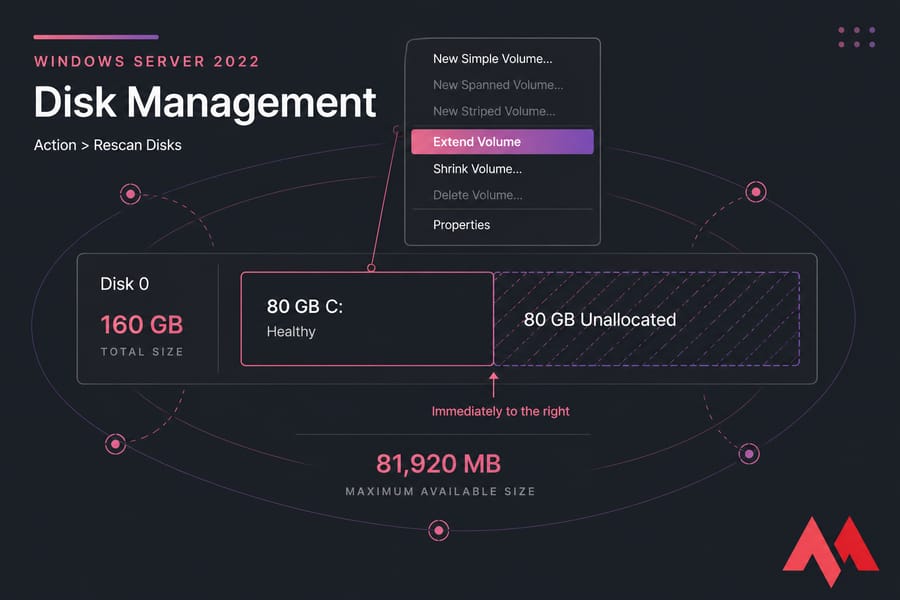
Same procedure works for eligible data volumes. What Disk Management can't do is move partitions, so non-adjacent free space is a dead end here.
Resize a Partition with PowerShell or DiskPart
For Server Core, scripting, or fleets of VMs, commands beat clicking. Always identify before you modify:
Update-HostStorageCache
Get-Disk
Get-Partition -DiskNumber 0
Get-Volume
Then use the drive-letter pattern instead of hardcoded numbers — safer, and it survives copy-paste:
$partition = Get-Partition -DriveLetter C
$size = Get-PartitionSupportedSize -DiskNumber $partition.DiskNumber -PartitionNumber $partition.PartitionNumber
Resize-Partition -DiskNumber $partition.DiskNumber -PartitionNumber $partition.PartitionNumber -Size $size.SizeMax
Get-Volume -DriveLetter C
If Get-PartitionSupportedSize returns a SizeMax equal to the current size, there's no adjacent space to claim. That's your diagnostic right there.
DiskPart still works fine if you prefer it:
diskpart
list disk
select disk 0
list volume
select volume C
extend
exit
Every disk and partition number in this article is an example. Verify yours. Never run clean during an extension workflow — it wipes the partition table.
Add and Initialize a New Disk
Attached a second virtual disk instead? Different procedure. Rescan, find the disk by its expected size (a new 200 GB Disk 1, say), then:
- If it shows Offline, confirm it's genuinely the new empty disk, then bring it online.
- Right-click the Unknown / Not Initialized label → Initialize Disk.
- Choose GPT. Pick MBR only for a documented legacy reason.
- Right-click the unallocated region → New Simple Volume.
- Set size, drive letter (D:), NTFS, and a meaningful label like
AppDataorSQLData.
Or in one shot:
Initialize-Disk -Number 1 -PartitionStyle GPT
New-Partition -DiskNumber 1 -UseMaximumSize -DriveLetter D | Format-Volume -FileSystem NTFS -NewFileSystemLabel "AppData" -Confirm:$false
Get-Volume -DriveLetter D
Don't initialize every RAW disk you see — a RAW disk that should contain data needs recovery, not formatting. Also verify service-account permissions on the new volume before you relocate application data. If capacity is the whole point (backups, archives, big datasets), storage VPS hosting is usually cheaper per GB than repeatedly inflating a system disk.
MBR, GPT, NTFS, and ReFS
| Feature | GPT | MBR |
|---|---|---|
| New VPS data disks | Recommended | Usually no |
| Beyond 2 TiB | Yes | Not in common 512-byte configurations |
| UEFI boot | Yes | Legacy only |
| Partition metadata | Redundant copies | Single structure |
If your disk caps out around 2 TB, that's the MBR partition table, not the filesystem. MBR2GPT targets qualifying system disks and isn't a universal converter — plan it separately with a verified backup. More detail in the MBR vs GPT partition schemes breakdown.
NTFS for anything bootable and for broad application compatibility. ReFS suits resilience-focused data volumes, but edition and workload caveats apply — check your specific Windows Server version. And please don't convert to a dynamic disk just to dodge a layout problem; you'll trade one headache for a portability and recovery mess.
When Extend Volume Is Greyed Out
| Symptom | Likely cause | Safe first action |
|---|---|---|
| Disk still shows old size | Provider op incomplete or no rescan | Check provider status, rescan, reboot if required |
| Space shows as unallocated | No volume has claimed it | Extend the adjacent volume |
| Extend Volume disabled | Space not adjacent, or unsupported layout | Inspect partition order |
| New disk missing | Not attached, or stale scan | Confirm attachment, rescan |
| Disk offline or read-only | SAN policy or provider state | Verify identity first, then change state |
| Capacity stalls near 2 TB | MBR limit | Plan a supported GPT migration |
| Volume shows RAW | Missing or damaged filesystem | Stop — do not format if data is expected |
The classic blocker is layout order: C: → recovery partition → unallocated space. Disk Management can't jump over that recovery partition, and deleting it casually is not the fix I'd recommend. Attach a data disk instead, or run a planned partition migration from a verified backup.
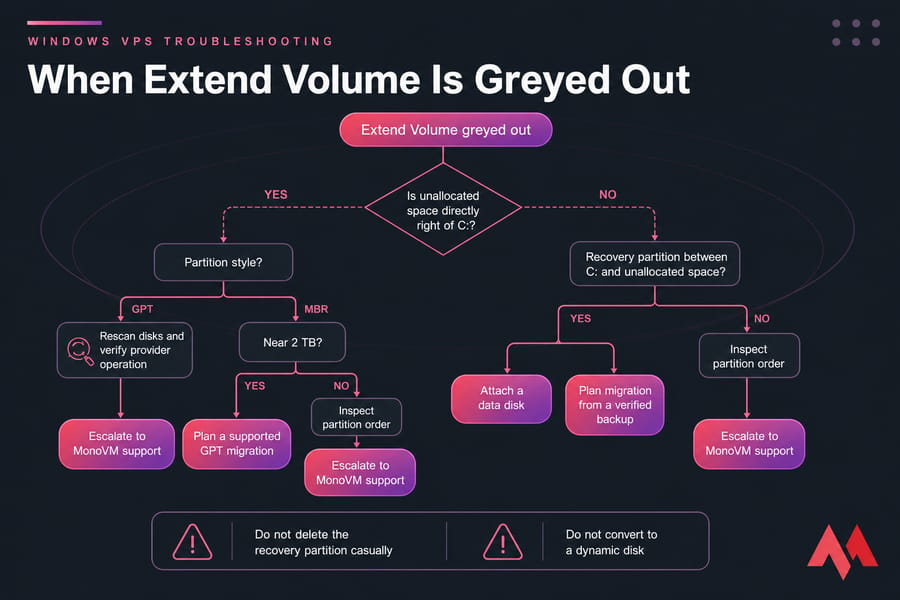
Stop and escalate if the VPS won't boot, a disk appears RAW but should hold data, BitLocker recovery triggers, or the provider reports a failed storage operation.
Verify, Then Monitor
Check File Explorer, confirm Disk Management shows Healthy, then run:
Get-Volume | Select-Object DriveLetter, FileSystem, HealthStatus,
    @{Name="SizeGB";Expression={[math]::Round($_.Size/1GB,2)}},
    @{Name="FreeGB";Expression={[math]::Round($_.SizeRemaining/1GB,2)}}
Repair-Volume -DriveLetter C -Scan is an optional read-only check — not a mandatory step. Test application paths, update backup jobs to include the new volume, and set alerts: warning below 20% free, critical below 10%. Adjust for your workload. Pick from these VPS monitoring tools so you're not doing this again at 2 a.m.
One caveat worth repeating: more space doesn't mean more speed. If the bottleneck is latency, look at troubleshoot a slow VPS or move to NVMe VPS hosting rather than just buying gigabytes.
Need headroom your current plan can't give you? Explore Windows VPS hosting plans with full administrator access and scalable storage.

An experienced tech and developer blog writer, specializing in VPS hosting and server technologies. Fueled by a passion for innovation, I break down complex technical concepts into digestible content, simplifying tech for everyone.