
To set up a virtual machine, install virtualization software such as VirtualBox, VMware, or Hyper-V, create a new VM, assign CPU, RAM, and storage, attach an operating system ISO, configure networking, and start the VM to install the guest OS. Then install guest tools for better performance and usability.
If you're looking for how to set up a virtual machine without getting stuck in BIOS menus, ISO errors, or sluggish performance, you're in the right place. I'll keep this practical. You’ll see what you need, which hypervisor makes sense, the exact setup flow, and when a local VM is fine or when a hosted server is the smarter move.
If you need background first, MonoVM also has a good explainer on what is a virtual machine.
Virtual machine requirements before you start
A VM runs a guest operating system inside your existing host OS. So if your laptop runs Windows and you create an Ubuntu VM, Windows is the host and Ubuntu is the guest. Simple idea. The setup fails, though, when the host doesn’t have enough resources or hardware virtualization is turned off.
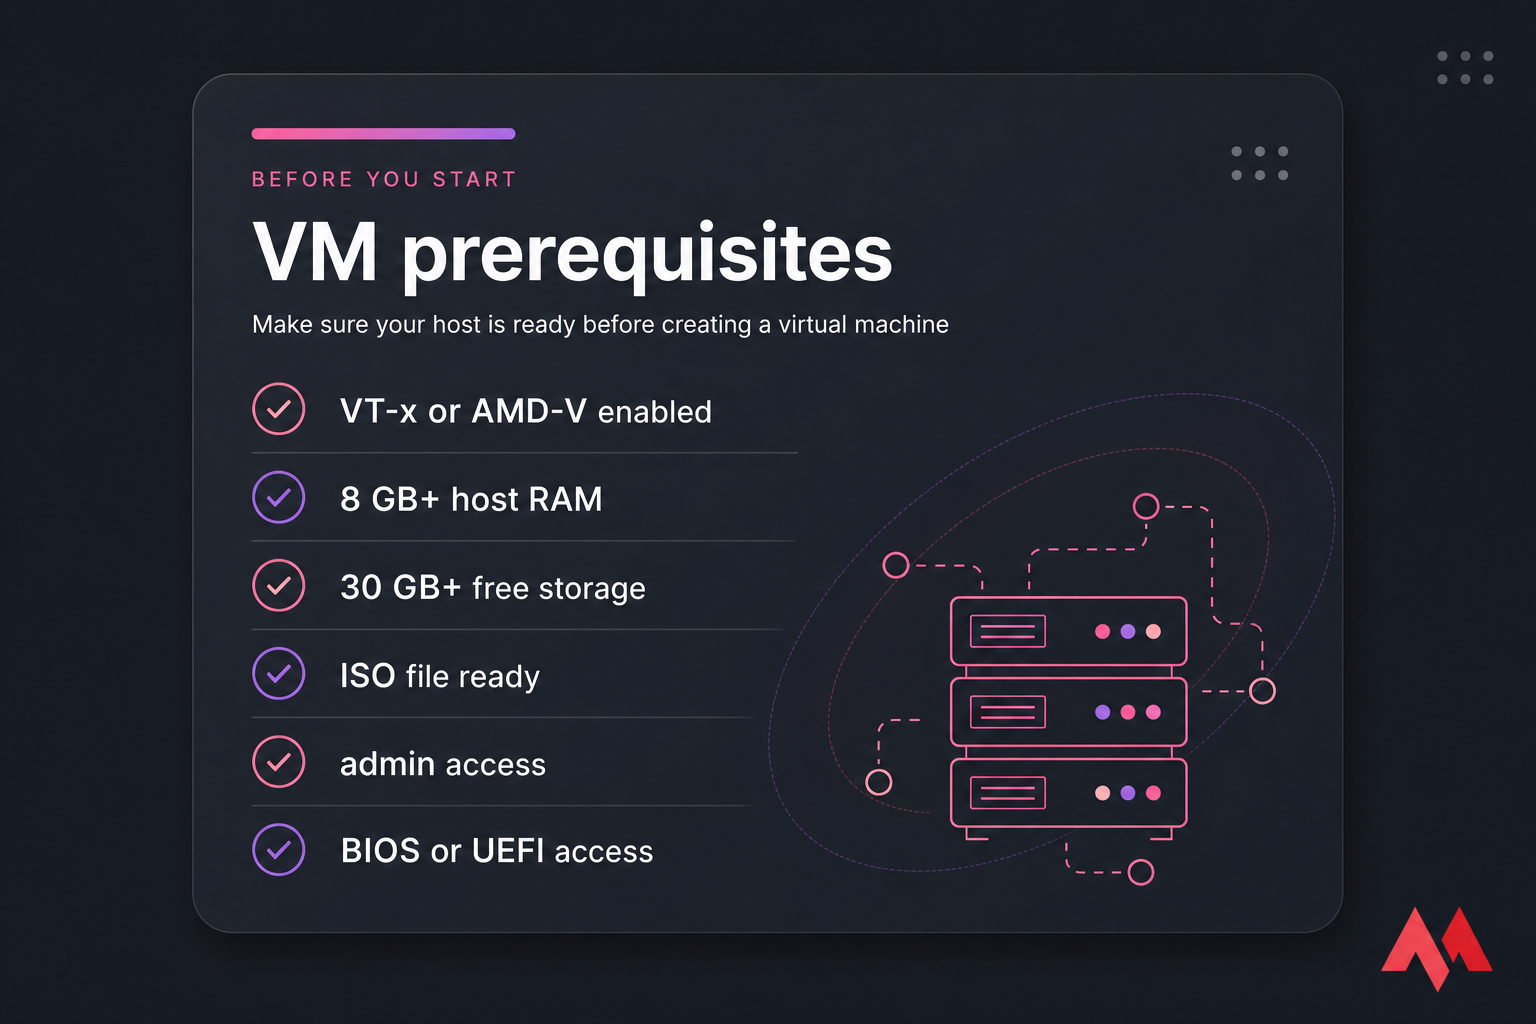
Check whether your CPU supports VT-x or AMD-V
Your processor should support Intel VT-x or AMD-V. Most modern CPUs do, but support alone isn’t enough — it also needs to be enabled. On Windows, you can check Task Manager under Performance > CPU and look for virtualization status. On Linux, commands like lscpu help. On macOS, the answer depends more on the platform and hypervisor you’re using.
Enable virtualization in BIOS or UEFI
If virtualization is disabled, VirtualBox or VMware may throw errors, or the guest OS will crawl. Reboot, enter BIOS or UEFI firmware, and look for settings named Intel Virtualization Technology, VT-x, SVM, or AMD-V. Save changes, reboot, and check again. Most beginners skip this, honestly, then wonder why the VM won’t start.
Download the guest OS ISO and verify storage space
You’ll also need an ISO image for the guest OS — Windows, Ubuntu, Debian, Fedora, whatever you plan to install. Get it from the official source when possible. For disk space, I’d treat these as safe starting points:
- Ubuntu: 4 GB RAM recommended for the guest, 25 GB disk
- Debian: 2 GB RAM works for light use, 20 GB disk
- Windows 10/11: 4 GB minimum guest RAM, 50–64 GB disk
- Host machine: ideally 8 GB RAM minimum overall for Windows guests, more if you want the host to stay usable
Have admin access on the host device too. You may need it to install the hypervisor, mount the ISO, or change BIOS settings. And if your computer is short on RAM, storage, or patience, a hosted VM is often better than forcing a laptop into server duty.
For more context on the layer that runs VMs, see MonoVM’s guide on what is a hypervisor.
Once your system meets these requirements, the next step is choosing the right VM software.
Best virtual machine software for setup on Windows, macOS, and Linux
You’ve got four tools that actually matter for most readers: VirtualBox, VMware, Hyper-V, and KVM. They all create VMs, but they don’t feel the same in day-to-day use.
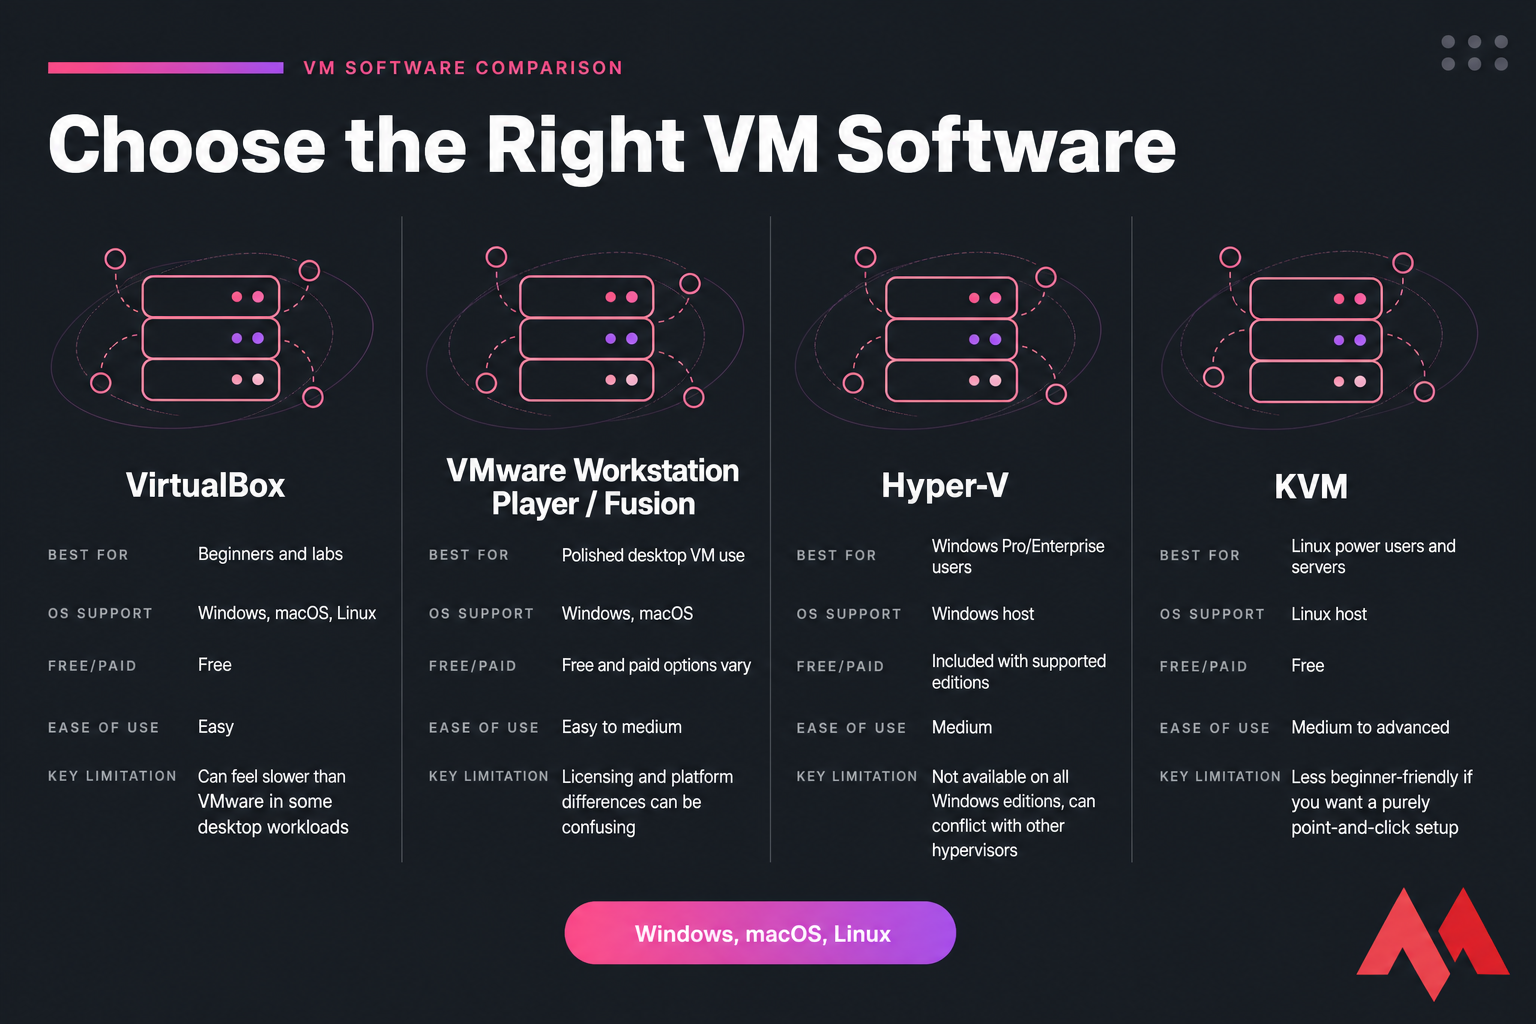
| Tool | Best For | OS Support | Free/Paid | Ease of Use | Key Limitation |
|---|---|---|---|---|---|
| VirtualBox | Beginners and labs | Windows, macOS, Linux | Free | Easy | Can feel slower than VMware in some desktop workloads |
| VMware Workstation Player / Fusion | Polished desktop VM use | Windows, macOS | Free and paid options vary | Easy to medium | Licensing and platform differences can be confusing |
| Hyper-V | Windows Pro/Enterprise users | Windows host | Included with supported editions | Medium | Not available on all Windows editions, can conflict with other hypervisors |
| KVM | Linux power users and servers | Linux host | Free | Medium to advanced | Less beginner-friendly if you want a purely point-and-click setup |
VirtualBox for beginners
For most first-time users, I’d start with VirtualBox. It’s free, works on Windows, macOS, and Linux, and the UI is pretty direct. The workflow is exactly what beginners expect: click New, name the VM, pick the ISO, assign RAM, create the virtual disk, and boot. If that’s your path, MonoVM has a separate guide on how to install Oracle VM VirtualBox.
VMware Workstation Player or Fusion for smoother desktop use
VMware usually feels a bit more polished, especially for desktop behavior and guest integration. Drag-and-drop, resizing, and general responsiveness can be nicer. Not always. But often enough that people notice. If you’re curious about the platform itself, read MonoVM’s overview of what is VMware.
Hyper-V for Windows Pro and Enterprise users
If you already have Windows Pro or Enterprise, Hyper-V is a sensible choice. It’s built into the OS, works well, and avoids adding another hypervisor if you’re staying in the Microsoft ecosystem. Just remember: Hyper-V can interfere with VirtualBox or VMware on Windows if both are trying to control virtualization features. MonoVM’s Hyper-V setup guide goes deeper if that’s your route.
KVM for Linux-based power users
KVM is excellent on Linux. Fast, mature, and widely used in hosted environments. It’s not the easiest first GUI-driven setup, but it’s a great fit if you’re already comfortable on Linux or want to understand the same virtualization family used by many providers. MonoVM covers KVM virtualization in more detail, and their piece on open-source virtualization is useful if you’re comparing platforms.
My short recommendation? VirtualBox for beginners, Hyper-V for Windows Pro users, VMware for polished desktop behavior, and KVM for Linux-heavy workflows. After choosing your hypervisor, you can create your VM in a few straightforward steps.
How to create a virtual machine step by step
The exact buttons differ a little between VirtualBox, VMware, Hyper-V, and KVM front ends, but the logic is basically the same every time.

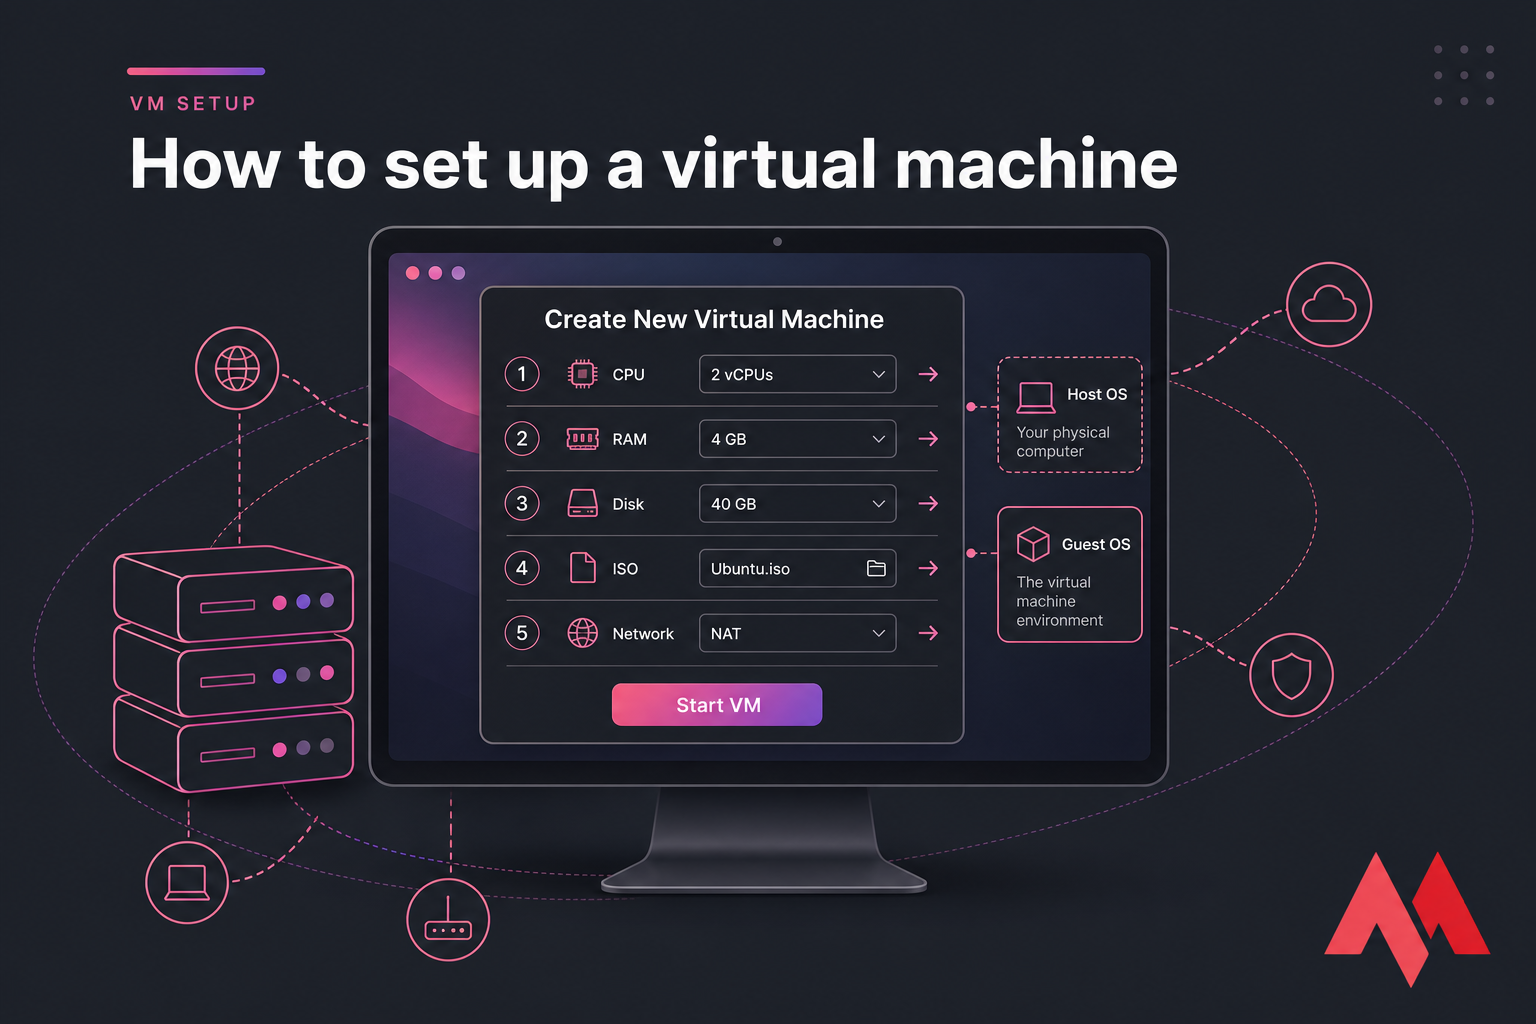
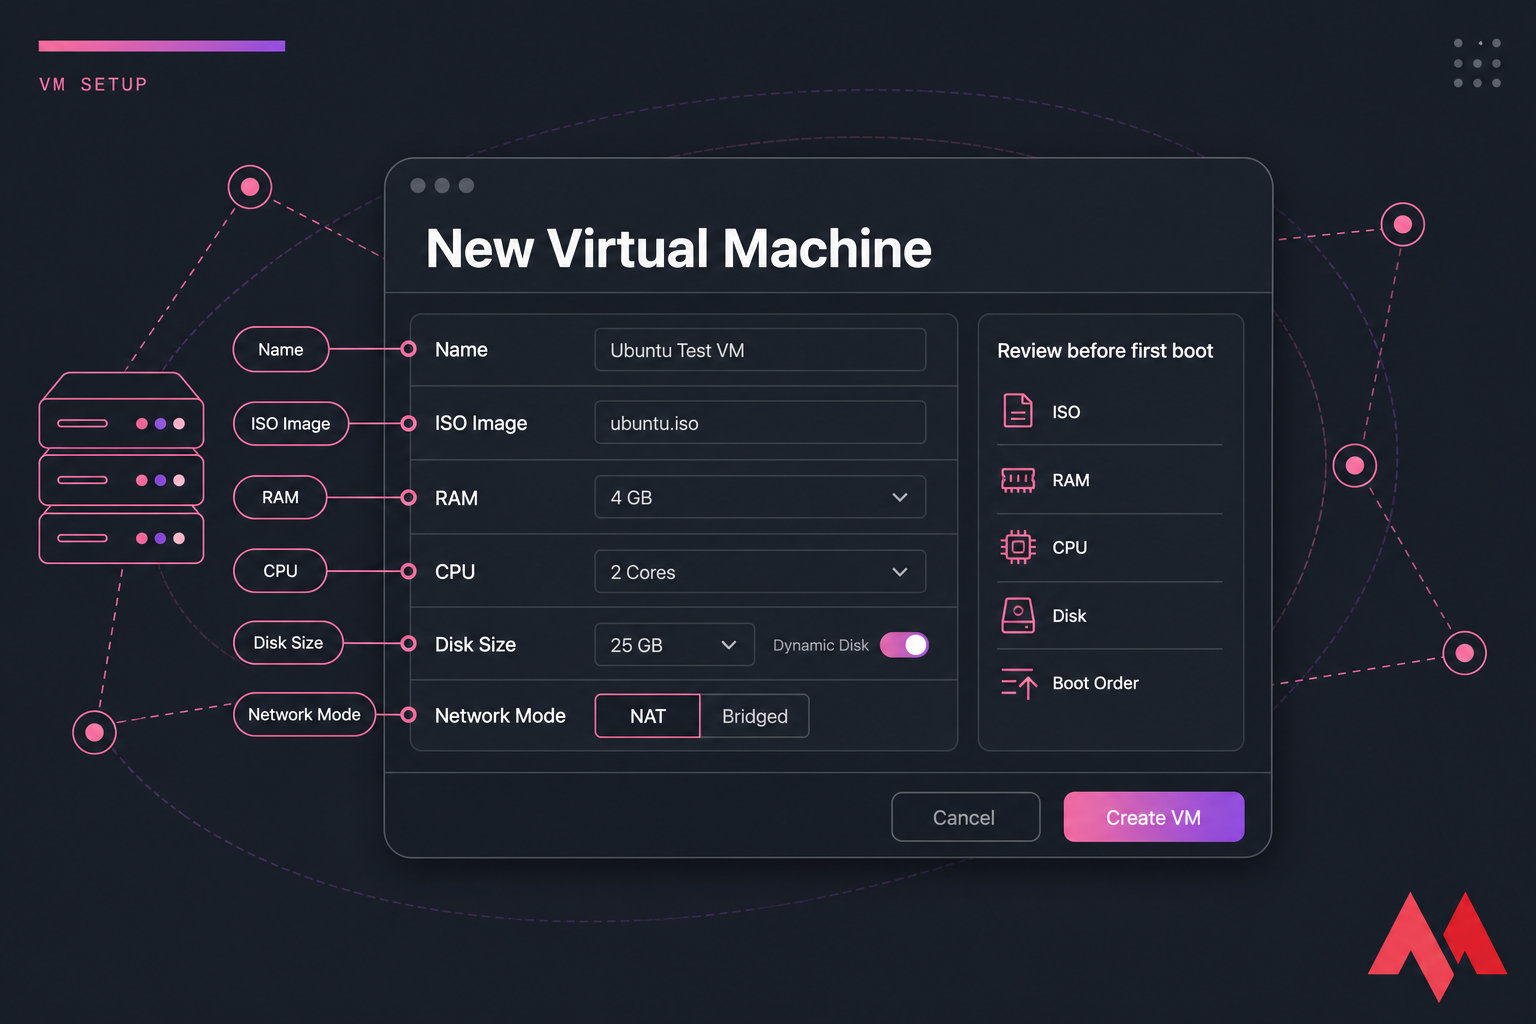
Create a new VM and name it correctly
- Open your hypervisor and click New, Create, or Create Virtual Machine.
- Name the VM clearly. Use something like
Ubuntu-22.04-TestorWindows11-Lab. You’ll thank yourself later if you create snapshots or clones. - Choose where the VM files live. If you have an SSD, use it. VM performance improves noticeably on fast storage.
Choose the guest operating system and ISO image
- Select the guest OS type and version. For example: Linux > Ubuntu 64-bit, or Windows 11 64-bit.
- Attach the ISO image. Some tools ask during creation. Others let you add it under storage or boot settings afterward. Make sure it’s a bootable ISO, not a random ZIP or incomplete download.
- Check firmware mode if needed. Some modern guests expect UEFI. Older systems may boot fine with legacy BIOS-style settings.
Set CPU, RAM, and virtual disk size
Here’s a good starting point for a basic virtual machine setup:
| Guest OS | vCPU | RAM | Disk | Recommended For |
|---|---|---|---|---|
| Ubuntu Desktop | 2 | 4 GB | 25 GB | Testing, learning, browsing, light dev |
| Debian | 2 | 2–4 GB | 20 GB | Light labs and server practice |
| Windows 10/11 | 2–4 | 4–8 GB | 64 GB | App compatibility and desktop testing |
| Lightweight Linux distro | 1–2 | 2 GB | 15–20 GB | Minimal sandbox use |
Don’t over-allocate. This part trips people up all the time. Giving a VM too much RAM or too many CPU cores can slow both the guest and the host. Leave breathing room for your host machine.
If the software asks about dynamically allocated versus fixed-size disk, dynamic is usually fine for a first VM. It saves space because the virtual disk grows as needed.
Select NAT or bridged networking
- Pick NAT if you just want internet access. It’s the safest default and works for most users.
- Pick bridged networking if the VM needs its own identity on your local network. That’s useful for testing servers, SSH, or LAN access from other devices.
Start the VM and begin OS installation
- Review the settings. Check ISO, boot order, RAM, CPU, and disk before first boot.
- Start the VM. If everything is right, it should boot from the ISO and launch the installer.
- If it doesn’t boot from ISO, power off and verify the virtual optical drive is attached and first in the boot order.
With the VM shell created, the next step is installing the operating system inside it.
How to install Windows or Linux on a virtual machine
Once the VM boots from the ISO, you’re mostly following a normal OS install. The nice part is that the “hardware” is virtual, so you’re not wiping your real computer.
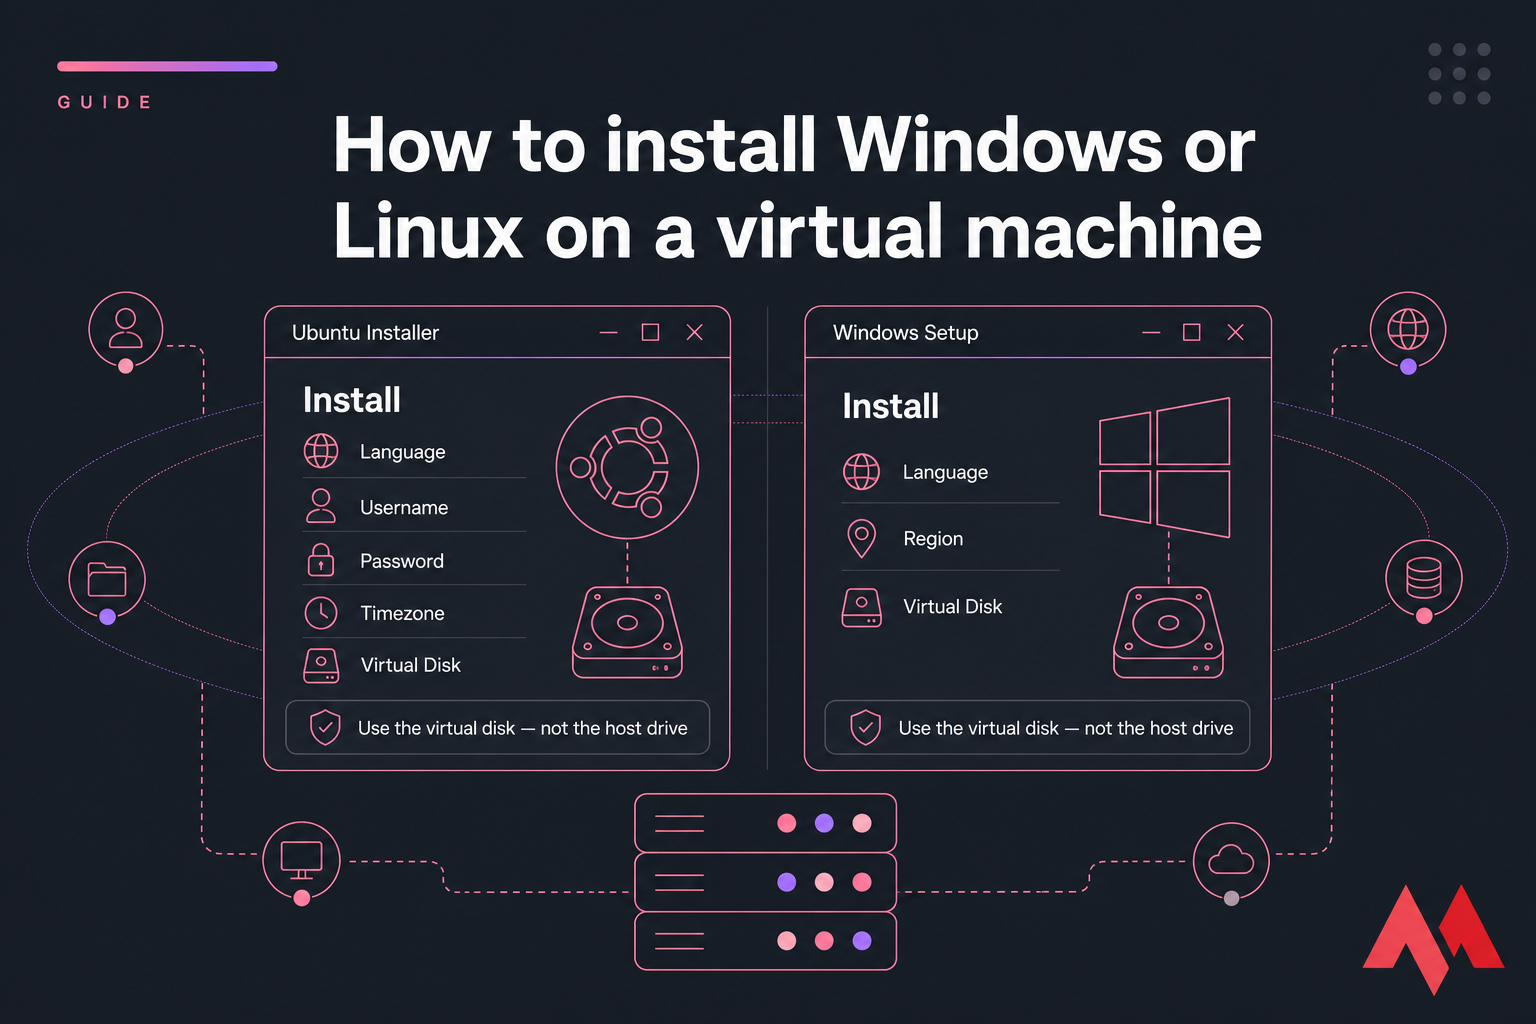
Installing Ubuntu or Debian in a VM
For Ubuntu or Debian, the installer usually gives you a Try or Install option. Choose Install. When it asks about disk handling, use the default option to erase and use the virtual disk — not your host drive. The VM only sees its own virtual hardware. After that, create your username, password, timezone, and wait for the files to copy.
If you’re looking for distro-specific help, MonoVM has guides on how to download Ubuntu, how to install AlmaLinux, and how to install Rocky Linux. There’s also a broader page on setting up a Linux virtual machine.
Installing Windows in a VM
Windows setup is similar. Boot from the Windows ISO, pick language and region, then choose Install. Select the virtual disk as the target. If Windows asks for a key, your options depend on the edition and your licensing situation, so I won’t overcomplicate that here. The main point is simple: install it to the VM’s virtual disk, not anything on the host.
MonoVM also has a useful guide focused on a Windows virtual machine if Windows is your main goal.
What to do after the first boot
After first login, do three things right away:
- Install system updates
- Install Guest Additions or VMware Tools
- Eject or detach the ISO if the VM keeps booting back into the installer
That last one matters. I’ve seen people reinstall the OS twice because the boot order still favored the ISO. Once the guest OS is installed, proper networking and storage settings make the VM far more useful.
Virtual machine network settings and storage options explained
These settings sound dry, but they change how usable the VM feels. And how exposed it is.
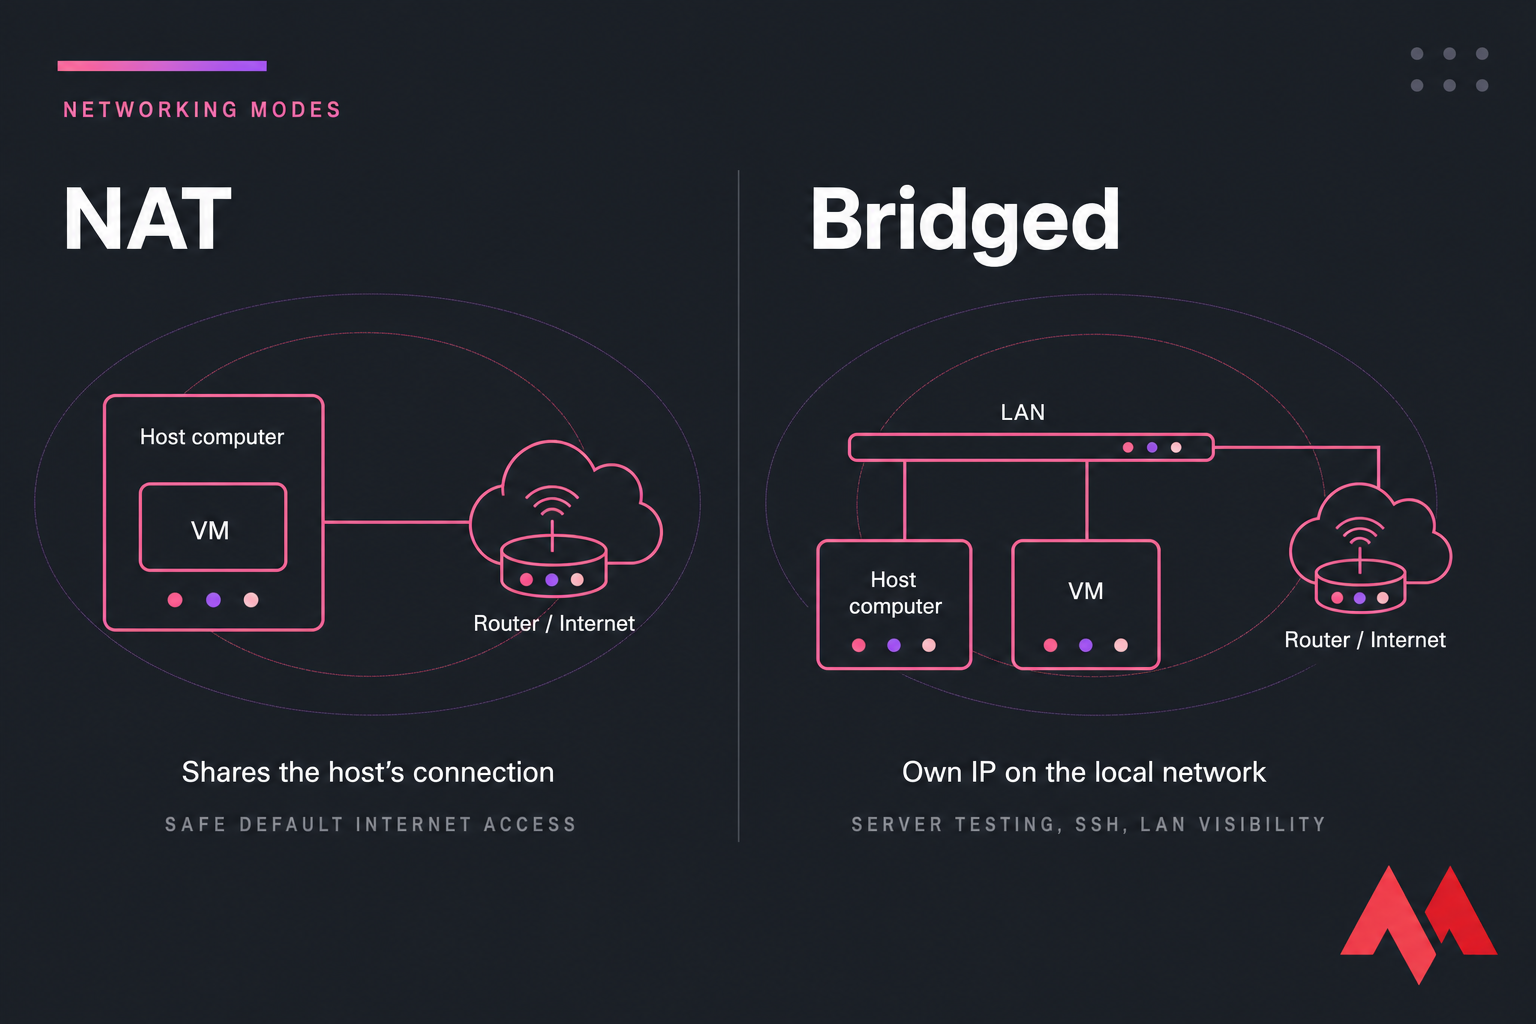
NAT vs bridged adapter
| Mode | What It Does | Best For |
|---|---|---|
| NAT | Shares the host’s connection and hides the VM behind it | Safe default internet access |
| Bridged | Puts the VM directly on the local network with its own IP | Server testing, SSH, LAN visibility |
Use NAT for most desktop VM setups. It just works. Use bridged mode when the VM must behave like a separate machine on your network. That’s handy, but it also increases exposure, so treat it more carefully.
If networking terms get fuzzy, MonoVM has simple refreshers on what is an IP address and what is LAN.
Dynamically allocated vs fixed-size virtual disks
Dynamic disks grow as data is written, so they save host storage early on. Fixed disks reserve the full size upfront and can be a bit more predictable for performance. For most beginners, I’d pick dynamic and move on. If you’re building something more serious, fixed-size can make sense.
Shared folders, clipboard, and USB pass-through
Most hypervisors let you enable shared folders, clipboard sync, drag-and-drop, and USB pass-through. These are convenient. They also reduce isolation between host and guest. Turn them on only if you need them. Same with shared clipboards — great for lab work, not always great for strict separation.
After connectivity works, a few performance tweaks can make your VM feel much smoother.
How to optimize virtual machine performance after setup
Small changes matter more than people expect. No miracle button, but enough to turn an annoying VM into a usable one.
Install Guest Additions or VMware Tools
This is the first thing I do after an OS install. Guest Additions and VMware Tools improve display resizing, mouse integration, clipboard support, drivers, and sometimes network performance. Skip them and the VM often feels clunky for no good reason.
Adjust RAM, CPU, video memory, and display settings
- Increase RAM only if the guest actually needs it
- Don’t assign every CPU core to the VM
- Use SSD storage when possible
- Raise video memory if the guest desktop is laggy
- Keep enough resources free for the host OS
If the guest is still dragging, look at the host first. A VM can’t outrun a host that’s already overloaded. For monitoring and tuning, MonoVM has extra reading on VM monitoring metrics and virtual machine security best practices. If your issue is more about general slowness under load, their guide on why a VPS is slow gives useful troubleshooting logic that applies to virtual environments too.
Use snapshots before testing risky changes
Snapshots are a lifesaver. Take one before major updates, package experiments, registry edits, or random software installs. If something breaks, roll back instead of rebuilding the whole VM. That’s one of the best parts of virtual machine setup, honestly.
If your VM stays resource-constrained or you need always-on access, that’s usually the point where a hosted VM makes more sense than tuning a local machine forever.
Common virtual machine setup errors and how to fix them
Most VM failures aren’t mysterious. They come from the same half-dozen mistakes.
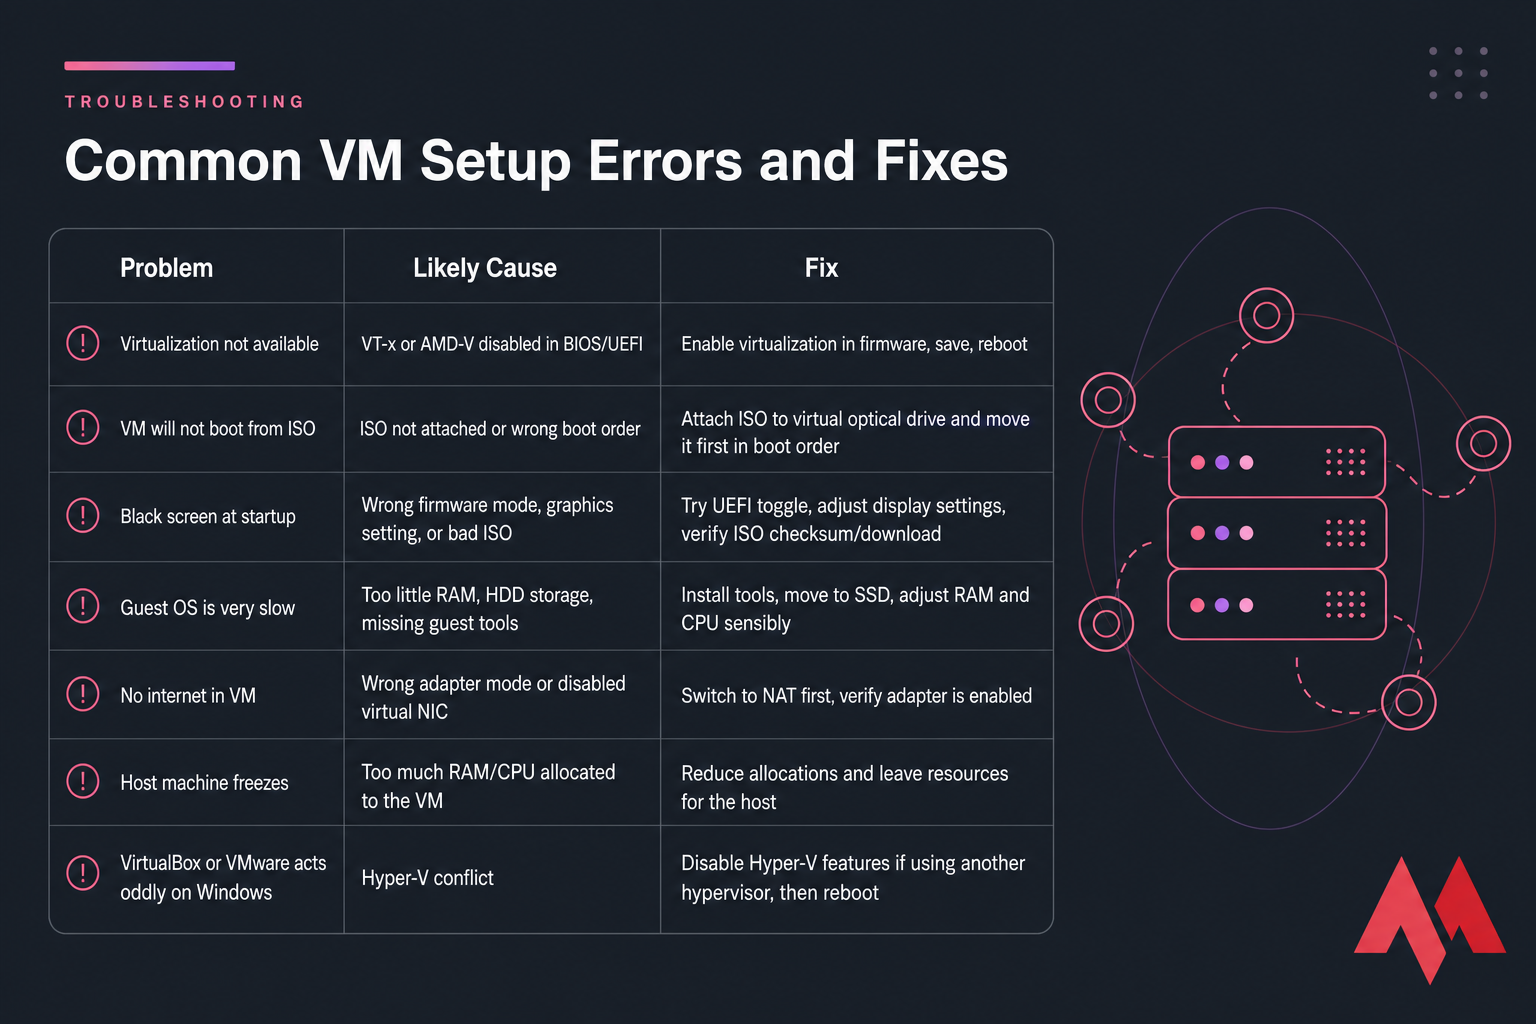
| Problem | Likely Cause | Fix |
|---|---|---|
| Virtualization not available | VT-x or AMD-V disabled in BIOS/UEFI | Enable virtualization in firmware, save, reboot |
| VM will not boot from ISO | ISO not attached or wrong boot order | Attach ISO to virtual optical drive and move it first in boot order |
| Black screen at startup | Wrong firmware mode, graphics setting, or bad ISO | Try UEFI toggle, adjust display settings, verify ISO checksum/download |
| Guest OS is very slow | Too little RAM, HDD storage, missing guest tools | Install tools, move to SSD, adjust RAM and CPU sensibly |
| No internet in VM | Wrong adapter mode or disabled virtual NIC | Switch to NAT first, verify adapter is enabled |
| Host machine freezes | Too much RAM/CPU allocated to the VM | Reduce allocations and leave resources for the host |
| VirtualBox or VMware acts oddly on Windows | Hyper-V conflict | Disable Hyper-V features if using another hypervisor, then reboot |
Virtualization is disabled in BIOS
This is the big one. If VirtualBox says hardware virtualization is unavailable, or Hyper-V refuses to cooperate, check BIOS or UEFI first. Look for VT-x, Intel Virtualization Technology, SVM, or AMD-V. Different motherboard vendors hide it in different menus, which is mildly annoying.
The VM will not boot from ISO
Usually the ISO wasn’t attached correctly, or the VM tried to boot from an empty virtual disk first. Reopen settings, confirm the ISO image is mounted, and verify boot order. If the ISO file itself is corrupted, download it again.
The guest OS is too slow
Slow guests usually come down to one of four things: not enough RAM, bad storage performance, missing Guest Additions or VMware Tools, or too many CPU cores assigned. More cores doesn’t always help. I’ve seen 2 vCPU perform better than 6 on weaker hosts.
No internet connection inside the VM
Start with NAT. It’s the easiest way to rule out network weirdness. If NAT works and bridged doesn’t, the issue is often the selected physical adapter, Wi-Fi limitations, or firewall rules. On Windows hosts, Hyper-V can also create confusion if multiple virtual switches are hanging around.
One more note for macOS and Apple Silicon users: compatibility depends heavily on the hypervisor and guest OS architecture. Not every x86 guest setup behaves the same on ARM-based Macs, so double-check support before you commit to a long install.
If your goal is hosting, development, or 24/7 uptime, a local VM may not be the best long-term option.
Virtual machine vs VPS: when local setup is not enough
A local virtual machine runs on your own computer. A VPS runs on remote virtualized infrastructure in a data center. That difference changes everything: uptime, performance consistency, accessibility, backups, and how much you can rely on it.
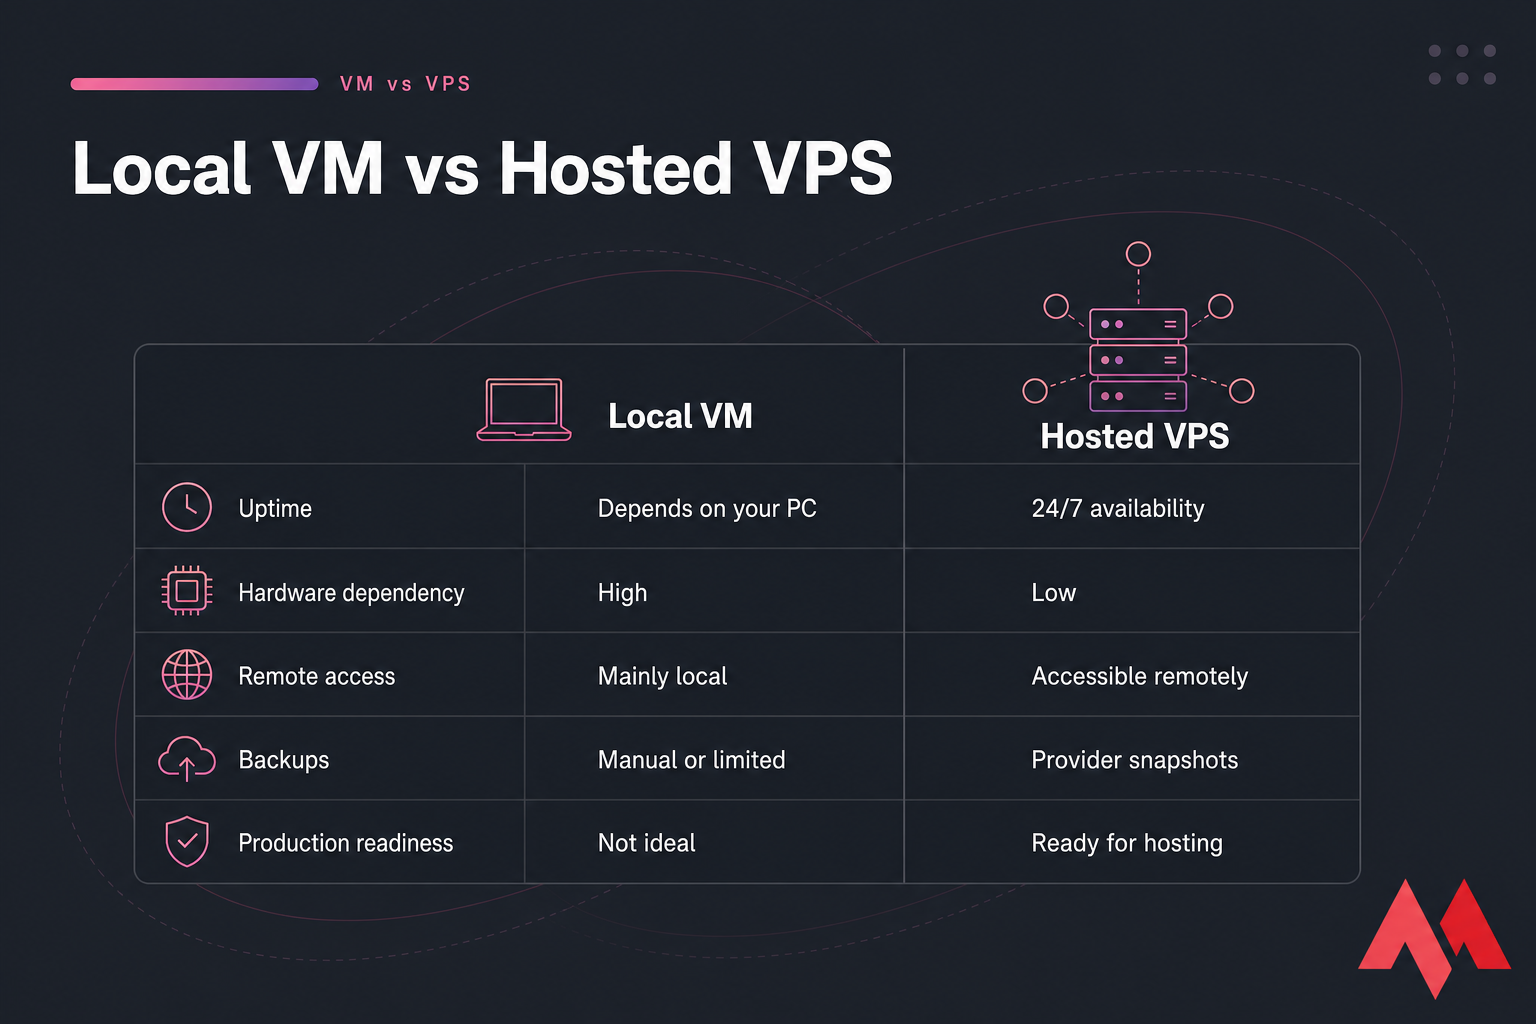
| Factor | Local VM | VPS |
|---|---|---|
| Where it runs | Your laptop or desktop | Remote server |
| Uptime | Only when your machine is on | Built for 24/7 availability |
| Access | Mainly local | Accessible remotely |
| Performance consistency | Depends on your host load | More predictable |
| Best use | Testing, learning, sandboxing | Hosting apps, sites, dev servers, automation |
When a local VM is the right choice
Use a local VM when you’re testing Linux on a Windows PC, running older software in isolation, practicing admin tasks, or building a throwaway lab. It’s cheap, flexible, and safe for learning.
When to use a hosted virtual machine or VPS
If your VM needs to stay online, host a website, run a bot, handle remote development, support a team, or act like a real server, go hosted. That’s exactly where VM vs VPS becomes less theoretical and more practical.
For those workloads, MonoVM’s VPS hosting, cloud VPS, and KVM VPS hosting are a better fit than leaving your home PC running all night.
Why MonoVM is better for always-on workloads
Local VMs are great for labs. Production is different. MonoVM offers KVM-based virtualization, full root access, global locations, 24/7 support, and more consistent uptime than a personal desktop can provide. If you want the trust layer too, you can browse MonoVM’s awards and general FAQ.
Virtual machine setup examples for common use cases
Sometimes the fastest way to know you’re doing the right thing is seeing a setup that matches your actual need.
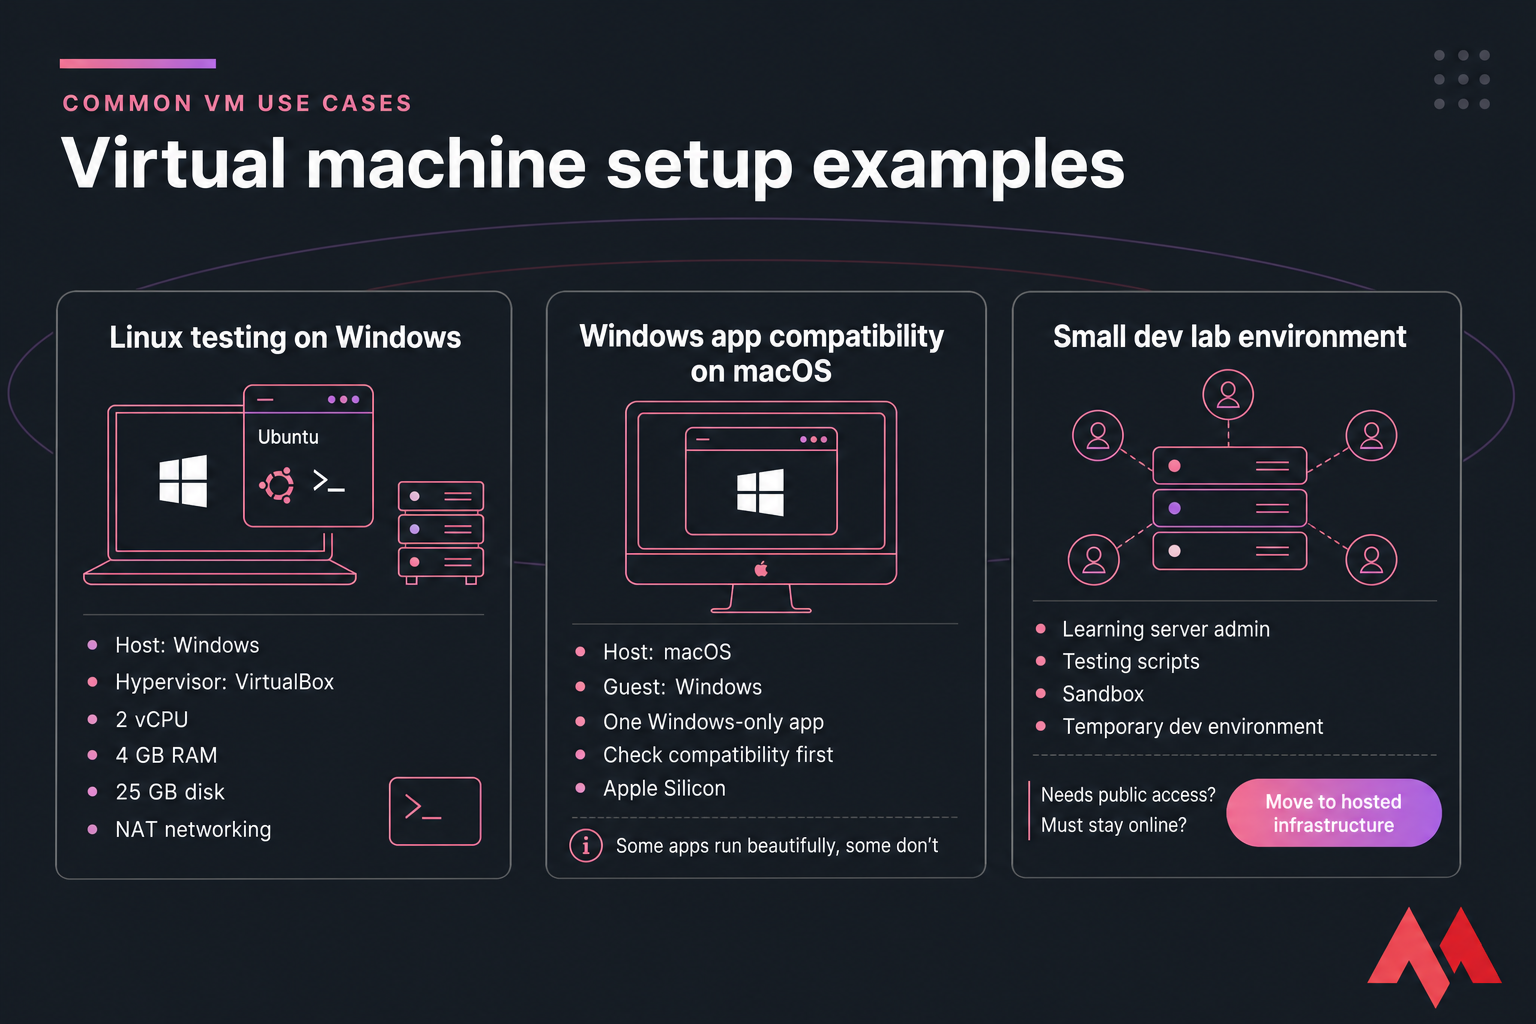
Testing Linux safely on a Windows PC
This is probably the most common beginner setup. Install VirtualBox, create an Ubuntu VM with 2 vCPU, 4 GB RAM, and 25 GB disk, use NAT networking, and test Linux without touching your Windows install. MonoVM has more on building a Linux virtual machine if you want a distro-specific path.
Running a Windows app on macOS
If you need one Windows-only application, a Windows VM can be cleaner than dual booting or replacing your workflow. Just check compatibility first, especially on Apple Silicon. Keep expectations realistic some apps run beautifully, some don’t.
Building a dev, lab, or learning environment
A VM is perfect for learning server admin, testing scripts, running a sandbox, or spinning up a temporary development environment. But if that dev stack needs public access or must stay online, move it to hosted infrastructure instead. MonoVM’s guide on how to set up a VPS for beginners is the natural next step.
Need a Virtual Machine That Runs 24/7? Local VMs are great for testing, but they depend on your own hardware staying online. If you need a stable virtual machine for hosting, development, remote access, or production workloads, MonoVM offers fast KVM VPS plans with full root access.Explore MonoVM VPS Plans
Ready to Move From Local Testing to a Real Hosted VM? Set up local VMs for learning and experimentation. When you need better uptime, faster storage, global locations, and reliable performance, launch a VPS with MonoVM in minutes. Virtual Machine Hosting
Quick summary: choose your hypervisor, create the VM, attach the ISO, allocate RAM, CPU, and disk carefully, install the guest OS, add guest tools, then secure and optimize it. That’s the cleanest answer to how to set up a virtual machine the first time without wasting an afternoon fixing avoidable mistakes.

An experienced tech and developer blog writer, specializing in VPS hosting and server technologies. Fueled by a passion for innovation, I break down complex technical concepts into digestible content, simplifying tech for everyone.