Many Linux distributions are available, and choosing one of them seems challenging. Different versions offer different features, and one of the most popular and reliable versions is Ubuntu, which provides features like easy to use and simply customizable. Based on the user's needs, Ubuntu can be scaled, and this is another feature of Ubuntu. If you`re a beginner user, Ubuntu is the right choice. Now that you know what Ubuntu is, Let's review how to download Ubuntu and install Ubuntu on your PC or laptop.
Curious to learn more about Ubuntu and its powerful features? Dive deeper into the world of this popular operating system by exploring our comprehensive guide at What is Ubuntu?. Whether you're a beginner or an advanced user, this article offers valuable insights and details about Ubuntu's history, benefits, and why it's the preferred choice for millions of users worldwide. Don't miss out on discovering how Ubuntu can transform your computing experience!
Prerequisites to Download Ubuntu
Before starting to download Ubuntu on your desktop, provide these requirements:
- A PC or laptop with a minimum of 25GB of storage space
- A ram with at least 4 GB of RAM
- 2 GHz dual-core processor
- USB port
- A USB with at least 4GB capacity
How to Download Ubuntu?
From the Official Ubuntu Website
To download Ubuntu from its official website, follow these steps:
- Go to the Ubuntu website.
- Choose the Ubuntu version you wish to download. The website typically features the latest stable release for desktops, servers, and cloud environments.
- Click on the download button for the version you've selected. This will start the download of the ISO file to your computer.
Download Ubuntu From Alternative Mirrors
If you are experiencing slow download speeds or the official site is unavailable, you can use alternative mirrors to download Ubuntu. These mirrors are hosted by universities and other organizations around the world. Here’s how to use them:
- Visit the official Ubuntu mirror list at https://launchpad.net/ubuntu/+cdmirrors.
- Select a mirror close to your geographical location for faster download speeds.
- Find the version of Ubuntu you want to download and select the appropriate link to download the ISO file.
Types of Ubuntu Downloads
Ubuntu offers different types of downloads to cater to the needs of various users:
- Desktop: The standard version for home and office PCs and laptops.
- Server: For setting up Linux servers without a graphical interface.
- Cloud: Images designed for cloud computing platforms.
- Flavours: Official variants of Ubuntu with different desktop environments (e.g., Kubuntu, Xubuntu, Lubuntu).
It's essential to choose the download that best fits your needs. Each version is tailored to specific use cases, ensuring optimal performance and user experience.
Ready to experience the power of Ubuntu without the hassle of setup? 🚀 Explore our Ubuntu VPS server options today! With just a click, find the perfect Ubuntu VPS server tailored to meet your needs – whether for development, hosting, or running applications. Don't miss out on seamless performance and flexibility. Click here to get started!
System Requirements Detailing for Ubuntu
Ubuntu is designed to be a flexible operating system that can run on a wide range of hardware. From personal computers to servers and cloud environments, Ubuntu's requirements can vary based on the version and the intended use case. Here's a detailed look at the system requirements for different versions of Ubuntu, including both minimum and recommended specifications to ensure a smoother experience.
Ubuntu Desktop
-
Minimum Requirements:
- Processor: 2 GHz dual-core processor
- RAM: 4 GB
- Storage: 25 GB of hard-drive space
- Display: 1024 × 768 screen resolution
- USB port or DVD drive for media installation
-
Recommended Specifications:
- Processor: 2 GHz multi-core processor or better
- RAM: 8 GB or more
- Storage: 50 GB or more of SSD storage for faster performance
- Display: 1920 × 1080 screen resolution or higher
- Graphics: Capable of 3D acceleration for an enhanced graphical environment
Ubuntu Server
-
Minimum Requirements:
- Processor: 1 GHz CPU
- RAM: 1 GB
- Storage: 2.5 GB of hard-drive space
-
Recommended Specifications:
- Processor: 2 GHz multi-core processor or better
- RAM: 4 GB or more
- Storage: 10 GB or more of SSD storage for improved performance and space for additional packages and data
- Network: Gigabit Ethernet adapter for high-speed network connectivity
Ubuntu Cloud
-
Minimum Requirements:
- Varies based on the cloud provider and specific deployment needs.
-
Recommended Specifications:
- Processor, RAM, and storage requirements depend significantly on the workload and the cloud services being utilized. Consult the cloud provider's documentation for specific recommendations.
Ubuntu Flavours (Kubuntu, Xubuntu, Lubuntu, etc.)
-
Minimum Requirements:
- Processor: Varies, but generally, 1.5 GHz dual-core processor or lower for lighter flavors like Xubuntu and Lubuntu
- RAM: 1 GB for Lubuntu and Xubuntu, slightly higher for others like Kubuntu
- Storage: 20 GB of hard-drive space
-
Recommended Specifications:
- Processor: 2 GHz dual-core processor or better
- RAM: 4 GB or more, with more demanding desktop environments benefiting from extra memory
- Storage: 40 GB or more of SSD storage for a responsive system
- Display: Varies, but a resolution of 1024 × 768 or higher is generally recommended
General Recommendations
- Graphics and Media: For users intending to use Ubuntu for media editing, gaming, or other graphics-intensive tasks, a dedicated GPU and additional RAM can enhance performance.
- Connectivity: For server and cloud environments, reliable network connectivity is crucial. Consider enterprise-grade network interfaces.
- Compatibility: Always check hardware compatibility, especially for Ubuntu Server deployments, to ensure support for specific network adapters, storage controllers, and other peripherals.
By meeting or exceeding these recommended specifications, users can enjoy a more responsive and enjoyable computing experience with Ubuntu, regardless of the version they choose to install.
Unlock the full potential of your projects with our Linux VPS solutions! 🌐 Dive into a world of reliability and flexibility with our Linux VPS hosting services. Perfect for developers, businesses, or anyone in need of robust hosting, our Linux VPS ensures top performance and security. Click here to explore your options and elevate your online presence today!
How to Install Ubuntu: wiping out the old Operating System
Here we tell you how to download Ubuntu using the first method, which will remove the old operating system. Using this method, you will wipe out all your data on your hard drive. After deleting the old operating system, you can start working with a fresh Ubuntu version. Installing Ubuntu by this method, Ubuntu will be your only OP. Let`s get started downloading Ubuntu using the easiest and cleanest way.
Step 1: Download Ubuntu
Downloading the official Ubuntu operating system is the first step. A single ISO file is available around 2 GB, which you can download from the official Linux website. We use the updated Ubuntu desktop version (22.04 LTS) for this tutorial, but you can use other versions. There are also different flavours of Ubuntu available, such as Ubuntu Server, and users can choose between them. It is imperative to note that beginners will find all the essential features they need in Ubuntu Desktop's main version.
Step 2: Create a live USB
Creating a bootable USB drive of Ubuntu is the next step after downloading the ISO file. This step allows you to install Ubuntu and boot into Ubuntu from a USB drive. It is possible to make a bootable USB of Ubuntu using free tools such as Rufus, Unetbootin, and Etcher.
Creating a bootable USB will erase all your data from the USB drive, so make sure to back it up before starting this process.
Step 3: boot from the bootable USB
Moving the USB disk up in the boot will ensure your system boots from the USB disk, not the hard disk. Restart your system and press F12/ F10/ or F2 when you see the logo of your computer brand, such as Acer, Dell, etc. Now you may see a different BIOS screen for the computer. A USB device (or removable media) should be placed at the boot order's top. Save the changes and exit.
Note: if you missed the BIOS screen, restart the system and try again.
Step 4: Install Ubuntu
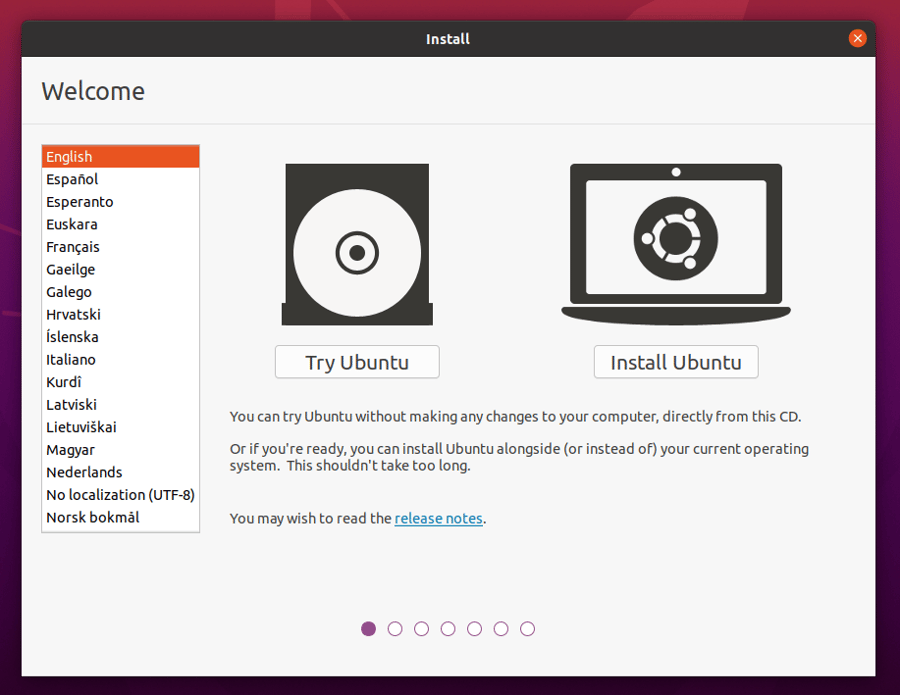
The Ubuntu live environment should now appear on your screen. Upon booting, you'll see the Grub screen with the option of trying Ubuntu without installing it or installing it immediately.
You can click on the first option, which is “Try Ubuntu without installing”:

The live Ubuntu environment should be accessible in about 10-20 seconds. If you`re using USB 2 at a lower speed, it will take more time.
Now the install Ubuntu icon will appear on your desktop. Click on it.
You should select your system's appropriate basic configurations, such as language and keyboard layout.

Some games and video players are installed with the standard installation, so it is recommended to go for the normal installation here.
After installing Ubuntu, you can download the latest updates if your system is connected to the internet. This is optional, as it may take longer if your connection could be faster. You can also update Ubuntu later without any problems.

Now the most relevant screen will appear. It is possible to install Ubuntu in dual boot mode if other operating systems are already installed. Since you intend to run Ubuntu Linux exclusively on your computer, it would be best to choose the option ‘Erase disk’ and install Ubuntu.
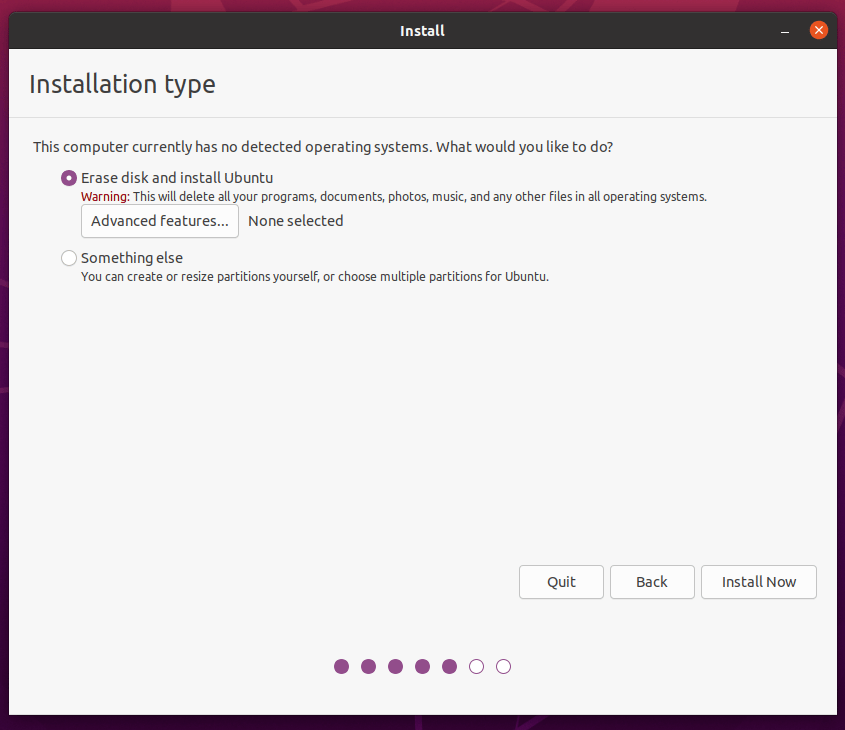
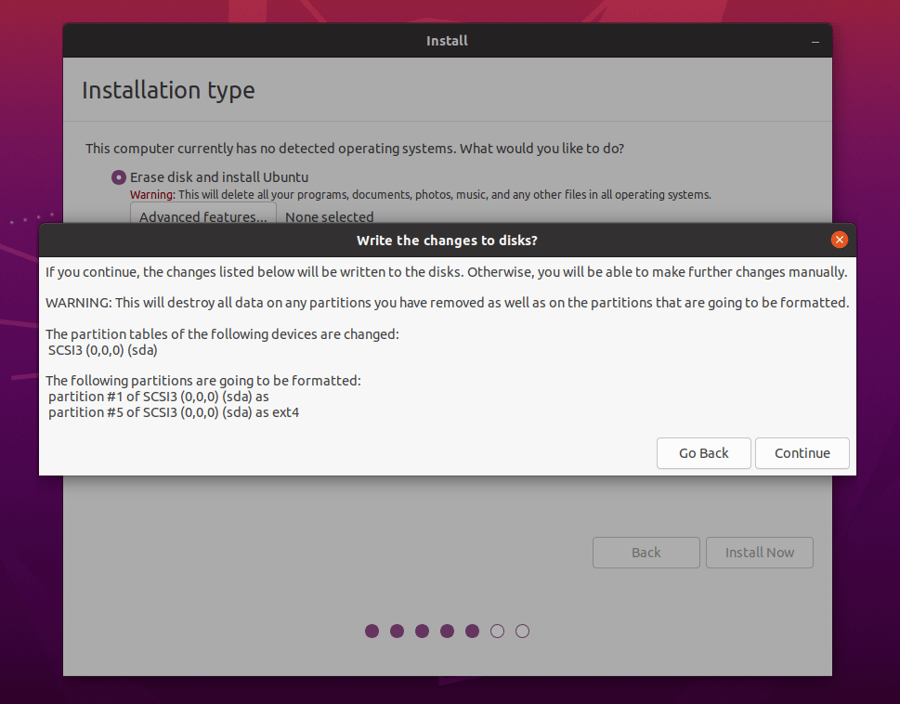
You already know that pressing the ‘install now’ button will erase all the data on your system, as it warns you.
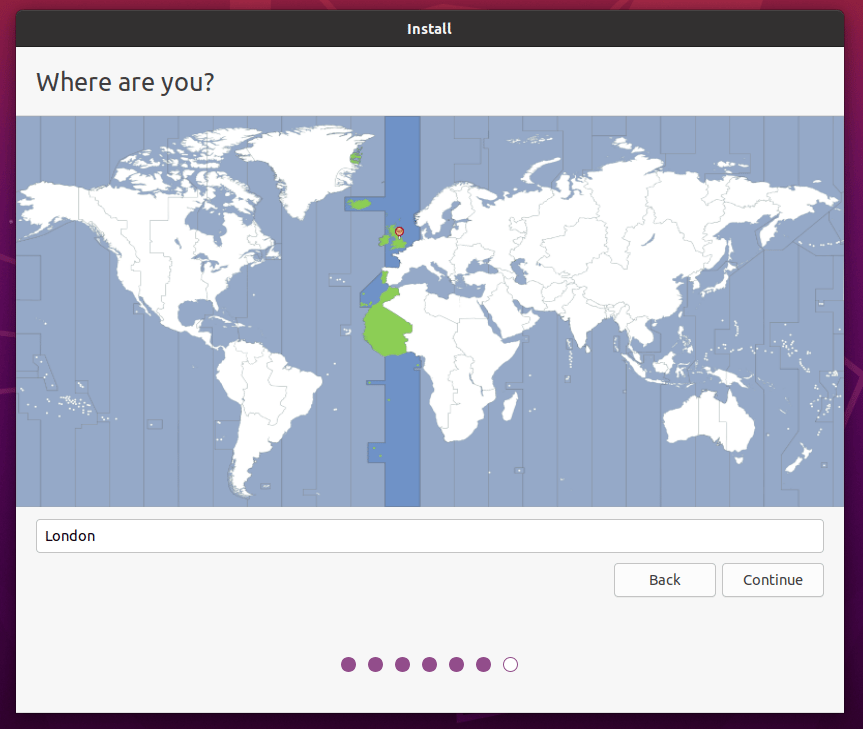
The other steps are straightforward. After you select a time zone, you’ll need to create a username, hostname, or computer name and set a password. Now you have to wait for 5 to 10 minutes until a slideshow of Ubuntu features appears on the screen, providing basic information about it.
After that, you`ll have to restart your system and remove the installation media. You might see a prompt to press Enter when restarting the system that shuts the system down.
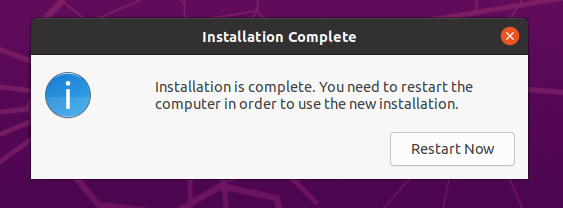
In the last step, remove the USB disk and press the Enter key. Your system will reboot and load Ubuntu instead.
You can easily switch from Windows to Ubuntu using this method. Plus, it only takes a few minutes to install. Enjoy your Ubuntu operating system now!
How to Install Ubuntu on Windows Using VirtualBox
This method is for you if you don’t want to lose your current operating system. Instead of wiping your hard drive clean, select the VirtualBox installation method when installing Ubuntu. This will run the operating system inside a virtual machine that doesn’t affect the main system. This method is ideal for aspiring programmers or developers who want to test multiple Linux distributions or add additional software packages to Ubuntu.
1. Download and Install VirtualBox
In the first step, download the latest version of Oracle VirtualBox. Then, continue the installation after you have opened the file. It will ask you about network interfaces, and you will select Yes. Remember, during installation, your system may disconnect from the internet. Continue the installation process.
2. Download and Install Linux ISO
Now that you have installed VirtualBox, it`s time to install Linux. To create a new virtual machine, open VirtualBox and press the ‘New’ button. Specify the name of the virtual machine and the amount of RAM to assign. Half of the main system`s RAM is enough. If your system's RAM is 8 GB, you should assign 4 GB to the virtual machine.
An error message will be displayed after the virtual machine is created successfully. To fix it, you must assign the Ubuntu ISO file you downloaded earlier under Settings. You can do this by opening Settings and heading to the Storage section. The ISO file should be assigned to the Controller IDE.
It will take a few minutes for the Ubuntu installer to start. Once it has done so, you can continue reading about the Ubuntu installer in the next section.
The virtual machine is ready to use right now.
Post-Installation Recommendations
After installing Ubuntu, optimize your system to enhance functionality and user experience. Key steps include:
- Install Additional Drivers: Check for proprietary drivers, especially for graphics cards and Wi-Fi hardware, via "Software & Updates" under the "Additional Drivers" tab.
- Configure Updates: Customize update settings by navigating to "Software & Updates." Enable automatic updates for security and choose how often to check for other software updates.
- Install Essential Software: Use the Ubuntu Software Center to install applications for productivity, media, and development. Consider adding web browsers, office suites, and media players.
Troubleshooting Common Issues
Encountering issues during installation is not uncommon. Here are solutions to frequent problems:
- Bootable USB Not Recognized: Ensure the USB is correctly formatted and the BIOS/UEFI is set to boot from USB. Check the boot order settings.
- Installation Freezes: Verify the integrity of the downloaded ISO file and the bootable media. If problems persist, try installing with minimal graphics (if available).
- Hardware Compatibility: For unrecognized hardware, search for drivers online or consult Ubuntu forums for workarounds.
Dual-Booting with Windows
To maintain both Ubuntu and Windows on the same machine:
- Partition the Hard Drive: Shrink the Windows partition to create space for Ubuntu. This can be done using Windows' Disk Management tool.
- Choose "Install Ubuntu Alongside Windows": During Ubuntu installation, select this option to manage partitions and choose how much space to allocate to Ubuntu.
- Boot Manager: Upon completion, the GRUB bootloader will manage the OS selection at startup.
Performance Optimization
Improve Ubuntu's performance with these tips:
- Manage Startup Applications: Limit the number of applications that automatically start. Use "Startup Applications" to disable unnecessary ones.
- Use Lighter Desktop Environment: For older hardware, consider switching to a lighter desktop environment like LXDE or XFCE.
- Regularly Update and Clean: Keep your system updated and clean up unnecessary files using tools like BleachBit to free up space and resources.
By following these brief but comprehensive sections, users can maximize their Ubuntu experience, troubleshoot effectively, enjoy dual-booting with Windows, and enhance system performance.
Ready to experience the power of Ubuntu without the hassle of setup? 🚀 Explore our Ubuntu VPS server options today! With just a click, find the perfect Ubuntu VPS server tailored to meet your needs – whether for development, hosting, or running applications. Don't miss out on seamless performance and flexibility. Click here to get started!
Conclusion
We hope that we can help you install Ubuntu easily and in the shortest possible time. Now you can use Ubuntu 20.04 on your system without any issues. Note that when you`re online, you may see install update notifications. In most cases, you should install updates unless you have mission-critical software that prevents you from doing so. Despite not all Linux beginners knowing how to install Ubuntu, it is often considered the go-to choice for an operating system because of its simplicity and versatility. Our goal is to provide you with an understanding of the major aspects of installing Ubuntu. Ubuntu installation is a complex process, which we hope you have learned about in this article.
People also read:

I'm fascinated by the IT world and how the 1's and 0's work. While I venture into the world of Technology, I try to share what I know in the simplest way with you. Not a fan of coffee, a travel addict, and a self-accredited 'master chef'.