To configure Nginx for IPv6 on a VPS, add IPv6 listen directives to your server block — listen [::]:80; and listen [::]:443 ssl; — run sudo nginx -t, reload Nginx, open ports 80 and 443 for IPv6 in your firewall, then point an AAAA record at the VPS IPv6 address.
That's the whole job in one sentence. The rest of this guide covers the parts that trip people up: verifying the server actually has public IPv6, keeping HTTP and HTTPS blocks consistent, and fixing the two errors everybody hits.
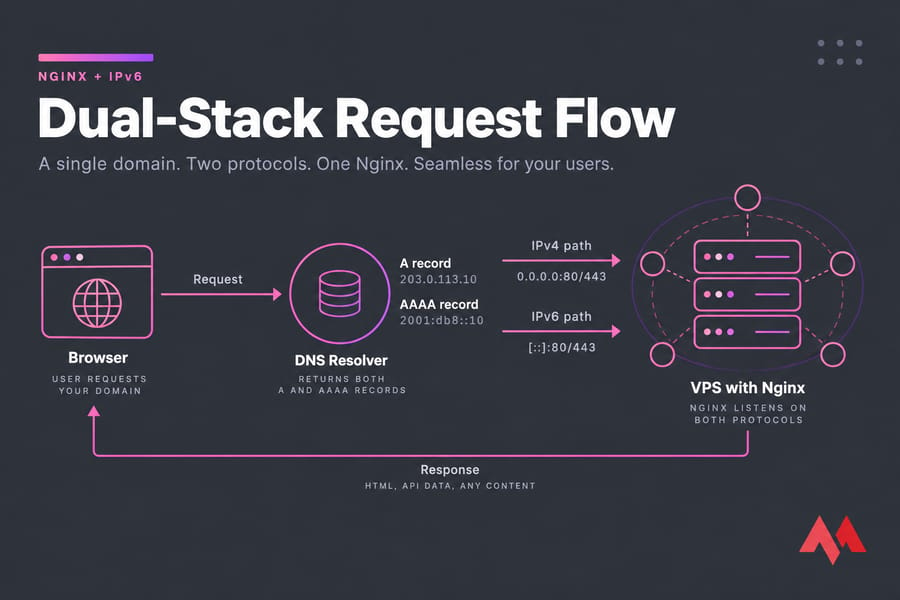
:80/443 → response, with labelled arrows for IPv4 and IPv6 paths]
Before you start
- A VPS with a public IPv6 address (not just link-local)
- Nginx installed — if not, see how to install Nginx on Ubuntu
- SSH and sudo access
- A domain plus DNS panel access
- An SSL certificate if you're serving HTTPS
What Nginx IPv6 configuration actually means
Nginx doesn't have a global "enable IPv6" switch. It listens on whatever address and port each listen directive tells it to. IPv4 and IPv6 are separate sockets, so you declare both. That's dual-stack: one server answering on both protocols.
IPv6 addresses go inside square brackets in Nginx config, because a colon already means "port." So [::]:80 reads as "every IPv6 address, port 80." Nginx picks the server block by address and port first, then by server_name.
One detail worth knowing now: the ipv6only parameter determines whether an IPv6 socket on the wildcard address [::] accepts only IPv6 connections or both IPv6 and IPv4 connections — it's on by default and can only be set once on start. Leave it alone. Almost every duplicate-listen error I've seen came from someone toggling it.
Step 1: Check whether your VPS already has IPv6
No Nginx config saves you if the server has no address to bind to. Check first:
ip -6 addr show scope global
ping6 -c 3 ipv6.google.com
You want a line starting with something like 2a01: or 2604:. Anything beginning fe80:: is link-local and useless for public traffic. If nothing shows up, check your provider's network panel — some hand out IPv6 blocks that need manual assignment, and our walkthrough on how to set up IPv6 on Ubuntu covers that path.
Still nothing? Then the plan changes. You need a host that ships public IPv6 by default — IPv6 VPS hosting avoids the tunnel-broker workarounds people waste weekends on.
Step 2: Add IPv6 to your Nginx server block
Config lives in /etc/nginx/sites-available/ on Ubuntu and Debian, symlinked into sites-enabled/. Back it up before touching anything:
sudo cp /etc/nginx/sites-available/example.com /root/example.com.bak
sudo nano /etc/nginx/sites-available/example.com
Here's a clean dual-stack HTTP block:
server {
    listen 80;
    listen [::]:80;
    server_name example.com www.example.com;

    root /var/www/example.com/html;
    index index.html index.htm;

    location / {
        try_files $uri $uri/ =404;
    }
}
Two lines, two protocols. Test and reload:
sudo nginx -t
sudo systemctl reload nginx
Pro tip: run nginx -t before every reload. A reload with broken syntax fails safely and leaves the old workers running, but you still want to know before you find out from a monitoring alert.
![Stylized terminal illustration showing Nginx config with listen 80 and listen [::]:80 labeled IPv4 and IPv6.](https://cdn.monovm.com/cdn-cgi/image/width=900,quality=80,format=auto/monovm/2026/09/19/stylized-terminal-illustration-showing-nginx-config-with-lis-e28f10.webp)
:80;" lines highlighted and labelled IPv4 / IPv6]
Step 3: Do the same for HTTPS on port 443
Mirror the pattern. If your certificate works over IPv4, it works over IPv6 — TLS doesn't care which layer carried the packets.
server {
    listen 443 ssl;
    listen [::]:443 ssl;
    server_name example.com www.example.com;

    ssl_certificate /etc/letsencrypt/live/example.com/fullchain.pem;
    ssl_certificate_key /etc/letsencrypt/live/example.com/privkey.pem;

    root /var/www/example.com/html;
    index index.html index.htm;
}
Your redirect block should carry IPv6 too, otherwise IPv6 visitors hitting http:// get nothing:
server {
    listen 80;
    listen [::]:80;
    server_name example.com www.example.com;
    return 301 https://$host$request_uri;
}
Certbot usually writes both listeners for you when it modifies a config, but it only mirrors what was already there. If your port 80 block had no IPv6 line, the generated 443 block won't either. Check it. Need the certificate first? Here's how to install SSL on your VPS.
Same logic applies if you're fronting an app — a Nginx reverse proxy uses identical listen lines; only the location block changes.
Step 4: Add the AAAA record
An A record maps a hostname to an IPv4 address. An AAAA record maps it to IPv6. For dual-stack you publish both, and clients pick.
| Record | Host | Points to | Needed? |
|---|---|---|---|
| A | @ | 203.0.113.10 | Yes, for IPv4 visitors |
| AAAA | @ | 2001:db8::10 | Yes, for IPv6 visitors |
| AAAA | www | 2001:db8::10 | If you serve www |
Warning: don't publish the AAAA until the server actually answers over IPv6. Clients with IPv6 connectivity prefer it, so a broken AAAA means a broken site for a slice of your audience while IPv4 users see nothing wrong. Test with the raw address first. More background in our guide to AAAA records. Propagation is usually minutes, occasionally up to 24–48 hours depending on TTL.
Step 5: Open IPv6 ports in UFW
UFW supports IPv6 out of the box, but it needs to be configured correctly for IPv6 traffic. Confirm it:
grep IPV6 /etc/default/ufw
sudo ufw allow 'Nginx Full'
sudo ufw status verbose
You want IPV6=yes. If it isn't set, edit /etc/default/ufw, then sudo ufw disable && sudo ufw enable to reload the rule set. In ufw status, rules ending in (v6) are your IPv6 rules — if you don't see them, IPv6 traffic is being dropped no matter how well Nginx is configured. Our configure UFW on Ubuntu guide covers the wider rule set.
Step 6: Verify it works
sudo nginx -t
sudo ss -lnt | grep -E ':80|:443'
dig AAAA example.com +short
curl -6 -I https://example.com
Success looks like: ss showing [::]:80 and [::]:443, dig returning your IPv6 address, and curl -6 returning a 200 or 301. If ss looks wrong, our notes on how to check open ports in Linux help narrow it down.
Common errors and fixes
| Error / symptom | Likely cause | Fix |
|---|---|---|
duplicate listen options for [::]:80 |
ipv6only or default_server declared in more than one block on the same socket |
Keep the parameter on exactly one block; drop it from the rest |
bind() to [::]:80 failed (98: Address already in use) |
Another service (Apache, an old Nginx process) holds the port | sudo ss -lnp | grep :80, stop the conflicting service, reload |
| Site loads on IPv4, dead on IPv6 | No AAAA record, or firewall blocking v6 | Check dig AAAA and ufw status for (v6) rules |
curl -6 fails but ss shows the socket |
Provider-level firewall or unrouted IPv6 block | Check the VPS control panel network settings |
| Wrong site served over IPv6 | Default server block catches IPv6 while yours doesn't listen on it | Add IPv6 listeners to every vhost you serve |
Best practices for dual-stack Nginx
- Write explicit IPv4 and IPv6
listenlines in every block. Clarity beats clever socket tricks. - Skip
ipv6only=offunless you have a specific reason — defaults are fine. - Keep port 80 and 443 blocks symmetrical.
- Test with the raw IPv6 address, publish DNS after.
- Monitor both stacks. A v6-only outage is easy to miss.
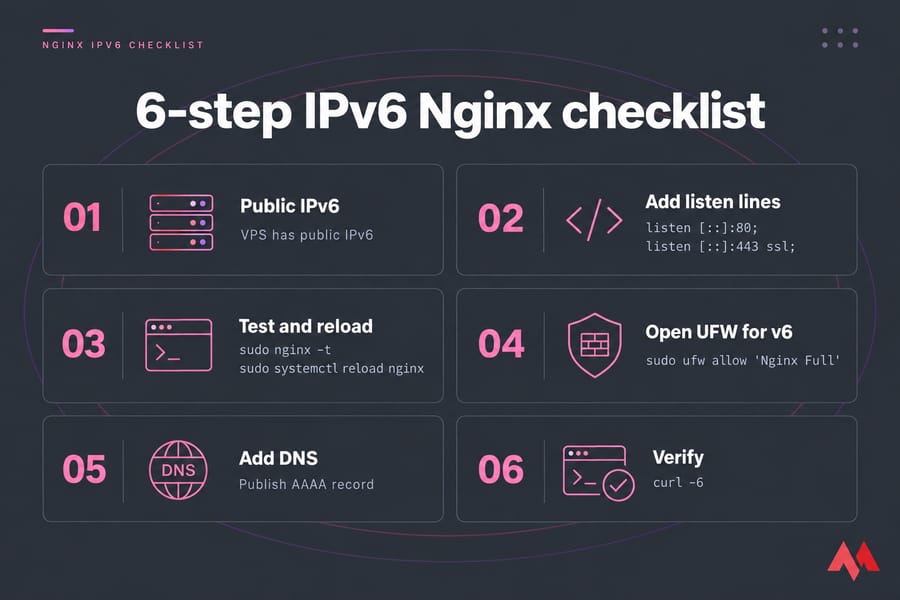
Six-step checklist graphic for configuring Nginx IPv6 on a VPS
Ready to put it live? See how to host a website on a Linux VPS with Nginx, or grab a Linux VPS with root access and public IPv6 included from day one.

An experienced tech and developer blog writer, specializing in VPS hosting and server technologies. Fueled by a passion for innovation, I break down complex technical concepts into digestible content, simplifying tech for everyone.