
In the ever-evolving landscape of network technology, the transition from IPv4 to IPv6 has become a crucial step for enhancing online communication capabilities. This guide focuses on 'How to Set up IPv6 on Ubuntu Linux Server,' a topic of significant importance for network administrators and IT professionals. Setting up IPv6 on an Ubuntu server involves understanding the new addressing scheme and configuring the server to handle these addresses efficiently. As Ubuntu is a widely used server OS, mastering this setup is essential for ensuring compatibility with the latest network standards and taking advantage of the improved security and speed that IPv6 offers. We will navigate through the necessary steps to achieve a seamless and efficient IPv6 configuration on your Ubuntu server.
How to Set Up IPV6 on Ubuntu
Setting up IPv6 on your Ubuntu Linux server is a crucial step to ensure your system is ready for the modern internet landscape. IPv6, with its larger address space, brings enhanced security and improved connectivity. In this guide, we'll walk you through the process step by step, making it easy for even beginners to follow along.
Step 1: Editing sysctl.conf file
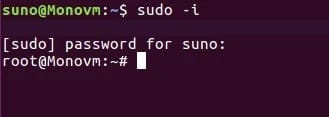
- In order to go through with this setup you will need to be logged in as the root user. Your terminal will look similar to the one below.

- If you are not logged in as root user, then in order to login use the following code and type your password.
sudo –i
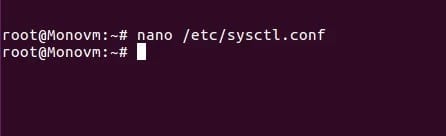
- Now we will need to enable IPv6 configurations and in order to do that we will be working throughout this article with nano editor. You can use any file editor you prefer.
First, you will have edit the sysctl.conf file, which can be done with the following code:
~# nano /etc/sysctl.conf
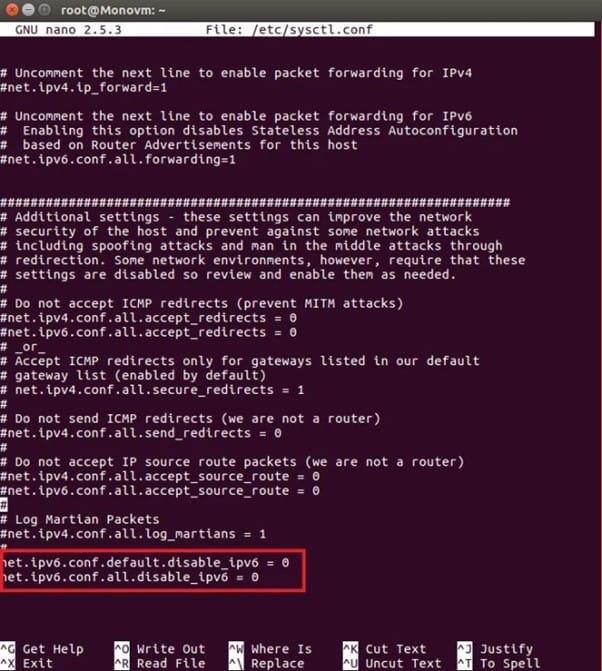
- In the opened file at the bottom add these two lines and exit the editor after saving the changes.
net.ipv6.conf.default.disable_ipv6 = 0
net.ipv6.conf.all.disable_ipv6 = 0
- Now it’s time to change your IPv6. To do so, write the following code in your terminal.
nano /etc/network/interfaces
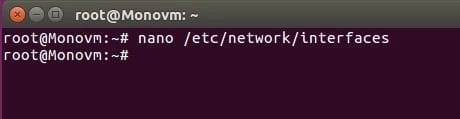
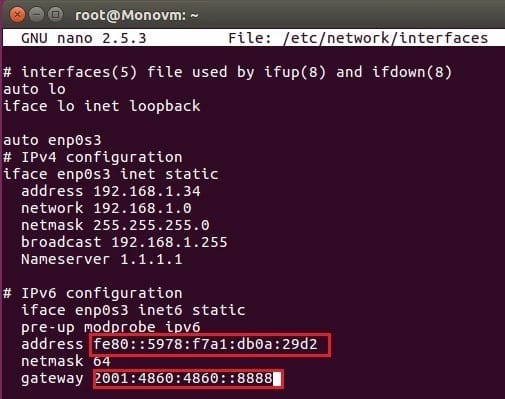
Step 2: Editing interfaces file
Once you are in the editor at the end of the file add the following code.
iface enp0s3 inet6 static
pre-up modprobe ipv6
address Your-IPv6-Address
netmask 64
gateway Your-Ipv6-Gateway-Address
Note that these addresses are examples of IPv6 addresses and in those places you will need to provide your desired IPv6 address. Save the chnages to the file and exit the editor.
Step 3: Restarting network service
Now in order these changes to take effect, you wll need to restart your networking service with the following command:
~#sudo systemctl restart networking
All MonoVM Linux VPS servers will be activated with public IPV6 address also we provide a valid hostname records that you can use easily your IPV6.
Step 4: verifying the Ubuntu IPv6 installation
To confirm that IPv6 is now active on your Ubuntu server, use the following command:
ifconfig | grep inet6
You should see the IPv6 addresses associated with your network interfaces. This indicates a successful IPv6 setup on your Ubuntu Linux server.
What Are the Reasons for Choosing to Disable IPv6 on Ubuntu?
While enabling IPv6 on Ubuntu offers numerous advantages, there are situations where you might consider disabling it. Understanding the reasons behind such a decision is crucial for effective network management.
- Network Compatibility Issues
In some instances, network devices or applications might not be fully compatible with IPv6. Disabling IPv6 can be a temporary solution to address compatibility issues until the necessary updates or fixes are available.
- Security Concerns
Although IPv6 is designed with enhanced security features, some administrators may opt to disable it due to unfamiliarity or perceived security risks. This decision often stems from a lack of understanding of IPv6 security features or concerns about potential vulnerabilities.
- IPv4 Preference
For legacy applications or environments that heavily rely on IPv4, administrators might choose to disable IPv6 to maintain consistency and simplicity in their network configurations. This can be a practical decision when transitioning to IPv6 is not immediately necessary.
- Troubleshooting and Debugging
Disabling IPv6 can also be a troubleshooting step in certain scenarios. If you encounter network issues or anomalies, temporarily disabling IPv6 can help identify whether the problems are related to IPv6 configuration or if they stem from other sources.
- Resource Optimization
In specific resource-constrained environments, administrators may disable IPv6 to conserve system resources. While modern systems are generally capable of handling both IPv4 and IPv6, disabling the latter can be a strategic choice for optimizing resource utilization in certain situations.
- Personal Preference or Policy
Administrative decisions sometimes come down to personal preference or organizational policies. If IPv6 is not a requirement for your specific use case or if your organization has a policy favoring IPv4, disabling IPv6 aligns with these preferences.
How to Disable IPv6 on Ubuntu?
Disabling IPv6 on your Ubuntu server can be necessary for various reasons, as discussed earlier. Fortunately, the process is straightforward, and there are multiple methods to achieve this. Below, we'll guide you through three different methods to disable IPv6 on your Ubuntu system.
Method 1: Disable IPv6 on Ubuntu Using the “sysctl” Command
The sysctl command allows you to dynamically change kernel parameters during runtime. To disable IPv6 using this method, open your terminal and execute the following commands:
sudo sysctl -w net.ipv6.conf.all.disable_ipv6=1
sudo sysctl -w net.ipv6.conf.default.disable_ipv6=1
This immediately disables IPv6 on your Ubuntu server. However, keep in mind that these changes are not persistent across reboots.
Method 2: Disable IPv6 on Ubuntu by Editing the “/etc/sysctl.conf” File
For a more persistent solution, you can edit the sysctl.conf file. Open the file with your preferred text editor and add the following lines at the end:
# Disable IPv6
net.ipv6.conf.all.disable_ipv6 = 1
net.ipv6.conf.default.disable_ipv6 = 1
Save the file and apply the changes by running:
sudo sysctl -p
This ensures that IPv6 remains disabled even after the system reboots.
Method 3: Disable IPv6 on Ubuntu Using GRUB
GRUB (Grand Unified Bootloader) is responsible for managing the boot process. To disable IPv6 using GRUB, edit the GRUB configuration file. Open the file, usually located at "/etc/default/grub," and add the following to the GRUB_CMDLINE_LINUX line:
ipv6.disable=1
Save the file and update GRUB:
sudo update-grub
Reboot your system to apply the changes.
Disable IPv6 on Ubuntu (Ubuntu Disable IPv6)
In conclusion, setting up and managing IPv6 on your Ubuntu Linux server is a critical step in ensuring optimal connectivity and security in the ever-evolving digital landscape. The benefits of IPv6, with its expanded address space and enhanced features, provide a forward-looking approach to networking. However, understanding the reasons and methods for disabling IPv6 is equally essential, especially in cases of network compatibility issues, security concerns, or organizational policies favoring IPv4. Whether you choose to enable or disable IPv6 on your Ubuntu server, the comprehensive guide provided here empowers you with the knowledge and practical steps to make informed decisions that align with your specific needs. Stay adaptable to the changing technological landscape, and ensure your Ubuntu server remains resilient and well-suited for the challenges of the modern internet.

I'm fascinated by the IT world and how the 1's and 0's work. While I venture into the world of Technology, I try to share what I know in the simplest way with you. Not a fan of coffee, a travel addict, and a self-accredited 'master chef'.