
With the rising adaptation of digitalization by the business world, it becomes obvious for online businesses to focus on securing their systems from external threats. One of the evergreen ways to accomplish the same is by employing firewalls.
When it comes to Ubuntu, a packet filtering system called Netfilter, and a traditional interface for its manipulation called iptables are provided. The iptables serve as a firewall solution that can be configured and customized as per the need.
However, getting proficient in iptables and getting started with Netfilter firewalling is a daunting task. As a result, a lot of work has been done over the years to build the frontends for iptables to achieve a better firewall. The Uncomplicated Firewall (UFW) is the outcome.
It is the default firewall configuration tool for Ubuntu, which is disabled until you configure and execute it. This blog details a step-by-step guide to configure The Uncomplicated Firewall on Ubuntu 14.04 along with all the necessary information needed to make the most out of UFW, which we are going to discuss next.
UFW 101: Everything You Need to Know
Ubuntu comes with its firewall labelled UFW. It is developed to provide a user-friendly way to create an IPv4 or IPv6 host-based firewall. Beginners can use UFW via the GUI (Graphic User Interface) tool Gufw, a graphical front-end for UFW.
The Uncomplicated FireWall has an easy-to-use frontend for the standard Linux iptables commands through which you can perform basic firewall tasks without learning iptables. However, it doesn’t offer all the flexibility and power of iptables commands, but it’s, nonetheless, less complex to run.
It was first introduced in Ubuntu 8.04 LTS and comes in-built in all Ubuntu installations after 8.04 LTS by default. Let’s dive into the guide to learn how to configure an Uncomplicated Firewall on Ubuntu 14.04 and filter your incoming and outgoing traffic along with boosting the security.
Step-By-Step to Configure Uncomplicated Firewall on Ubuntu 14.04
1. Installing UFW
Typically, UFW comes pre-installed in Ubuntu but if somehow you ever need to install it by yourself, you can run the following command as a sudo user.
sudo apt-get install ufw
2. Allowing ports
If you have a web server, you would want everyone to access your website. And for this, you have to make the TCP port open through the following command:
sudo ufw allow <port>/tcp
3. Refusing ports
However, if you want to deny access to any particular port, you can take the advantage of the following command:
sudo ufw deny <port>/<protocol(optional)>
It is highly suggested to restrict the access to your SSH port (its port is 22 by default) from anywhere except your trusted IP addresses.
4. Allowing limited access
To allow certain IP addresses only to access your restricted ports, you can use the following command:
sudo ufw allow from (IP address) to any port (port number)
5. Enabling UFW from the Terminal
Since it is disabled by default, you need to enable the firewall by running the below-mentioned command on your terminal:
Note: But before proceeding, make sure that your SSH port is allowed to receive connections from your IP address.
sudo ufw enable
Right after running this command, a line will pop-up which states “Command may disrupt existing ssh connections. Proceed with operation (y|n)?”. Type Y and hit enter to activate UFW.

6. Check Status
To have a clear look at all your rules and their respective status, use the “sudo ufw status” command.
(step-6)
7. Disabling UFW
To disable UFW, you can run the following command.
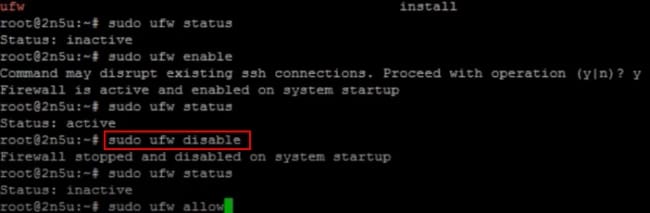
Moreover, you can check the status by running the “sudo ufw status” command, it will display “inactive”.
8. Reloading and Restarting UFW
If you want to reload the rules/the rules to take effect, you can do it by reloading UFW by running the “sudo ufw reload” command.
To restart UFW, you have to disable it first and then enable it by running the respective commands. The commands are:
sudo ufw disablesudo ufw enable
Note: Ensure to have your SSH port allowed for your IP address.
9. Deleting rules
The easiest method to delete a rule in a firewall is deleting the same by the number. To find the corresponding rule number for a particular rule, you have to run the following command.
ufw status numbered
Right after hitting the Enter key, you’ll be displayed with the numbers (in brackets), actions, and their respective source.
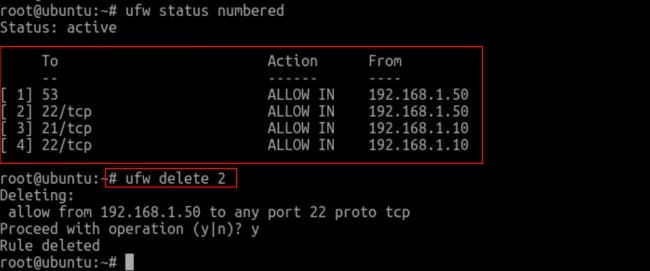
To delete a particular rule, you can run “ufw delete (number)” and, as a result, the respective rule for that number will be deleted.
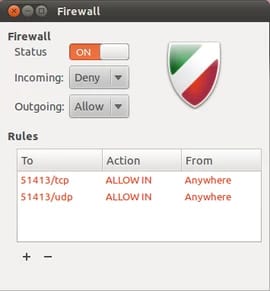
10. Using the Graphical Interface
To have even more easy control over enabling or disabling the firewall, managing the default policy for inbound or outbound traffic, or adding rules, you can use GUFW graphical interface for UFW.
Ubuntu doesn’t come with a graphical interface, but gufw is embedded with Ubuntu’s software repositories. Run the following command to install it:
sudo apt-get install gufw
You can conveniently execute simple or complicated rules.
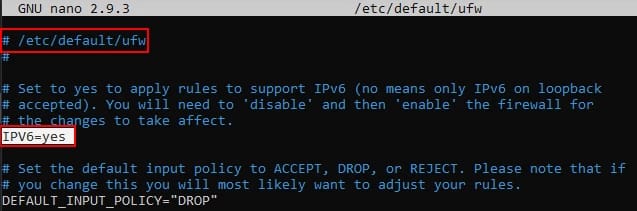
11. Allowing IPv6
If you’re up to IPv6, then you need to enable IPv6 and IPv4 support on UFW. Run the “sudo nano /etc/default/ufw” command on your text editor. After that, make sure “IPV6” is set to "yes" in the configuration file as shown.
12. Returning to default
If you want to delete all the rules in one shot and want the default settings back, then you can simply type the following command:
sudo ufw reset
That was all about configuring The Uncomplicated FireWall (UFW) on Ubuntu 14.04, and in most updates as well.
Conclusion
One of the very first attempts to forte up your cloud server is a functioning firewall. It will help you get protected against the usual hacking attempts and spam, and UFW in Ubuntu helps do the same.
The blog is constructed with all the necessary steps required to configure UFW (Uncomplicated Firewall) on Ubuntu 14.04. Along with this, the blog also focuses on providing you with all the other details and necessary information regarding the same.
However, to be truthful, to make your security measures more detailed and robust, you need to get your hands on iptables too, and only using UFW won’t help.
