
Want the short version? To transfer a Minecraft world to a new server, stop the old server, back it up, download the world folder plus player data and server configs, upload everything to the new host, set level-name in server.properties to match your world folder, then start the server on the same Minecraft version and test privately before you tell anyone the new IP.
That's the whole job in one breath. The reason people still lose builds and inventories is that they copy one folder, cross their fingers, and skip the checks. I've watched a 400-hour survival world come back as a blank beach because of a single capital letter in a folder name.
So let's do it properly.
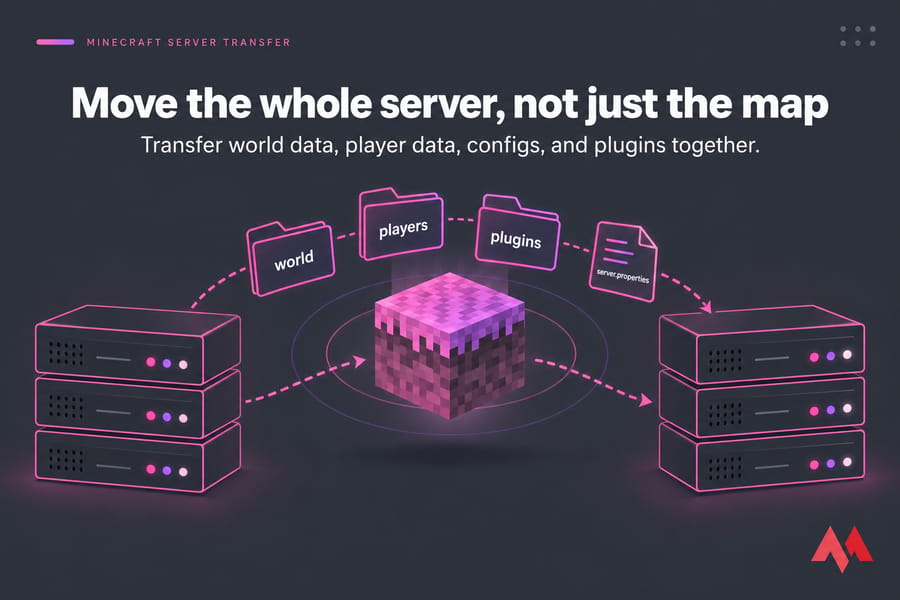
What transfers in a Minecraft server migration
There's a difference between uploading a custom singleplayer map and doing a real Minecraft server migration. The first one is a file drop. The second one is moving a live service — world, players, permissions, plugin databases, settings.
A "world transfer" that keeps your community happy usually includes four things: the world folder (with all dimensions), player data, server configuration files, and whatever plugins or mods your server runs.
| What you move | World-only transfer | Full server migration |
|---|---|---|
| Builds and terrain | Yes | Yes |
| Nether and End | Only if you catch the dimension folders | Yes |
| Inventories, positions, ender chests | No | Yes |
| Ops, whitelist, bans | No | Yes |
| Plugin/mod data and ranks | No | Yes |
Copying only world is the single most common mistake I see. It gets you the terrain and nothing else. If you're spinning up the destination box from scratch, our guide on how to make a Minecraft server covers the base install you'll be dropping these files into.
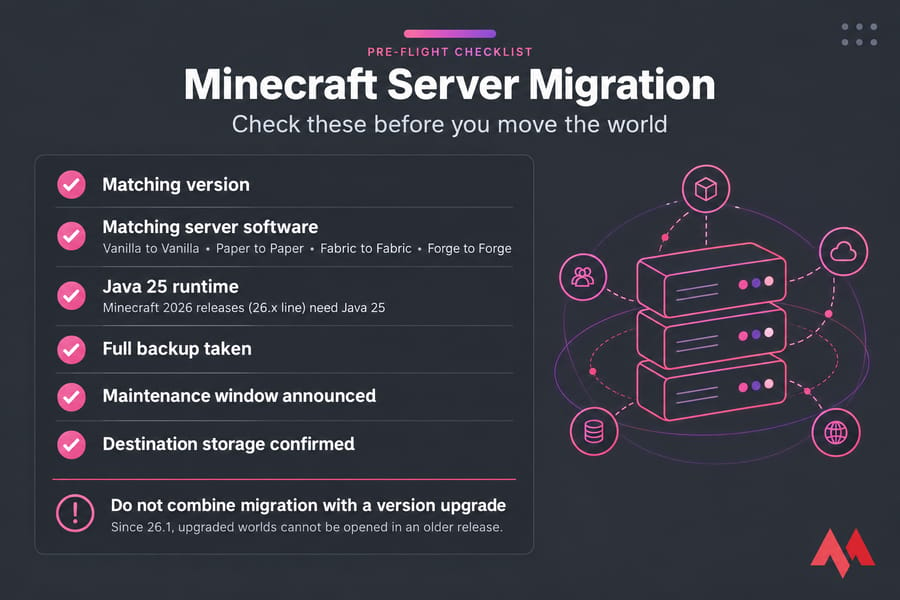
Minecraft server migration checklist before you start
Five minutes here saves two hours later.
- Match the Minecraft version exactly. Same release on both ends. Not "close enough."
- Match the server software. Vanilla to Vanilla, Paper to Paper, Fabric to Fabric, Forge to Forge with the same modpack build.
- Check the Java runtime. Minecraft's 2026 releases (the 26.x line) need Java 25 on the server. Old hosts sometimes still ship Java 17 or 21.
- Take a full backup first. Archive the entire server directory, not just the world. Here's how to back up a Minecraft server automatically so you always have a rollback point.
- Announce a maintenance window. Nobody should be online writing new chunks while you're copying files.
- Confirm storage and access. Enough disk on the new host, plus SFTP or file manager credentials ready.
One hard rule: don't combine a migration with a version upgrade. Move first on the current version, confirm everything works, then update a Minecraft server as a separate job with its own backup. Version jumps rewrite chunk and save data, and since 26.1 an upgraded world can't be opened in an older release at all. One-way door.
Minecraft world files to copy from the old server
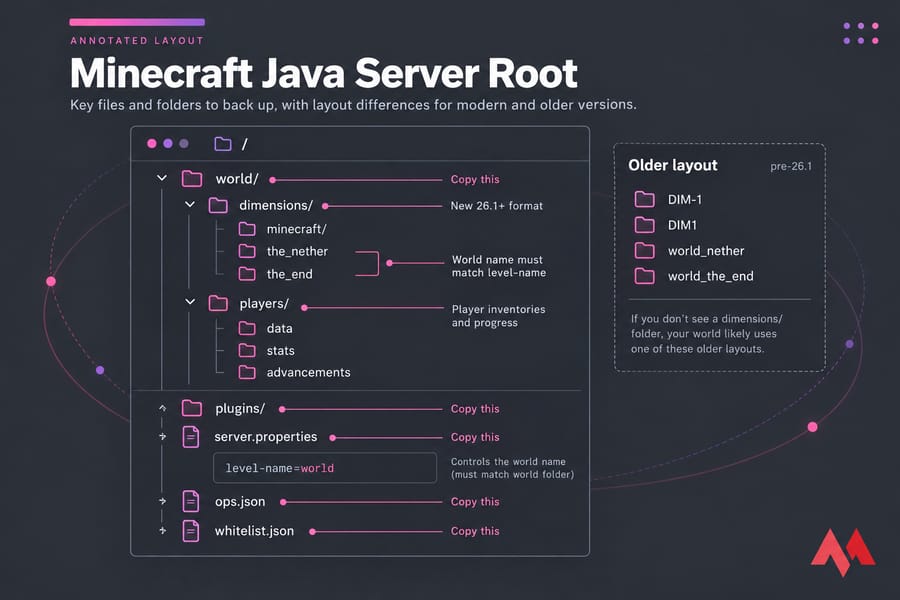
Here's where the exact names matter — and where recent Minecraft versions changed the rules. As of 26.1, dimensions live inside the world folder under dimensions/minecraft/, and player files moved to a players/ subfolder. Paper adopted the same vanilla-style layout in its 26.1 build, so the old top-level world_nether and world_the_end folders no longer exist on current Paper servers.
If your server is still on a 1.21.x-era release, you'll see the older layout instead. Both are listed below.
| File / folder | Edition | Required? | What it preserves |
|---|---|---|---|
world/ |
Java | Required | Overworld terrain, builds, chests |
world/dimensions/minecraft/the_nether and the_end (26.1+) |
Java | Required | Nether and End, portals, End cities |
world_nether/, world_the_end/ (pre-26.1 Paper/Spigot) |
Java | Required | Same dimensions, older folder layout |
world/DIM-1, world/DIM1 (pre-26.1 Vanilla/Fabric/Forge) |
Java | Required | Same dimensions, older folder layout |
players/data (was playerdata/) |
Java | Required | Inventories, XP, positions, ender chests |
players/stats, players/advancements |
Java | Recommended | Stats and advancement progress |
level.dat |
Java + Bedrock | Required | Seed, spawn, world rules, version stamp |
server.properties |
Java | Required | World name, gamemode, difficulty, view distance |
ops.json, whitelist.json, banned-players.json, banned-ips.json |
Java | Required if used | Admin access, whitelist, ban lists |
plugins/ |
Java (Paper/Spigot) | Recommended | Ranks, economy, claims, plugin databases |
mods/ + config/ |
Java (Fabric/Forge) | Recommended | Modded blocks, machines, mod settings |
worlds/<YourWorld>/ or exported .mcworld |
Bedrock | Required | Entire Bedrock world |
permissions.json, allowlist.json |
Bedrock | Required if used | Operator and allowlist access |
Not sure which layout you have? Open the world folder and look. If there's a dimensions directory, you're on the new format. If you see DIM-1 or a sibling world_nether folder, you're on the old one.
How to transfer a Minecraft Java world to a new server
This is the core process. It works on most control panels and on a bare VPS — only the button names change.
- Stop the old server. Use the panel's Stop button or run
stopin the console so chunks and player data flush to disk. Never copy a running world. - Archive the server directory. Zip the whole folder if your panel supports it. On a Linux box:
tar -czf mc-backup.tar.gz /home/minecraft/server. One file transfers far more reliably than 80,000 loose region files. - Download or move the archive. Panel file manager for anything under a gigabyte or so. For bigger worlds, use SFTP — it runs over SSH, so it survives flaky connections better than plain FTP and encrypts the transfer. FileZilla is fine;
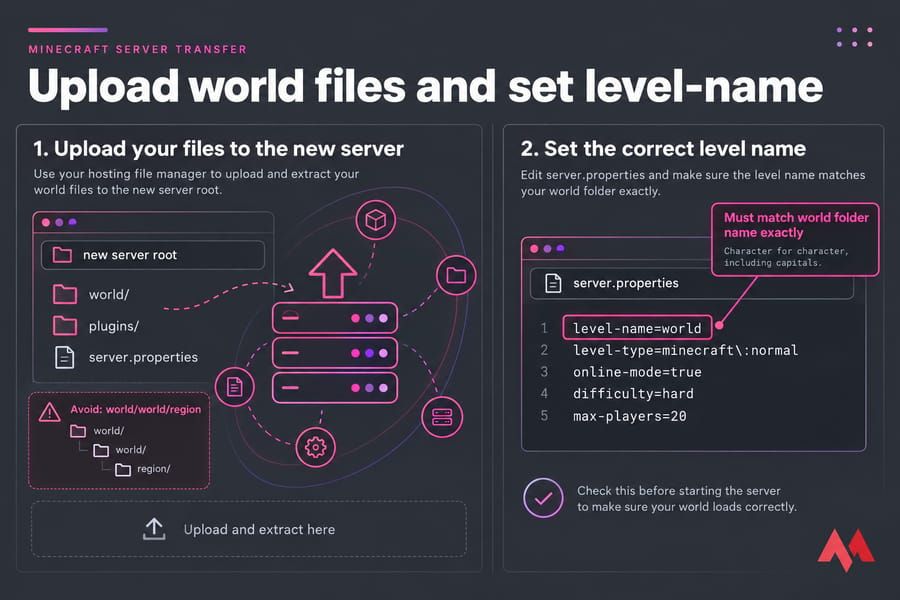
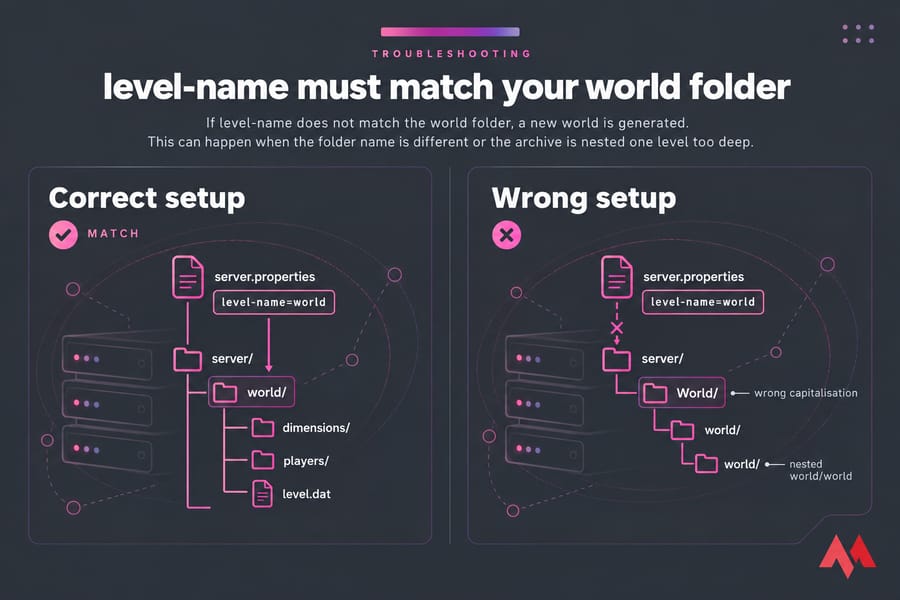
scporrsync -avzbetween two Linux hosts is faster still. Our walkthrough on how to connect to a VPS covers the SSH side if that's new to you. - Upload to the new server root and extract there. Then check the nesting. A very common slip is ending up with
world/world/regionbecause the archive unpacked one level too deep. - Edit
server.properties. Thelevel-namevalue must match your world folder name character for character, including capitals.
level-name=world
level-type=minecraft\:normal
online-mode=true
difficulty=hard
max-players=20- Start the server and read the console. You want to see it loading your world, not "Preparing level" followed by fresh terrain generation. Check the reported version in the startup lines too.
- Join and look around. Spawn point, your last base, the Nether portal.
Common mistake after this step: people delete the old server immediately. Don't. Keep it stopped but intact for at least a week.
How to transfer a Minecraft Bedrock world to a new server
Bedrock is a different path. Don't mix Java folder names into it.
- Export the world. On the Windows Bedrock client, go to your world's edit screen and choose Export World. You get a single
.mcworldfile. This workflow is much easier on Windows than on mobile or console. - Extract it with 7-Zip or WinRAR. Inside you'll find
level.dat,db/, and the rest. Rename the resulting folder something simple likeSurvivalWorld— no spaces. - Stop the new server and upload that folder into the
worlds/directory over SFTP or the panel file manager. - Set the level name. In
server.propertieson a Bedrock Dedicated Server,level-namemust equal the folder name you just uploaded. Some panels label this field "Level Name" under Bedrock server properties. - Copy
permissions.jsonandallowlist.jsonfrom the old server if you used operator or allowlist controls, then start up.
And to be clear: converting a Java world to Bedrock (or back) is a completely separate job needing third-party conversion tools. It's not a migration — it's a rebuild, and it's lossy.
How to move Minecraft plugins, mods, and config files
Terrain without your plugins isn't really your server. Ranks vanish, claims stop protecting, the economy resets to zero.
For Paper, Spigot, or Bukkit servers, copy the entire plugins/ folder — including each plugin's own subfolder, because that's where the SQLite databases and YAML configs live. LuckPerms permissions, EssentialsX homes, CoreProtect logs: all in there. For Fabric and Forge, copy both mods/ and config/, and match the loader version, not just the Minecraft version. If the plugin-versus-mod distinction is still fuzzy, read Minecraft plugins vs mods before you start shuffling jars.
| Old server | New server | Safe to move? | Notes |
|---|---|---|---|
| Paper | Paper (same version) | Yes | Cleanest possible migration |
| Spigot | Paper | Usually | On 26.1+, go Spigot → Vanilla → Paper; direct moves aren't supported |
| Paper | Vanilla | With care | Plugins stop working; pre-26.1 worlds need dimension folders remapped |
| Vanilla | Fabric | Yes | Same world layout; add mods to both server and clients |
| Forge | Forge (same modpack build) | Yes | Mismatched mod versions can void chunks containing their blocks |
| Forge | Fabric | No | Different loaders, incompatible block IDs — expect holes in the world |
| Paper | Fabric or Forge | No | Plugin data doesn't port; treat as a new server build |
Running a modded pack? Our guide to making a modded Minecraft server lists the loader files that have to line up on both ends.
How to test a transferred Minecraft world before players join
Put the whitelist on and go in alone first. Then work this list:
- Spawn point is where it should be, not a random beach
- Your main base and outlying builds render, with no missing chunk walls
- Inventory, XP level, and ender chest contents are intact
- Nether portal works and lands you in your existing Nether
- End portal still leads to your fought-out End, not a fresh dragon
- Ops have their permissions; whitelist and ban lists carried over
- Plugin commands respond — test one rank command and one economy command
- The new IP or domain resolves for an outside player
Two more players in different regions is ideal for that last check. Need to confirm the address you're handing out? Here's how to find a Minecraft server address. Keep the old server offline the whole time — if half your players connect to the old IP and half to the new one, you'll have two diverging worlds and no clean way to merge them.
Minecraft world transfer problems and troubleshooting fixes
| Problem | Likely cause | Fix |
|---|---|---|
| "My server made a new world" | level-name doesn't match the folder, wrong capitalisation, or the archive nested one level deep |
Stop the server, delete the auto-generated folder, correct the name or flatten the nesting, restart |
| "Player inventories are gone" | players/data (or legacy playerdata) wasn't copied, or online-mode changed and UUIDs shifted |
Copy the player folder from the backup and keep online-mode=true as it was |
| "The Nether didn't transfer" | Dimension folders left behind, or you switched server software with a different layout | Copy the dimension folders across; for pre-26.1 software changes, move DIM-1/DIM1 in or out of the world folder as required |
| Missing or corrupted chunks | Version mismatch, or files copied while the server was running | Restore the backup, start on the original version, migrate again cleanly |
| Ranks and claims reset | Only plugin jars copied, not their data subfolders | Re-copy the whole plugins/ tree |
| Server won't boot at all | Wrong Java version, or too little RAM for the pack | Install Java 25 for 26.x builds; see how to add more RAM to your Minecraft server |
| Upload fails partway | Thousands of small files over a browser uploader or plain FTP | Archive first, then push via SFTP or rsync; see transferring files from Windows to a Linux server |
| Players say "can't connect" | Old DNS cached, firewall closed, or port 25565 not open | Open the port and check your Minecraft server port forwarding setup |
Should you move your Minecraft server to a VPS?
Most people searching for this aren't switching hosts for fun. They're escaping something — a laggy shared plan, a PC that has to stay on all night, a host with no file access.
You've outgrown home hosting when your friends can't play unless your machine is awake, when port forwarding fights with your router or CGNAT, or when four players turn the tick rate to mush. A VPS fixes those with a static public IP, 24/7 uptime, and root-level file access — which also makes migrations like this one far less painful, because you can re-upload and roll back as many times as you want.
Size it before you buy. Plan roughly 2–3 GB of RAM for a small vanilla group and 6–8 GB for a mid-sized modded pack; how much RAM Minecraft needs breaks that down by player count.
Ready to move your Minecraft world to a faster server?
If your current setup lags, drops offline, or won't give you the file access a clean migration needs, Minecraft VPS hosting from MonoVM gives you root control, global locations, and 24/7 support. Prefer a ready-made panel instead? See Minecraft server hosting plans.
Final checklist for a no-data-loss Minecraft server migration
- Same Minecraft version and same server software on both ends
- Full backup of the old server taken and stored off the server
- World folder, all dimensions, player data, configs, plugins or mods copied
level-namematches the world folder exactly, capitals included- Tested solo behind a whitelist: spawn, inventories, Nether, End, permissions
- Old server kept stopped but intact until the new one is proven
Tick all six and a Minecraft world transfer to a new server stops being scary. It becomes a twenty-minute maintenance window nobody complains about.
Start your new Minecraft server and bring your world with you — builds, progress and settings intact.

An experienced tech and developer blog writer, specializing in VPS hosting and server technologies. Fueled by a passion for innovation, I break down complex technical concepts into digestible content, simplifying tech for everyone.