OpenVPN on MikroTik: what actually works (and what doesn't)
Yes, you can run OpenVPN on MikroTik but mostly as a client, and only if the server config plays nice with RouterOS. That's the short version. The longer version involves cipher mismatches, certificate quirks, and a few routing decisions that can lock you out of your own router if you're not careful.
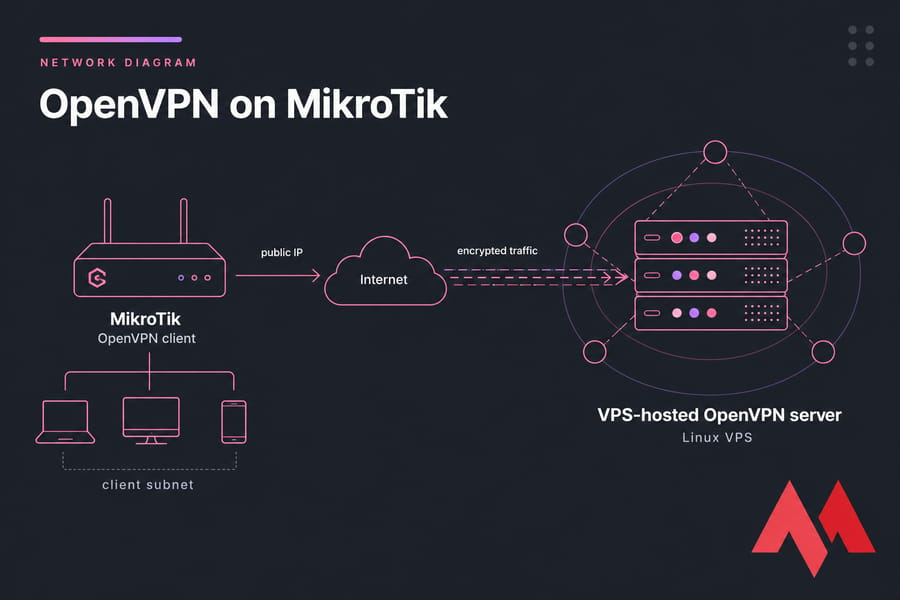
I've configured this setup more times than I can count, on everything from a hAP ac² in someone's home office to a CCR1009 sitting in a small ISP rack. It works. It works well, actually once you understand where MikroTik's OpenVPN implementation draws the line. If you're building everything from scratch, running your own VPN server on a Linux VPS gives you far more control than fighting with third-party profiles.
This guide focuses on the most common scenario: MikroTik as an OpenVPN client connecting to a remote OpenVPN server (often a VPS you control). We'll also cover when MikroTik can act as a server, why a lot of commercial .ovpn profiles fail, and how to fix the routing once the tunnel is up.
MikroTik OpenVPN support and RouterOS limitations
Before you copy a single setting, let's set expectations. MikroTik's OpenVPN implementation is real, but it's not a drop-in replacement for the desktop OpenVPN client. There are gaps. Knowing them up front saves hours.
Does MikroTik support OpenVPN client, server, or both?
Both, technically. RouterOS has an OVPN client (under PPP) and an OVPN server mode. In practice, most admins use it as a client. Why? Because the server side has historically lacked features like tls-auth, full UDP support in older versions, and push-route support though newer RouterOS releases have closed some of those gaps.
RouterOS version differences that affect OVPN
This part is honestly a moving target. Older RouterOS versions (pre-7) supported OpenVPN over TCP only, with a limited set of ciphers. RouterOS 7.x added UDP support and broadened the cipher list including AES-GCM variants. If you're stuck on an older firmware, you'll feel the limits fast. Keeping your routerOS up to date is also one of the basic steps you'll find in our MikroTik firewall hardening guide.
Common compatibility issues with commercial VPN profiles
Here's the painful truth. Most commercial VPN providers NordVPN, ExpressVPN, Surfshark, you name it ship .ovpn files designed for the desktop OpenVPN binary. They use options MikroTik doesn't honor: tls-crypt, compress lz4, auth-user-pass with embedded inline certs, push directives, you name it.
You can sometimes massage these profiles to work, but it's tedious. If you want a VPN that just works on MikroTik, run your own server.
| Setting / Feature | Supported on MikroTik | Notes |
| OpenVPN over TCP | Yes | Supported across most RouterOS versions |
| OpenVPN over UDP | RouterOS 7+ | Not available in RouterOS 6 |
| AES-256-CBC / AES-128-CBC | Yes | Reliable cipher choice for most setups |
| AES-GCM ciphers | RouterOS 7+ | Verify exact build documentation |
| tls-auth (static key) | Limited | Configurable manually in some versions |
| tls-crypt | No | Disable on server side for MikroTik clients |
| LZO / LZ4 compression | Limited | Often must be disabled server-side |
| Push routes from server | Limited | Add routes manually on the router |
| .ovpn file direct import | No | You'll configure manually in WinBox/CLI |
| Username/password auth | Yes | Combined with certificate auth |
Key takeaway: MikroTik OpenVPN works best when the server config is built with RouterOS compatibility in mind. Fighting a third-party profile is a losing game; building a matching server is the winning one.
What you need before configuring OpenVPN on MikroTik
Setup goes smoother when you've gathered everything before touching WinBox. Here's the checklist I run through every single time.
Information you need from the OpenVPN server
- Server hostname or public IP — the address your router will dial out to
- Port — typically 1194, but anything goes
- Protocol — TCP or UDP (UDP requires RouterOS 7+)
- Cipher — must match what the server is configured with
- Auth algorithm — SHA1, SHA256, etc.
- Authentication method — certificate only, or certificate + username/password
Required certificates, keys, and login details
You'll typically need three files: the CA certificate (ca.crt), the client certificate (client.crt), and the client private key (client.key). If your server uses username/password on top, grab those too.
One quick gotcha: if the private key is password-protected, you'll need that passphrase to import it into RouterOS. There's no way to recover it later.
| Item | Why it matters | Where to find it |
| Server address & port | Required for client connection | Server config or provider dashboard |
| CA / client cert / key | Required for TLS handshake | Server admin or VPN provider |
| Cipher & auth algorithm | Mismatch = TLS handshake failure | server.conf on Linux server |
| Username/password | If auth-user-pass is enabled | Provider or your own setup |
| RouterOS version | Determines feature support | /system resource print |
How to configure a MikroTik OpenVPN client
Now we get into the actual work. I'll walk through this with WinBox in mind because that's how most admins do it, but every step has a CLI equivalent. I'll show both where it helps.
Step 1: Import certificates first
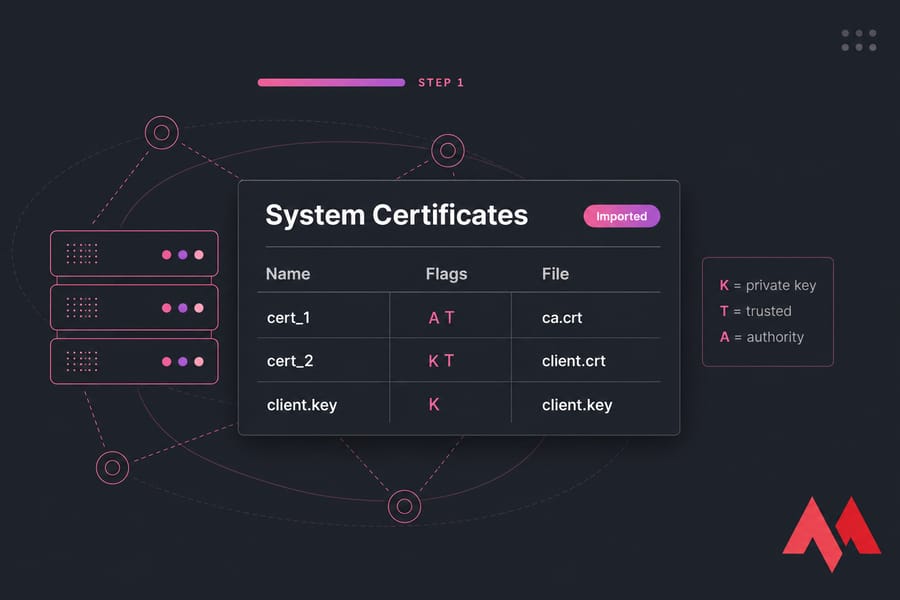
Don't skip this. The OVPN client interface needs the certs to exist before you can attach them. Upload your ca.crt, client.crt, and client.key files into the router's Files section drag-and-drop in WinBox works fine.
Then in System → Certificates, click Import and select each file in turn. If your private key has a passphrase, RouterOS will prompt for it. After import, you should see entries with names like cert_1, cert_2. The flag column tells you what's there: K means a private key is attached, T means trusted, A means authority.
Step 2: Create the OVPN client interface
Navigate to PPP → Interface → + and select OVPN Client. (In some RouterOS builds it's under Interfaces → OVPN Client directly.) You'll get a dialog with a bunch of fields. Here's what each one means in practice:
- Name — anything memorable. I usually use
ovpn-out1orvpn-to-vps. - Connect To — your server's hostname or IP
- Port — match the server (1194 by default)
- Mode —
ipfor routed (TUN), almost always what you want - User / Password — if your server uses auth-user-pass
- Profile — leave as
defaultunless you've created a custom one - Certificate — pick the client cert you imported
- Auth — match server (e.g.
sha1,sha256) - Cipher — match server (e.g.
aes-256-cbc) - Verify Server Certificate — turn this on if you imported the CA and want strict checking
Or if you prefer the terminal:
/interface ovpn-client add \
  name=ovpn-out1 \
  connect-to=vpn.example.com port=1194 \
  protocol=udp \
  user=myuser password=mypass \
  certificate=client_cert \
  auth=sha256 cipher=aes-256-cbc \
  add-default-route=no \
  disabled=no
Notice add-default-route=no. Leave it that way for now. We'll handle routing manually in the next section, and you really don't want the default route flipping while you're testing.
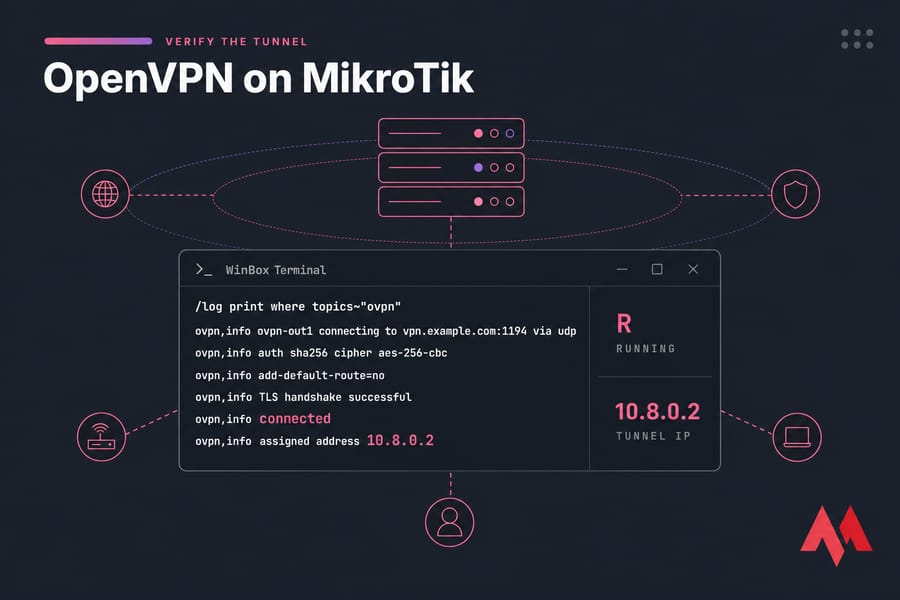
Step 3: Verify the tunnel is up
Hit Apply, then Enable. If everything's right, the interface will show R (running) within a few seconds. Open the interface and check the Status tab — you should see "connected" and an assigned IP.
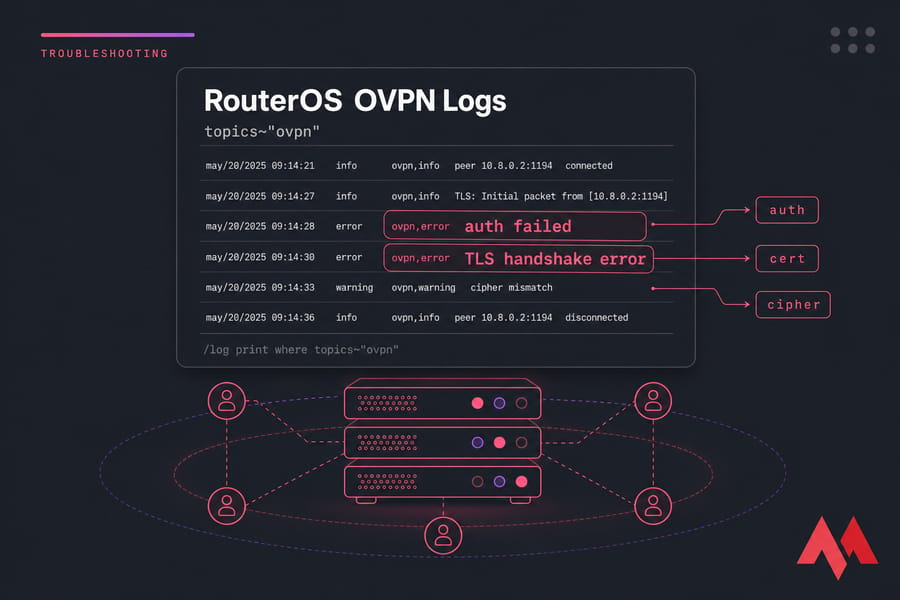
If it's not coming up, check the logs:
/log print where topics~"ovpn"The log messages are usually enough to diagnose the issue. Auth failed? Wrong creds. TLS error? Cert problem. Connection refused? Server isn't listening or a firewall is in the way.
How to import OpenVPN certificates into MikroTik correctly
I covered the basics above, but cert problems are so common they deserve their own section. Here's where most setups go sideways.
Which certificate files RouterOS accepts
RouterOS handles .crt, .cer, .pem, and .key files natively. PKCS#12 bundles (.p12 or .pfx) work too — and they're often easier because the cert and key come together. If your server admin can export a .p12, take it.
What RouterOS doesn't love: certs embedded inside .ovpn files between <ca>...</ca> tags. You'll need to extract those into separate .crt files first. Open the .ovpn in any text editor, copy each block (including the -----BEGIN CERTIFICATE----- lines), and save as a separate file.
How to mark certificates as trusted
After import, double-click the CA cert in System → Certificates and tick Trusted. Without this, the OVPN client may refuse to verify the server. From the CLI:
/certificate set ca_cert trusted=yesWhat to do if certificate import fails
The usual suspects, ranked by frequency:
- Wrong format. A DER-encoded cert won't import as PEM. Convert with OpenSSL:
openssl x509 -inform der -in cert.der -out cert.pem - Bad passphrase on the private key. Try the import again and watch the password field carefully.
- Key/cert mismatch. The client cert and key must be a matched pair. If they aren't, the import succeeds but the tunnel fails at TLS handshake.
- Missing intermediate CA. If your server uses a chain, you need to import every cert in it.
Pro tip: if you're setting up your own server anyway, use a VPS-hosted OpenVPN deployment where you control the entire certificate chain. No more guessing what the provider's CA bundle actually contains.
MikroTik VPN routing: full tunnel and split tunnel
The tunnel's up. Now what? By default, no traffic uses it. You decide what gets routed through. This is where MikroTik OpenVPN setups most often go wrong — the connection works, but no traffic flows, or worse, you lock yourself out.

How to route all traffic through OpenVPN (full tunnel)
Full tunnel means every packet from your LAN exits through the VPN. Useful for branch offices, privacy, or accessing resources that whitelist your VPS IP. You'll need to configure appropriate routes, which ties closely into proper port forwarding on MikroTik if external services need to reach back inside the tunnel.
Warning: changing the default route can lock you out of remote management instantly. If you're configuring this from a remote location, set up a recovery method first either a scheduled config rollback or out-of-band access. A safe management practice is to always have a backup of your configuration; see our guide on how to back up MikroTik configuration.
Here's the safer way. Add a route through the OVPN interface with a lower distance than the existing default:
/ip route add dst-address=0.0.0.0/0 gateway=ovpn-out1 distance=1 comment="VPN default"Or in the OVPN client settings, set add-default-route=yes. Either approach works. The CLI route gives you more control over distance and routing marks.
How to route only selected subnets through the VPN (split tunnel)
Split tunnel sends some traffic through the VPN and the rest through your normal ISP. This is the right choice when you only need to reach a remote office subnet, an admin VPS, or specific cloud resources.
Two approaches. Simple route-based:
/ip route add dst-address=10.50.0.0/16 gateway=ovpn-out1 comment="Remote office"Or per-source policy routing if you want only certain LAN devices to use the tunnel:
/ip firewall mangle add chain=prerouting src-address=192.168.88.50 \
  action=mark-routing new-routing-mark=via-vpn passthrough=no

/ip route add dst-address=0.0.0.0/0 gateway=ovpn-out1 \
  routing-mark=via-vpn distance=1
The mangle rule tags packets from a specific host, and the marked route sends only those packets through the VPN.
How to avoid losing MikroTik management access
Before you flip the default route, add a static route for your management network so it always uses the local gateway:
/ip route add dst-address=YOUR.MGMT.IP/32 gateway=ISP-gateway distance=1Validate routing before walking away. If the trace shows your VPS as the second hop, full tunnel is working. If it shows your ISP, your route isn't being preferred — check distances and gateway reachability. Running a quick traceroute on MikroTik is the fastest way to confirm which path your packets are taking.
MikroTik firewall and NAT rules for OpenVPN traffic
Tunnel up, route in place, still nothing? It's almost always NAT, DNS, or a firewall rule. In that order. Here's how to fix each.
When masquerade is required
If your LAN clients are using private IPs (192.168.x.x, 10.x.x.x) and you want them to reach the internet through the VPN, you need to masquerade outgoing traffic on the OVPN interface:
/ip firewall nat add chain=srcnat out-interface=ovpn-out1 \
  action=masquerade comment="VPN egress NAT"
Without this, the VPS sees raw private IPs and has no way to send replies back. Packets vanish into the void. Frustrating to debug if you don't know to look here.
DNS settings that prevent resolution issues
Common scenario: tunnel works, you can ping 8.8.8.8, but google.com doesn't resolve. That's DNS. By default, your LAN clients are still using whatever DNS they had before — possibly your ISP's, which may be unreachable through the VPN, or which leaks queries outside the tunnel.
Fix it by pushing a public or VPS-hosted DNS resolver to clients. Configure DHCP to hand out 1.1.1.1 or your VPS's resolver, and make sure RouterOS's own DNS isn't quietly responding with cached ISP results. If you need a full walkthrough for this part, check our guide to DNS configuration on MikroTik.
Firewall rules that can break the tunnel
If you have a strict input/forward chain, the OVPN interface might be getting dropped. Check that:
- Forward chain allows traffic from LAN to
ovpn-out1and back - Input chain allows the OVPN interface for established/related
- Interface lists include
ovpn-out1in the WAN list (so existing WAN-style rules apply)
Quick summary: if the tunnel is up but traffic fails, check route, then NAT, then DNS in that exact order. Nine times out of ten, that sequence finds the problem.
MikroTik OpenVPN troubleshooting steps
This section is the one you'll bookmark. Real failure modes, real causes, real fixes.
The diagnostic order
When OpenVPN won't behave, work through this sequence. Don't skip steps — even if you're sure the issue is "obviously" cert-related.
- Can you reach the server's IP from the router?
/ping vpn.example.com - Is the port open?
/tool/torchon the WAN interface, or test from another machine - Are the OVPN logs showing handshake attempts?
/log print where topics~"ovpn" - If handshake fails, is it auth, cert, or cipher?
- If handshake succeeds but no traffic, route → NAT → DNS
| Symptom | Likely cause | Where to check | Fix |
| Tunnel won't connect at all | Server unreachable or port blocked | Ping server, test port from elsewhere | Verify server running, ISP not blocking 1194 |
| "auth failed" in logs | Wrong username/password | OVPN client credentials | Re-enter; check for trailing spaces |
| "TLS error" or "TLS handshake failed" | Cert mismatch or untrusted CA | System → Certificates | Re-import CA, mark trusted, verify chain |
| "cipher mismatch" | Server and client use different ciphers | Server cipher directive vs OVPN client setting |
Match exactly on both ends |
| "certificate has expired" | Cert past validity OR clock wrong | RouterOS clock, cert dates | Set NTP, regenerate cert if expired |
| Connected but no internet | Missing default route or NAT | IP → Routes, IP → Firewall → NAT | Add masquerade on ovpn-out1, verify route |
| Connected but DNS fails | Clients using unreachable DNS | DHCP server settings | Push public or VPS resolver |
| Tunnel flapping / dropping | MTU mismatch, packet fragmentation | Interface MTU settings | Lower MTU to 1400, add MSS clamp |
| "unable to load private key" | Wrong passphrase or corrupt key file | Certificate import dialog | Re-import with correct passphrase |
| Slow throughput on tunnel | CPU bottleneck or distant VPS | /system resource monitor |
Use lighter cipher, choose closer region |
Authentication failed and TLS errors
"Auth failed" almost always means credentials. But sometimes it means the client cert isn't matched to the server's CA. The error message is the same. Check both.
TLS errors on the other hand are usually one of three things: untrusted CA, system clock drift on the router, or a cert that's actually expired. The clock issue is sneaky if your MikroTik just booted and hasn't synced NTP yet, certs can appear "not yet valid." Fix the time first by configuring an NTP server on MikroTik and setting the correct MikroTik date and time.
MTU, MSS, and unstable tunnel issues
If your tunnel works for small packets but breaks on anything large (web pages load partially, SSH sessions hang), it's MTU. OpenVPN adds overhead, and if the underlying network can't fragment, big packets get dropped silently.
Two fixes, applied together:
/interface ovpn-client set ovpn-out1 mtu=1400

/ip firewall mangle add chain=forward protocol=tcp tcp-flags=syn \
  out-interface=ovpn-out1 action=change-mss new-mss=clamp-to-pmtu
The MSS clamp tells TCP sessions to negotiate smaller segment sizes, which keeps everything within the tunnel's MTU.
OpenVPN vs WireGuard vs L2TP on MikroTik
Honest take: if you're starting fresh in 2024 or later, WireGuard is usually the better pick on MikroTik. It's simpler, faster, and has been native in RouterOS since version 7. OpenVPN still earns its keep when you're connecting to existing infrastructure, when policy demands it, or when you need username/password auth without a separate identity layer.
| Protocol | Ease on MikroTik | Performance | Compatibility | Best use case |
| OpenVPN | Medium — manual cert handling | Good, CPU-bound | Wide industry support | Connecting to existing OpenVPN infrastructure |
| WireGuard | Easy — minimal config | Excellent | Newer; some legacy systems lack support | New deployments, branch office, mobile clients |
| L2TP/IPsec | Medium — IPsec policy fiddly | Good | Native on most OSes | Mixed-OS environments needing built-in client support. If you need this, see our MikroTik L2TP VPN setup guide. |
Key takeaway: for new MikroTik deployments, WireGuard is often the easiest road. Choose OpenVPN when compatibility, existing infrastructure, or specific auth requirements push you that way.
Using a VPS-hosted OpenVPN server for MikroTik
I've hinted at this throughout, but it deserves a proper section. The cleanest, most predictable MikroTik OpenVPN setup pairs your router with a VPN server you control on a VPS.
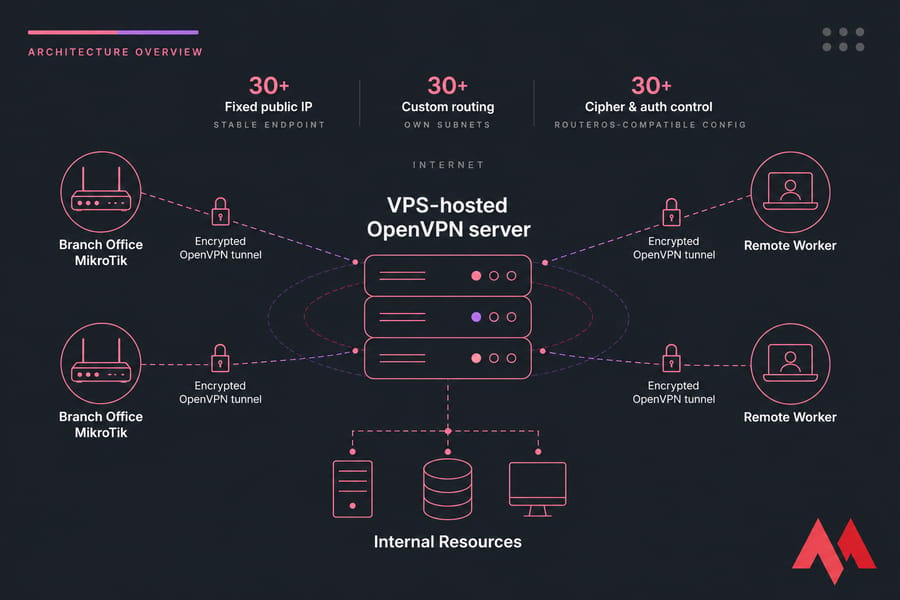
Why a VPS gives more control than a third-party VPN profile
- Cipher and auth control — pick exactly what RouterOS supports, no fighting with tls-crypt
- Fixed public IP — useful for whitelisting, DNS, and stable site-to-site routing
- Custom routing — push your own routes, define your own subnets
- Audit trail — your logs, your retention policy, your call
- Lower latency — pick a region close to your router. You can verify latency with a MikroTik bandwidth test.
Recommended server requirements for a MikroTik VPN endpoint
OpenVPN is CPU-bound. The cipher does the work, and a small VPS can saturate quickly under load. Rough sizing:
- Light use (1–5 clients, casual traffic): 1 vCPU, 1 GB RAM, any modern Linux
- Branch office (10–25 clients, business traffic): 2 vCPU, 2 GB RAM
- Heavy throughput (gigabit-class): 4+ vCPU, AES-NI capable CPU, fast network port
Build a reliable MikroTik VPN stack
Launch a VPS-hosted OpenVPN endpoint, choose a region close to your router, and connect with settings you fully control. No more provider profiles that don't match RouterOS. No more guessing what cipher the other end speaks. Just a VPN that works the way you configured it.
Get started with a MikroTik VPS or a high-performance Linux VPS and build your VPN stack from scratch.

An experienced tech and developer blog writer, specializing in VPS hosting and server technologies. Fueled by a passion for innovation, I break down complex technical concepts into digestible content, simplifying tech for everyone.