![How to Traceroute on MikroTik [MikroTik Traceroute Command]](/wp-content/uploads/2019/08/cover431-main.webp)
MikroTik is the operating system created by MikroTik RouterBOARD hardware that users can install on the PC. Users can turn it into the router with essential features such as wireless access point, routing, bandwidth management, VPN server, backhaul link, firewall, hotspot gateway, and so on. In this guide, we want to learn about How to Traceroute on MikroTik. It is a command-line program that assists in troubleshooting network connectivity issues using echo packets to trace the route.
Traceroute on MikroTik [Mikrotik Traceroute Command]
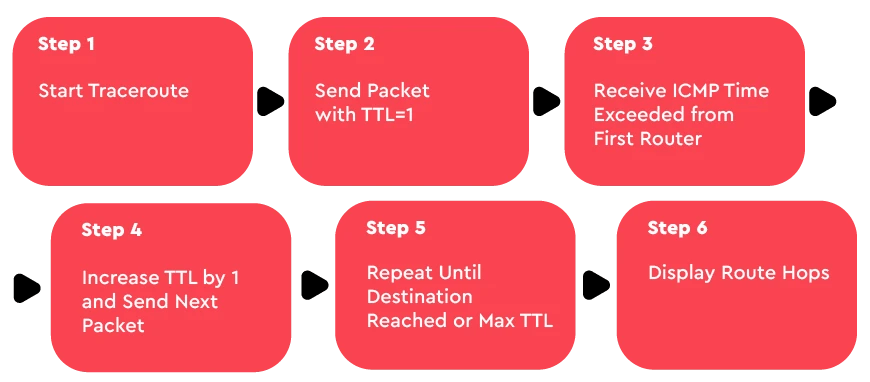
This tool is used to check hops (i.e., the way that packets take to the endpoint). Traceroute helps us figure out the packets' path and locating the disconnected hops. Here is a small guide on how to use it:
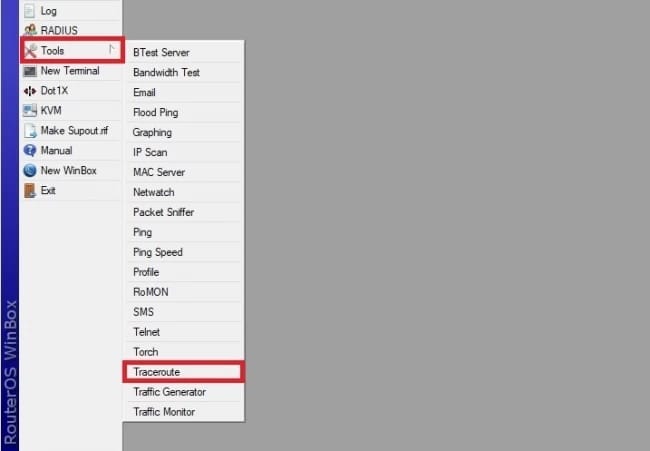
- First, you have to connect to the router with Winbox, then select "Traceroute" from the "Tools" menu.
- You can also use the following command to open the "Traceroute" option in the system.
/tool traceroute
- Once you select the "Traceroute" option in the system, you will get a new window in which you can edit some options for managing tracing. So here is the list of following options you can change:
- Traceroute To: you have to provide the destination IP that you want to trace.
- Packet Size: It represents the size of packets sent to hops.
- TimeOut: It represents the response waiting timeout (i.e., the delay between messages).
- Protocol: In this section, you can set ICMP and UDP.
- Port: In this option selecting the UDP protocol defines the port manually.
- Use DNS: It works to specifies whether to use a DNS server (no by default)
- Count: It represents the number of the packets to send
- Max Hops: It represents the maximum number of hops
- Src.Address: It works to change the source address of the package
- Interface: In this option, you can select the interface to use in tracing
- Routing table: In this option, you can select one of the routing tables
- Let's take an example in which you have to enter the destination IP(8.8.8.8) in the "Traceroute To" field.
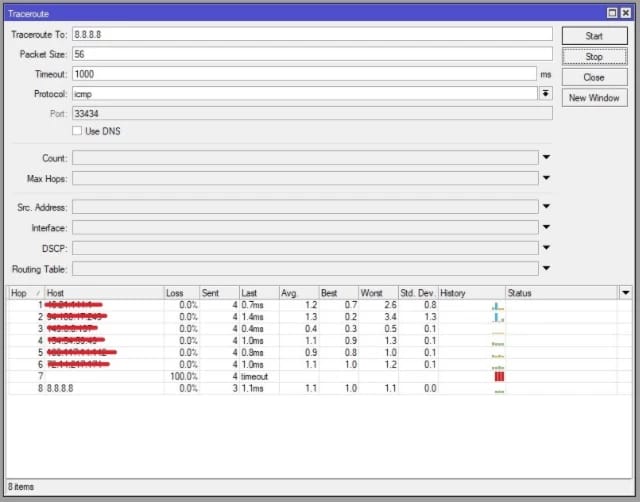
- After providing the IP, fill in all of the required details, so in this example, we took packet size as 56, timeOut as 1000, protocol as ICMP(The full form of ICMP is The Internet Control Message Protocol, which is a supporting protocol in an internet protocol suite), and port as 33434.
- After providing all of the details, click on the Start button to begin the Traceroute on MikroTik.
- Once the system stops the process, you will get the needed results from MikroTik.
|
Option |
Description |
Default Value |
Usage Example |
|
timeout |
Time to wait for a reply (ms) |
3000 |
/tool traceroute timeout=5000 |
|
count |
Number of probes per hop |
3 |
/tool traceroute count=5 |
|
interval |
Interval between probes (ms) |
1000 |
/tool traceroute interval=2000 |
|
protocol |
Protocol used (icmp, udp) |
icmp |
/tool traceroute protocol=udp |
Conclusion

So this is how you can traceroute on MikroTik easily, and this guide can be helpful for you to check hops. As we have mentioned earlier, traceroute is a great tool to check hops on the MikroTik. We have divided the procedure into simple steps with an appropriate example so that you can use this procedure to perform the traceroute without having any errors. If you liked this guide, please check more of them on our website, and you can also go for the VPS hosting services as they are cheap and offer excellent facilities.
People are also reading:

I’m Oliver k. I have MS degree in Computer Engineering. For nearly 5 years that I have been working on web programing and also in last 2 years I have worked on windows and Linux VPS. This is my honor to share my experiences with a new community.