List of content you will read in this article:
If you have never experienced a hardware failure or even just a software crash that caused you to lose some important files, you can count yourself as one of the lucky few PC users. As for the rest of us, who at some point had to deal with this painstakingly annoying problem, we learned how to use backups to keep our files safe and avoid headaches. If you never went through this but still use regular MikroTik backup for redundancy, hats off to you; keep up the good job.
In most cases, backups can be created with just a few simple clicks of the mouse, and in MikroTik’s case, it is no different. The catch is that you need to know exactly where to click, which is exactly what we will be showing you today. Before the tutorial, however, let us first understand backups and their importance.
What is a Backup?

A backup is simply a copy of the important data that is stored on a different system so that it can be recovered in case the original data is lost or corrupted. Technically, it does not even have to be another system but could also be a form of storage media that is not a part of the machine on which the original data exists. In layman’s terms, it could be just an HDD (i.e., Hard Disk Drive) or SSD (i.e., Solid State Drive) that is simply stored in a secure location.
The frequency at which performing backups is recommended depends on how often the backed-up information changes, how valuable the said data is, and how long it takes to execute the process. In the case of MikroTik configuration backups, we recommend that they be done every time the said configuration is edited.
Why are Backups Important?
Despite computer hardware becoming more and more reliable, there are still countless circumstances in which your data could be lost or corrupted. Be it a hardware failure, unexpected power outage, software bug, or an inexperienced intern accidentally deleting the wrong thing (professionals occasionally do it as well), having a recent backup of the lost/corrupted files just makes life easier for all PC users.
You will not need to go digging in the recycle bin for that accidentally deleted file. Neither will you have to redo that important excel document for your work. As for MikroTik, you will not have to try and remember all the previous configurations you have created and manually redo them. Simply restore the previously created backup and enjoy being back on your feet with minimal downtime.
How to Backup MikroTik Configuration [Export MikroTik Backup]
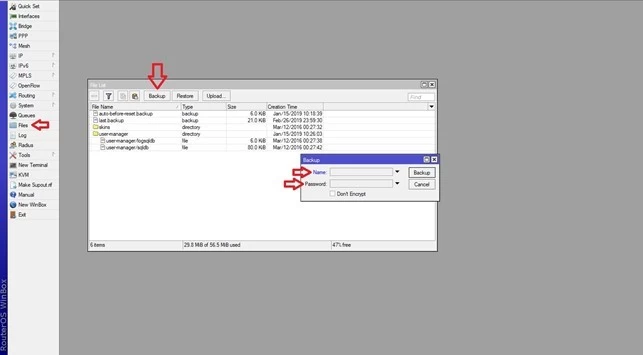
Making backups and saving MikroTik configuration backup is one of the most important parts of MikroTik usage. Follow these 6 simple steps to create MikroTik backup and export MikroTik backup on your local device.
Step 1: Log in to your MikroTik OS with a Winbox application with a user that has admin privileges.
Step 2: Click on the Files menu on the left side of the screen. A window should pop up with all your files.
Step 3: Click on the Backup button at the top of the files window. Another pop-up should appear.
Step 4: Within this pop-up, type the backup file name.
Step 6: For further security, set a password for the backup file.
Step 6: Click on Backup, and the file will be ready.
Now, simply save MikroTik backup file somewhere easily accessible so that you can restore the MikroTik backup in case of a data loss event.
Conclusion
If you were previously unfamiliar with the concept or process of backups, we hope you learned a new neat computer feature that you will start using more, as well as why it is so important to frequently create backups of your files. We are also happy to present this short yet comprehensive tutorial on how to backup MikroTik configuration. In this way, you can easily secure your MikroTik server. If you have any questions or have any issues, leave a comment below, and we will respond as soon as possible.
People are also reading:
![How to Backup MikroTik Configuration [Export MikroTik Config]](/wp-content/uploads/2020/09/129497-main.webp)
I’m Oliver k. I have MS degree in Computer Engineering. For nearly 5 years that I have been working on web programing and also in last 2 years I have worked on windows and Linux VPS. This is my honor to share my experiences with a new community.