MikroTik RouterOS is the stand-alone Linux operating system that is used with MikroTik’s networking equipment. However, that is not the only function it can perform. It is more than just an OS for routers. In fact, this software can even be installed on regular PCs to turn them into dedicated routers.
Nevertheless, the blog is a step-by-step tutorial on how to configure port forwarding in MikroTik. Before we get into it, however, we will first discuss a little more about the OS itself and give you a general idea of what port forwarding id & Mikrotik port Forwarding, and RouterOS Port Forwarding actually is.
What is Mikrotik?

MikroTik itself is a Latvian network equipment manufacturing company. They develop and sell wired and wireless network routers, network switches, access points, operating systems, and auxiliary software for their products.
MikroTik’s RouterOS is the operating system that powers its devices and has a very high level of flexibility when it comes to network management. RouterOS can also be installed on a PC turning it into a router with all the necessary features - routing, firewall, bandwidth management, wireless access point, backhaul link, hotspot gateway, VPN server, and more.
The feature that we will delve into today is RouterOS port forwarding. Unlike with other operating systems, the way to set it up might not be very intuitive, but not difficult at its core. Before setting up the configuration, let us first explain what port forwarding is.
What is Port forwarding?
Port forwarding is the process of intercepting data traffic headed for a computer's IP/port combination and redirecting it to a different IP and/or port. This process can be easily done using a MikroTik router or any system running RouterOS.
Before we get to that, try to imagine the following situation:
You are an IT administrator. You created a large network, and someone wants to connect remotely to your VPS server or dedicated server to work remotely. You can’t share the server IP with that person for security reasons. What should you do? In this situation, you should use port forwarding on the MikroTik router to handle all the requests. Also, You can check out our Mikrotik VPS Server.
How to Configure Mikrotik Port Forwarding?
In this section, we'll provide detailed step-by-step instructions for configuring MikroTik port forwarding for various purposes. We'll cover three common scenarios: forwarding to an internal web server, FTP server, and SSH server. Each set of instructions will be presented clearly and concisely, catering to readers with varying levels of technical expertise.
Step 1: Log in to your own MikroTik server with admin privileges.
Step 2: Click on IP from the left side panel.
Step 3: In the newly opened submenu, click on Firewall.
Step 4: Head over to the NAT tab in the Firewall window.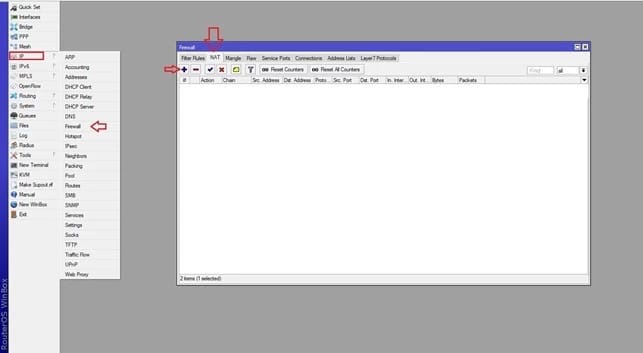
Step 5: Click on the + button to create a new rule.
Note: In this scenario, assume the router connects to IP (10.10.10.10), and we want to forward all requests from (10.10.10.10:5847) to the (20.20.20.20:4324).
Step 6: Click on the General tab and select dstnat from the chain drop-down list.
Step 7: In the Dst. Address field, type the IP you wish to forward all requests from (i.e., 10.10.10.10 in our case).
Step 8: From the Protocol list, select the connection protocol, such as TCP.
Step 9: In the Dst. Port field, type the port you wish to forward requests from (i.e., 5847 in this example).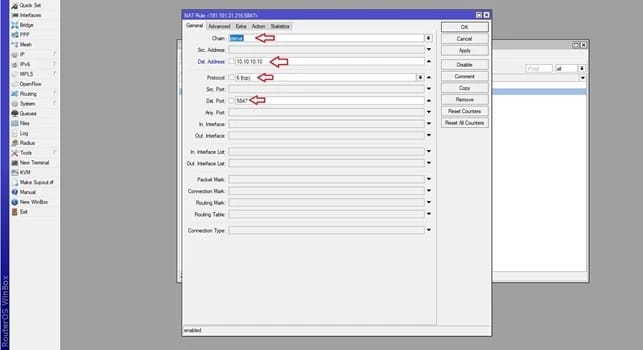
Step 10: Now, navigate to the Action tab.
Step 11: From the Action drop-down list, select dst-nat.
Step 12: In the To Addresses field, type the IP to which you wish to forward all requests (i.e., 20.20.20.20 in our case).
Step 13: In the To Ports field, type the port you want to forward requests to (i.e., 4324 in this example).
Step 14: Click on Apply and then on OK to save and add the new rule.
And that’s it. You have successfully configured your first port forwarding rule on MikroTik. To add new port forwarding rules, simply follow the steps with new ports or IPs.
Troubleshooting Tips
While configuring port forwarding is a valuable skill, issues may arise during the setup process. Here are some common problems users may encounter and tips on how to troubleshoot them:
Port Conflicts
Problem: Another device or application is already using the port you intend to forward.
Solution: Check for port conflicts by verifying that the chosen port is not in use elsewhere on your network. Consider changing the forwarded port if necessary.
Incorrect IP Address
Problem: Forwarding to the wrong internal IP address can lead to connection failures.
Solution: Double-check and ensure that you've entered the correct internal IP address of the target device or server in your port forwarding rule.
Firewall Blocking
Problem: The target server's firewall may be blocking incoming traffic on the forwarded port.
Solution: Adjust the firewall settings on the target server to allow incoming connections on the forwarded port. Ensure both your router's and server's firewalls are correctly configured.
Dynamic IP Address
Problem: If your internal device has a dynamic IP address that changes, the port forwarding rule may become invalid.
Solution: Configure your router to assign a static or reserved IP address to the internal device. This ensures that the port forwarding rule remains effective even if the IP address changes.
ISP Restrictions
Problem: Some Internet Service Providers (ISPs) may impose restrictions on certain ports.
Solution: Contact your ISP to inquire about any port restrictions. Consider using alternative ports for forwarding if necessary.
Common Use Cases of Port Forwarding
Port forwarding is a versatile networking technique with a wide range of applications. Here, we'll explore some common scenarios where port forwarding becomes a crucial tool:
Remote Desktop Access
In today's interconnected world, the need for remote access to computers is paramount. Whether you're an IT administrator managing servers or a remote worker accessing your office desktop, port forwarding enables secure access to remote desktops. By forwarding the appropriate port (e.g., TCP port 3389 for RDP) on your MikroTik router to the target computer's IP, you can access it from anywhere, enhancing productivity and flexibility.
Online Gaming
Online gaming enthusiasts often rely on port forwarding to achieve optimal gaming experiences. Popular multiplayer games, like those on gaming consoles or PC platforms, require specific ports to be open for seamless connectivity. Port forwarding ensures that game traffic flows smoothly between players, reducing lag and enhancing the gaming experience.
Optimize your gameplay with a Gaming VPS Server! Deploy yours now and elevate your gaming experience with powerful resources. Explore the potential of Linux commands for ultimate customization and control.
Web Server Hosting
For businesses and individuals hosting websites or web applications, port forwarding is indispensable. By forwarding HTTP (port 80) or HTTPS (port 443) requests to a web server's internal IP, you can make your website accessible to users on the internet. This is essential for businesses looking to establish an online presence and for developers testing their web applications.
File Sharing and FTP Servers
Sharing files across the internet or running an FTP server for file transfers often requires port forwarding. Whether you're sharing files with colleagues, clients, or friends, port forwarding allows external users to connect to your FTP server securely. FTP typically uses port 21 for control connections and a range of ports for data transfers, making precise port forwarding crucial.
Surveillance Systems (NVR/DVR)
Security is a top concern for many homeowners and businesses. Network Video Recorders (NVRs) and Digital Video Recorders (DVRs) used for video surveillance can benefit from port forwarding. By forwarding specific ports, you can remotely access your surveillance system, view live camera feeds, and review recorded footage from anywhere with an internet connection.
Network Diagram
In this section, we'll provide a visual representation of the network setup, which is essential for you to understand the context of the port forwarding configuration. This diagram illustrates how the MikroTik router is connected to both the WAN and LAN and how port forwarding plays a vital role in the overall network architecture.
The network setup consists of the MikroTik router with its ether1 interface connected to the WAN, having an IP address of 120.50.–.198. Meanwhile, the ether2 interface is connected to a LAN switch with an IP address of 193.168.20. Within the LAN, there are three servers: a web server, an FTP server, and an SSH server. These servers are only accessible to users within the local network. Port forwarding will enable users outside the local network to access these servers via the Internet.
Alternative Methods for Mikrotik Port Forwarding
While port forwarding is a widely used method for network configuration, there are alternative approaches and tools that can achieve similar results:
Virtual Private Networks (VPNs)
VPNs provide a secure and versatile way to access resources on your network remotely. By setting up a VPN server on your MikroTik router, you can create a secure tunnel for remote access to your local network, bypassing the need for port forwarding. VPNs are particularly useful for remote desktop access and ensuring data encryption.
Reverse Proxies
For web hosting purposes, reverse proxies can be an alternative to port forwarding. A reverse proxy server can receive incoming web requests and route them to the appropriate backend server, effectively hiding the internal server's IP address. This method can enhance security and load balancing for web applications.
Cloud Services
Consider leveraging cloud-based solutions for certain applications. Cloud-hosted services, such as cloud-based surveillance systems or cloud-based web hosting platforms, eliminate the need for port forwarding by providing remote access through dedicated cloud infrastructure.
Notes and Recommendations
In this section, we present important considerations and recommendations to optimize your MikroTik port forwarding setup and safeguard against common pitfalls. By adhering to these guidelines, you can ensure a seamless and secure port forwarding configuration:
Keep RouterOS Updated
Before embarking on your port forwarding journey, it is imperative to verify that your MikroTik router is running the latest version of RouterOS. Regularly updating your router's operating system ensures that you benefit from the latest features, bug fixes, and security enhancements. Visit the MikroTik website to download and install the most recent RouterOS release.
Firewall Configuration
To enable successful port forwarding, pay close attention to your server's firewall settings. In addition to configuring port forwarding rules on your MikroTik router, you must permit incoming connections to the designated ports on the target server. Failing to adjust the server's firewall may result in inaccessible services. Ensure that any firewall software or hardware on the server is properly configured to allow traffic on the forwarded ports.
Protocol and Port Accuracy
Precision is key when specifying the protocol and port numbers for your port forwarding rules. Be certain that you accurately identify the protocol type (e.g., TCP, UDP) and the port number associated with the service you intend to forward. Incorrect settings can lead to connectivity issues or security vulnerabilities. Consult the documentation of the service or application you are forwarding to verify the correct protocol and port details.
Logging and Monitoring
Implement logging and monitoring practices to keep track of port forwarding activities. MikroTik routers offer comprehensive logging capabilities that can assist in troubleshooting and security monitoring. Regularly review logs to detect any unusual or unauthorized access attempts. Consider setting up alerts or notifications for specific events, ensuring timely response to potential threats.
Security Best Practices
While port forwarding is a powerful tool for remote access, it should be approached with security in mind. Implement strong authentication mechanisms for services exposed through port forwarding. Utilize secure, complex passwords and, where applicable, consider implementing additional security layers such as VPNs or two-factor authentication (2FA). Regularly audit and update access credentials to maintain a high level of security.
Regular Testing
Periodically test the functionality of your port forwarding rules to verify that they are working as intended. Attempt remote access from outside your local network to confirm that the forwarded services are accessible. Regular testing helps identify and address any configuration issues or changes in network conditions.
Conclusion
We hope that with the help of this article, you now have a better understanding of Mikrotik port forwarding and can set up the port forwarding configuration on MikroTik without any issues. If you run into an issue or have any questions, you can post them in the comment section below or contact us via live chat or e-mail.

I’m Oliver k. I have MS degree in Computer Engineering. For nearly 5 years that I have been working on web programing and also in last 2 years I have worked on windows and Linux VPS. This is my honor to share my experiences with a new community.