![DNS Setup on MikroTik | MikroTik DNS Server [Complete Guide]](/wp-content/uploads/2020/09/141700-main.webp)
Creating effective DNS configurations on MikroTik routers is essential for ensuring that your network runs smoothly and efficiently. DNS, or Domain Name System, is the cornerstone of internet accessibility, translating human-friendly domain names into IP addresses that computers use to communicate. When it comes to MikroTik routers, understanding how to properly configure DNS settings is crucial. MikroTik, a popular choice among network professionals for its versatility and performance, offers a range of features that can be optimized to enhance your network's DNS resolution process. Whether you're managing a small home network or a large corporate infrastructure, mastering DNS Setup on MikroTik can significantly improve your network's reliability and performance.
Interested in the building blocks of the internet? Enhance your knowledge with our detailed guide on 🔍 What is DNS.
What is the Reason for Setup DNS Server in MikroTik?
Understanding the importance of configuring a DNS server on your MikroTik router is paramount. The DNS system acts as a translator, converting human-readable domain names into IP addresses that machines can comprehend. By configuring a DNS server on MikroTik, you're streamlining the process of connecting to websites and services, resulting in quicker response times and an overall improved user experience.
🚀 Interested in speeding up your internet? Learn more about the "Fastest DNS Servers" here!
In a nutshell, the DNS server configuration on MikroTik ensures efficient and prompt resolution of domain names, contributing significantly to the speed and reliability of your network.
How to Configure DNS in MikroTik using Terminal
Configuring DNS on MikroTik using the Terminal might sound intricate, but fear not – it's a straightforward process. Follow these steps to seamlessly set up your DNS server:
Step 1: Accessing the MikroTik Terminal
Open the MikroTik router interface and navigate to the Terminal. This can be done through the web interface or by connecting to the router via SSH.
Step 2: Entering DNS Configuration Commands
In the Terminal, type the following command to enter the DNS configuration mode:
/ip dns
This command takes you to the DNS configuration submenu, where you can set up various parameters.
Step 3: Adding DNS Servers
To add DNS servers, use the following command:
set servers=8.8.8.8,8.8.4.4
Replace the IP addresses with your preferred DNS server addresses. Google's public DNS servers are used in this example.
Step 4: Configuring Cache Size
Optimize your DNS configuration by setting an appropriate cache size. Use the following command to set the cache size, adjusting the value according to your preferences:
set cache-size=2048KiB
Step 5: Enabling DNS Cache
Enable the DNS cache to improve response times. Execute the following command:
set allow-remote-requests=yes
This command allows the MikroTik router to respond to DNS requests from devices on your network.
Step 6: Verifying Configuration
Before exiting the DNS configuration mode, it's essential to review your settings. Use the following command to check your configuration:
print
This command displays the current DNS configuration, allowing you to verify that everything is set up correctly.
Step 7: Exiting DNS Configuration
Once you've verified your DNS settings, exit the DNS configuration mode with the following command:
quit
Configuring DNS in MikroTik Using Winbox
To configure DNS in MikroTik through Winbox, begin by installing the Winbox tool on your MikroTik VPS. Winbox simplifies the management of MikroTik RouterOS, making it a preferred choice for users seeking a graphical interface. Follow these steps for a seamless DNS setup:
- Launch the Winbox software and connect to your MikroTik router.

- Once in the router's main dashboard, navigate to IP > DNS to access the DNS settings window.
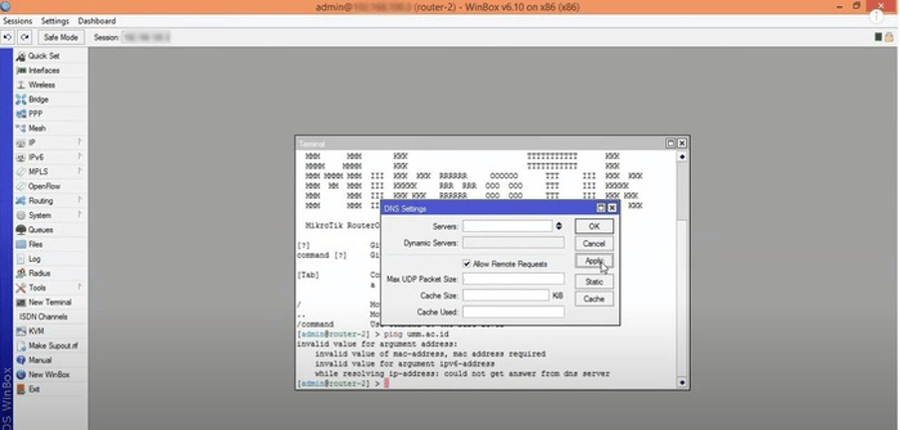
- Complete the DNS settings fields using the following guide:
-
- Server: Enter the public DNS IP address, such as Google's (8.8.8.8 and 8.8.4.4) or your network’s DNS server IP.
- Dynamic Server: Fill in this section if using a dynamic server; otherwise, skip it.
- Allow Remote Request: Ensure this option is checked to enable MikroTik to act as a DNS server, activating the Cache feature.
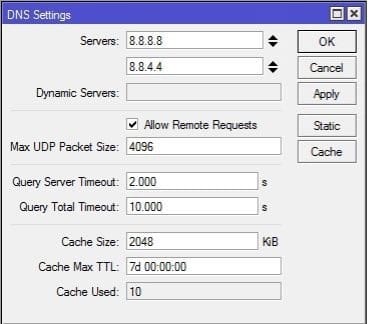
- Max UDP Packet Size: Set the maximum UDP packet size.
- Query Server Timeout: Determine the waiting time in seconds for the DNS server to respond.
- Cache Size: Specify the size of the Cache space and DNS records cache.
- Cache max TTL: Set the time allocated for caching queries before a new request.
- Cache Used: Adjust the amount of cache used by the MikroTik router.
- After filling in the DNS settings, click Apply and then OK to implement the changes. Congratulations! You have successfully configured the DNS server in MikroTik using the Winbox graphical interface.
Note that the DNS setting in MikroTik is a cache DNS and resolves all DNS requests to external servers.
Setting MikroTik Cache DNS to Save Static DNS Entry
Optimizing your MikroTik cache DNS to save static DNS entries can enhance efficiency and provide a more tailored experience for specific domains. Follow these steps to set up static DNS entries:
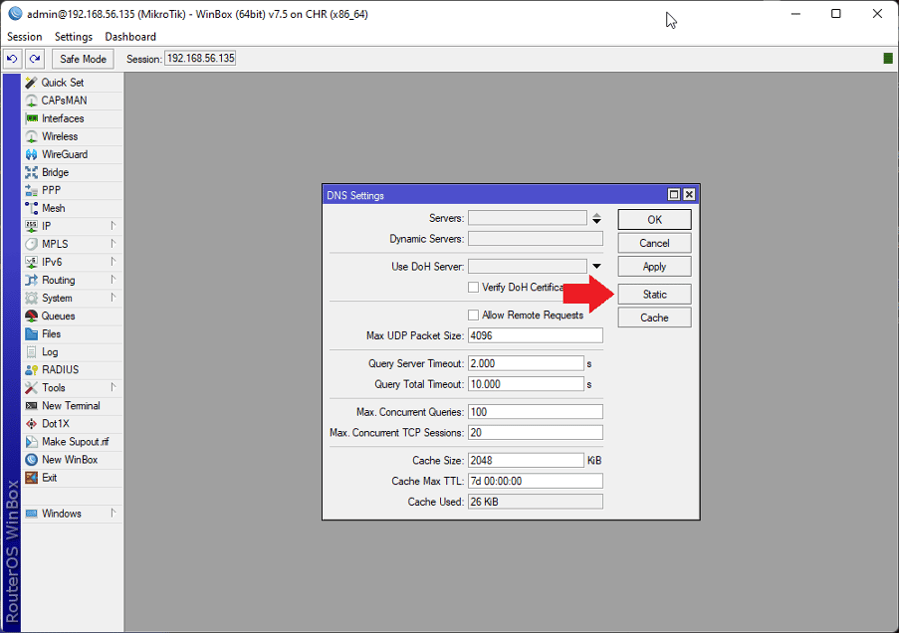
Step 1: Accessing DNS Static Entries
-
- In the MikroTik interface, navigate to the "IP" menu.
- Select "DNS" and go to the "Static" tab.
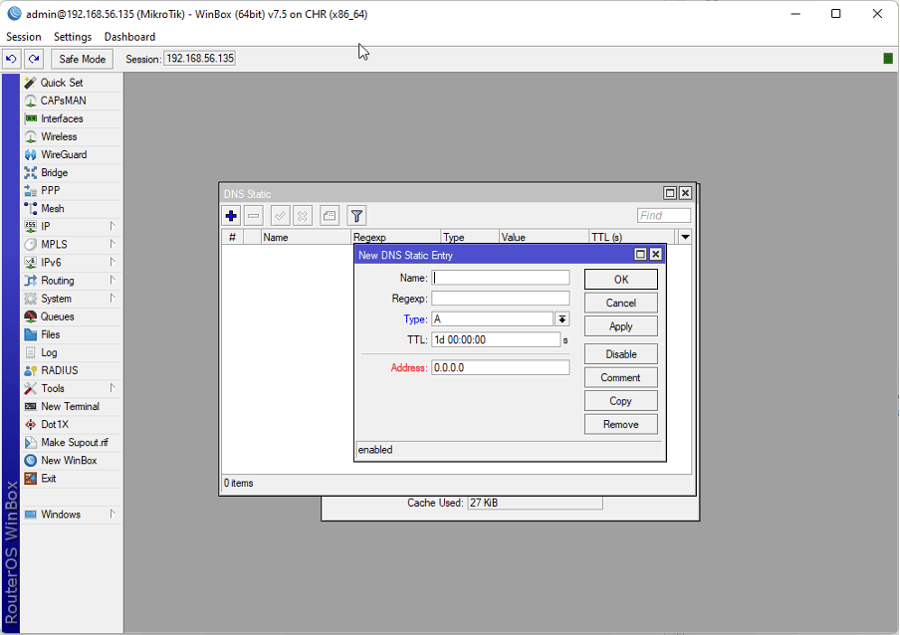
Step 2: Adding Static DNS Entries
-
- Click on the "+" or "Add" button to create a new static DNS entry.
- Enter the domain name and the corresponding IP address.
Step 3: Verifying Static Entries
-
- After adding static entries, review the list to ensure accuracy.
- Static DNS entries provide a direct mapping for specific domains, optimizing resolution times.
Step 4: Saving Configuration Changes
Remember to save your configuration changes. Look for the "Apply" or "OK" button in the MikroTik interface and click to save the static DNS entries.

I’m Oliver k. I have MS degree in Computer Engineering. For nearly 5 years that I have been working on web programing and also in last 2 years I have worked on windows and Linux VPS. This is my honor to share my experiences with a new community.