
Custom nameservers are branded nameservers that live under your own domain something like ns1.example.com and ns2.example.com instead of the default ones your hosting provider hands you (think ns1.somehostingcompany.com). They do the same job as any other nameserver: they tell the world which DNS records belong to your domain. The only real difference is the label on the front.
I've set these up for clients more times than I can count, and the confusion is almost always the same. People assume "custom nameservers" means changing DNS resolvers (like setting your laptop to use 8.8.8.8). It doesn't. We're talking about delegation telling the registry "here's who's authoritative for this domain."

Custom Nameservers vs Standard Registrar Nameservers
When you buy a domain, your registrar usually parks it on their default nameservers. When you sign up for hosting, the host gives you their nameservers (e.g. ns1.bluehost.com). Both work fine. They just don't carry your brand.
Custom nameservers flip this. You point your domain at hostnames you own. To the end user, it looks like you're running your own DNS infrastructure even if the actual server behind it is a single VPS. If you're still getting familiar with the fundamentals, our guide on what is a domain name covers the basics.
Private Nameservers, Branded Nameservers, and Child Nameservers Explained
You'll see these terms thrown around almost interchangeably. Here's the truth:
- Private nameservers and custom nameservers mean the same thing in 99% of hosting contexts.
- Branded nameservers is the marketing term same thing, focused on the "your name on it" angle.
- Child nameservers is the technical term for the registrar-side registration step. When you tell your registrar "yes,
ns1.example.comis a real nameserver and here's its IP," you're creating a child nameserver record at the TLD registry.
Example of a Custom Nameserver Setup
Say you own example.com and you have a VPS at 192.0.2.10. A typical custom nameserver setup looks like this:
ns1.example.com→192.0.2.10ns2.example.com→192.0.2.11(or the same IP, if you only have one)- Domain
example.comusesns1.example.comandns2.example.comas its nameservers
When You Should Use Private Nameservers
Honestly? Most websites don't need them. If you're running a single blog or a small business site, the default hosting nameservers do the job perfectly well. Custom nameservers shine in specific scenarios.
Best for Reseller Hosting and Agency Branding
If you're reselling hosting, you probably don't want your clients seeing ns1.bigcorporatehost.com in their domain settings. Branded nameservers make the operation look professional and self-contained. Clients see ns1.youragency.com and assume correctly or not that you run the show.
Useful for VPS and Self-Managed Hosting
If you've got a VPS hosting setup and you want to run your own authoritative DNS (BIND, PowerDNS, or via a control panel like WHM), custom nameservers are basically a requirement. Otherwise, you'd be paying for a server and then borrowing someone else's nameservers kind of defeats the point.
When Custom Nameservers Are Unnecessary
Skip them if any of these are true:
- You only have one site and don't care about branding.
- You're using managed hosting and never plan to switch providers often.
- You'd rather have your DNS managed by a third party like Cloudflare and just point your domain there.
| Scenario | Best Option | Why |
| Reseller hosting business | Custom nameservers | Branding and professional appearance |
| Single personal site | Default nameservers | Less to maintain, no real benefit |
| Agency managing 50+ client domains | Custom nameservers | Centralized control, branded delegation |
| VPS running own DNS | Custom nameservers | Sovereignty over DNS infrastructure |
| Site behind Cloudflare | Cloudflare's nameservers | Cloudflare needs to be authoritative to proxy traffic |
| White-label SaaS or hosting product | Custom nameservers | Required for credible brand presentation |
If you're running a hosting business, pairing branded nameservers with reseller hosting is basically the standard play.
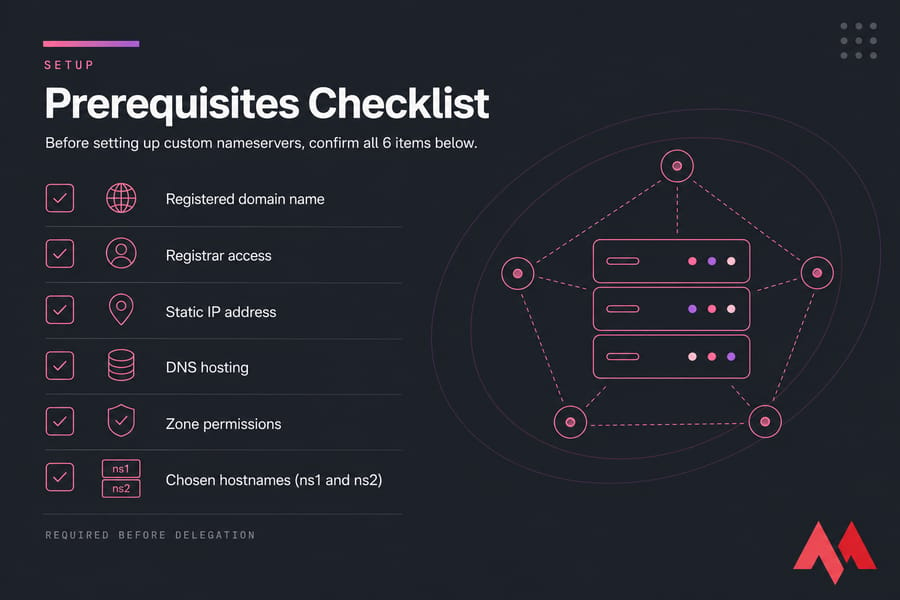
Prerequisites for Setting Up Custom Nameservers
Before you touch anything, make sure you've got the following lined up. Skipping any of these is the most common reason people end up with a half-broken setup.
- A registered domain name. You can't create nameservers under a domain you don't own. For a smooth experience, consider domain registration with a provider that gives you full DNS control.
- Access to your domain registrar account. Login credentials to the place where you bought the domain. Not your hosting account — those are different.
- A server with at least one static IP address. Could be a VPS, dedicated server, or hosting account that exposes a usable IP.
- DNS hosting or authoritative DNS service. Either via your hosting control panel (cPanel/WHM, DirectAdmin, Plesk) or a separate DNS service.
- Permission to edit DNS zone records. If your hosting plan locks you out of the zone, this won't work.
- Two hostnames decided on. Almost everyone uses
ns1andns2. Just go with that.
One IP vs Two IPs for ns1 and ns2
Two IPs is the textbook best practice. The whole reason for having ns1 and ns2 is redundancy if one IP goes down, the other answers. Pointing both at the same IP technically works, and most registrars will accept it, but you lose the redundancy benefit.
If you only have one IP, do it anyway. It's better than not having custom nameservers at all. Just plan to add a second IP later.
Also: document your current nameservers before you change anything. Take a screenshot. If something goes sideways, you want to be able to roll back fast.
How DNS Delegation and Glue Records Work
This is the part that trips everyone up. Stick with me once you get it, the rest is mechanical.
DNS works through delegation. The root nameservers know who runs .com. The .com registry knows who runs example.com. And whoever runs example.com knows the actual records the A record for www, the MX record for email, and so on. Each layer just points to the next.
When you set custom nameservers, you're telling the .com registry: "for example.com, talk to ns1.example.com."
Why Glue Records Are Required for Child Nameservers
Now imagine the resolver's perspective. A user types example.com into their browser. The resolver asks .com: "who's authoritative for example.com?" The registry answers: "ns1.example.com."
So the resolver thinks: "Cool, let me look up ns1.example.com." But to find the IP for ns1.example.com, it has to ask… example.com's nameservers. Which is ns1.example.com. Which we don't know the IP of yet.
Chicken and egg.
Glue records solve this. A glue record is an IP address attached directly to the nameserver registration at the TLD registry. So when the registry says "ns1.example.com is authoritative," it also hands over "and by the way, its IP is 192.0.2.10." Resolver doesn't need to ask anyone else. Loop broken.

Difference Between A Records, NS Records, and Host Records
People mix these up constantly. Here's the cheat sheet:
| Record Type | What It Does | Where It's Set | Example |
| A record | Maps a hostname to an IPv4 address | DNS zone (your DNS host) | ns1.example.com → 192.0.2.10 |
| NS record | Declares which nameservers are authoritative for a domain | DNS zone | example.com NS ns1.example.com |
| Host record / glue record | Registers a child nameserver hostname + IP at the TLD registry | Domain registrar | ns1.example.com → 192.0.2.10 (registered at registry) |
| Domain nameserver assignment | Tells the registry which NS to delegate the domain to | Domain registrar | example.com uses ns1.example.com, ns2.example.com |
The key insight: an A record inside your zone is not the same as a glue record at the registrar. You need both.
What Happens During Propagation
When you change nameservers, the new info has to spread across the global DNS cache. TLDs typically push changes within minutes, but resolvers around the world hold cached data for as long as the previous TTL allowed. Realistically: a few hours for most users, up to 48 hours in stubborn corners of the internet.
How to Set Up Custom Nameservers Step by Step
Alright. Now we get to the actual work. Follow this order skipping or reordering steps is what breaks setups.
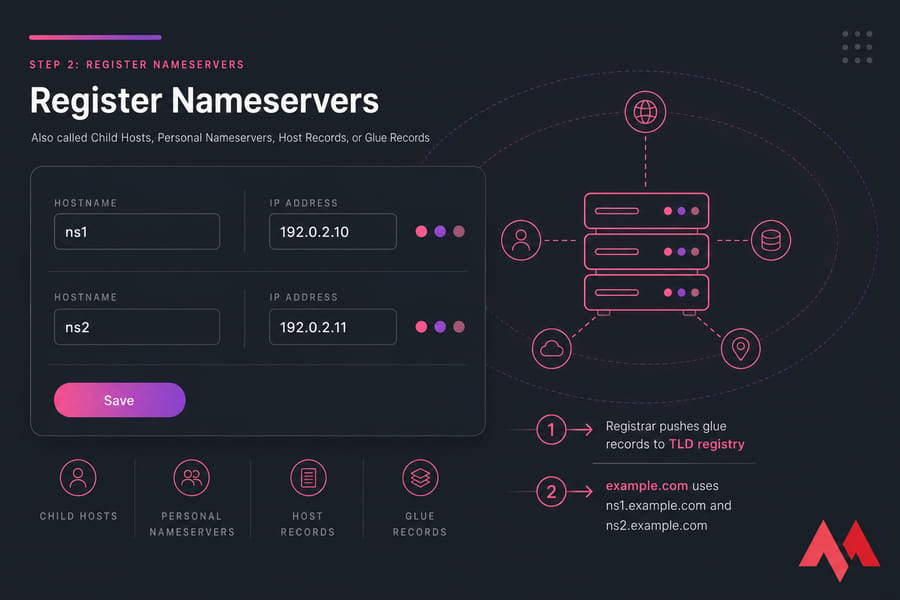
Step 1: Choose Your ns1 and ns2 Hostnames
Pick the hostnames you'll use. The convention is ns1.yourdomain.com and ns2.yourdomain.com. Some operators use dns1 and dns2, or include the location like ns1.us.yourdomain.com. Stick with ns1 and ns2 unless you have a reason not to.
For our walkthrough, we'll use:
ns1.example.com→192.0.2.10ns2.example.com→192.0.2.11
Step 2: Register Child Nameservers at Your Domain Registrar
Log into your registrar. Look for a section called something like:
- "Register Nameservers"
- "Child Hosts"
- "Personal Nameservers"
- "Host Records" or "Host Management"
- "Glue Records"
Every registrar names it differently. Namecheap calls it "Personal DNS Servers" under "Nameservers." GoDaddy hides it under "Host Names" in advanced domain settings. Whatever the wording, you're looking for the place where you can enter a hostname and an IP address.
If you need more guidance, our domain control panel management guide covers the specifics for popular registrars.
Add both:
- Hostname:
ns1IP:192.0.2.10 - Hostname:
ns2IP:192.0.2.11
Save. The registrar will push these as glue records to the TLD registry. This usually happens within minutes.
Step 3: Add Matching DNS Records to Your Domain Zone
Glue records at the registrar are only half the story. Your authoritative DNS zone for example.com also needs A records that match.
In your DNS zone (cPanel Zone Editor, WHM DNS Zone, Cloudflare DNS, or whatever you use), add:
ns1.example.com.A192.0.2.10ns2.example.com.A192.0.2.11
And the NS records:
example.com.NSns1.example.com.example.com.NSns2.example.com.
Critical reminder: before you do step 4, make sure your zone has all your existing website and email records. A records for @ and www, MX records for email, TXT records for SPF/DKIM, anything else you depend on. The moment you switch the domain to your new nameservers, the new zone is what the world sees. If it's empty, your site goes down.
Step 4: Assign the Custom Nameservers to the Domain
Back at your registrar, find the nameserver settings for example.com itself. Change them from the default ones to:
ns1.example.comns2.example.com
Save. This is the moment delegation actually changes.
Step 5: Wait for DNS Propagation
You're done with the configuration. Now go get coffee. Propagation typically completes within a few hours for most of the world, though some ISPs cache aggressively and may take up to 48 hours.
Don't keep changing things during this window. That's how you make troubleshooting impossible. Set it up correctly, then wait.
If you're setting up the domain on a fresh server, our companion guide on how to set up a domain on a VPS walks through pointing the website itself.
How to Configure Custom Nameservers in WHM, cPanel, or DirectAdmin
Hosting control panels add a layer of convenience and a layer of confusion. The panel can create the DNS zone records for you, but it cannot register child nameservers at the registrar. That step lives outside the panel, always.
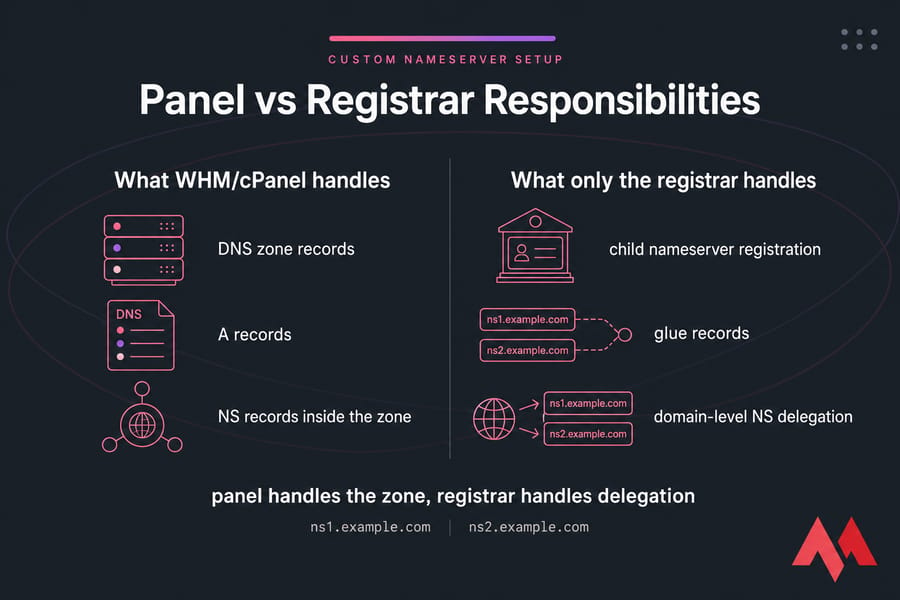
WHM Private Nameserver Basics
In WHM, navigate to Server Configuration → Basic WebHost Manager Setup. You'll see fields for nameservers (typically labeled NS1, NS2). Enter ns1.yourdomain.com and ns2.yourdomain.com here. WHM will create the corresponding A records in your DNS zone automatically when you click "Add A Entries for Hostname and Nameservers."
That's it for WHM. You still need to register the child nameservers at your registrar — WHM has no idea what your registrar is or how to talk to it.
DirectAdmin and Other Control Panel Notes
DirectAdmin's flow is similar. Under Admin Settings → Server Settings, you'll find nameserver fields. DirectAdmin will create the zone records when you set up DNS for a domain. Plesk follows the same pattern under Tools & Settings → DNS Template Settings.
The pattern is universal: panel handles the zone, registrar handles delegation.
Registrar-First vs Hosting-Panel-First Workflow
Some people do registrar steps first. Some do panel steps first. Either order works — but here's the safer path:
- Set up the DNS zone in your control panel first (so the records exist).
- Register child nameservers at the registrar.
- Verify the glue records are visible.
- Switch domain delegation to the new nameservers.
Doing it this way means at no point is the domain pointing at nothing.
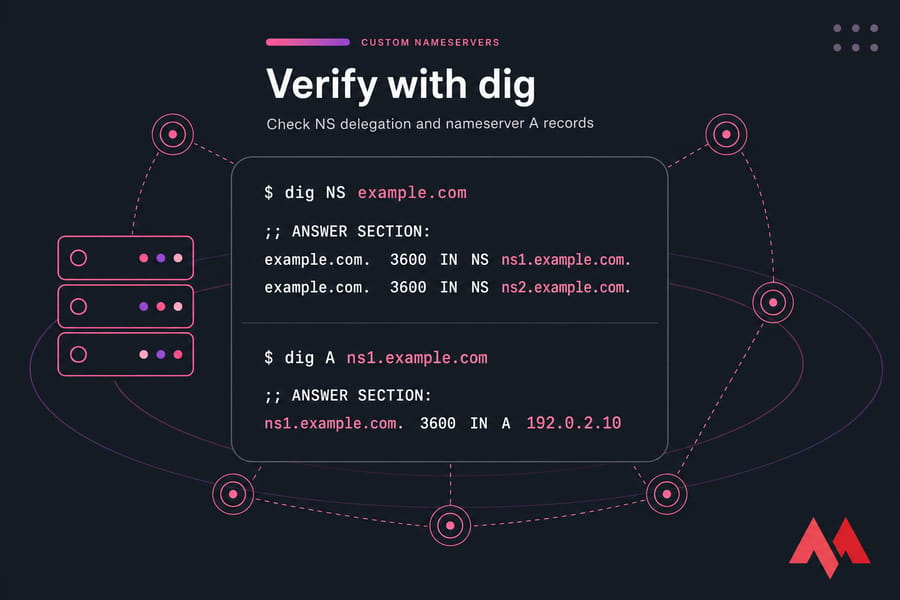
How to Verify Custom Nameservers Are Working
Don't just open your browser and hope. Use proper tools.
Check with WHOIS Lookup
WHOIS shows you what the TLD registry has on file. If your custom nameservers aren't listed there, the change hasn't taken effect at the registry level yet — and no amount of waiting elsewhere will fix it.
Use a WHOIS lookup tool and search for your domain. Look for the "Name Server" lines. They should show ns1.example.com and ns2.example.com. You can run a WHOIS lookup to instantly check if the registry has your new nameservers on file.
Check with dig and nslookup
From a terminal:
dig NS example.comExpected output (abbreviated):
;; ANSWER SECTION:
example.com.    3600    IN    NS    ns1.example.com.
example.com.    3600    IN    NS    ns2.example.com.
Then verify each nameserver resolves to the right IP:
dig A ns1.example.com
dig A ns2.example.com
If you're on Windows without dig, nslookup works:
nslookup -type=NS example.com
nslookup ns1.example.com
To spot-check from different regions, a DNS checker tool can confirm what resolvers around the world are actually seeing.
Common Custom Nameserver Errors and Troubleshooting
Things go wrong. Here's how to read the symptoms.
| Error / Symptom | Likely Cause | Fix | How to Verify |
| "Nameserver not registered" | Child nameserver wasn't created at the registrar before you tried to assign it to the domain | Register ns1 and ns2 as child hosts with IPs first, then assign |
WHOIS lookup for ns1.example.com |
| "Invalid nameserver" or "host not found" | Hostname has a typo, or the glue IP is wrong/not reachable | Re-check spelling and IP at the registrar | dig A ns1.example.com |
| Site loads from old IP after switch | DNS cache hasn't expired yet | Wait, or flush local DNS cache | DNS propagation checker from multiple regions |
| Site completely down after switch | New zone is missing the website's A record or is empty | Add missing A records to the zone (e.g. @ and www) |
dig A example.com @ns1.example.com |
| Email broken after switch | MX, SPF, DKIM records weren't migrated to the new zone | Add MX/TXT records, then wait for propagation | dig MX example.com |
| Registrar refuses the nameserver | Some registrars only let you assign nameservers that are already registered as host records on a domain in their system | Register the host first, then assign | Check registrar's "Host Records" section |
| Propagation past 48 hours | TTL was set very high before the change, or registry-level update failed | Re-save nameserver settings; contact registrar if persistent | WHOIS + global propagation checker |
Nameserver Not Registered
This is the single most common error. People skip step 2 entirely they go to assign ns1.example.com as the domain's nameserver, but they never registered it as a child host first. The registrar (or the receiving registry) checks: "is this a known host?" Answer: no. Rejection.
Fix order: create child host first → assign to domain second. Always.
Site or Email Stops Working After Switching Nameservers
This one hurts. You switch nameservers and your website goes blank. Or worse, email starts bouncing.
The cause is almost always the same: your new DNS zone doesn't have all the records the old one had. Before switching, make a list of every record on the current nameservers (A, AAAA, MX, TXT, CNAME, SRV) and recreate them on the new zone.
Propagation Takes Longer Than Expected
If it's been 48+ hours and WHOIS still shows old nameservers, something didn't save at the registrar. Re-enter the nameserver settings. If WHOIS shows new nameservers but resolvers still cache old data, that's a TTL issue and there's nothing you can do but wait. Next time, lower your TTL to 300 seconds a day before making changes.
Rollback Plan
If things are seriously broken and you need the site back up now, just revert the domain to its previous nameservers at the registrar. The custom nameserver records you created don't get deleted — they just sit unused. You can fix the zone, then switch back.
Need a Server for Your Custom Nameservers?
To run private nameservers reliably, you need a domain, a stable IP address, and a hosting environment that handles your DNS and website records. MonoVM's stack domain registration, VPS hosting, and web hosting with cPanel or DirectAdmin — gives you all the pieces in one place. With 25+ global VPS locations, you can pick a region close to your audience and skip the migration headaches later.
Custom Nameservers vs Changing Domain Nameservers
One last thing that confuses people. "Setting up custom nameservers" and "changing nameservers" are not the same task.
| Action | What You're Doing | When You Do It |
| Changing nameservers | Pointing your domain at someone else's existing nameservers (e.g. your host's ns1.bigcompany.com, or Cloudflare's) |
You signed up for new hosting or a managed DNS service |
| Setting up custom nameservers | Creating ns1.yourdomain.com and ns2.yourdomain.com, registering them as child hosts with glue records, then pointing your domain at them |
You want branded NS for resale, agency, or self-managed DNS |
Creating Nameservers vs Assigning Nameservers
Creating = registering a hostname as a nameserver at the TLD registry (the host record / glue record step). Assigning = telling the registry which nameservers a specific domain should use.
Custom nameserver setups need both. Standard nameserver changes only need assignment.
When to Use Default Hosting Nameservers Instead
Honestly, if you're not branding, not reselling, and not running your own DNS, default hosting nameservers are simpler. Less to break. Less to maintain.
If you're trying to understand how domains and hosting fit together, our comparison of domain vs hosting explains the distinction clearly.
Final Checklist Before You Use Custom Nameservers
Run through this before you call the job done.
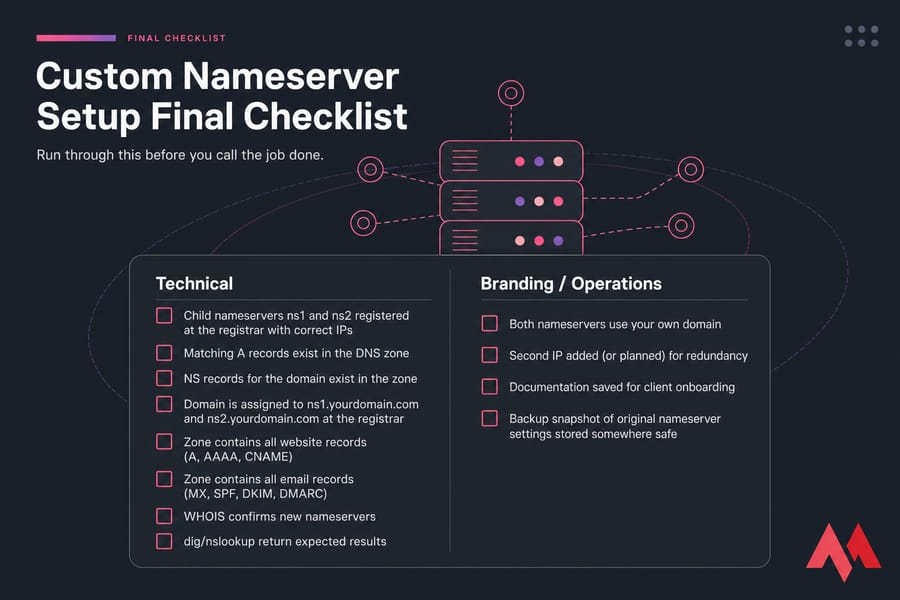
Technical Checklist
- Child nameservers
ns1andns2registered at the registrar with correct IPs - Matching A records exist in the DNS zone
- NS records for the domain exist in the zone
- Domain is assigned to
ns1.yourdomain.comandns2.yourdomain.comat the registrar - Zone contains all website records (A, AAAA, CNAME)
- Zone contains all email records (MX, SPF, DKIM, DMARC)
- WHOIS confirms new nameservers
- dig/nslookup return expected results
Branding and Reseller Checklist
- Both nameservers use your own domain
- Second IP added (or planned) for redundancy
- Documentation saved for client onboarding
- Backup snapshot of original nameserver settings stored somewhere safe
Next Steps
If you've made it through the checklist and everything verifies, you're done. The domain is delegated, the records are in place, the world will see your branded nameservers.
Launch Your Domain With Branded Nameservers
If you want full control over your domain, DNS, and hosting stack, you'll want each piece working with the others not stitched together across three providers. MonoVM puts domain registration, VPS hosting, and control-panel-ready servers (cPanel, DirectAdmin, Plesk) under one roof, so your custom nameservers don't fight with the rest of your setup.

An experienced tech and developer blog writer, specializing in VPS hosting and server technologies. Fueled by a passion for innovation, I break down complex technical concepts into digestible content, simplifying tech for everyone.