
If you've got crypto sitting in a wallet or exchange and you want to spin up a VPS without pulling out a credit card, paying with Cryptomus on MonoVM is one of the cleanest ways to do it. This guide walks you through the exact checkout flow, the coins and networks worth double-checking, and the small mistakes that can turn a quick purchase into a support ticket.
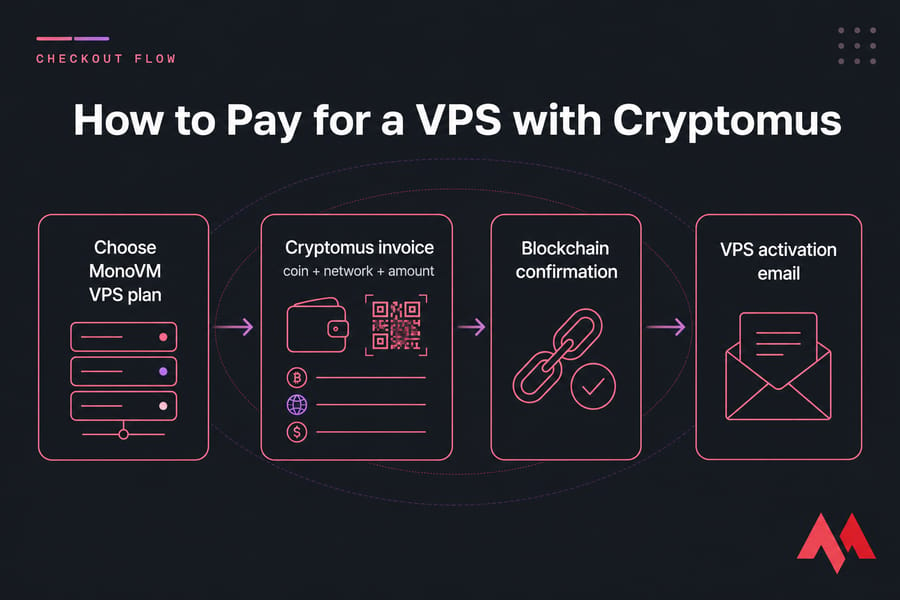
Short version, for the skimmers: pick a plan, head to checkout, choose Cryptomus, select your coin and network, send the exact invoice amount before it expires, and wait for the blockchain to confirm. That's the whole thing. The details below just keep you from tripping over the predictable potholes.
Quick answer
To pay for a VPS with Cryptomus, choose your VPS plan, go to checkout, select Cryptomus as the payment method, pick your cryptocurrency and network, send the exact invoice amount before it expires, and wait for blockchain confirmation. Once confirmed, your VPS order is processed and activated.
What does paying for a VPS with Cryptomus actually mean?
Quick clarification, because this trips people up: you're not buying Cryptomus. Cryptomus is the payment gateway sitting between you and MonoVM. When you choose it at checkout, it generates an invoice with a wallet address, a specific coin, a network, and an exact amount. You pay the invoice. The gateway confirms the payment. MonoVM activates your VPS.
That's it. No account at Cryptomus required for a one-off payment. No swapping coins. You're just settling an invoice with crypto you already hold whether that's BTC in a hardware wallet or USDT sitting on an exchange.
If you want a broader look at how crypto payments fit into MonoVM's checkout, the payment guide has the full picture.
Why use Cryptomus for crypto VPS hosting payments?
Honestly, the appeal is simple. You skip card declines, currency conversion fees, and the awkward dance of international billing. If you already hold crypto, you've already done the hard part.
- Coin flexibility — you're not locked into one specific coin. The invoice shows what's available at the moment of checkout.
- Clear invoice format — exact amount, exact address, exact network. No guesswork.
- Global reach — works whether you're in São Paulo or Singapore. No card geo-restrictions.
- Verifiable payment trail — every transaction has a TXID you can check on a blockchain explorer.
And if you've already decided on a specific coin, MonoVM has dedicated routes too: buy VPS with Bitcoin, buy VPS with USDT, or buy VPS with Ethereum. Cryptomus is the multi-coin checkout option. The others are direct coin-specific paths.
What you need before you pay
Two minutes of prep saves a lot of headaches. Run through this checklist before you click "checkout."
- A selected MonoVM VPS plan Linux VPS plans, Windows VPS hosting, or something budget-friendly depending on your use case.
- A funded wallet or exchange account with the coin you plan to use.
- Enough balance for the invoice amount plus network fees don't cut it close.
- The correct network for that coin (more on this below).
- A working email address. Activation and payment notifications land there.
Pro tip: use a wallet you actually control. Exchange withdrawals work fine, but they can delay things by minutes or even hours during peak congestion. If you're in a hurry, a self-custody wallet is faster.
How to pay for a VPS with Cryptomus step by step
Here's the actual flow. I'd recommend keeping this open in a second tab while you go through checkout.
Step 1: Pick your VPS plan
Choose the plan that fits your workload. Pay attention to OS, location, RAM, and storage. MonoVM has VPS locations worldwide, so pick the one closest to your users. If you're after raw performance, look at KVM VPS hosting or NVMe VPS hosting.
Step 2: Go to checkout and enter billing details
Fill in your contact info and double-check the email. That's where your activation notice goes. If you're new to the process, how to get a VPS has the full breakdown.
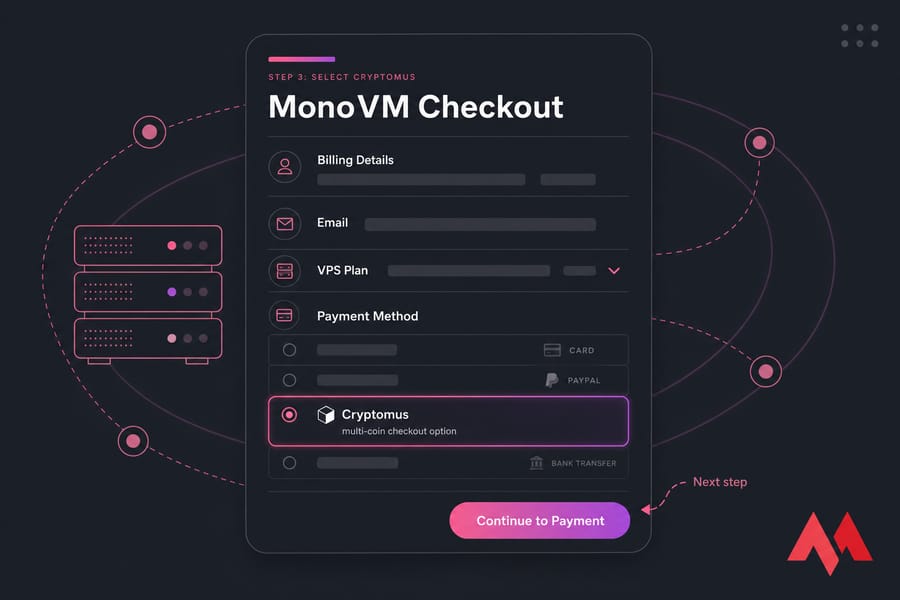
Step 3: Select Cryptomus as the payment method
On the payment method screen, choose Cryptomus. You'll then be taken to the invoice page where you'll pick your coin.
Step 4: Choose your coin and network
This is the step where most mistakes happen. Pick the coin you want to pay with — and then pick the right network. If you're sending USDT, it could be TRC20 or ERC20. They are not interchangeable. Send USDT-TRC20 to an ERC20 address and your funds are gone.
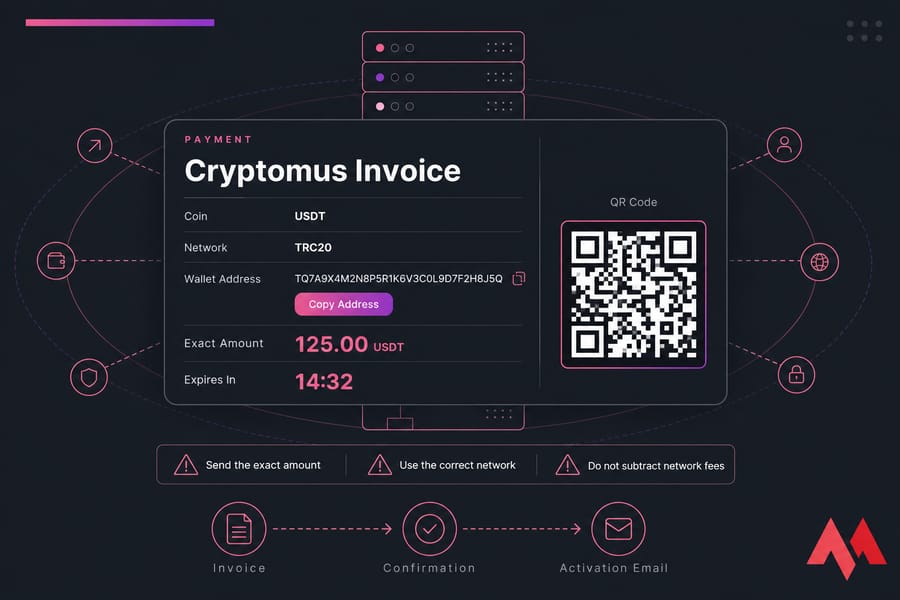
Step 5: Send the exact amount
The invoice shows three things: the wallet address, the exact amount in your chosen coin, and a timer. Copy the address (use the copy button or QR code — never type it manually) and send the exact amount. Don't round down. Don't round up. Don't subtract network fees from the amount — those come out of your wallet's balance separately.
Step 6: Wait for confirmation
Once your transaction hits the mempool, the invoice page should reflect that pretty quickly. Final confirmation depends on the network. BTC typically needs one or more block confirmations. USDT on TRC20 is usually faster. Save the TXID either way screenshot the wallet, copy the hash, do both.
When confirmation completes, MonoVM processes the order and your activation email lands shortly after.
Supported coins and networks — check the live invoice
Available coins can shift, so the rule is simple: trust the live invoice, not a static list. That said, common options usually include Bitcoin, Ethereum, and USDT. The network choice matters as much as the coin.
| What to check | Why it matters |
|---|---|
| Coin shown on invoice matches your wallet | Sending BTC to an ETH address means lost funds |
| Network (e.g. TRC20 vs ERC20 for USDT) | Wrong network = unrecoverable transaction |
| Network fee in your wallet | You need balance for fees on top of the invoice amount |
| Confirmation time for that network | Affects how quickly your VPS activates |
| Whether your exchange supports that withdrawal network | Some exchanges only support specific chains |
Warning: never send funds on a different network than the one shown on the invoice. The blockchain doesn't care that you "meant" to send ERC20 — once it's on the wrong chain, recovery ranges from very difficult to impossible.
How long does confirmation and activation take?
Realistically? Anywhere from a couple of minutes to half an hour, sometimes longer if the network is congested. Here's what affects it:
- Network choice — Tron and Litecoin confirm faster than Bitcoin on average.
- Network congestion — fees and confirmation times spike during peak periods.
- Exchange processing — if you're withdrawing from an exchange, that adds its own delay.
- Required confirmations — some coins need more confirmations than others before the invoice settles.
Your VPS activates after the payment is fully confirmed and the order is processed. Check your email and your MonoVM dashboard. If 30–60 minutes pass with nothing, that's when troubleshooting starts.
Common crypto payment mistakes to avoid
I've seen every one of these in practice. Avoid them and you'll be fine.
- Wrong network. The #1 cause of lost crypto payments. Match the invoice exactly.
- Wrong amount. Send too little and the invoice won't settle. Send too much and overpayment handling gets messy.
- Expired invoice. Invoices have a timer. If you pay after it expires, the system may not match your payment automatically.
- Typing the address manually. Always copy or scan the QR. One wrong character means lost funds.
- Not saving your TXID. If anything goes sideways, that hash is your proof of payment.
- Confusing fiat and coin amounts. The invoice shows a precise crypto amount. Send that exact value in coin, not the dollar equivalent your wallet displays.
What to do if your Cryptomus payment isn't detected
First, don't panic and definitely don't send a second payment. Work through this checklist:
- Copy your TXID and look it up on a blockchain explorer. Confirm it was sent, on the right network, to the right address, with the right amount.
- Check the invoice status on the Cryptomus payment page.
- Confirm the network you sent on matches the network the invoice required.
- Check if you paid before the invoice expired.
If everything looks right and your VPS still hasn't activated, contact support with this info:
- Order ID
- Payment timestamp
- Coin and network used
- TXID
- Screenshot of the wallet transaction and the invoice page
That bundle gives support everything they need to track it down quickly. The MonoVM FAQ also covers common edge cases.
Cryptomus vs Bitcoin, USDT, and other VPS payment options
Cryptomus isn't always the right choice. Sometimes a coin-specific path is simpler.
| Method | Best for | Watch-outs |
|---|---|---|
| Cryptomus | Buyers who want a guided multi-coin checkout | Pick the right coin and network at the invoice step |
| Bitcoin direct | BTC holders who want the simplest path | Confirmation can be slower during congestion |
| USDT direct | Stablecoin users avoiding price swings | TRC20 vs ERC20 matters |
| Ethereum direct | ETH holders | Gas fees can spike |
Ready to order your VPS with crypto?
Pick a plan, pick a location, and finish checkout with the coin you already hold. If you're after a general-purpose box, Linux VPS plans are the usual starting point. Need RDP? Go Windows VPS. Watching your budget? Affordable VPS hosting works fine for most light workloads.
Quick recap: exact amount + correct network + valid invoice window = successful payment. Get those three right and the rest is automatic.

An experienced tech and developer blog writer, specializing in VPS hosting and server technologies. Fueled by a passion for innovation, I break down complex technical concepts into digestible content, simplifying tech for everyone.