MikroTik BGP configuration trips up a lot of admins mostly because the old RouterOS v6 tutorials still floating around don't match what you see in RouterOS v7. This guide fixes that. Everything here is written for RouterOS v7, tested in a clean two-router lab, and built around one consistent example you can copy and adapt.
What Is MikroTik BGP and How Does It Work?
Border Gateway Protocol (BGP-4, defined in RFC 4271) is the path-vector routing protocol that stitches the internet together. It runs over TCP port 179 and exchanges reachable prefixes along with a set of path attributes. On MikroTik, you'll use it for eBGP sessions with an upstream provider, iBGP inside your own network, internet exchange peering, or just a lab on a CHR instance.
A few terms you'll see throughout. Here they are in one line each.
| Term | What it means on MikroTik |
|---|---|
| ASN | Your autonomous system number — 64512 for R1, 64513 for R2 in this lab |
| Neighbor | The remote peer; RouterOS v7 represents peers as BGP connections |
| Router ID | A unique 32-bit identifier per router |
| AS_PATH | The list of ASNs a route has traversed — used for loop prevention |
| NEXT_HOP | Where to forward traffic for a learned prefix |
| LOCAL_PREF | Internal preference for choosing between multiple paths |
| MED | A hint to neighbors about your preferred entry point |
| Community | A tag attached to routes for policy grouping |
BGP doesn't discover peers on its own. You configure each neighbor explicitly, and policy — not geography — decides what you accept and advertise. Don't use BGP on a plain single-provider home connection. It's overkill there. With those components defined, collect the exact values you'll need.
MikroTik BGP Setup Prerequisites and Network Topology
Warning: BGP changes can drop your remote connectivity in seconds. Always back up your MikroTik configuration and keep console or out-of-band access before you start.
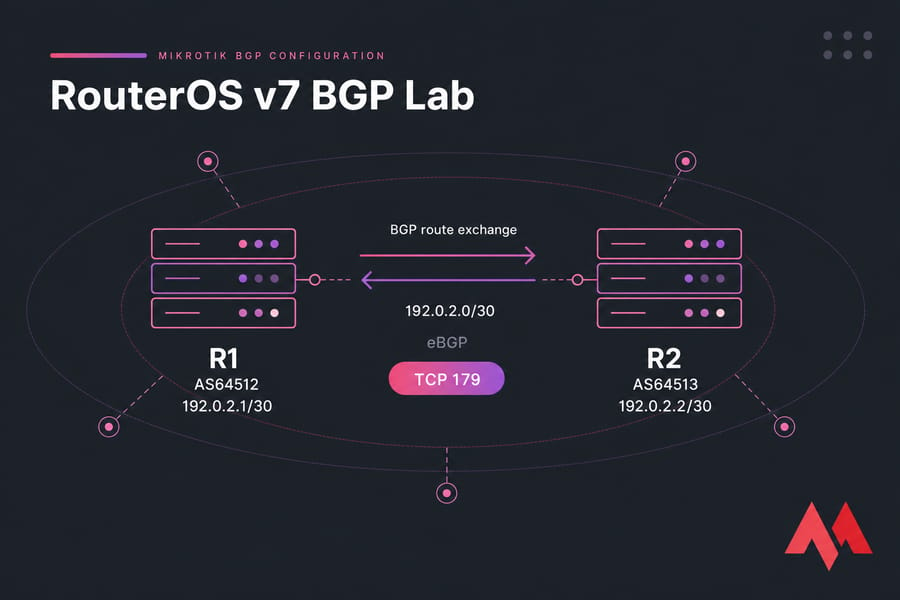
Here's the lab everything is based on. All addresses and ASNs are reserved for documentation (RFC 5737) or private use (RFC 6996). Swap them for provider-approved values in production.
| Component | Router R1 | Router R2 |
|---|---|---|
| Role | Customer/edge | Upstream/lab ISP |
| ASN | 64512 | 64513 |
| Peering address | 192.0.2.1/30 | 192.0.2.2/30 |
| Router ID | 10.255.0.1 | 10.255.0.2 |
| Advertised prefix | 203.0.113.0/24 | 198.51.100.0/24 |
Before touching BGP, run /system resource print and /system package print to confirm your RouterOS v7 stable version. Take both a binary backup and a readable export. Then confirm the peer is reachable — a simple ping from R1 to 192.0.2.2 should succeed. If you're peering over loopbacks, make sure a route to the neighbor exists.
Check that your MikroTik firewall rules permit TCP 179 between the two peers. And if you're not sure your prefix math is right, the CIDR prefix calculations guide is worth a quick look. Need to check the path when something's off? Here's how to run traceroute on MikroTik.
One more thing on capacity. A full internet table needs far more RAM than a single default route — so if you plan to accept everything, size the box accordingly. Now replace the lab variables with your real values and run the next commands.
RouterOS v7 BGP Configuration Step by Step
RouterOS v7 splits BGP into two objects: a template that holds shared local settings, and a connection that defines the neighbor. This is the biggest change from v6.
Step 1 — Configure peering addresses. On R1:
/ip/address
add address=192.0.2.1/30 interface=ether1
On R2, use 192.0.2.2/30. Verify with /ip/address/print, then ping across. If the ping fails, fix Layer 3 first — BGP won't come up without it.
Step 2 — Create the BGP template. On R1:
/routing/bgp/template
add name=AS64512-TEMPLATE as=64512 router-id=10.255.0.1
Pro tip: name objects after the ASN or peer —AS64512-TEMPLATEbeatsbgp1when you're debugging at 2am.
Step 3 — Add the BGP connection.
/routing/bgp/connection
add name=R1-TO-R2 \
    templates=AS64512-TEMPLATE \
    remote.address=192.0.2.2 \
    remote.as=64513 \
    local.role=ebgp
The mirror configuration on R2:
/routing/bgp/template
add name=AS64513-TEMPLATE as=64513 router-id=10.255.0.2

/routing/bgp/connection
add name=R2-TO-R1 \
    templates=AS64513-TEMPLATE \
    remote.address=192.0.2.1 \
    remote.as=64512 \
    local.role=ebgp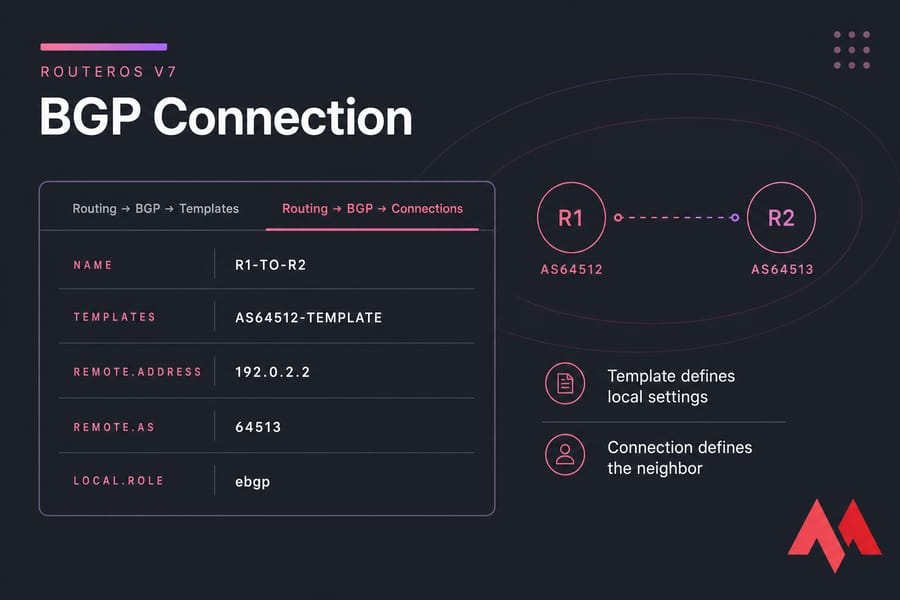
In WinBox this lives under Routing → BGP → Templates and Routing → BGP → Connections. Terminal stays authoritative here — the menus map cleanly.
Step 4 — Confirm the session. Run /routing/bgp/session/print. You want to see the state as established with an uptime that keeps climbing. If it's not, jump to troubleshooting.
Quick summary: the template defines your local settings; the connection defines the neighbor. An established session does not mean the right prefixes are being exchanged — verify that separately.
How to Advertise a Network Through MikroTik BGP
Establishing a session and advertising a prefix are two different jobs. On RouterOS v7 you point the template's output at an address list, and the prefix must actually exist in the routing table.
Warning: only advertise prefixes you own or are explicitly authorized to announce. Leaking someone else's space causes real outages.
To originate 203.0.113.0/24 from R1:
/ip/firewall/address-list
add list=BGP-OUT address=203.0.113.0/24 comment="Approved BGP prefix"

/ip/route
add dst-address=203.0.113.0/24 type=blackhole distance=254 \
    comment="BGP aggregate origination route"

/routing/bgp/template
set [find name=AS64512-TEMPLATE] output.network=BGP-OUT
The blackhole route is an origination technique — it ensures the aggregate exists so BGP can announce it, while dropping traffic that has no more-specific match. It's not right for every design, so understand what it does before using it.
The address-list entry alone won't create a routable prefix. The route has to be there. On R2, confirm receipt with /routing/route/print where dst-address=203.0.113.0/24. If nothing shows, check that the route exists on R1 and that no output filter is blocking it. Default-route origination is a separate, riskier topic — handle it only when the design demands it. Before the prefix leaves the router, lock down the output policy.
MikroTik BGP Routing Filters for Safe Route Exchange
Warning: never turn up a production transit peer without tested input and output filters. "Accept all" is not a policy.
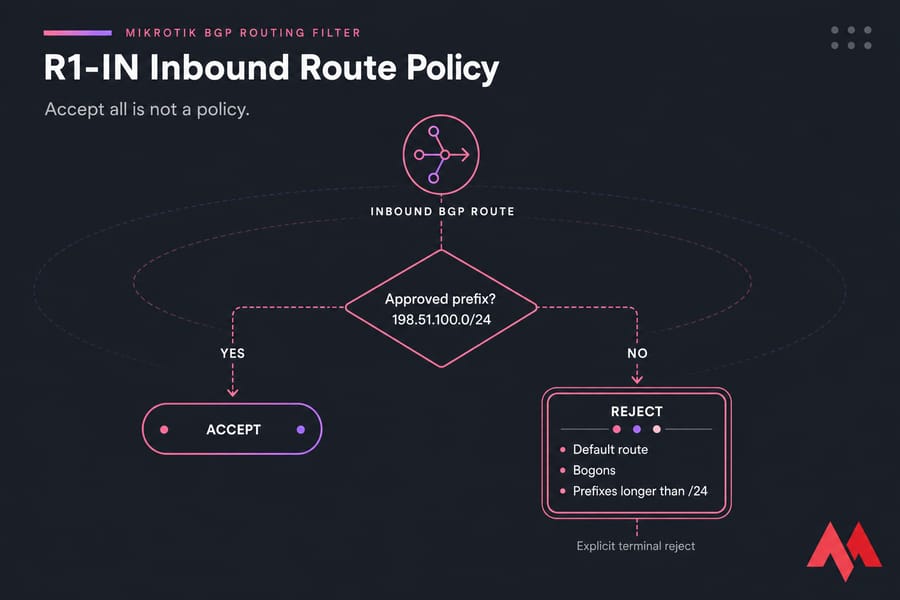
RouterOS v7 uses filter chains with a rule language. Each chain needs an explicit terminal reject — otherwise you fall through to default behavior you may not want.
/routing/filter/rule
add chain=R1-OUT rule="if (dst == 203.0.113.0/24) { accept }"
add chain=R1-OUT rule="reject"

add chain=R1-IN rule="if (dst == 198.51.100.0/24) { accept }"
add chain=R1-IN rule="reject"
Read that plainly: R1 advertises only its own /24 and accepts only R2's expected prefix. Everything else gets dropped. Attach the chains to the connection using the release's input.filter and output.filter-chain properties.
| Direction | Allowed | Rejected |
|---|---|---|
| R1-OUT | 203.0.113.0/24 | Everything else |
| R1-IN | 198.51.100.0/24 | Default route, bogons, overly specific prefixes |
In production you'd also reject the default route (unless you genuinely want it), bogon ranges, and prefixes longer than /24. You can set LOCAL_PREF to favor an upstream, match on AS_PATH, or tag with communities — RFC 7454 covers operational security here. Don't confuse routing filters with firewall filters; they do completely different jobs. After attaching policy, verify both the session and every advertised route.
MikroTik eBGP vs iBGP Configuration
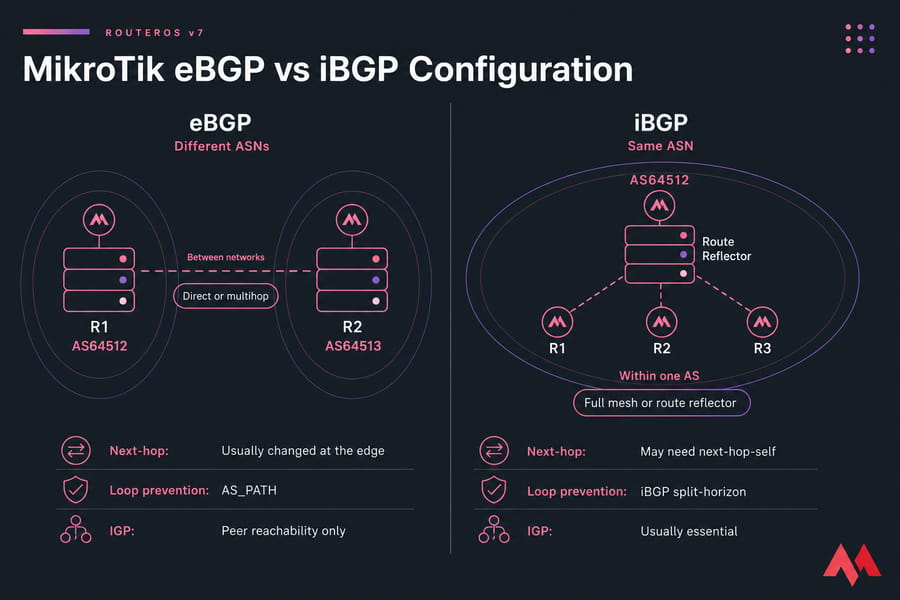
| Factor | eBGP | iBGP |
|---|---|---|
| ASNs | Different | Same |
| Typical use | Between networks | Within one AS |
| Topology | Direct or multihop | Full mesh or route reflector |
| Next-hop | Usually changed at the edge | May need next-hop-self |
| Loop prevention | AS_PATH | iBGP split-horizon |
| IGP dependency | Peer reachability only | Usually essential |
For iBGP, set local.role to the internal role in your tested release and keep the ASN identical on both sides. iBGP doesn't advertise iBGP-learned routes onward, which is why full mesh or a route reflector exists. And it won't replace OSPF or IS-IS for internal reachability — your IGP still carries the loopbacks and next hops. Peer over loopbacks (with multihop and a bound source address) rather than flaky interface IPs. Whatever the peer type, RouterOS must show an established session and usable routes.
How to Verify MikroTik BGP Peers and Routes
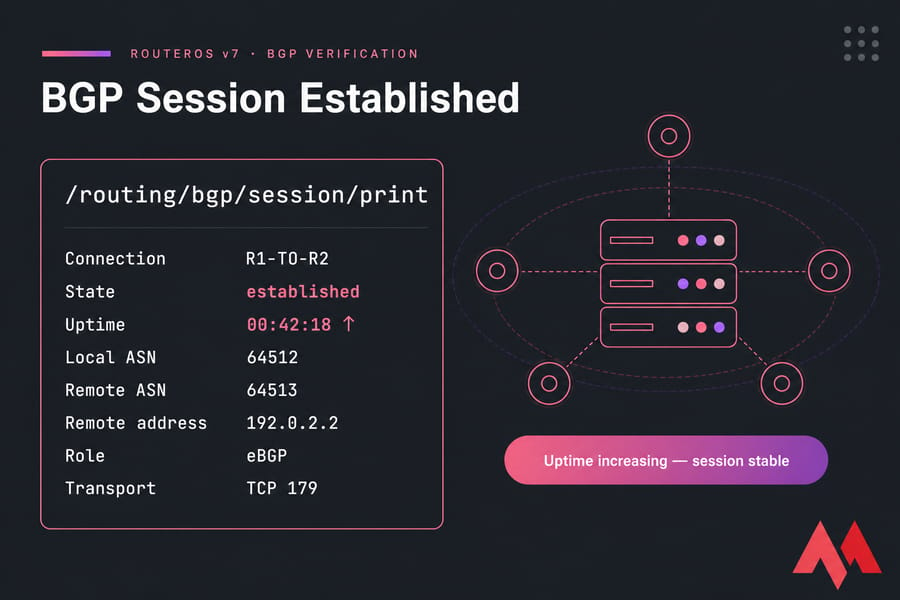
| Command | Purpose |
|---|---|
/routing/bgp/session/print |
State, uptime, local/remote ASN |
/routing/route/print where bgp |
View BGP-learned routes |
/routing/route/print detail where dst-address=198.51.100.0/24 |
Best-path attributes and next hop |
/log/print where topics~"bgp" |
Session messages and errors |
Pro tip: confirm your advertised prefix from the peer's side, not just from the router originating it.
Your success criteria: session is established, uptime climbs instead of resetting, expected prefixes appear, next hops resolve, the approved learned route is active, and no default or bogon route slipped through. If a learned route shows but sits inactive, it's usually an unreachable next hop or a better competing route. If any check fails, diagnose by state instead of changing settings at random.
MikroTik BGP Troubleshooting by Session State
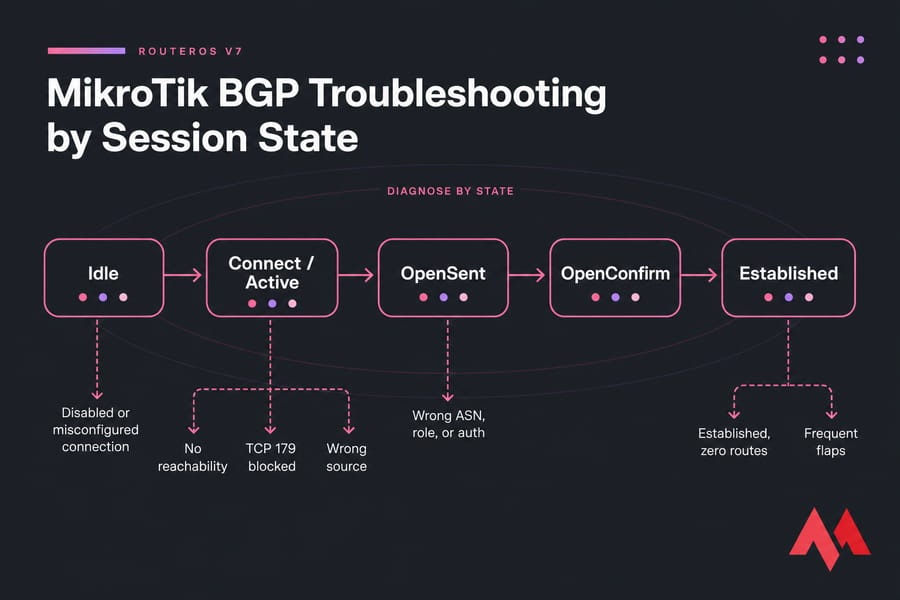
| Symptom | Likely cause | Check | Fix |
|---|---|---|---|
| Idle | Disabled or misconfigured connection | Connection flags, logs | Enable, correct required fields |
| Connect/Active | No reachability, TCP 179 blocked, wrong source | Ping, route lookup, firewall, sniffer | Restore path, permit 179, bind correct source |
| Immediate reset | Wrong ASN, role, or auth | Logs on both peers | Match ASN, role, and capabilities |
| Established, zero routes | Peer sends none or input filter rejects all | Peer policy, filter rules | Fix import policy |
| Prefix not advertised | Route missing or output mismatch | Route table, output policy | Install route, permit exact prefix |
| Learned route inactive | Unreachable next hop, better route | Route attributes, next-hop lookup | Restore next-hop reachability |
| Frequent flaps | Packet loss, MTU, CPU, hold timer | Interface errors, resource use | Fix transport or capacity |
| High memory | Full table on small hardware | Route count, RAM | Use default/partial routes or larger CHR/CCR |
Warning: don't disable the whole firewall to test BGP. Add a temporary, narrowly scoped rule and log it.
Verify the peer IP and ASN on both sides. Make sure clocks are accurate so logs line up. Use the packet sniffer or Torch to watch TCP 179 — but remember, an open TCP session doesn't guarantee the BGP OPEN will negotiate successfully. And don't reboot first, and don't change five things at once. If your commands came from an old tutorial, compare them with the version differences below.
RouterOS v6 vs v7 BGP Configuration Differences
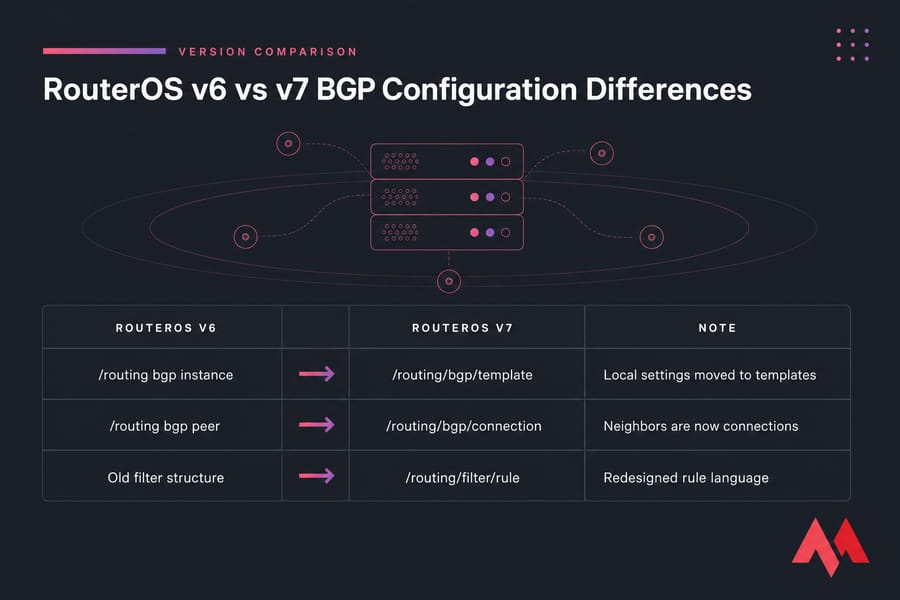
| RouterOS v6 | RouterOS v7 | Note |
|---|---|---|
/routing bgp instance |
/routing/bgp/template |
Local settings moved to templates |
/routing bgp peer |
/routing/bgp/connection |
Neighbors are now connections |
| Old filter structure | /routing/filter/rule |
Redesigned rule language |
The upshot: v6 copy-paste commands will either fail the parser or build the wrong policy in v7. Migration can carry some config across, but you must validate every route-policy manually. Keep all your primary tutorial screenshots on v7 menus only. Before you upgrade, here's how to update MikroTik RouterOS. Once your syntax is current, harden the design.
MikroTik BGP Security, Capacity, and Best Practices
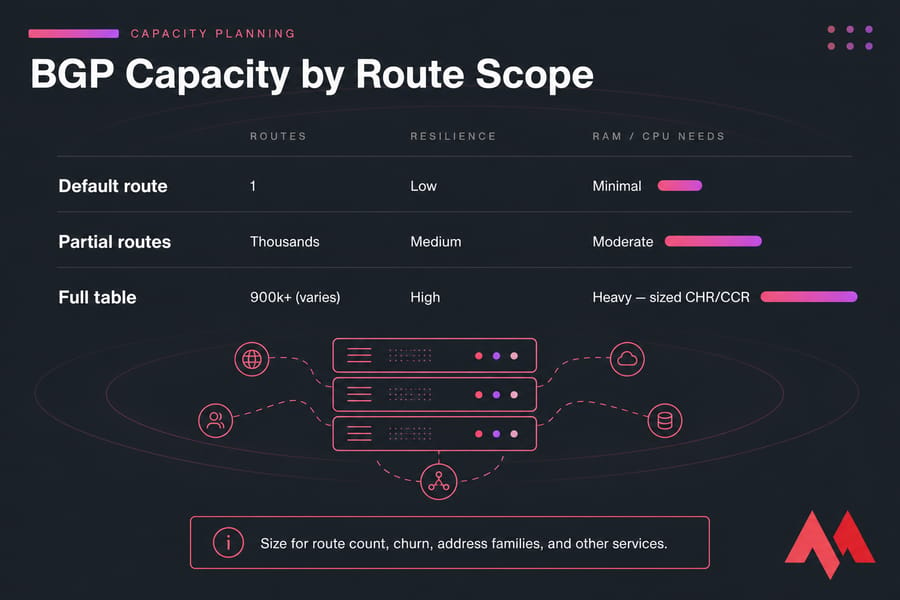
Size hardware around your actual route count, churn, address families, and other services running on the box — not a magic RAM number. A full IPv4 and IPv6 table needs substantially more than a default route or a handful of partial routes. Use max-prefix limits where your release supports them so a misbehaving peer can't blow up your RIB.
| Option | Routes | Resilience | Resources |
|---|---|---|---|
| Default route | 1 | Low | Minimal |
| Partial routes | Thousands | Medium | Moderate |
| Full table | 900k+ (varies) | High | Heavy — sized CHR/CCR |
The rest of the checklist: apply explicit inbound and outbound filters, permit TCP 179 only from the known peer address, use authentication when both sides support it (it's not encryption — it just protects the session), use stable router IDs and loopbacks where appropriate, and never redistribute all connected or static routes blindly. Monitor flaps, route count, memory, and CPU with your VPS monitoring tools, and run a MikroTik bandwidth test after deployment. RPKI origin validation helps but depends on your architecture — BGP itself doesn't verify who owns a prefix.
Need a lab without extra hardware? RouterOS CHR runs BGP in a virtual environment, which is handy for repeatable labs and virtual edge routing. A MikroTik CHR VPS hosting instance gives you adjustable CPU and RAM — size it around your expected route count. Just note a VPS doesn't include an ASN, address space, or transit. Learn how MikroTik CHR licensing works before you pick a tier.

An experienced tech and developer blog writer, specializing in VPS hosting and server technologies. Fueled by a passion for innovation, I break down complex technical concepts into digestible content, simplifying tech for everyone.