
If you've already spun up OpenVPN or WireGuard from a one-line install script, congrats the tunnel works. But a working tunnel isn't a secure server. I've seen plenty of self-hosted VPNs that encrypt traffic beautifully while leaving SSH wide open to the entire internet, leaking DNS to the upstream provider, and running on an unpatched kernel from six months ago.
This guide is about what comes after the install. How to secure a VPN server in the practical sense: firewall rules that actually fit your protocol, DNS leak protection that holds up under testing, and access hardening that survives a determined brute-force attempt.
VPN privacy is not the same as VPN server security
Encryption protects the data in transit. Server hardening protects the box that terminates the tunnel. Those are two separate problems. A solid cipher suite means nothing if an attacker SSH-brute-forces your admin user and pulls the keys directly.
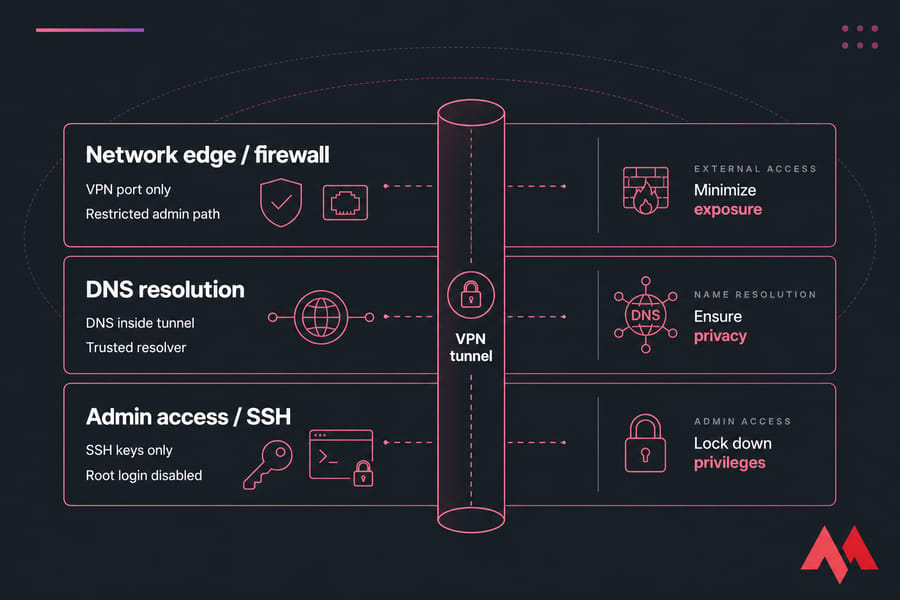
The three layers this guide focuses on
- Firewall: only the VPN port and a restricted admin path should be reachable.
- DNS: client lookups stay inside the tunnel, resolved by a source you trust.
- Access: SSH locked to keys, root login disabled, least privilege enforced.
Who should use this checklist
You've got a Linux VPS, root or sudo access, and either OpenVPN or WireGuard already installed. You know how to edit a config file and run a few commands. If that's you, the rest of this guide applies directly.
If you still need the install part, start with our guide on how to set up a VPN on a VPS server, then come back here.
Reduce attack surface on a self-hosted VPN server
Before you write a single firewall rule, figure out what's actually exposed. Most VPS images ship with services you don't need — sometimes a mail relay, a web panel, an old cron job from the install script. Each one is a door.
Warning: Take a snapshot before you start. If you misfire a firewall rule and lock yourself out, you'll want a clean rollback point. Most providers (MonoVM included) offer one-click snapshots from the panel.
Remove or disable services you do not need
List running services, then kill what you don't use:
systemctl list-units --type=service --state=running
sudo systemctl disable --now <service-name>
If you don't need Apache, Postfix, or some random web panel that shipped with your install, get rid of them. Less surface, less to patch, less to monitor.
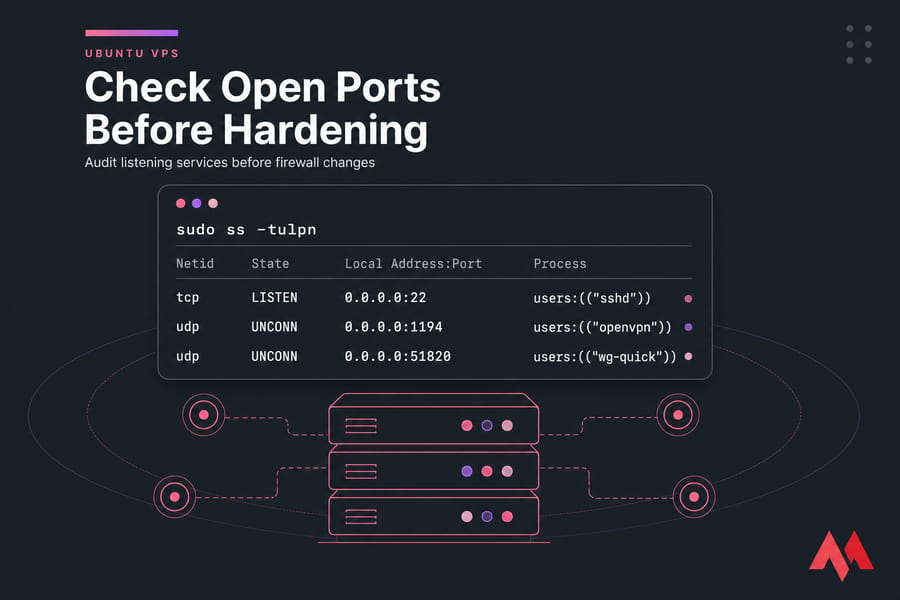
Check which ports are open before hardening
Run this on the server itself:
sudo ss -tulpnYou'll see every listening port and the process behind it. Cross-reference that list against what your VPN setup actually requires. For a deeper walkthrough, see how to check open ports in Linux.
Separate VPN traffic from admin access where possible
If you can swing it, don't expose SSH on the same public IP path your VPN users hit. Some admins put SSH behind a management VPN, or restrict it to a single static IP. Even an IP allowlist on the host firewall is a massive upgrade over open-to-the-world port 22.
VPN firewall rules for OpenVPN and WireGuard
Default deny inbound. Allow only what's necessary. That's the whole philosophy in one sentence — everything else is implementation.
Minimum ports a VPN server should expose
| Service | Protocol | Default Port | Public? | Notes |
|---|---|---|---|---|
| SSH | TCP | 22 | Restricted IPs only | Never wide-open if you can avoid it |
| OpenVPN | UDP | 1194 | Yes | UDP preferred for performance |
| OpenVPN (TCP fallback) | TCP | 443 | Optional | Only if UDP is blocked upstream |
| WireGuard | UDP | 51820 | Yes | Single UDP listener, no TCP variant |
| DNS | UDP/TCP | 53 | No | Only bind to the tunnel interface |
| Web panels | TCP | varies | No | Disable or bind to localhost |
UFW example for an OpenVPN server
UFW is the friendliest option on Ubuntu and Debian. Here's a minimal ruleset assuming OpenVPN on UDP 1194 and SSH restricted to your office IP:
sudo ufw default deny incoming
sudo ufw default allow outgoing
sudo ufw allow from 203.0.113.10 to any port 22 proto tcp
sudo ufw allow 1194/udp
sudo ufw enable
Replace 203.0.113.10 with your real admin IP. If your IP changes often, consider a small bastion or a management VPN instead of opening SSH globally.
For more UFW background, see our guide on how to configure UFW.
UFW example for a WireGuard server
sudo ufw default deny incoming
sudo ufw default allow outgoing
sudo ufw allow from 203.0.113.10 to any port 22 proto tcp
sudo ufw allow 51820/udp
sudo ufw route allow in on wg0 out on eth0
sudo ufw enable
That last ufw route line allows forwarded traffic from your tunnel interface to the public NIC. Without it, clients connect but get no internet.
iptables or nftables logic for forwarding and NAT
For WireGuard, you'll also need IP forwarding and NAT. Enable forwarding in /etc/sysctl.conf:
net.ipv4.ip_forward=1Then add a masquerade rule (replace eth0 with your actual public interface):
sudo iptables -t nat -A POSTROUTING -o eth0 -j MASQUERADEOpenVPN handles this through its own config (push "redirect-gateway def1" on the server side), but the NAT rule on the host is still required for traffic to actually reach the internet.
When to allow SSH from only trusted IPs
Pro tip: If your ISP gives you a dynamic IP, don't pin SSH to one address — you'll lock yourself out within a week. Instead, run a small jump host on a static IP, or use a management WireGuard tunnel and only allow SSH from 10.0.0.0/24 (your VPN subnet).
Warning: Always open a second SSH session in another terminal before applying firewall changes. If something breaks, you'll still have a working connection to fix it. Lock yourself out once, you'll never forget this rule.
Host firewalls aren't the only option, by the way. Most VPS providers offer a network-level firewall that filters traffic before it even reaches your server. Use both — defense in depth is cheap.
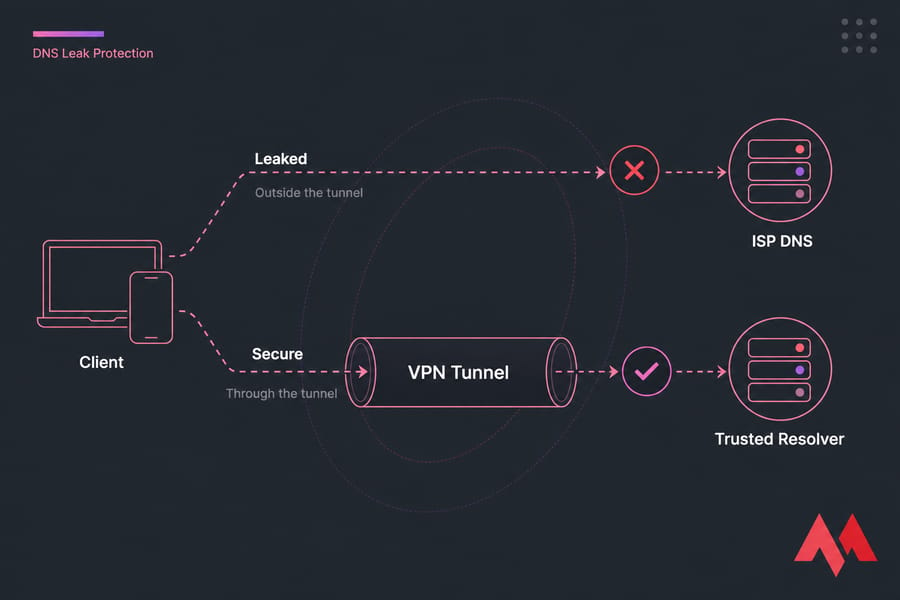
DNS leak protection for a VPN server
This is the section most setup guides skip. A working tunnel routes your packets through the VPN — but if your client still asks its old ISP resolver "what's the IP for example.com," that lookup leaks out of the tunnel in plaintext.
What causes DNS leaks on self-hosted VPNs
Three common causes:
- Server doesn't push DNS settings to clients, so clients keep using local resolvers.
- Split tunneling routes some traffic outside the VPN, including DNS in some cases.
- OS-level DNS-over-HTTPS (Chrome, Firefox, Windows) ignores the tunnel-pushed resolver.
If you're shaky on what DNS is doing under the hood, our primer on how DNS works covers the basics.
Push or assign trusted DNS resolvers to clients
For OpenVPN, add these to your server config:
push "dhcp-option DNS 10.8.0.1"
push "block-outside-dns"
The first line tells clients to use your tunnel-side resolver. The second blocks Windows clients from sneaking around it. For WireGuard, set DNS = 10.8.0.1 in the client [Interface] section.
You've got three real options for what that resolver actually is:
- A local resolver on the VPN server itself (Unbound is the go-to). Maximum privacy, more setup.
- A public privacy DNS like Quad9 or Cloudflare. Easier, but you're trusting a third party.
- Your VPS provider's DNS. Convenient, but the provider sees every query.
I lean toward running Unbound on the server. It's not hard to set up and it eliminates one trust hop. Bind it to the tunnel interface only — never to the public IP, or you'll end up as a free DNS amplification source for someone's DDoS attack.
Force DNS traffic through the VPN tunnel
For full-tunnel setups, you can block port 53 outbound on the host firewall except from the tunnel interface itself. That way, if a misconfigured client tries to bypass your pushed DNS, the lookup gets dropped instead of leaked.
Split tunnel is trickier. If users intentionally route some traffic outside the VPN, you can't fully control their DNS without breaking their setup. Be honest with users about that trade-off.
Test whether your VPN still leaks DNS
Connect a client, then run from the client side:
nslookup whoami.example.com
dig +short example.com
The resolver that answers should be the one inside your tunnel, not your ISP. Pair that with a web-based DNS leak test (dnsleaktest.com is the usual one) for a sanity check.
Our nslookup walkthrough covers more advanced verification.
Key takeaway: A working tunnel doesn't guarantee DNS privacy. Test from every client OS you support — Windows and mobile especially tend to do surprising things with DNS.
Access hardening with SSH keys, MFA, and least privilege
Now lock down the admin path. Most successful attacks on small VPS targets are dumb brute-force attempts against SSH — not exotic VPN exploits. Fix that and you've removed the largest single risk.
Disable password-based SSH login
Generate a key on your workstation if you don't have one yet (here's how to create an SSH key), copy the public half to the server, then verify you can log in with the key. Test it first — don't skip this — then edit /etc/ssh/sshd_config:
PasswordAuthentication no
ChallengeResponseAuthentication no
UsePAM no
Reload SSH: sudo systemctl reload ssh. Connecting with a private key is faster, safer, and immune to brute-force.
Disable root login and use sudo
In the same config file:
PermitRootLogin noCreate an admin user with sudo, log in as that user, and escalate when needed. Root login is a single point of failure attackers love.
Change the SSH port only after stronger controls
Moving SSH off port 22 reduces noise in your logs. That's it. It's not security — anyone running a real scan will find the new port in seconds. Do it if you want, but only after keys-only auth and a restrictive firewall are already in place. Our guide on how to change the SSH port walks through it safely.
Warning: Changing the SSH port is not a substitute for keys and disabled password login. I've seen people change the port, leave password auth on, and get owned the same week.
Add MFA or IP allowlisting for admin access
Two more layers worth adding:
- MFA via Google Authenticator or YubiKey through
libpam-google-authenticator. Adds a one-time code on top of your key. - IP allowlisting at the firewall level. Even keys can be stolen — an allowlist means a stolen key only works from approved networks.
And keep VPN user credentials completely separate from server admin credentials. A leaked VPN client config should never grant shell access.
For a deeper SSH lockdown, see our guide on how to configure secure SSH on a VPS.
VPN server security best practices for updates, fail2ban, and logging
Hardening isn't a one-time event. Software gets CVEs, keys age, logs need eyes on them. Here's the maintenance layer.
| Task | Frequency | Tool | Risk if skipped |
|---|---|---|---|
| OS and kernel updates | Weekly | unattended-upgrades, apt | Unpatched CVEs in OpenSSL, SSH, kernel |
| VPN package updates | Monthly | apt/dnf | Protocol-level vulnerabilities |
| Log review | Weekly | journalctl, auth.log | Missed brute-force or anomaly patterns |
| Key/cert rotation | 6–12 months or on offboarding | easy-rsa, wg genkey | Long-lived compromised credentials |
| fail2ban review | Monthly | fail2ban-client status | Jails silently broken or too permissive |
| Backup configs | After every change | rsync, snapshots | No recovery path after a bad edit |
| DNS leak retest | Quarterly | dig, dnsleaktest | Drift after client OS updates |
Use fail2ban or equivalent rate limiting
Install it, enable the sshd jail, and you're 80% there:
sudo apt install fail2ban
sudo systemctl enable --now fail2ban
For OpenVPN, you can add a custom jail watching its auth log too. Set a reasonable bantime (an hour is fine for starters) and maxretry of 3–5. Crowdsec is a modern alternative if you want shared threat intel.
Log without overexposing
Keep auth events, connection attempts, and firewall drops. Don't log full request URLs, user IPs in cleartext beyond what you need for abuse handling, or client certificate details into world-readable files. Make sure NTP is running so timestamps actually match across logs — timedatectl status will confirm.
Rotate keys, certificates, and user access regularly
Revoke certs the same day a user offboards. Rotate the server's own keys every 6–12 months, or immediately if you suspect compromise. For OpenVPN, that means using your CA's revocation list (crl.pem) properly. For WireGuard, just remove the peer's public key from the config and reload.
Don't forget backups — ideally off-server, encrypted, and tested at least once.
Secure OpenVPN server vs secure WireGuard server considerations
Both protocols can be hardened well. They just demand different things from you.
| Area | OpenVPN | WireGuard |
|---|---|---|
| Config complexity | Higher — multiple files, TLS settings, PKI | Lower — one config per peer |
| Key management | Full PKI with CA, certs, CRL | Static public/private key pairs |
| Firewall simplicity | TCP or UDP, multiple port options | Single UDP port |
| Performance | Solid, more CPU overhead | Faster, lower overhead |
| Hardening effort | More knobs to get right or wrong | Fewer moving parts to misconfigure |
| Audit-friendliness | Mature, well-understood | Smaller codebase (~4k lines) |
WireGuard is generally easier to harden because there's less to misconfigure. OpenVPN is more flexible — TLS auth, certificate-based identity, granular cipher control — but every knob is a chance to set the wrong value.
For a deeper comparison, see WireGuard vs OpenVPN.
Neither protocol matters much if SSH on the same box is wide open. The protocol is the door; the server is the house. Lock both.
Common VPN hardening mistakes that leave servers exposed
- SSH open to the entire internet. Risk: continuous brute-force. Fix: IP allowlist or jump host.
- Unrestricted outbound DNS. Risk: clients leak queries. Fix: force DNS through tunnel, block port 53 except via tunnel interface.
- Reusing keys across users. Risk: one leak compromises everyone. Fix: unique key per client, document who has what.
- Running the VPN as root. Risk: any compromise = full system. Fix: drop privileges where the daemon supports it.
- No monitoring at all. Risk: breach goes unnoticed for months. Fix: weekly log review, fail2ban, alerts on repeated failures.
- Treating "I changed the SSH port" as security. Risk: false confidence. Fix: layered controls — keys, MFA, allowlist.
- Blindly trusting one-line install scripts. Risk: defaults often skip hardening. Fix: read the config the script generated and tighten it.
For a broader checklist that goes beyond VPN-specific concerns, see our VPS security best practices and how to secure a Linux VPS.
How to test your VPN server security after setup
Hardening you don't verify isn't hardening. Run through this after every meaningful change.
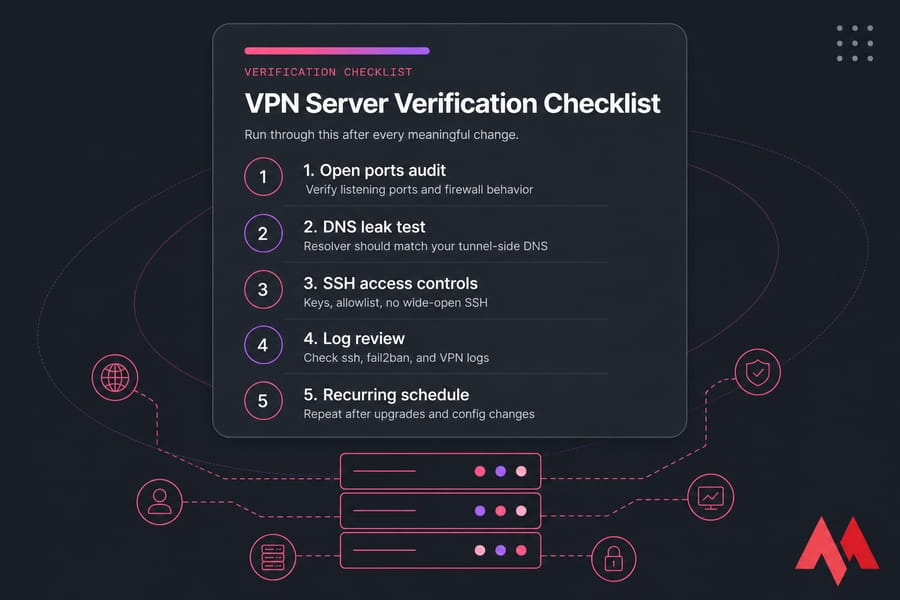
Verify listening ports and firewall behavior
From the server:
sudo ss -tulpn
sudo ufw status verbose
From outside, scan your public IP from a different network:
nmap -Pn -p- your.server.ipOnly your VPN port and your restricted SSH path should answer. Anything else is a problem. Our nmap cheat sheet covers more scan techniques.
Test DNS leak protection from the client side
Connect a client, then run dig +short whoami.cloudflare or visit dnsleaktest.com. The resolver in the result should match your tunnel-side DNS. Test from Windows, macOS, and mobile — they behave differently.
Review logs for rejected connections and brute-force attempts
sudo journalctl -u ssh -n 100
sudo fail2ban-client status sshd
sudo journalctl -u openvpn-server@server
Look for repeat offenders, weird usernames, or auth failures from countries you don't operate in. A small daily review beats a quarterly panic.
Run a recurring hardening checklist
Quick summary: If your open ports are minimal, your DNS resolves only through the tunnel, and SSH only accepts keys from known IPs, your posture is in solid shape. Re-test after every OS upgrade — kernel updates occasionally reset sysctl flags or break firewall rules.
Secure VPN hosting options if you need a stronger foundation
Sometimes the bottleneck isn't your config it's the VPS underneath. Oversold shared cores, flaky network, missing root access, or a provider that doesn't give you a usable snapshot system make hardening painful.
For self-hosted VPN work, you want: full root access, a Linux distro you actually know (Ubuntu, Debian, AlmaLinux), reliable bandwidth, location choice that matches your users, and a provider that won't shut you down for running a VPN.
MonoVM's Linux VPS plans and dedicated OpenVPN server hosting are built with self-hosted VPN deployments in mind full root, multiple OS options, 25+ locations, and snapshot support so you can roll back from a bad firewall rule without a panic. If you want a turnkey setup, the VPN server hosting page covers the pre-configured options.
Whichever route you pick, the hardening steps above don't change. The foundation just makes them easier to apply

An experienced tech and developer blog writer, specializing in VPS hosting and server technologies. Fueled by a passion for innovation, I break down complex technical concepts into digestible content, simplifying tech for everyone.