For people who have important data and need a super secure connection for their remote server, SSH with a private key is the solution! Password-based authentications are safe, but you should know that they can be vulnerable to brute-force attacks and that’s why SSH key-based connections are more secure and efficient for accessing servers. If you don’t know how to connect to SSH with a private key, don’t worry as we’re going to explain how to do that in a step-by-step guide.
The majority of servers on the internet are run on Linux, meaning if you want to connect to them, you have to use SSH (Secure Shell), a remote administration protocol that allows you to control and modify your remote servers over the internet.
If you are connecting from a Linux OS or macOS, typically, you would open the terminal and enter ssh [user]@[ host ] which would then prompt you to enter the password for the user. In this case, [user] represents the account you want to access, for example, root, and the [ host] represents the server you wish to access, which can be either an IP address or a domain name.
Why is a private key safe in SSH connections?
If you’re reading this blog post, you may know What is SSH protocol. SSH or Secure Shell is a safe way to make remote connections. administrators and developers use it as a safe and secure way to control and manage their remote computers. It uses a special code to keep your data safe and secure. Actually, there are 2 ways that you can connect with SSH: using a password or using a key. Passwords can be easy for hackers and bad guys to guess, while keys are a more secure way as they use cryptographic pair—public and private keys.
The public key functions similarly to a lock and is stored on the server permanently. On the other hand, the private key acts like the lock's key and is stored on your computer. This method is so much safer because hackers can’t readily guess the key, and they require both the lock and the key to gain access.
Connecting to SSH using a private key?
Now that you know what is an SSH key, you know that key-based connections through SSH connections are much safer than using passwords, you may want to know how to connect SSH with the private key. To do that, just follow these steps:
Step 1: Check if You Already Have an SSH Key
Before creating a new key, you should check if one already exists. Run the following command to check it:
ls ~/.ssh
The output will be like:

Using this command, a list will be shown which includes any SSH keys stored in the `~/.ssh` directory. In this list, if you see something like `id_rsa` and `id_rsa.pub`, it means you already have an existing key pair. If not, you need to create a new one which we tell you how in the next step.
Step 2: Create an SSH Key
In a complete guide, we explained how to create SSH key. So, you can use that tutorial if you need a complete explanation. But here we shortly tell you how to do that.
In the last step, if you don’t see any existing keys, you need to create a new one using this command:
ssh-keygen
The output will be like:
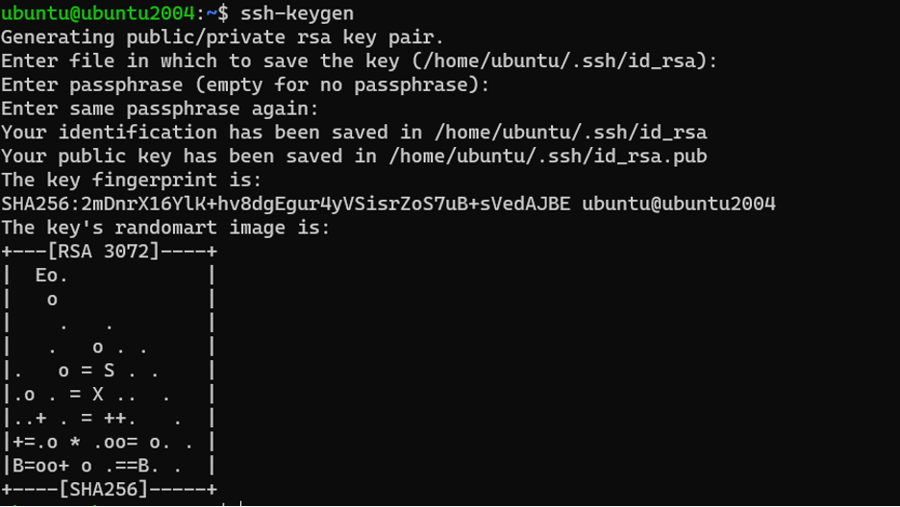
To save the key, it will prompt you to enter a file name after running this command. The default name for the private key will be `id_rsa` and the public key `id_rsa.pub`. If you want to accept the default location and filenames, you need to press ENTER.
$ Enter file in which to save the key (/home/ubuntu/.ssh/id_rsa):
You'll then be prompted to create a passphrase to better secure your private key. This is optional, but strongly recommended for extra protection. You can skip this step by clicking ENTER.
$ Enter passphrase (empty for no passphrase):
$ Enter same passphrase again:
This will create two files: `id_rsa` (private key) and `id_rsa.pub` (public key) in your `~/.ssh` directory.
Step 3: Copy Public Key to the Remote Host
Now run this command:$ ls ~/.ssh
And the output will be like this:

Now, to start using your SSH key pair, you need to copy the public key to the remote server you need access to. This step is necessary to enable the server to authenticate your connection without needing any passwords. Using 'ssh-copy-id' command is the easiest way to do that:
$ ssh-copy-id remote_server_user@remote_server_ip
Instead of `remote_server_user` use your username on the remote server and instead of `remote_server_ip` use the server's IP address. This command will automatically append your public key to the `~/.ssh/authorized_keys` file on the remote server. After completing this step, the server can identify you by your private key.

Step 4: SSH Using the Private Key
Now your public key is on the remote server and you are able to connect to it using your private key by running the following command:
ssh remote_server_user@remote_server_ip
The SSH client will utilize the private key saved in the '~/.ssh' directory to authenticate the connection. If you specify a password for your key, you will be required to enter it.

You did it! you now built a SSH with a private key and have more security than ever!
Windows users, on the other hand, have to download an Windows SSH client such as PuTTY to establish an SSH connection. Within the client, they have to enter the server IP and the SSH port. Afterward, a window will open that will ask you to enter the username followed by the password.
There is, however, another way you could establish an SSH connection without using the username and password. You can connect to SSH with a private key, and today we will show you how it’s done.
How to connect to a Linux server with an SSH private key using PuTTY?
First, you will need to install some software on your machine:
- PuTTY
- PuTTYgen
We recommend using the PuTTY client to connect to SSH from Windows (these steps can also be done on Linux and macOS as both PuTTY and PuTTYgen are also available on said OS). Both can be installed from the official site with only one installer. Once the software is installed, you are ready to begin the setup.
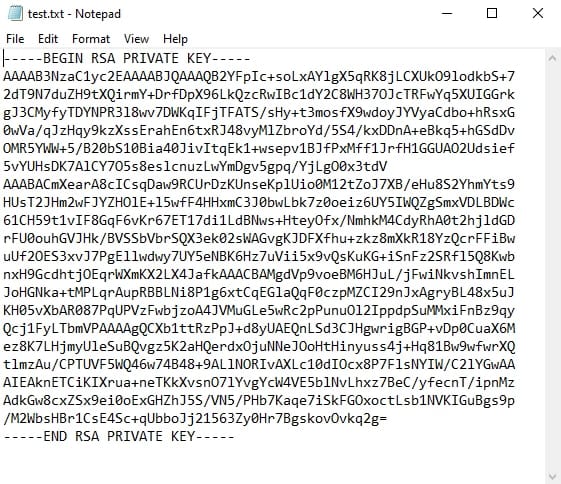
- Create a text file, paste your SSH private key into it, and save the file. This type of file is called a key file. Do keep in mind that you must also include the BEGIN and END It should look similar to this:
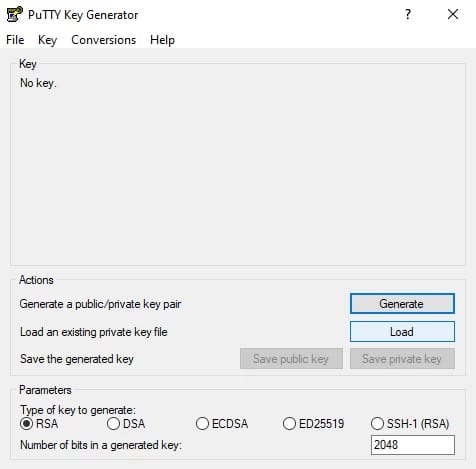
- Launch PuTTY Key Generator (i.e. PuTTYgen)
- Within the Actions menu, click on Load, and select the key file that you created in step 1. If the key is loaded successfully, a confirmation should be displayed. Click on OK to dismiss the message.
- Enter a unique key passphrase into the Key passphrase field and then re-enter it again into the Confirm passphrase You will be prompted for the passphrase whenever you try to connect to the server using the private key (you can also leave them blank, however, it is not recommended)
- Now click on Save private key and enter the file name to be saved as a .ppk file.
- You can now close PuTTYgen and open PuTTY itself.
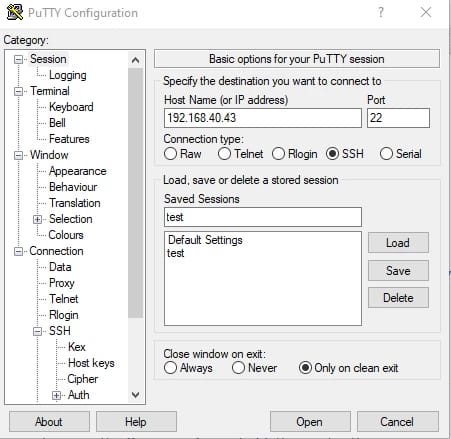
- Enter the server’s IP address into the Host Name (or IP address) field and the corresponding port into the Port Do not forget to select SSH under Connection type. Lastly, enter the name for the session under Saved Sessions and click on Save.
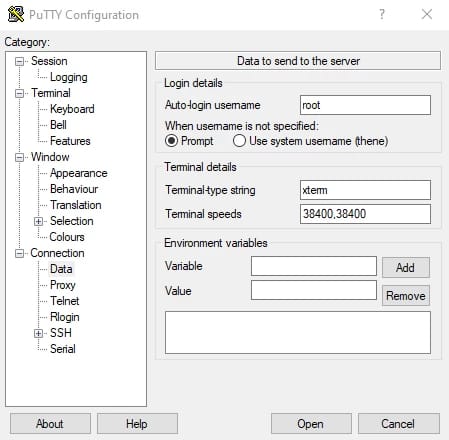
- Within the left navigation pane, click on Connection > Data and type root in the Auto-login username If you wish to access a different user, enter that user instead.
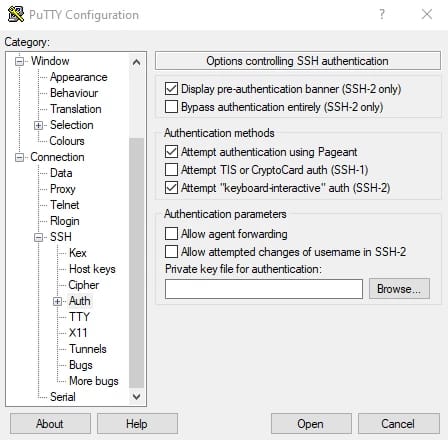
- Go back to the left navigation pane and click on Connection > SSH > Auth. You will see the options that control the SSH authentication. Under the Private key file for authentication click on the Browse… file button and select your .ppk file generated in step 5.
- Return to the starting page by clicking Session in the left navigation pane and click on
- Click on Open and establish your connection to the server.
And that is how you set up an SSH connection to a Linux server via the SSH private key. Since we named and saved the connection (steps 7 and 10, respectively), we can now choose it from the saved sessions list at any time and use it without having to repeat all of these steps. If you found this tutorial useful or need some help, we encourage you to leave a comment on the article.

I'm fascinated by the IT world and how the 1's and 0's work. While I venture into the world of Technology, I try to share what I know in the simplest way with you. Not a fan of coffee, a travel addict, and a self-accredited 'master chef'.