![How to fix DNS_PROBE_FINISHED_NXDOMAIN Error? [Updated 2024]](/wp-content/uploads/2022/11/how-to-fix DNS-PROBE-FINISHED-NXDOMAIN-Error107-main.webp)
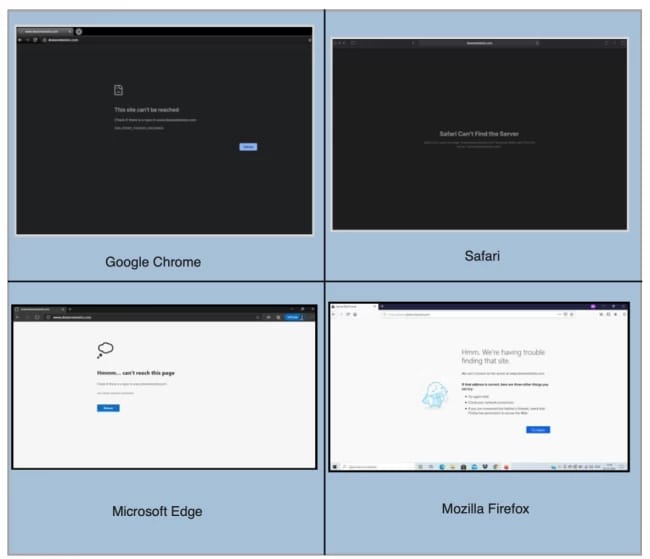
If you are frequently web surfer encountering the DNS_PROBE_FINISHED_NXDOMAIN error might sound familiar to you. It is a commonly occurring error that may be prevalent across various domains. It sometimes refers to when your domain seems non-existent, or the related IP address is unavailable. You can encounter this error on any browser whenever the site you try to reach is unavailable.
There can be various reasons for this error to occur in the first place. Before getting into the causes and the ways to fix this error, we will learn more about DNS_PROBE_FINISHED_NXDOMAIN.
What is DNS_PROBE_FINISHED_XDOMAIN Error?
DNS helps direct the incoming traffic by connecting the domain names with the web servers. This domain name gets converted into the IP address to be understood by the computer. This error commonly occurs when there is a mistake within the configuration or any issue with the DNS. The actual problem occurs when you provide the URL, and the DNS will not be able to search the server with an appropriate IP address regarding that server. Whenever the DNS fails to explore, it results in an error called DNS_PROBE_FINISHED_NXDOMAIN, where NXDOMAIN represents the non-existent domain.
For an in-depth understanding of how the Domain Name System (DNS) works and its crucial role in the internet infrastructure, explore this comprehensive guide at What is DNS?.
There is nothing to worry about as it is easy to fix, and the solution comes in many ways suitable to you. Well, different browsers serve you with different ways of solving the problem. This error name is mostly for Google chrome, but that does not mean this error does not occur on other browsers.
DNS PROBE FINISHED NXDOMAIN error Based on Different Browsers
Methods to Fix the DNS_PROBE_FINISHED_NXDOMAIN Error
In the article below, we will learn various ways to implement different solutions on different operating systems. We will discuss the below-mentioned methods.
- Flushing the DNS Cache
- Releasing and Renewing the IP Address
- Changing the DNS Servers
- Restarting the DNS Client Service
- Checking the Local Hosts File
- Resetting the Chrome Flags
- Disabling the VPN or Antivirus
- Resetting the Network Adapter
- Moving to Google DNS
- Clearing the Chrome Browser Cache
- Contacting Your Internet Provider
Flushing the DNS Cache
A DNS cache is a temporary file stored on your system that contains the IP address of the previously visited sites. One way is to clear that cache file to avoid the outdated IP address for the particular website. This solution may resolve your problem. You can follow the below steps for the different OS to resolve the issue.
How to Flush DNS in Windows
- Hit the start button and look for the command prompt. To make DNS cache changes, you must log in as an administrator. So right-click the command prompt and log in as administrator.
- A command prompt terminal will open and run the below command.
ipconfig/flushdns
- Click enter to complete this CMD command and clear the DNS cache. This method is viable for Windows operating systems.

How to Flush DNS in Linux, CentOS, Ubuntu, Debian,
Ubuntu does not come with a DNS cache, so you must install a DNS service to do that manually. Once you start storing the DNS cache, you can clear it up to resolve the problem using the following steps.
- Open the terminal window using ctrl+alt+T.
- Use the below command on the terminal to clear the DNS entries and hit enter.
sudo /etc/init.d/nscd restart
So this is the guide to help you to fix dns_probe_finished_nxdomain ubuntu.
Releasing and Renewing the IP Address
If applying the previous method did not work, you can use it to clear the cache, which is almost the same with some changes.
For Release and renew IP in Windows,
First, open the command prompt with administrative rights again by right-clicking it. Then you can follow the below steps to clear the DNS entry.
- You can use the following command to release the current IP address.
ipconfig/release
- Run the following command to display the full IP configs for all the adapters.
ipconfig/all
- To reset the DNS cache, run the following command.
ipconfig/flushdns
- The following command will renew the DNS setting for all adapters.
ipconfig/renew
- Resetting the IP setting for already present IP.
netsh int ip set dns
netsh winsock reset
- Then restart the system.
For Release and renew IP in MacOS.
You can follow the below steps to release and renew the IP address.
- Navigate to System Preferences and select Network.
- Go for the internet connection and click the Advanced option.
- Go to the TCP/IP menu and click the Renew DHCP Lease option.
- Click OK to make the changes, and then restart your computer.
Changing the DNS Servers
If none of the above-discussed methods work, you can try changing your system’s DNS. By default, the computer uses the internet service provider for DNS. to resolve the issue, and you can change it to Google DNS or Open DNS.
For Windows
Below are the steps to make DNS server changes on Windows.
- Navigate to the Control panel and look for the Network and Sharing center, as shown below.
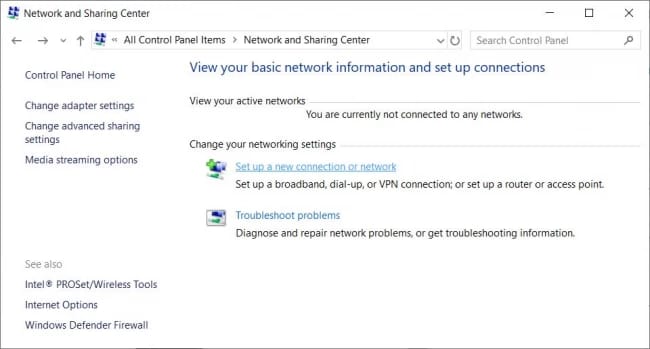
- Go to the Change Adapter setting on the left side menu.
- Right-click the current connection and hit properties.
- Select the Internet Protocol Version 4 (TCP/IPv4) option and hit the properties option.
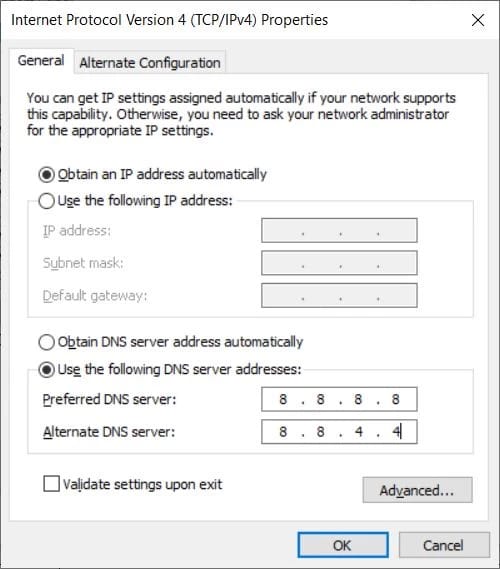
- You can change the DNS server from the Preferred and alternate DNS server options under the General tab.
For Google DNS-
8.8.8.8
8.8.4.4
For Open DNS-
208.67.220.222
208.67.222.220
- Click OK after making the changes accordingly.
For macOS.
Follow the below steps to make DNS server changes.
- Go to the Apple icon and look for system preferences.
- Go to the Network, select the currency used for the internet connection, and select the advanced option.
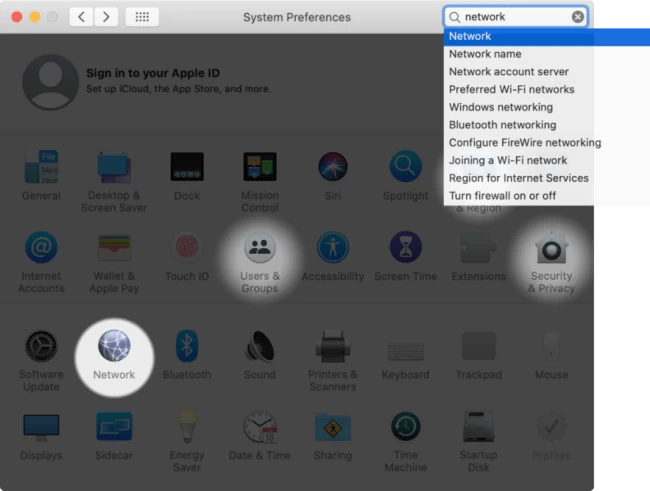
- Select the DNS tab, press the ‘+’ button, and provide the new DNS server details, either Google DNS or Open DNS, whose value will be the same as mentioned above.
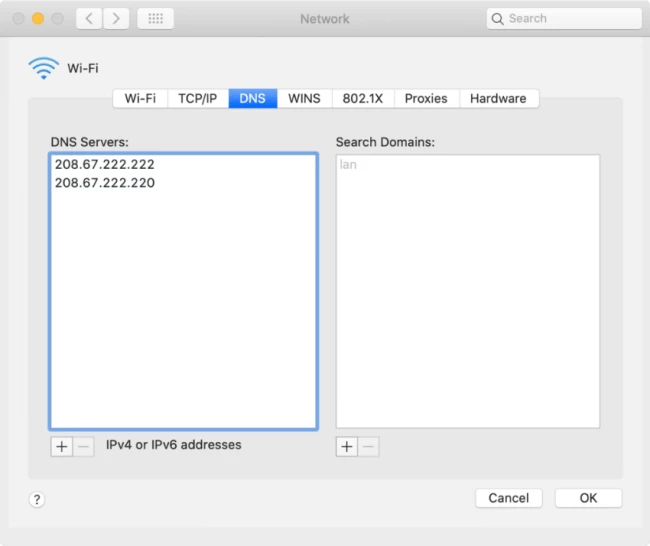
- Click OK to apply the changes.
Restarting the DNS Client Service
Three different ways to restart the DNS client service on the Windows OS are available.
Windows Command Prompt
- Open the command prompt with admin rights and run the below commands.
- Run the below command to Stop the DNS server.
net stop dnscache
Output:
The DNS Client service was stopped successfully.
- Now, start the DNS service again using the below command.
net start dnscache
Output:
The DNS Client service was started successfully.
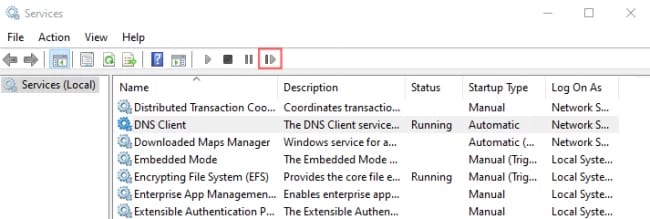
Windows Service Manager
- Open the search bar from the Start menu and look for services.
- Select the ‘DNS client’ option from the list, as shown in the image below.
- To apply the changes, you can now restart the DNS client service.
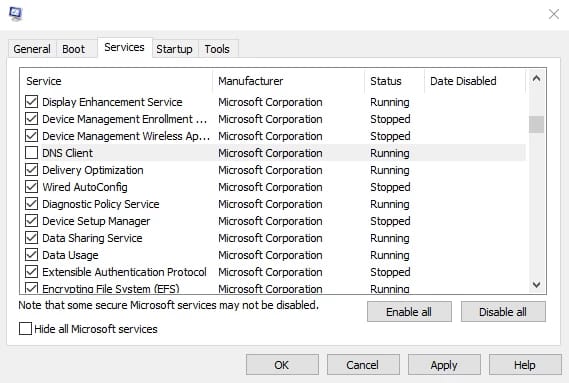
Windows System Configuration
- Open Run, type MSConfig, and enter.
- A new window will appear with all the services. Go for DNS client service.
- Disable the service by unclicking it.
- Click OK and then restart.
- Follow the first two steps again, and recheck the service.
- Restart your system after making the changes.
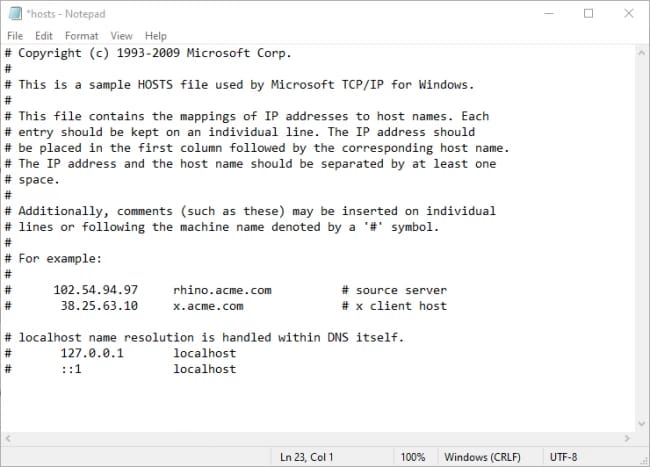
Checking the Local hosts’ File
A host's file is stored on your system locally that maps the IP addresses’ domain names. This file is always considered before visiting any website. If the file does not have any information for the website, it will search for the DNS system to load it. Make sure that the details are present there to avoid DNS issues.
Windows
- Open Notepad with administrative rights.
- Click fill and open.
- Now change the file filter to All Files.
- Copy the below address in the address bar to open the file.
%SystemRoot%:\Windows\System32\Drivers\etc
- Open the host’s file from the folder.
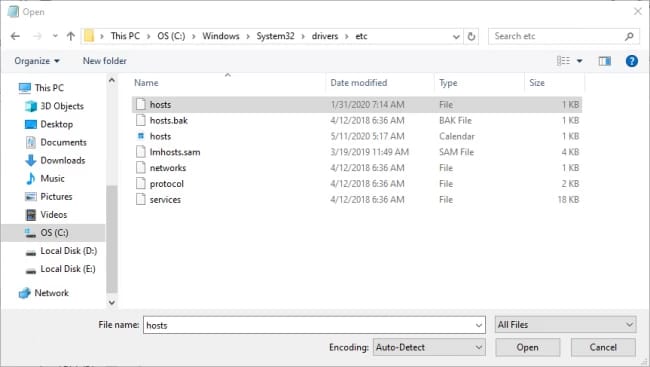
- Remove the visiting website's domain name and IP address and save the changes.
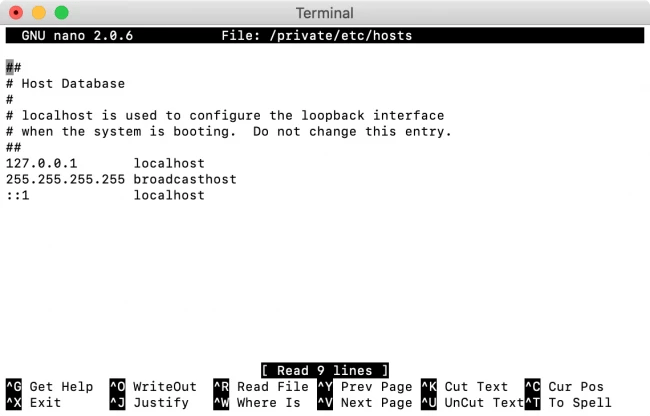
macOS
- Open the terminal from the launchpad.
- You can run the below command to open the Nano editor as administrator.
sudo nano /private/etc/hosts
- Enter the password for the admin account.
- You will be redirected to the hosts’ file.
- Remove the file details and save changes by clicking ctrl_O.
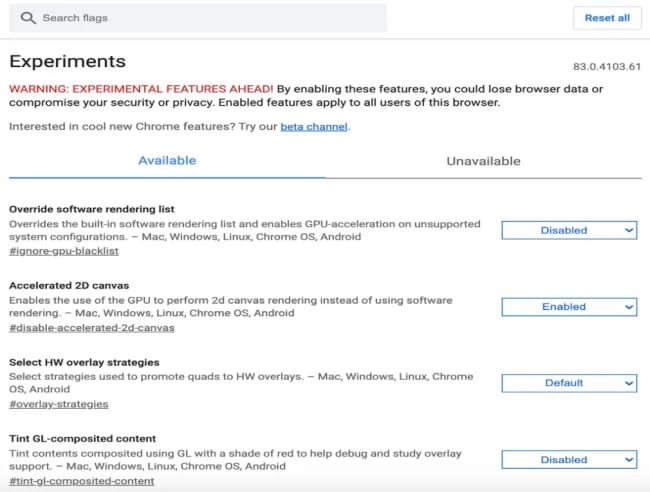
Resetting the Chrome Flags
One solution is resetting the Google Chrome settings and the experimental features that were modified by mistake. Open the below link in Chrome.
chrome://flags
A window will appear with all experimental features; click reset all in the upper right corner. Then close and start the browser again.
Disabling the VPN or Antivirus
Though VPN and Antivirus ensure safety but might prevent you from accessing some websites, to resolve the issue, you can temporarily turn off the active VPN or antivirus and roll back the changes if not required.
You can disable the Antivirus from the control panel and temporarily turn it off. To disable the VPN details on your system, follow the steps below.
- Go to Control Panel, navigate Network and Internet, and click Network Connections.
- Select the VPN accordingly and click Properties.
- Go to the Networking tab, and click uninstall.
- Restart the system after making the changes.
Reset the Network Adapter
- Right-click the start button again and click on the command prompt.
- On this command prompt window, type in
netsh winsockreset and then enter. - Restart the computer after you have entered the command.

Public DNS Services
Switching to a public DNS service can significantly impact your internet speed, privacy, and the reliability of your connection. While the article mentions popular options like Google DNS and OpenDNS, several other services provide distinct advantages. Here's a brief overview of some leading public DNS services, including Cloudflare, to help you choose the best option for your needs.
Google DNS
- IP Addresses: 8.8.8.8 and 8.8.4.4
- Benefits: Known for its speed and reliability, Google DNS also offers security features like protection against DNS cache poisoning.
OpenDNS
- IP Addresses: 208.67.222.222 and 208.67.220.220
- Benefits: Offers customizable filtering options, parental controls, and phishing protection, making it a great choice for families and businesses.
Cloudflare
- IP Addresses: 1.1.1.1 and 1.0.0.1
- Benefits: Focuses on privacy and promises to never log personal information. Cloudflare is known for its speed and also offers malware protection with its 1.1.1.2 and 1.0.0.2 addresses.
Quad9
- IP Addresses: 9.9.9.9 and 149.112.112.112
- Benefits: Prioritizes security by blocking malicious domains and offers DNS encryption for privacy. Quad9 also ensures no personal data collection.
CleanBrowsing
- IP Addresses: 185.228.168.9 and 185.228.169.9
- Benefits: Specializes in content filtering, making it another excellent choice for families and schools. Offers protection against adult content, malware, and phishing.
Choosing the Right Public DNS Service
When selecting a public DNS service, consider the following factors:
- Speed: The physical distance between you and the DNS server can affect your internet speed. Test different services to see which is fastest in your location.
- Privacy: Review the privacy policy of the DNS provider to understand what data is collected and how it is used.
- Security: Look for features like phishing protection, malware blocking, and support for DNS over HTTPS (DoH) or DNS over TLS (DoT) for encrypted queries.
- Features: Specific needs like content filtering, parental controls, or customizable settings might lead you to prefer one service over another.
By exploring these public DNS services, you can optimize your internet experience based on speed, security, privacy, and other preferences, ensuring a smoother and safer online browsing experience
IPv6 Connectivity
As the internet continues to grow, IPv6 adoption has become increasingly necessary due to the larger address space it offers. However, transitioning from IPv4 can introduce DNS resolution issues if not properly configured or supported by your network infrastructure.
- Diagnosis: Use the ping command to test connectivity with an IPv6 address (e.g., ping -6 ipv6.google.com). If the command fails, there might be an issue with your IPv6 connectivity.
- Fix: Ensure your router and ISP support IPv6. Check your device's network settings to ensure IPv6 is enabled. If issues persist, consider disabling IPv6 temporarily to check if DNS resolution improves, indicating a potential IPv6 configuration issue.
Browser Extensions
Browser extensions enhance functionality but can sometimes conflict with web browsing and DNS resolution.
- Troubleshooting: Identify problematic extensions by disabling all extensions and re-enabling them one by one. Check if the DNS resolution issue occurs after enabling a specific extension.
- Solution: Update or remove the extension causing the issue. Consider looking for alternative extensions or contacting the extension developer for support.
Mobile Devices
DNS resolution problems aren't exclusive to desktops; mobile devices can also encounter similar issues, affecting connectivity and web access.
-
iOS:
- Diagnosis: Use the Safari browser to test web access. Check Wi-Fi and cellular data settings to ensure proper network connectivity.
- Fix: Toggle Airplane mode on and off. Reset network settings by going to Settings > General > Reset > Reset Network Settings. Consider using a public DNS service by manually configuring DNS settings in the Wi-Fi network's properties.
-
Android:
- Diagnosis: Use Chrome or another browser to check for DNS resolution issues. Inspect both Wi-Fi and mobile data for connectivity problems.
- Fix: Toggle Airplane mode or restart the device. For Wi-Fi connections, modify the DNS settings to use a public DNS service by navigating to the Wi-Fi network's settings and selecting the option to modify the network. Choose 'Static' under IP settings and enter the DNS servers of your choice.
Implementing these solutions can help resolve DNS resolution issues across different devices and networks, ensuring a smoother online experience.
By Clearing the Chrome Browser Cache
- Open the Google Chrome Browser on your PC
- Select the three dots in the Chrome Menu Icon and then hover the mouse over the More Tools section
- Click "Clear browsing data.”
- On the screen that pops up, choose “all-time” and then click “clear data.” If you want to retain certain browsing data, you can deselect individual items
Firewall Settings
Firewalls are essential for protecting your network by controlling incoming and outgoing traffic based on an organization's previously established security policies. However, these security measures can sometimes interfere with DNS resolution, leading to errors like DNS_PROBE_FINISHED_NXDOMAIN. Adjusting your firewall settings may be necessary to ensure that DNS requests are not mistakenly blocked, allowing your system to connect to the desired websites without interruption. Here's how you can check and adjust your firewall settings on various operating systems to resolve DNS issues:
Windows
- Open Windows Defender Firewall: Go to Control Panel > System and Security > Windows Defender Firewall.
- Allow an App or Feature: Click on "Allow an app or feature through Windows Defender Firewall" on the left pane. Here, you can check if your browser or any other application that requires internet access is allowed through the firewall.
- Advanced Settings: For more detailed settings, click on "Advanced settings". This opens the Windows Defender Firewall with Advanced Security window. Here, you can create inbound and outbound rules that specifically allow or block DNS requests. Ensure that outgoing DNS requests (usually on port 53) are allowed.
- Turn Windows Defender Firewall on or off: If troubleshooting, you might consider temporarily turning off the firewall to see if DNS issues resolve. This option is available under "Turn Windows Defender Firewall on or off". Remember, this should be a temporary measure for diagnostic purposes only.
macOS
- Open System Preferences: Click on the Apple menu and select "System Preferences", then click on "Security & Privacy".
- Firewall Tab: Go to the "Firewall" tab and click the lock to make changes (you may need to enter your administrator password).
- Firewall Options: Click "Firewall Options" to see a list of applications and services with their respective firewall settings. Ensure that your web browsers and any DNS applications are set to allow incoming connections.
- Advanced Firewall Settings: For advanced users, you can use the Terminal to create more specific rules for inbound and outbound connections, including DNS.
Linux
The process for adjusting firewall settings on Linux varies depending on the distribution and the firewall solution in use (e.g., UFW, Firewalld, iptables).
- UFW (Uncomplicated Firewall):
- Open Terminal.
- To allow DNS requests, you can allow outbound traffic on port 53 with the command: sudo ufw allow out 53.
- Firewalld:
- Open Terminal.
- Use the command: sudo firewall-cmd --permanent --add-service=dns and then sudo firewall-cmd --reload to apply the changes.
- iptables:
- Open Terminal.
- Allow DNS requests by adding a rule: sudo iptables -A OUTPUT -p udp --dport 53 -j ACCEPT for UDP and similarly for TCP if needed.
Tips for All Operating Systems
- Check for Specific Rules: Ensure there are no specific rules set up that might block DNS requests or traffic to and from your DNS server.
- Review Blocked Applications: Sometimes, firewalls might block or limit applications crucial for DNS resolution. Ensure that these applications are on the allowed list.
- Temporary Disable for Diagnosis: If you're uncertain whether the firewall is the cause of DNS issues, temporarily disabling it can help diagnose the problem. If the issue resolves with the firewall turned off, you'll need to adjust your settings rather than keeping the firewall disabled.
Network Troubleshooter Tools
Operating systems come equipped with network troubleshooter tools designed to diagnose and sometimes automatically resolve network connectivity issues, including DNS errors. These tools can be particularly helpful in identifying and fixing common network problems without requiring deep technical knowledge.
- Windows: Access the network troubleshooter by navigating to Settings > Network & Internet > Status. Click on "Network troubleshooter" to start the diagnosis process.
- macOS: Use the Wireless Diagnostics tool. Hold down the Option key, click the Wi-Fi icon in the menu bar, and select "Open Wireless Diagnostics." Follow the on-screen instructions to diagnose issues.
- Linux: Depending on the distribution, you can use commands like nm-tool or graphical tools like Network Manager for troubleshooting. For detailed diagnostics, the terminal command ping and traceroute can be useful.
Router/Modem Issues
Resolving DNS errors may sometimes require troubleshooting your router or modem, as these devices play a crucial role in managing your network's DNS settings. Here are some steps you can take to address potential router or modem issues:
- Restarting: A simple restart can resolve many connectivity issues. Unplug your router and modem, wait a minute, and then plug them back in.
- Updating Firmware: Manufacturers release firmware updates to improve performance and security. Check your router’s administration interface for updates.
- Checking DNS Settings: Access your router’s settings to ensure it's configured to use the correct DNS servers. You might want to switch to public DNS services like Google DNS or OpenDNS for better reliability.
- Factory Reset: If other troubleshooting steps fail, consider a factory reset. This will erase all settings and configurations, allowing you to start fresh. Note that you will need to reconfigure your network settings afterward.
Advanced Diagnostic Tools
For users with a deeper understanding of network operations or those looking to delve into the technicalities of DNS issues, advanced diagnostic tools and commands offer a way to analyze and pinpoint specific problems. Tools like traceroute, dig, and nslookup are invaluable for this purpose, allowing for a detailed examination of the pathways and processes involved in DNS resolution.
Traceroute
- Purpose: Maps the path that packets take from your computer to a destination host, helping identify where delays or blockages occur.
- Usage: In the command line or terminal, type traceroute [destination] on macOS/Linux or tracert [destination] on Windows. This command reveals the route taken and highlights any transit delays.
Dig
- Purpose: Queries DNS servers directly, fetching data with more detail than most tools. It's particularly useful for troubleshooting DNS-related issues by providing comprehensive information about the DNS response.
- Usage: Enter dig @[DNS server] [domainname] in the terminal (mostly Linux/macOS). For Windows, dig can be used if installed via Windows Subsystem for Linux (WSL) or other third-party applications. It shows detailed information about the query, including response time and the answering DNS server.
Nslookup
- Purpose: Allows users to query DNS servers to obtain domain name or IP address mappings, helping diagnose DNS resolution issues.
- Usage: Simply type nslookup [domainname] in your command prompt or terminal. For more detailed information, you can specify a particular DNS server with nslookup [domainname] [DNS server]. This tool is available on both Windows and Unix-like systems, providing a quick way to view the DNS records associated with a domain.
Usage Tips
- Cross-Referencing Results: Using these tools in conjunction can provide a comprehensive view of where DNS resolution may be failing or being delayed. For instance, if nslookup returns the correct IP but traceroute shows a failure to reach the destination, the issue may lie in the network path rather than DNS resolution.
- Analyzing Output: Look for inconsistencies in response times, failed hops in traceroute, or errors in DNS responses in dig and nslookup. These clues can help pinpoint network bottlenecks or misconfigurations in DNS settings.
These advanced tools are powerful aids in diagnosing complex network and DNS issues, offering insights that can lead to targeted and effective solutions.
Conclusion
DNS_PROBE_FINISHED_NXDOMAIN problem is prevalent and easy to fix. We have already discussed some methods to help you eliminate the problem. We have mentioned easy-going steps for each method that is easy to manage and handle. There is no need to go through every method if your issue gets resolved with any method. Once you eliminate the DNS problem, you can access the website without issue.

People are also reading:
