Transferring files between computers can seem daunting, especially when they are not on the same local network. However, with the advent of remote desktop technologies, this task has become simpler and more efficient. "How to Transfer Files Using Remote Desktop" serves as a straightforward guide to moving documents, images, and other files between a local and a remote computer seamlessly. This process leverages remote desktop protocols (RDP) to not only allow you to access another computer's interface over a network but also to transfer files between the two systems securely and quickly. Whether for work, technical support, or personal use, understanding how to execute this file transfer effectively can save time and eliminate the need for physical storage devices or cumbersome email attachments.
Dive deeper into the world of remote access technologies. Learn everything you need to know here: 🔍 What is RDP?
Can I Transfer Files to a Remote Computer?
Exactly you can! Remote desktop file transfer is possible and there are many easy methods for that! The most common and popular way for transferring files remotely is through Remote Desktop Software. With distant Desktop enabled, your local computer can access the distant computer's files just as you were sitting in front of it. In this blog post, we`ll talk about transferring files using Remote Desktop.
Note: Not to mention that there are other options for transferring files remotely. These options use cloud storage services such as Dropbox and Google Drive. Uploading files to the cloud allows you to access them from any device with an internet connection, even your remote PC.
Why do we need remote file access?
If you work remotely, probably you know how important remote file access is. The main reasons that we all need remote desktop file transfer are:
- Work from anywhere: You can access your work files from home, on vacation, or even at that coffee shop down the street.
- Never forget a file again: Did you forget an important presentation at the office? Remote access lets you grab it from your work computer.
- Easy collaboration: Share and edit documents with colleagues, no matter where is their location.
Best methods for transferring files from an RDP to a PC?
Moving files between your remote computer and local PC through RDP file transfer is a joy! There are many ways to do this, and some of them are far faster than emailing or uploading things online. Here we go over the most common and efficient methods. These solutions can be faster than downloading and uploading large files over the internet; some are drag-and-drop simple. Let`s go through it.
1- Copy & Paste (Clipboard)
This is the classic and easy method. In the RDP session, choose the files you want, then right-click and select "Copy" (or Ctrl+C). Then, on your local PC, go to the right spot, right-click, and select "Paste" (or Ctrl + V). This works effectively for small files or multiple files at once.
2- Drag & Drop
Another simple way! In the RDP file transfer session, choose the files you want to transfer and drag them to a folder on your local PC window. To drop the files, release the mouse button. This is also suitable for smaller transfers.
3- Shared Drives or Folders
If your network lets you, then you can make certain disks or folders on the remote computer accessible from your local PC. This makes them appear identical to local folders, allowing you to simply copy and move data across them. This method works well if you frequently transfer files between your local PC and the RDP computer. To do that, follow these steps:
- Create the drop zone: First of all, pick a folder where you'd like to keep the transferred files on your local PC. This will be your "shared folder."
- Grant access: Next, ensure the RDP session has access to this folder. The exact methods may differ depending on your operating system, but it normally involves right-clicking the folder, selecting "Properties," and then the "Sharing" option. There, you can grant access to "Everyone" or the user account used for the RDP session.
- Use the drop zone: Now, when connected to RDP, simply copy or move the files you want to transfer directly to this shared folder. They'll be readily available on your local PC whenever you switch back.
4- Remote Desktop Manager
If you manage several remote machines using RDP file transfer, software such as Remote Desktop Manager can be very helpful. Not only can you set up all of your connections in one spot, but you can also avoid the headache of copying and pasting while moving files.
It works like this: With Remote Desktop Manager open and your RDP session active, just select the files you want to transfer. Drag them right away from the RDP session window to your local PC's folder (provided it is visible on your screen). Remote Desktop Manager manages the transfer of data behind the scenes, so you can save time and effort!
5- Using Third-Party Tools
The methods that we covered above are handy, but there are some third-party tools that make the remote desktop file transfer supercharge! These options range from simple file-moving apps to feature-packed remote access solutions. Some popular tools that you can use include:
- FileZilla: This is a dedicated moving truck for your files. It lets you securely transfer large amounts of data between your local PC and the RDP session.
- WeTransfer: This is a great option for occasionally sending or receiving big files. It allows you to upload files to a temporary online space and then share a link for download on your local PC.
- Beyond Compare: This tool does more than just transfer files; it also allows you to compare and sync files between your local PC and the RDP session. It's ideal for situations where you need to keep both sets of files perfectly aligned.
How to Transfer Files Using Remote Desktop?
There are many different ways to transfer files between your local computer and a Windows VPS. We chose the simplest and most convenient one: transferring files via a Remote Desktop connection. The method shown in this article has many advantages such as:
- Files are available in only a few clicks
- One-time setup
- No server configuration required
- No need to install any applications
Follow these simple steps to connect one or multiple local drives to the Windows VPS.
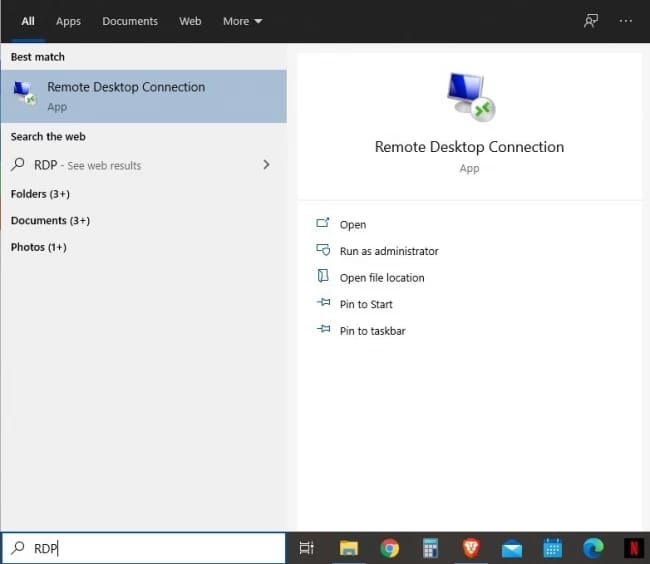
Step 1: Run the Remote Desktop Connection on your PC. You can do so by typing RDP into the Windows search bar.
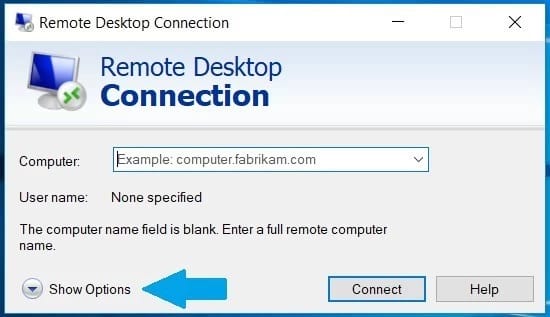
Step 2: Click on Show Options.
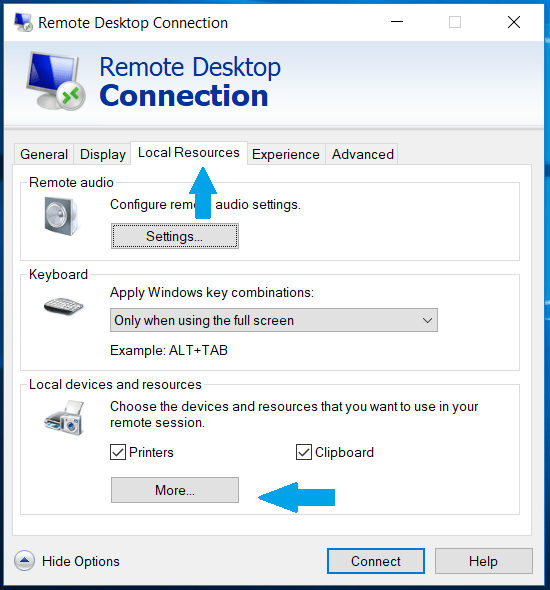
Step 3: Open the Local Resources tab.
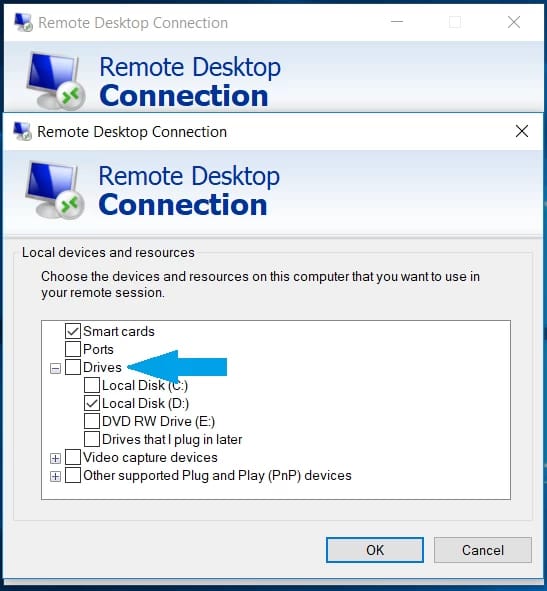
Step 4: Press the More... button under the Local Devices and Resources category.
Step 5: Now choose the drives you want to share, click OK, and connect to the VPS.
Now you have shared one of your PC’s drives with your Windows VPS and have access to it from it. This shared drive shows alongside the other VPS drives. We also have an article that shows how to upload files to Linux VPS from your desktop PC.
How to Transfer Files to a Remote PC Using AnyDesk?
AnyDesk is a powerful remote desktop software that allows you to securely and reliably access and operate a remote computer, as well as transfer data between local and remote PCs. This is especially handy for remote work, IT assistance, or collaborative scenarios in which you need to access files or resources on another machine. Transferring files to a remote PC using AnyDesk is easy:
- Download and Install AnyDesk: Ensure AnyDesk is installed on both your local computer and the remote PC. You can download it from the official AnyDesk website.
- Launch AnyDesk: Open AnyDesk on both the local and remote computers.
- Start a Connection: On your local computer, enter the AnyDesk address (a nine-digit number) of the remote PC in the "Remote Desk" field. Click "Connect" and wait for the connection request to be accepted on the remote side.

- Accept the Connection: On the remote PC, a pop-up will appear requesting permission to connect. Click "Accept" to establish the connection.

- Open the File Transfer Menu: Once connected, click on the "File Transfer" button in the AnyDesk toolbar. This will open the file transfer window.

- Go to the Desired Files: In the file transfer window, you will see two panels: one representing the file system of your local computer and the other representing the remote PC’s file system. Go through the directories on both panels to locate the files you want to transfer.
- Transfer Files: Select the desired files in the local panel and drag them to the appropriate directory in the remote panel. Alternatively, you can use the "Copy" and "Paste" buttons in the file transfer window.
- Confirm the Transfer: Monitor the progress of the file transfer in the AnyDesk window. Then, you can verify the files on the remote PC to ensure they have been transferred successfully.
- Close the Connection: After the file transfer, close the AnyDesk connection by clicking the "Disconnect" button.
How to copy files with Remote Desktop Connection?
This is especially useful for accessing work files from home, exchanging documents with team members, and maintaining data on a server without the need for additional file transfer applications. The following steps tell you how to do that:
Open Remote Desktop Connection (RDC): You can find RDC in the Start menu or by searching for “mstsc”, “remote desktop”, or “RDC”.

Show Options: Click “Show Options” in the RDC window to see more configuration settings.

Local Resources Tab: Go to the “Local Resources” tab to adjust sharing settings. Click “More” under the “Local devices and resources” section.

Share Drives: Click the “+” next to “Drives” to expand the options. Check the boxes for any drives you want to share (e.g., Windows drives, flash drives, CDs/DVDs). Click “OK” to save these settings.

Enter IP Address: Return to the “General” tab. Enter the IP address of the remote computer in the “Computer” box under “Logon settings”.
Connect: Click “Connect” to start the remote connection.

Access Shared Drives: Once connected, open “Windows File Explorer” (right-click the Start menu > File Explorer). Look for shared devices under the “Redirected drives and folders” section.

Transfer Files: Drag and drop files between folders and drives as needed.
Note: If you received the notice "Destination Folder Access Denied" while attempting to transfer files with the Windows Remote Desktop Connection function, you may need to restart the RDP connection. Users should then launch the Remote Desktop Connection application as administrators. This ensures that the appropriate permissions are in place to allow file transfers between the local and distant workstations.
Transferring Files Between Local and Remote PCs Using the Windows 10 Remote Desktop App
In the past, you could easily copy files between your computer and a remote system using Remote Desktop. However, the newer Remote Desktop app works differently. Here's the good news: you can still copy and paste files with the latest version (10.1.1107 or later).
Here's how to set it up:
- Add a new remote computer connection.
- Scroll down and click "Show more" options.
- Turn on the "Clipboard" setting.
- Save the settings and connect to the remote machine.

You can now simply copy and paste files from your local system to the remote machine, just as you would normally.
Note: If you encounter any permissions issues, consider restarting the Remote Desktop session and running the software as administrator. This will provide it the necessary power to relocate your files.
Is Microsoft Remote Desktop File Transfer Limited to Windows Machines?
No, Microsoft Remote Desktop file transfer is not only for Windows computers. While the capability is geared for Windows-to-Windows connections, files can be transferred to and from remote computers running other operating systems, such as macOS or Linux, however there may be extra constraints or processes necessary.
Transferring files using Remote Desktop is determined by the app you use. Using Classic Remote Desktop (built-in on Windows) allows you to transfer files between any device that can run a Remote Desktop client, independent of operating system (Windows, Mac, etc.). But new Windows Remote Desktop program (from the Microsoft Store) transfers files using copy-paste. It may function with other devices, but it is dependent on their individual Remote Desktop software. If you are doubtful, always refer to the remote machine's software handbook.
How to End the Remote Desktop Session
There are two ways to end your Remote Desktop session, depending on whether you wish to totally log off or simply disconnect temporarily:
Completely Log Off
- Use the Start Menu: Click on the Start button on the remote computer (the one you're controlling remotely). Then, click on your profile picture or username and choose "Sign out".
- Keyboard Shortcut: Press Ctrl + Alt + End on the remote computer. This will bring up a menu where you can choose "Sign out".
Temporarily Disconnect
Just close the Remote Desktop window on your local computer. This will disconnect you from the session, but any apps you were running on the remote PC will remain active in the background. You can reconnect later and resume where you left off.

My name is Sophia H. My degree is MS in Information Technology Engineering. I have been working for 5 years on Java developing (j2ee), Computer Networking (Optical Networks), Virtualization and Hosting.