![How to Repair Windows with DISM command? [DISM Tools]](/wp-content/uploads/2020/10/repair-windows-with-dsim532-main.webp)
It is not uncommon for users to experience errors and warnings after working with Windows Server OS or even Windows Home editions, such as Windows 10. Sometimes, these errors involve issues with a simple system file for Windows OS. in this article you will get a complete brief guide DISM command, DISM /Online /Cleanup-Image /RestoreHealth, and how it is useful to repair windows.
The Windows operating system offers a system file checker tool for scanning the system files and finding any changes or corruptions. This tool scans the Windows files and replaces them with the current version if it finds any modified files. You can control this tool with the help of DISM commands, which are designed for optimizing and customizing Windows, however, it can also be used to repair Windows.
What is DISM?
Deployment Image Servicing and Management or DISM for short is a command-line tool that can be used to service and prepare Windows images, and no, we do not mean .jpg and .png images, we mean OS images. An OS image is simply a file that contains the operating system, your executable programs, and any data files that might be related to your programs.
When to use DISM?
If your computer is running with startup problems, unexpected errors, or performance issues, the traditional method to fix them is to run the System File Checker or SFC, by typing sfc /scannow into the command prompt. This will detect and replace any corrupted files on the local OS image.
However, there are situations when the problem resides much deeper within the system image, so deep in fact, that the SFC simply cannot repair it. This is the time to use the DISM command to attempt to get rid of the issue.
How to repair Windows with a DISM command? [Step by step guide]
In order to run any DISM commands, you need to have administrative privileges on your Windows account.
Step 1: Run the PowerShell terminal with all administrator permissions. Simultaneously to do, press Windows+R keys on your keyboard to open the Run utility and type Powershell into it. Then, press CTRL+Shift+Enter keys on your keyboard at the same time to open PowerShell with administrator permissions.
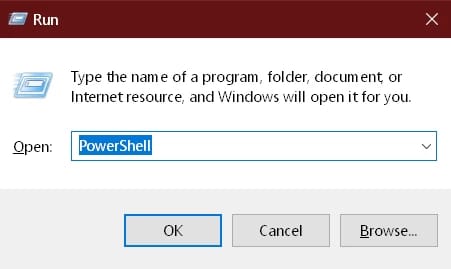
You will be greeted with the following screen:
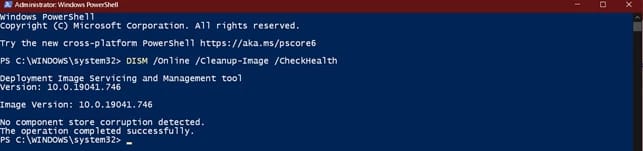
Step 2: In PowerShell, you must first troubleshoot your system by running the following command:
DISM /Online /Cleanup-Image /CheckHealth
With the DISM /Online /Cleanup-Image /CheckHealth command, the DISM will search for errors in local log files.
Step 3: The next command you should run for troubleshooting, and it is:
DISM /Online /Cleanup-Image /Scanhealth
This command only scans Windows system files, excluding log files, for any errors. Once you run the command, the system will take 10 to 15 minutes to check every file and detect issues.
Please note that after the completion of the aforementioned troubleshooting procedures, we will begin to repair Windows in online mode. DISM will start downloading the required files using the Windows Update service. If the Windows Update service is disabled or there is no internet connection, this operation will not be successful.
Step 4: Run the following DISM command in order to begin the repair process:
DISM /Online /Cleanup-Image /Restorehealth
Once you execute this command, Windows will start to recover and replace the corrupted files with the correct ones.
Offline Repair in Windows 10 with DISM command
it has the ability to find files from different sources such as DVDs, flash drives, or even the Windows ISO files, and repair Windows from it. Now, we will show you how to change the source of the files for the DISM command.
Step 1: Commence the troubleshooting procedures as outlined in steps 1 and 2 of the previous section.
Step 2: To change the source of the DISM command, we use it with source parameters. So, if you want to use the DISM command with RestoreHealth and define a special source, the command structure will be as follows:
DISM /Online /Cleanup-Image /Restorehealth /Source:G:\Sources\install.esd
To specify the source, you must enter the address of the Install.esd file, Install.win, or Install.wsm, which is the original Windows installation file. Also note that in each media, there will generally be one of three files.
Do not forget that if you want to restore damaged files in Windows through the local source, your Windows version must be completely equal to the media version.
Using the above command, you will define a unique source for the DISM command, but the DISM will use other sources if required. Suppose you want DISM to use only your defined source. To do so, use the /Limitaccess parameter at the end of your source command:
DISM /Online /Cleanup-Image /Restorehealth /Source:G:\Sources\install.esd /Limitaccess
This way, no other sources will be used to run the command.
Conclusion
we hope in the article "How you can repair Windows using DISM commands" you know that how to eliminate all of the bugs related to your system from Windows. We have included all of the required information and commands to use in Windows so that you can eliminate errors without having any troubles. If you have any questions or suggestions, please leave them in the comment section below.
People are also reading: