List of content you will read in this article:
Every Windows user gets the option to select from two main account types, that are Administrator and Standard User. Both of them offer different privileges regarding the way you use your computer or applications. The administrator privileges are more robust and include complete system control, installing apps, executing elevated tasks, and manipulating most things.
On the other side, privileges of the Standard User account are restricted to certain boundaries. Users can flexibly work with the apps but can’t install new ones, they can change only a certain level of settings, and global system configurations aren't allowed. Therefore, individuals must have administrator powers. The blog is constructed to provide all the necessary details regarding the same and how one can change, login, and enable/disable an administrator account on Windows.
A Brief Explanation About Administrator Account
An administrator is leveraged to make changes or affect other users of the computer. It will have out-of-the-box powers like changing security settings, installing software, accessing and editing all the computer files, and making changes in other accounts. An individual should have a user account on the same computer to get started as an administrator.
Users need to know the login credentials (username and password) to get started as administrators. However, if you cannot log in as an administrator, you can ask the administrator to change your account type.
However, the administrator account is kept disabled by default, and users are required to enable it manually before getting started with it. Accessing the administrator account brings few security risks, and you can unknowingly contribute to potential consequences. To know whether you are using an administrator account or not, you can check the account type after you log in.
Who Should be the Administrator?
It is important to allow only the restricted people to get administrator access to your network. As giving it to various people will increase the chances to inadvertently cause a lot of damage and natural human mistakes that can result in the removal of important documentations.
Generally, Windows has a “Windows Active Directory Domain” containing the list of all the user accounts. From there, one can manage the permissions given to each user on the network. However, if someone requires special permissions, the admin can simply provide the administrator account’s credentials and provide only the required access level.
Steps to Log in as an Administrator Account
If your Computer is on Domain
- First, open the accounts by clicking on the Control Panel -> User Accounts -> Manage User Accounts.
- It will be required to enter the password here. Therefore, type the password or provide confirmation.
- “User name” will be highlighted at this stage, and it will be shown as “administrator” in the Group column.
If the Computer is on the Workshop
- Log in to the user account with the help of credentials (name and password).
- To open the user account, click on Control Panel -> User Accounts, and Family Safety -> click on Manage another account. Here, type in the password or confirm to proceed further.
- Account details are displayed below the username. You’ve logged in as an administrator if it is showing the “administrator” tag.
Enabling Windows Administrator
-
With the Help of a Command Prompt
It is required to use the elevated command prompt. For this, run it from the administrator credentials.
In the search bar, type cmd.exe. The results will pop up; from there, right-click on cmd.exe and opt to run as administrator. Run the below-mentioned command:
net user administrator /active: yes
To disable the same, enter no:
net user administrator /active:no
Enabling the Windows Administrator account will help you run with privileges from the current user account. The admin account will get displayed on your screen.
-
Using Local Users
Another approach of enabling administrators is using local users and groups Windows. It is a straightforward process that only works on professional and updated versions of Windows. This procedure will not be compatible if you are up to Home Basic or Starter versions of Windows.
First of all, users need to run Window by pressing Windows + R. After this, type lusrmgr.msc into the required area and proceed by clicking OK.
On the left side, click on “Users,” then right-click on “Administrator,” and select the “properties”. Right after this, a “general” tab will appear in which a checkbox labeled Account is disabled will display. Uncheck this to implement the changes by hitting the OK button. Congratulations, you’ve successfully enabled Windows administrator users.
-
Using Local Security Policy
It is the most complicated yet straightforward process among all three. Like the local user process, the local security policy technique also works only in professional and updated Windows versions. Get started by pressing Windows + R keys and type secpol.msc into the window that shows up.
From the left pane, click on Local Security Policy and then select Security Options. Now right-click on the Accounts: Administrator account status and select Properties. There you’ll find the local security tab that you have to switch from Disabled to Enabled and click OK.
Changing Windows Administrator User
Following is the step-by-step guide to change Windows administrator user account:
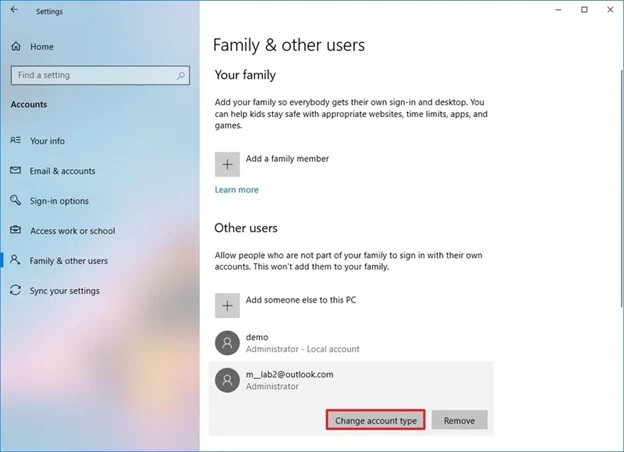
- Start by opening the “settings”. From there, click on “Accounts,” All of the users’ accounts with their dedicated privileges will be listed.
- After this, click on the option for “family & other users.”
- Now select the user account by going under the “Your family" and "Other users" There press on the Change account type button.

- Choose the option for “Standard User account type” and hit the OK
After completing all these steps, you have to restart your computer to execute the changes and get started with the administrator account with extra privileges.
Renaming the Windows Administrator
To keep your account and system away from malicious activities and frauds, one should know how to rename an administrator account. It is important because hackers and malware distributors keep looking for ways to break into systems and access the Administrator account. And keeping administrator enabled with the same name will be a clear call for them.
An individual can surely opt for various antivirus programs to practice robust security habits and make it more secure; one can rename an Administrator account.
Open the Start Menu, then type cmd.exe in the search bar to get started. Now right-click on the same and opt to run as administrator. Run the following command:
wmic useraccount where name='Administrator' call rename name='ChangeName'
In this case, it is renamed as “ChangeName”. You can put the name as desired and hit enter.
Pros and Cons of Administrator User
-
Security
Security goes a little lower when it comes to the administrator account. The privileges enjoyed by this account can destroy the data and machine of the person wants to. Therefore, it must be in the right hands.
Moreover, the administrator account can bypass the UAC directly without any verification and perform the manipulation. It increases the risk if an attacker is logged in because UAC will not stop him either. However, this UAC is extremely beneficial as it blocks any legitimate admin (who may break the rules).
-
Management
Administrator accounts enjoy the maximum level of management flexibility. They can perform nearly all the functions, access any file, manipulate any information, etc. They can even provide few privileges to user accounts and even hold to power to sue accounts.
However, managing all these local accounts gets perplexed at times, and it gets overwhelming as well because changes will affect all computers where the account is used. Admin has the liberty to change local account passwords.
-
Access to Data and Problem Solving
A local administrator account usually has access to all data and privileges to solve major problems. By default, the accounts’ limit is restricted to only 10 domain accounts to log in to the system successfully.
If by any means, the data is lost due to poor connectivity, it can’t be recovered with the normal user account. But the local Administrator account can help in the same.
Conclusion
Administrative privileges are really important for the right individual to have. It liberates individuals to perform nearly any desired action required. Therefore, it is crucial to know what tasks admins can do and add more than one admin.
The blog contains information regarding the same so that one doesn’t have to flee different places. Drop a comment below if you have a query or suggestion.
