![How to Enable Remote Desktop in Windows 10? [Complete Guide]](/wp-content/uploads/2021/05/cover711-main.webp)
If you wish to use the Remote Desktop Protocol on Windows 10, then you have landed at the right place. This article will deliver an in-depth analysis of how to enable remote desktop in Windows 10, and to enable RDP on your PC. The basic objective of the Remote Desktop is to permit remote access to that device using the RDP. In simple words, this feature is generally used when you are not present physically in front of the desktop but want to access it.
In Windows 10, you can configure the settings and then enable Remote Desktop on your system. Now, there are various ways through which you can accomplish this task. Take a look:
How to Enable Remote Desktop in Windows 10?
Here you will start your journey with enabling RDP in windows 10 using:
- Windows Settings
- Command Prompt
- Control Panel
- PowerShell
Let us analyze each pointer in detail.
Method 1: Enable Remote Desktop using Settings [Step by step guide]
Follow the below-outlined steps to enable Remote Desktop on Windows 10 through Settings:
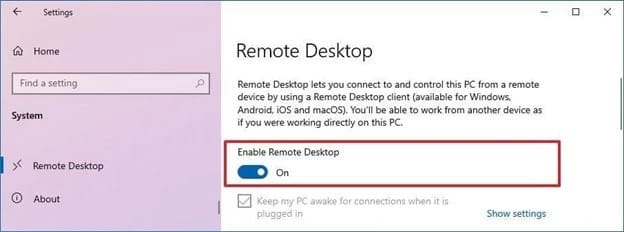
Step 1: First you have to visit the Settings section and search for Remote Desktop and select Remote Desktop. Simply click on the option Enable Remote Desktop as shown in the snapshot below.
Step 2: Now, click on confirm and move ahead.
Step 3: You have to visit the Advanced Settings page now and select, ‘Require computers to use Network-level authentication to connect’, option. But what is the need of selecting this option? Well, this feature helps to make your connection extra secure.
The users are asked to authenticate with the network prior to the connection with the device. Hence, this option proves helpful to you in the longer run. Have a look.
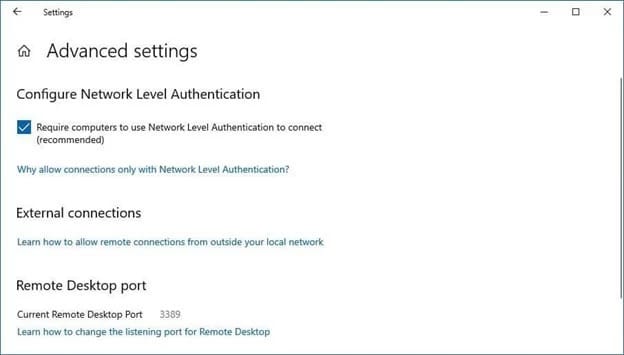
As you can see, at the bottom of the window, there is some information about the current Remote Desktop port. Now, if you want to configure the router to permit the establishment of remote connections outside the domain of your network, you can make specific changes here. Otherwise, the by default RDP port number will always remain at 3389.
Moving a little further, our next segment is to understand the process to enable Remote Desktop using the Control Panel.
Method 2: Enable Remote Desktop using Control Panel
Follow these simple steps to accomplish this objective:
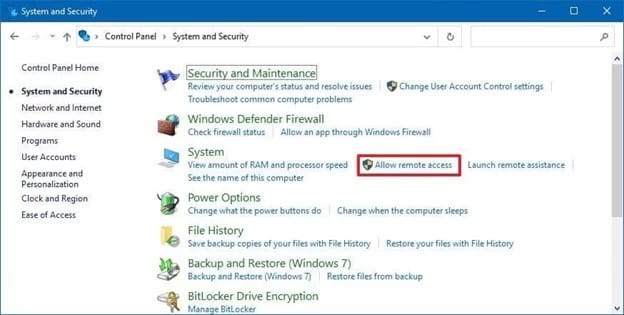
Step 1: Go to the Control panel and select System and Security. On the right-hand side, find System and tap on Allow remote access option. Take a look at the picture below.
Step 2: Now, click on System properties, and in the Remote Desktop section, choose the option - ‘Allow remote connections to this computer. Then subsequently click Apply and then press OK.
Remember that whenever you enable this feature using the Control panel, the NLA or the Network Level Authentication automatically gets selected. Otherwise, you need to enable this option on your system.
Furthermore, let us analyze the process of enabling Remote Desktop using the Command prompt.
Method 3: Enable Remote Desktop using Command Prompt
The steps are really simple.
Step 1: Select Start and search for the Command Prompt. Click-right on Command Prompt and hit the option stating, Run as administrator.
Step 2: Now, type the following command:
reg add "HKEY_LOCAL_MACHINE\SYSTEM\CurrentControlSet\Control\Terminal Server" /v fDenyTSConnections /t REG_DWORD /d 0 /f
Step 3: After typing the command, press Enter. This window appears in front of your screen.
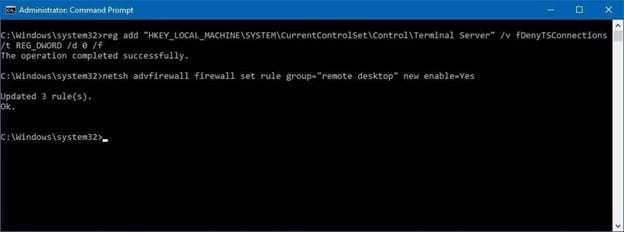
Step 4: Additionally, if you wish to implement Windows Firewall, simply type this command:
netsh advfirewall firewall set rule group="remote desktop" new enable=Yes
That is it, you are done with setting up enabling RDP using CMD.
How to disable RDP in Windows 10 using CMD?
Furthermore, what if you want to disable the Remote Desktop? Well, it is a simple process to follow these steps:
Step 1: Click on Start and find the command prompt.
Step 2: Then Right Click and again select Run as Administrator.
Step 3: Now, enter the below-stated command and press enter:
reg add "HKEY_LOCAL_MACHINE\SYSTEM\CurrentControlSet\Control\Terminal Server" /v fDenyTSConnections /t REG_DWORD /d 1 /f
Here is a snapshot for you.

Time to hop onto our next section, shall we?
Method 4: Enable Remote Desktop using PowerShell
It’s really simple to enable remote desktop on your Windows 10 by using PowerShell commands. Let us discuss this in full detail.
As you have seen that there are various methods to enable or even disable Remote Desktop. This method is used for the creation of a script that helps to configure the remote desktop devices quickly. It is also beneficial to send the script to a particular user and they can simply double-click and set up the feature automatically.
Take a look at the following steps:
Step 1: Click on Start and search for the PowerShell option and click right on it. Choose the Run as administrator option and subsequently type the following stated command.
Set-ItemProperty -Path 'HKLM:\System\CurrentControlSet\Control\Terminal Server' -name "fDenyTSConnections" -value 0
Step 2: Now, this command helps to enable the Remote Desktop. After typing, press Enter. You see this window in front of you.
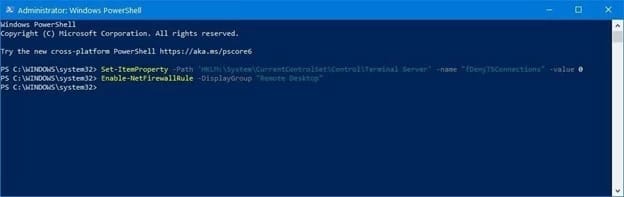
Step 3: Additionally, if you want to enable the RDP through the Windows firewall, you can enter the following command and then press Enter.
Enable-NetFirewallRule -DisplayGroup “Remote Desktop”
How to disable RDP using Powershell
After you complete the following steps, you can easily enable the remote desktop on your system. Moreover, if you wish to disable the Remote Desktop, use these steps:
Step 1: Click on start and find PowerShell. Again choose the run as administrator option and type this command as shown below:
Set-ItemProperty -Path 'HKLM:\System\CurrentControlSet\Control\Terminal Server' -name "fDenyTSConnections" -value 1
Step 2: Moreover, if you also want to disable the feature via the Windows firewall, then follow this command:
Disable-NetFirewallRule -DisplayGroup "Remote Desktop"
Conclusion
Now you have successfully learned how to enable remote desktop on Windows 10 and various ways through which you can accomplish your objective of enabling remote desktop on Windows 10. Keep practicing, keep learning! If you have any questions or suggestions, please leave them in the comment section given below.
People are also reading:
