The Microsoft Store has a "Remote Desktop" program for Windows 10, which is aimed to make it easier to connect and operate other devices through a local network or the internet. It's also the interface that'll take the place of the built-in "Remote Desktop Connection" function. The application is straightforward, but based on how you want to access it, you may have to make additional configurations and then forward the appropriate port on your network that connects to other Windows 10 devices remotely. There's a problem, though. The Remote Desktop software may be enabled on any version of Windows 10, but the remote desktop protocols, that allow you to connect to a computer, are only available on the Pro and Enterprise versions of Windows 10. Remote connections are not supported in Windows 10 Home.
Connect to a Microsoft Remote Desktop session
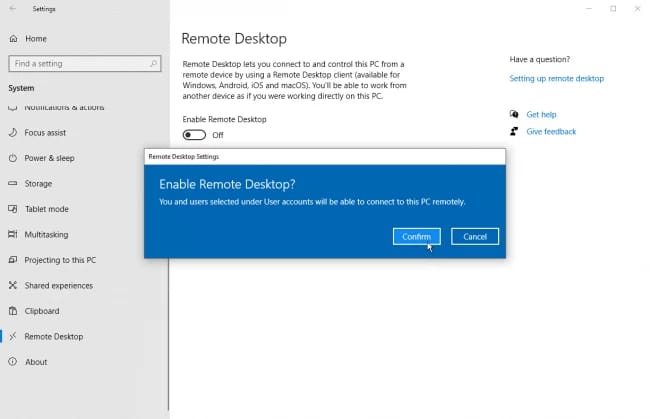
To start, users or somebody else must actually login into the system you want to access from a distance. Open and turn on Remote Desktop on this machine. Turn on the option next to Remote Desktop to activate it. Click Confirm to activate the modification.
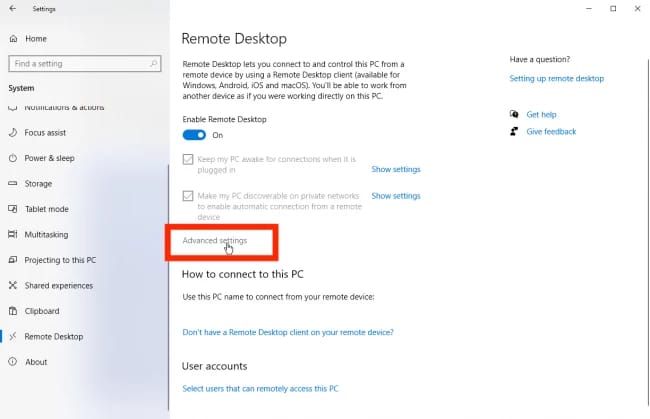
Make your PC accessible on secure networks and maintain your PC ready for connectivity when connected are both enabled by default. Click the relevant Show Settings link to examine or edit either option, although both can be left active at this time. Choose Advanced Settings from the drop-down box alternatively.
Select the checkbox next to "Require machines to connect using Network Level Authentication (NLA)." NLA makes distant connections over the same network more secure by requiring users to authenticate before getting access to the remote PC.
You can skip the "External connections" part if you're connected to a machine on the same network. The default port for listening for and accepting a remote connection is shown in the Remote Desktop port section.

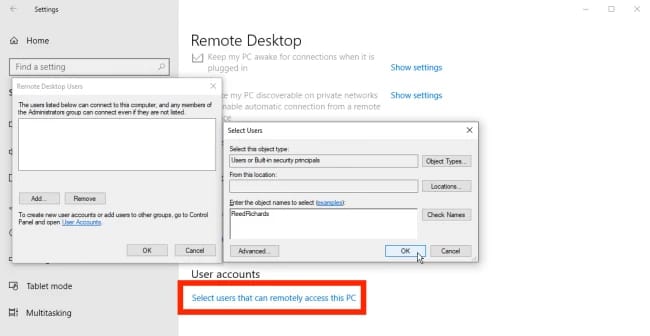
Click the back arrow and navigate through the Remote Desktop choices to go to the previous page. By default, any user with an administrator privilege on the remote PC may view it. If you use a Microsoft Account to log into Windows and that account has administrator capabilities, your best chance is to sign in remotely with that account. Click the "Select users who may remotely access this PC" choice at the bottom if you wish to allow remote access to a separate account. Click Add and provide the login for the user account.
Finally, jot down the name of the system because you'll need it to sign in remotely. Follow these procedures to change the computer's name to something simpler to remember. When you're finished, close the Remote Desktop settings window.
Using Windows, Access to a Remote Computer.
Assume you want to connect from your personal computer to this different Computer. By pressing the Start button and choosing Remote Desktop Connection in Windows 10, you can go to the Windows Accessories folder. Select Remote Desktop Connection from the shortcut menu.
For previous versions of the OS, the procedure is slightly different. To open the Search tool in Windows 8.1, press Win key+S. Type "windows remote desktop" into the search area and select the result. In Windows 7, go to the Start menu, open the Accessories folder, and find the Remote Desktop Connection shortcut.

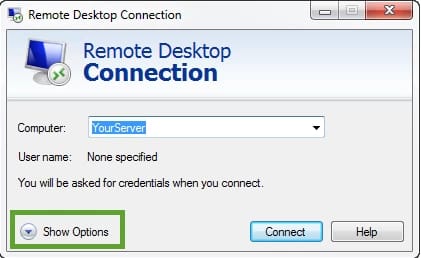
In the Remote Desktop Connection of window's Computer section, type the name or IP address of the remote computer. From the drop-down list, choose Show Options and enter the username for the profile you'll use to log in. Check the box beside "Allow me to save credentials" and you'll save your details so you wouldn't have to type it in every session you logged in. By clicking the Connect button, you may establish a connection.

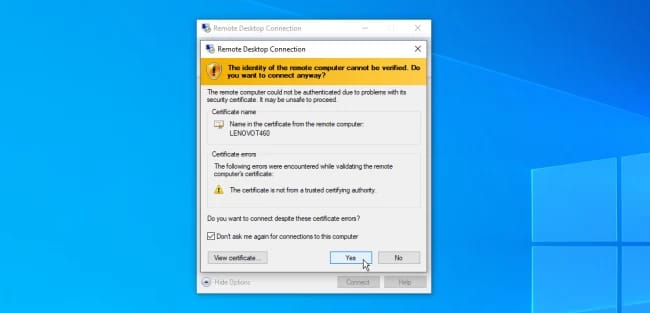
Type your password in the options window. Check the "Remember Me" box if you might not want to enter your password every time you use this profile. Click the OK button. You could get a notice claiming that the distant computer's identification can't be verified. Select "Don't ask me for connections to this machine again" and click on Yes.
You should now be able to execute apps, open and interact with files, and do other operations by connecting to the remote computer. At the top of the window, a blue connection bar with many options emerges.
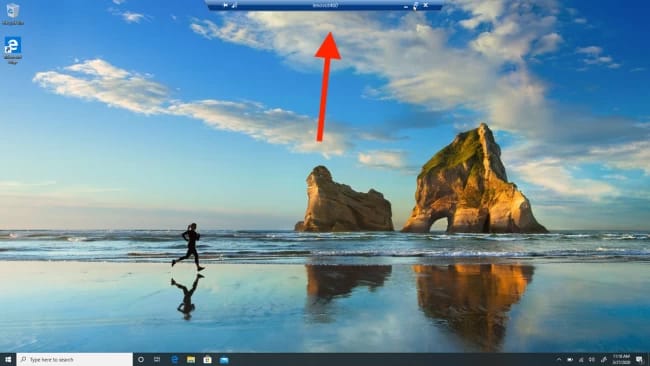
You may anchor the bar and check the network connectivity using the controls on the left side of the bar. You may minimize the remote window to the taskbar, alter the window size, and stop the remote session using the controls on the right. Close the connection by clicking the Close symbol when you're done.
Remote Desktop Settings
You may change some of the tool's settings from the setup page for Remote Desktop Connection.

Use the Windows 10 Remote Desktop Application
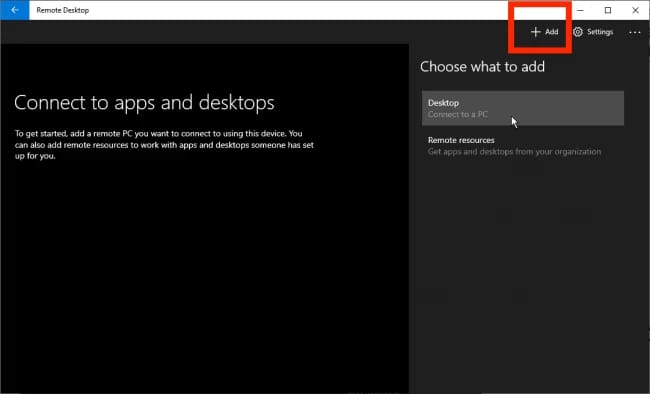
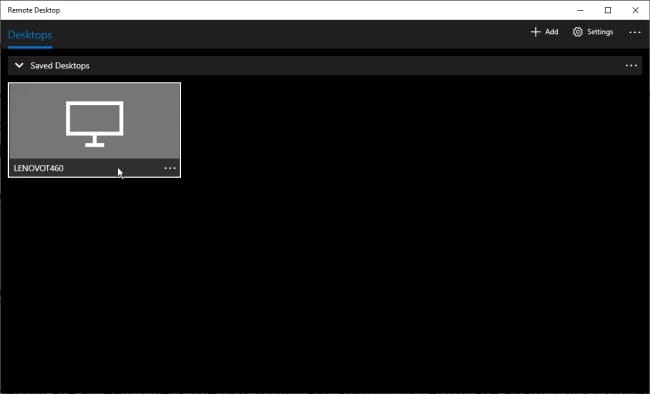
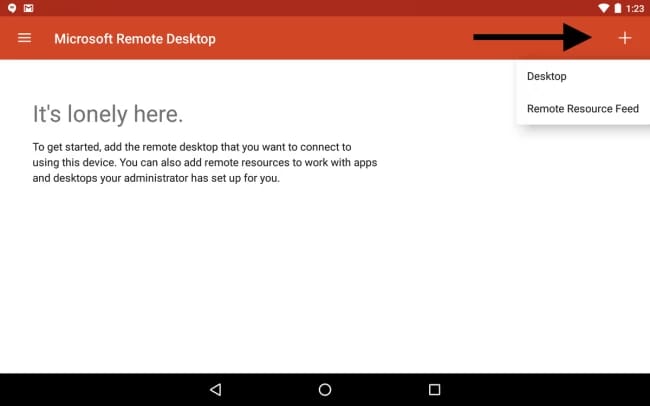
You may use the Microsoft Remote Desktop application. From the Microsoft Store, download and start the program. Click the Add button and select Desktop from the drop-down box to make a connection.
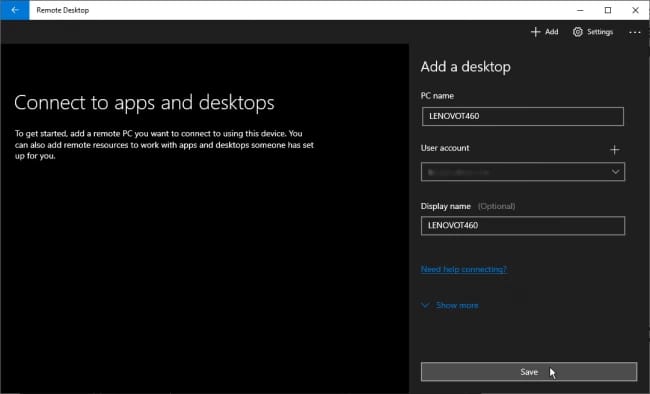
Add your account by putting the name of the system you want to connect to in this box. In the account window, enter your username and password. You may also give your account a nickname or a display name if you choose. Save the document.
To connect to the remote PC, double-click the icon. Check the box next to "Don't inquire about this certificate again" on the certificate screen.
You've established a link with the system on the other remote computer. Rather than a blue bar on top of the page, the Remote Desktop app uses a black panel just on side of the window.
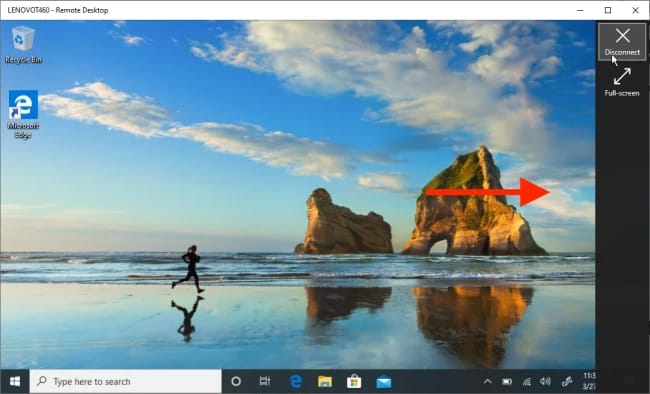
You can scale in and out with the magnifying icon at the top, and you can toggle between full screen and windowed view with the ellipsis icon. To deactivate, select Disconnect from the ellipsis icon.
Additionally, we are also providing how to set up the remote connections on MAC OS and Android.
From a Mac, Connect to a Remote PC
Install the Microsoft Distant Desktop program from the Mac App Store to connect to a remote computer. Start the program and give it the permissions it needs. Select Add PC from the drop-down menu, then input the PC's name or IP address.

If you type the Computer name, you must use the domain name address. If you're talking about a single PC, you'd finish the name with .local, such as xyz.local.
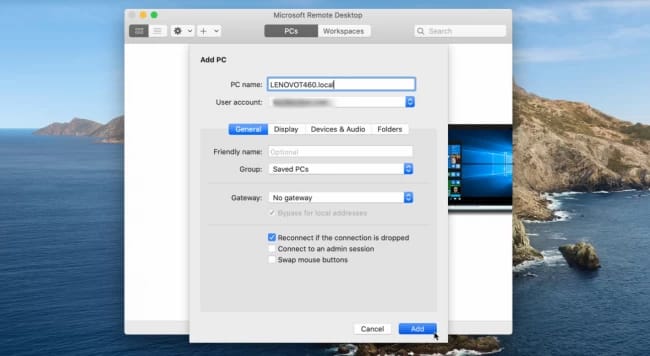
Choose whether to keep the Ask when prompted for User Profile choice selected, or to enter your login and password now so you wouldn't have to fill them in each and every time. Click Add once you're finished.
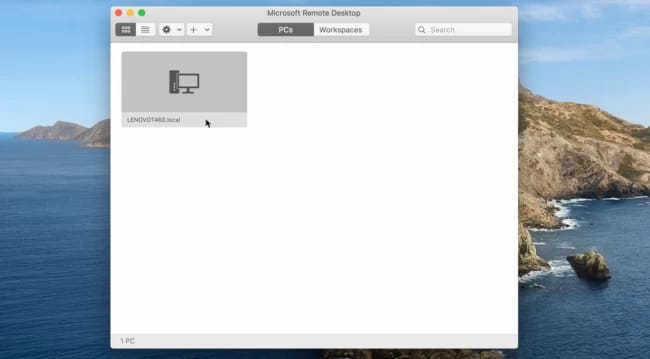
Double-click the remote session icon on the Home screen. If you get a notice saying the certificate couldn't be confirmed, click Continue. After that, you should be able to connect to the remote PC.

To access the remote desktop app's menu bar, move your mouse to the top of the screen. You may alter the window's size and close the connection from the Window menu.
Connect to a Remote PC from iOS
Install the Microsoft Remote Desktop app from the App Store to connect to a remote PC from your iPhone or iPad. After you've given the program the required rights, touch the + button and choose Add PC from the drop-down menu.

Enter the PC name or IP address of the machine you wish to visit in the following box. You must specify the fully qualified domain name if you use the PC name. For a single PC, this entails appending. local to the end of its name.
Your user account can be typed in or selected. You may give the connection a pleasant name and activate other options under Additional Options. To connect to the computer, tap Save, then pick the desktop icon.

Enter your password on the Credentials screen, then toggle on the option next to Store username and password if you don't want to type them in every time. Don't forget to tap on Done. Turn the switch for "Don't ask me for connection to this PC again" on in the login box. You'll be connected as soon as you accept.
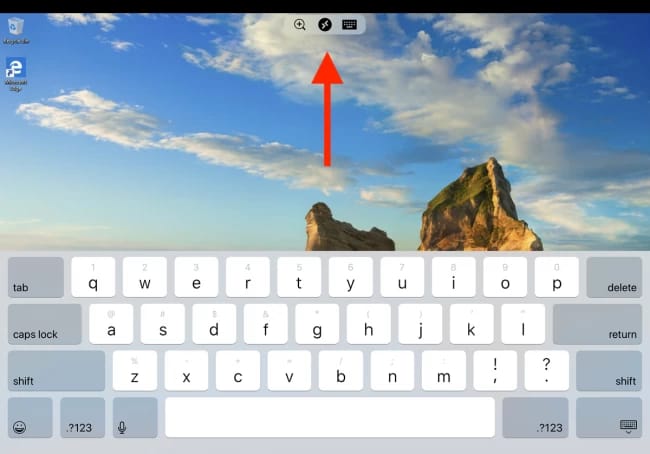
Look at the toolbar at the top of the window. Zoom in and out by tapping the magnifying glass. The center icon returns you to the app's main screen without ending your current session. To bring up the device's keyboard, choose the keyboard icon.
Connecting to a Remote PC via an Android device
You can easily download and install the Microsoft Remote Desktop application software from the Google Play store to connect to a Windows System from your Android device. Accept the agreement by opening the app and accepting the terms. To add a connection, tap the Plus icon and choose the Desktop option.
You can scan for the distant PC wirelessly if you're close enough. Otherwise, manually enter it. Fill in the computer's name and username. Any more alternatives should be included. Save the file.

Tap on the icon to access that system. After you've entered your password and checked the box next to "Store username and password," tap Connect. And check the checkbox of Never ask again.

You've established a connection. A little toolbar is located at the top of the screen. To expand side panels with more choices, click the first icon. You may establish a new connection, terminate an existing one, return to the home screen, and toggle between touch and mouse pointer.

You can see an icon on the top. To terminate the session click on the cross button on the top left.
How to make Remote Desktop Faster
Many of our clients utilize Remote Desktop to connect to a terminal server or workstations from a remote location. Depending on your connection and the speed of all of the devices involved, remote work can be a smooth experience or a laggy, slow experience if your Remote Desktop client isn't properly set up. If you find yourself typing anything on your keyboard and it takes many lengthy seconds for it to appear, following adjustments can improve speed and decrease input delays.
Microsoft Remote Desktop is an excellent tool for connecting to your Acctivate system from a remote location or if you are using a web hosting provider. The Remote Desktop Connection program has a plethora of settings for adjusting performance and usefulness.
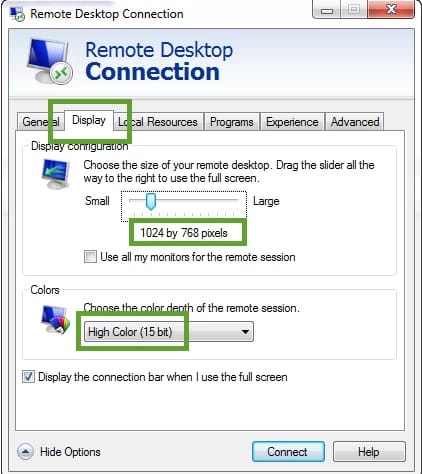
- From the Windows Start menu, open Remote Desktop Connection and click Display Options
- Navigate to the Display tab and change the Windows Size and Color options. As a starting point, let us try for 1024 by 768 pixels and High Color (15 bit).
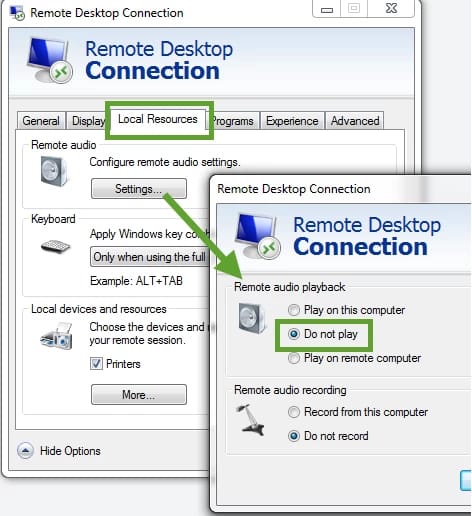
- Navigate to the Local Resources tab and choose Settings... from the Remote audio section. Select the Do not play option, then press OK.
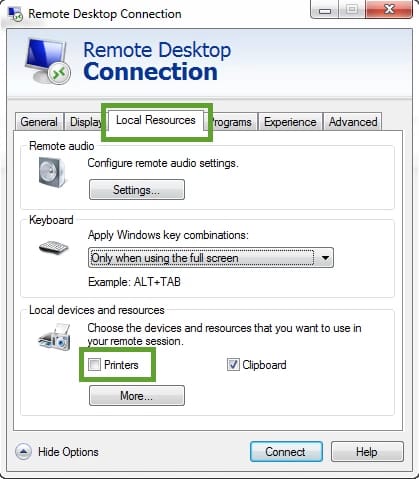
- Uncheck the Printers option unless you need to print documents from Acctivate to a local (remote) printer. The Printers option may create a downtime when you initially connect to the server. If your broadband connection is poor, remote printing could be slow as well. Another option is to save the information to the servers as Pdfs and then send the file.
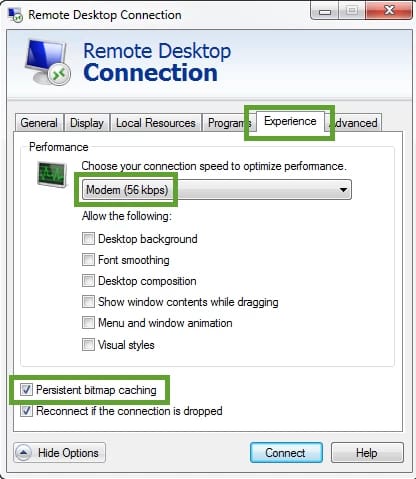
- The most recent recommended modifications may be found on the Experience tab. Lower Quality Equals Better Performance in this instance. Even if your internet connection is faster, select one of the default options, such as Modem (56 kbps).
Make sure the Persistent Bitmap Caching option is CHECKED.
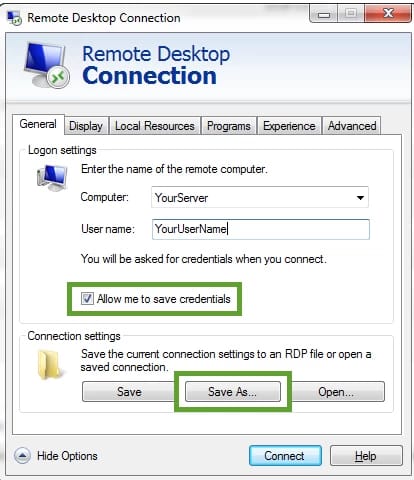
- Don't forget to save the settings. Return to the General tab, click the Allow me to save credentials box, and then type in your User name. By selecting the Save option, you may save these settings for future connections. Then, choose Save As to create a shortcut for this Remote Desktop connection.
- Rename the file Acctivate - YourCompany and save it.
- Navigate to the newly Remote Desktop file in the Documents folder utilizing Windows Explorer.
- Right-click the RDP file and select Send to -> Desktop (Create Shortcut)
- Launch your new and enhanced Remote Desktop connection for Acctivate using the new Desktop Shortcut.
Conclusion:
Hence we have seen how we can set up a remote desktop connection using various techniques and access other systems. This is a very useful technique if two systems are remotely away from each other.
We also saw how and what makes the connection slower and how we can optimize the connection. By decreasing the colour resolution and pixels quality along with some additional settings in the remote desktop protocols we can easily fasten up the performance of the remote desktops.
