List of content you will read in this article:
The most significant risk when switching web hosting or migrating a website to a new server is data loss and downtime. Both of these can make your website temporarily inaccessible to users and search engines, resulting in a loss of sales and search engine rankings.
This step-by-step tutorial will show you how to safely migrate your WordPress site to a new host without any downtime.
- Install and Setup the Duplicator Plugin for Easy Migration
- Getting back up by using Duplicator Plugin
- Transfer backup file and import your WordPress site to the new host
Install and Setup Duplicator for Easy Migration
The first thing you need to do is install and activate the free Duplicator plugin on the website that you want to move. For more details, see our step-by-step guide on how to install a WordPress plugin.
Duplicator is a free plugin that we highly recommend. You can also use it to move your website to a new domain name without losing SEO. However, in this article, we will walk you through how to use it to migrate your WordPress site from one host to another with zero downtime.
The first thing you need to do is go to your WordPress admin area and click on Plugins » Add New. Search for the Duplicator plugin and install it.
Getting a backup using the Duplicator Plugin
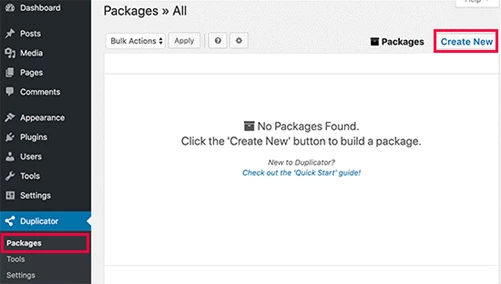
Step 1: Once you have installed and activated the Duplicator, go to the Duplicator » Packages page in your WordPress admin area.
Step 2: Next, you need to click the ‘Create New’ button in the top right corner.
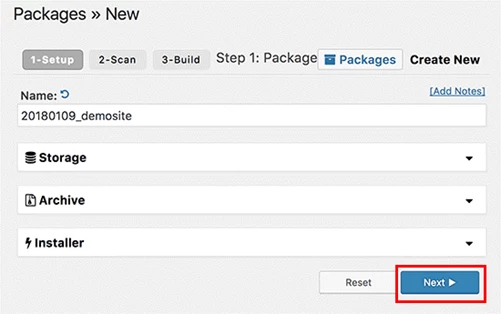
Step 3: After that, click the Next button and follow the steps to create your package.
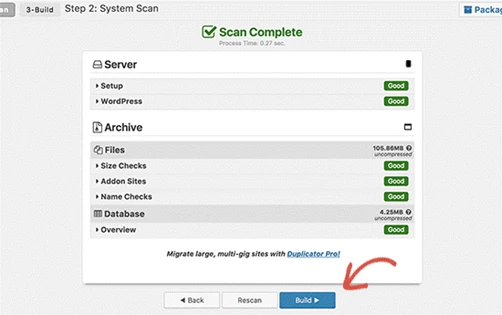
Step 4: Make sure that your scan results check out (everything should say “Good”) and click the Build button.
The process may take several minutes to complete. Once the process is complete, you’ll see download options for the installer and the Archive package. You need to click on the ‘One-click download’ link to download both files.
The archive file is a copy of your complete website, and the installer file will automate the installation process for you.
Transfer the Backup File and Import Your WordPress Site to the New Host
Step 1: Now go to your new hosting account’s cPanel dashboard and upload both the installer.php file and your archive .zip file to the root directory of your website
This is usually can be found in: File manager /username/public_html/
Step 2: Make sure that your root directory is completely empty. Some web hosting companies automatically install WordPress when you sign up. If you have WordPress installed in your root directory, then you need to delete WordPress first.
Step 3: Before you run the installer on the new host, you will need to create a MySQL database on your new hosting account. If you have already created a MySQL database, then you can jump to the next step.
Step 4: Go back to the main page of cPanel VPS, scroll down to the Databases section and click on the MySQL Databases icon.
Step 5: You will see a field to create a new database. Enter a name for your database and click the “Create Database” button.
Step 6: After creating the MySQL database, you need to scroll down to the MySQL Users section.
Step 7: Next, provide a username and password for your new user and click on the ‘Create a user’ button.
Step 8: After that, you need to add this user to your database. This will give the username you just created all the permissions to work on that database.
You can do this by scrolling down to the ‘Add user to a Database’ section. Simply select the database user you created from the dropdown menu next to the user, then select the database and click on the add button.
Your database is now ready to be used with WordPress. Be sure to make a note of the database name, username, and password. You’ll need that information in the next step.
Step 9: Now, we’re ready to run the installer. Navigate to the following address in your browser window, replacing example.com with your domain name:
http://www.example.com/installer.php
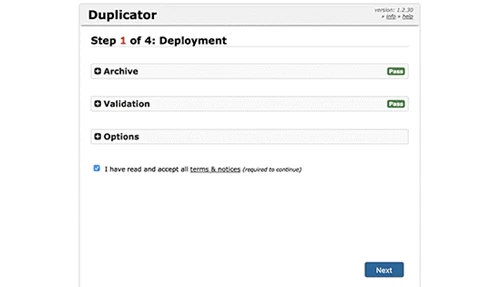
The installer will run a few tests and will show you ‘Pass’ next to archive and validation tests.
Step 10: You need to check the terms & conditions checkbox and continue by clicking on the Next button.
Step 11: Now, you will be asked to enter your MySQL host, database name, username, and password. Your host will likely be localhost. After that, you will enter the details of the database you created in the previous step.
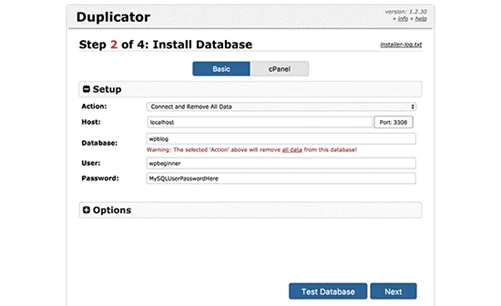
Note: You can click the ‘Test Database’ button to ensure you entered the correct information.
If Duplicator can connect, then you will see a string starting with Pass. Otherwise, you will see the database connection error details.
Step 12: Click on the next button to continue.
Duplicator will now import your WordPress database from the archive zip into your new database.
Step 13: Next, it will ask you to update the site URL or Path. Since you are not changing domain names, you DON’T need to change anything here. Simply click on the next button to continue.
Duplicator will run the final steps and will show you the login button.
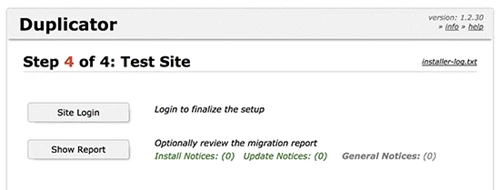
You can now log in to your WordPress site on the new host to ensure that everything is working as expected.
At this point, you’ve created a complete copy of your WordPress database and files on your new hosting server, but your domain still points to your old web hosting account.
To update your domain, you need to switch your DNS nameservers. This ensures that your users are taken to the new location of your website when they type your domain into their browsers.
Conclusion
We hope that with the help of this straightforward tutorial, you were able to successfully migrate your WordPress website from one web host to another. If you have any questions or suggestions, please leave them in the comment section below.
My name is Linda, I have Master degree in Information Technology Engineering. I have some experiences in working with Windows and Linux VPS and I have been working for 2 years on Virtualization and Hosting.