![How to Create a Windows Live USB [Windows 10 USB]](/wp-content/uploads/2020/09/132562-main.webp)
There is great functionality in having a fully working version of Windows that you could boot from any computer on something as small as a USB flash drive (Windows Live USB), and today we will show you how to do it. All you need is a 16GB (recommended 32GB+) flash drive and a license to activate Windows on the USB.
First of all, you will need to get a Windows ISO file with the version you require for your system. We are going to use WinToUSB, which has a free version of the program. There is a small caveat, but the free version of the program only supports Windows 10 versions 1803 (April 2018 release) and lower (Windows 2016, Windows 7).
To get a later version of Windows (Windows Server 2019) to work, you will have to pay $29.95 for the Professional version of WinToUSB. So in this guide, we will explain how to create a Windows Live USB on different versions of Windows such as Windows 10, Windows 7, Windows 2016, Windows 2019, etc.
How to Create a Windows Live USB (Live Windows USB)
1. Go to the official website of WinToUSB and download it into your system.
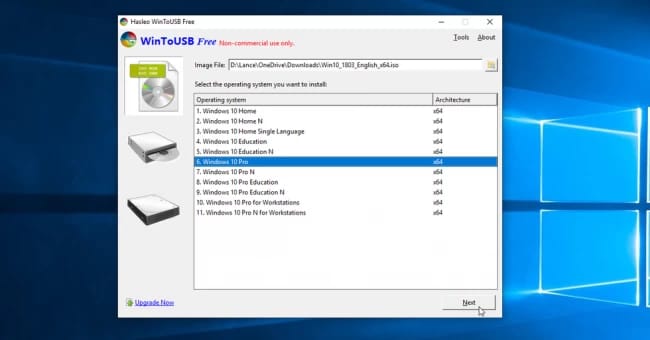
2. Now you can connect a blank USB to your computer and launch WinToUSB. From here, use the browse button (i.e., to the right of the "Image File" field) to select your ISO file and the version of Windows you wish to clone onto the USB stick. Once done, click on the "Next" button.
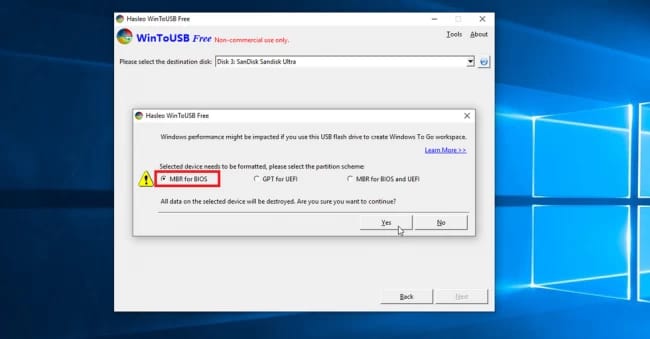
3. After that, select the USB drive from the drop-down menu. Once selected, a popup will appear, prompting you to select a partition scheme. Click on "MBR for BIOS" and then "Yes" to continue.
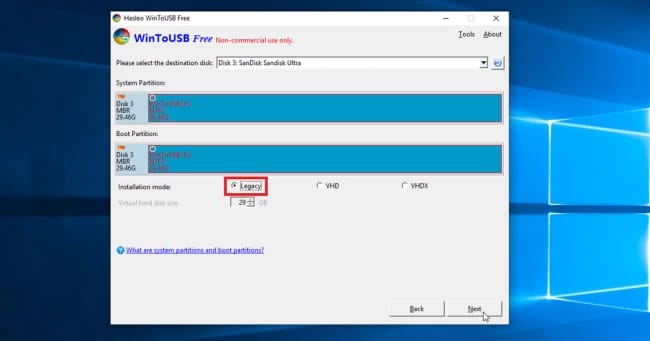
4. On the next screen, select the "Legacy" option under "Installation mode:" and click Next. The creation of the Windows USB shall begin, and once it reaches 100%, you can unplug your USB.
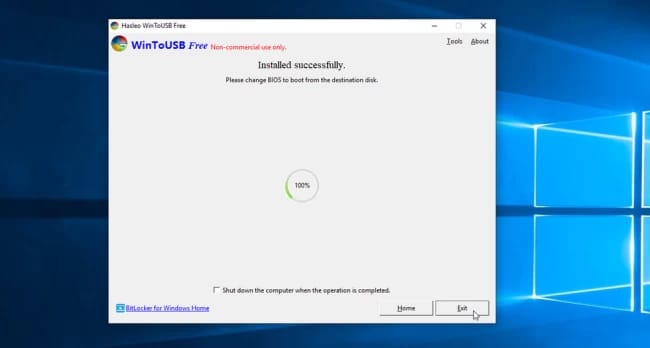
Note: In order to use the Windows USB on a computer, you will have to enter BIOS and change the boot preferences in order to boot the Windows USB.
You have to make sure that your USB drive must have more than 4GB of space because a Windows ISO file can be more breather than 3.63 GB. Some ISO files require more than 4 GB of space, so ensure that you use an appropriate USB drive having sufficient space to create Live Windows USB.
Best tools to create Windows Live USB
Creating a Windows Live USB (or bootable USB) is a common task, and several tools can help you achieve this. Here are some of the best and most popular tools for creating a Windows Live USB:
Rufus:
Pros: Fast, reliable, and offers advanced settings for power users. Supports both MBR and GPT partition schemes.
Cons: Windows-only.
Website: Rufus
Windows USB/DVD Download Tool:
Pros: Official tool from Microsoft. Simple and straightforward.
Cons: Limited features compared to other tools. Windows-only.
Website: Available on the Microsoft Store and various software distribution sites.
Balena Etcher:
Pros: Cross-platform (available for Windows, macOS, and Linux). User-friendly interface.
Cons: Fewer advanced options compared to Rufus.
Website: Balena Etcher
UNetbootin:
Pros: Cross-platform. Has been around for a long time and is quite reliable.
Cons: Interface is a bit dated. Primarily designed for Linux distributions, but can work with Windows ISOs.
Website: UNetbootin
WinToUSB:
Pros: Allows you to install and run a fully-functional Windows operating system on an external hard drive or USB flash drive. Supports creating Windows To Go from an ISO image file or CD/DVD drive.
Cons: Free version has limited features. Windows-only.
Website: WinToUSB
WinSetupFromUSB:
Pros: Can add multiple ISOs to one USB drive. Supports both Windows and Linux distributions.
Cons: Interface can be confusing for beginners. Windows-only.
Website: WinSetupFromUSB
YUMI (Your Universal Multiboot Installer):
Pros: Allows for the creation of multiboot USBs, meaning you can have multiple operating systems on a single USB drive.
Cons: Interface is not as intuitive as some other tools. Windows-only.
Website: YUMI
When choosing a tool, consider your needs (e.g., do you need a multiboot USB? Do you want a tool that's cross-platform?) and your level of expertise. For most users, Rufus or the Windows USB/DVD Download Tool will suffice. For more advanced users or specific needs, one of the other tools might be more appropriate.
Conclusion
So this is how you can easily create a Windows Live USB for your system, as it can help you in critical situations in which Windows get corrupt. Windows is an amazing platform, but it is important to have a backup system of this operating system so that you can easily reinstall it again.
In case you like this guide, then make sure to check out more on our official website, as we have uploaded multiple types of guides. Apart from it, we also offer multiple services like a Dedicated Server, SSL service, Web Hosting, Windows VPS Hosting, and many more at lower prices.
People are also reading:
