In this comprehensive guide, we're diving into the seamless integration of IPv6 on Windows. As the successor to IPv4, IPv6 promises enhanced performance and a virtually limitless pool of IP addresses (Internet Protocol addresses). Whether you're a tech enthusiast or a professional seeking to stay ahead in the digital era, our step-by-step tutorial will empower you with the knowledge to set up IPv6 on your Windows system effortlessly. Let's embark on this journey to unlock the full potential of your network.
🌐 IPv6 is not just the future of internet protocol — it's already shaping our digital world. Want to understand more about how IPv6 works and why it's important? Click here to read our comprehensive guide and learn everything you need to know about IPv6, from its basic principles to its global impact. Stay ahead in the digital space – make the switch to understanding IPv6 today!
How to Enable IPv6 on Windows 11
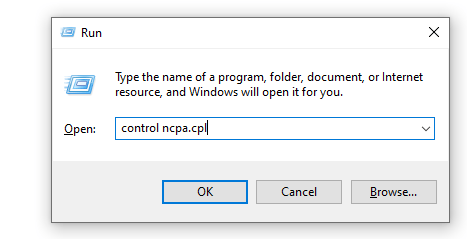
Access Network Connections:
- Press Win + R to open the Run dialog box.
- Type control ncpa.cpl and press Enter. This opens the Network Connections window.
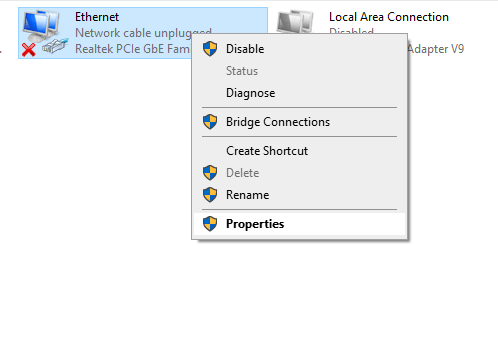
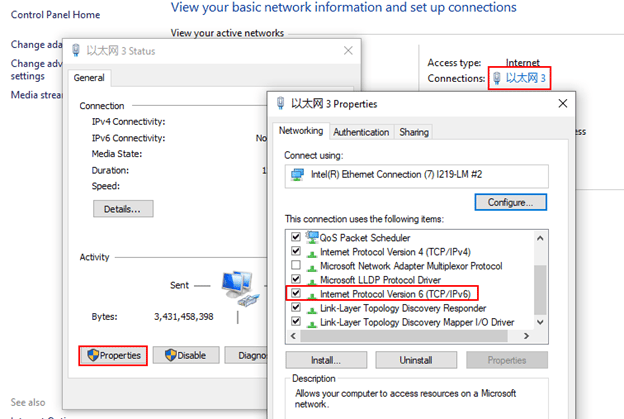
Select Network Adapter:
- Right-click on the network adapter you intend to configure and select "Properties."
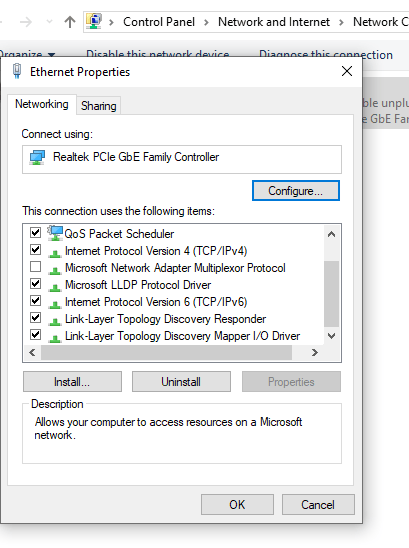
Enable IPv6 Protocol:
- In the adapter properties window, scroll through the list of available protocols and locate "Internet Protocol Version 6 (TCP/IPv6)."
- Check the box next to it to enable IPv6 for this network adapter.
- Click "OK" to save the changes.
Apply Changes and Reconnect:
- After saving the new settings, reconnect your Windows PC to the Wi-Fi network.
- Upon reconnection, your system will acquire both IPv6 and IPv4 addresses for the network.
🌐 Discover More: Ready to delve deeper into the world of internet protocols? Click here to learn more about the differences and advantages of IPv4 and IPv6 addresses, and how they impact your online experience. Your journey into the future of internet connectivity starts here!
Verify Configuration:
- Open Command Prompt by searching for "cmd" in the Start menu.
- Type ipconfig /all and press Enter. This command displays detailed configuration information for all network interfaces.
- To specifically view IPv6 addresses, use the command ipconfig /all | findstr "IPv6". This command filters the output to display only IPv6 information for clarity.
Now, you’ve successfully learned how to set up IPv6 on PC and Windows 11. Let’s proceed with guides for previous versions of Windows.
Explore More: Discover the Power of Windows Commands!
Dive deeper into the world of Windows with our comprehensive guide on essential commands. Learn shortcuts, tips, and tricks to enhance your productivity and simplify your computing experience.
How to Enable IPv6 on Windows 10
A lot of you might ask “How to change IPv6 address Windows 10?”. Your answer is here:
Access Network Connections:
- Press the Windows key + 'R' key simultaneously to open the Run dialog box.
- Type cpl into the Run window and hit Enter. This will open the Network Connections window.
Configure Network Properties:
- Right-click on the network connection you want to modify and select "Properties." Note: You'll need administrative privileges to make changes.

Enable IPv6 Protocol:
- In the Properties window, locate and click on the "Networking" tab.
- Scroll down and find "Internet Protocol Version 6 (TCP/IPv6)" in the list. Double-click on it to open its properties.
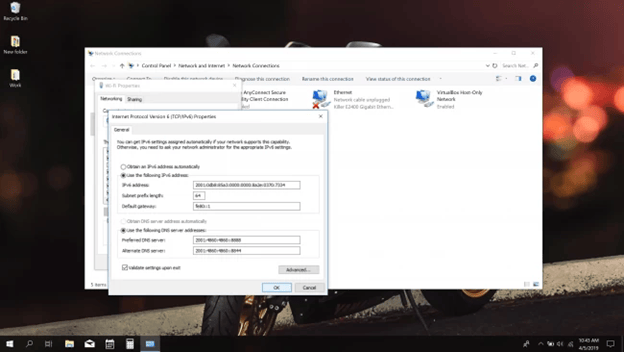
Input IPv6 Configuration:
- Choose "Obtain an IPv6 address automatically" to use DHCPv6 if your network supports it.
- Alternatively, select "Use the following IPv6 address" and enter the specific IPv6 address, subnet prefix length, default gateway, and DNS server information provided by your network administrator or ISP.
- Click "OK" to save your settings.
Testing the Configuration:
- For those of you asking how to find IPv6 address Windows 10, open Command Prompt (cmd) and type ping <IPv6 address> (replace <IPv6 address> with the configured address) to check connectivity.
This was the process you needed to learn to enable IPv6 Windows 10 cmd. If you’re using even older versions, don’t worry. We’ll teach you how to set up IPv6 on Windows 8 and 7 as well.
Set Up IPv6 on Windows 8
Access Network Connections:
- Press the Windows key + 'X' and select "Network Connections" or open the Control Panel and navigate to "Network and Sharing Center" > "Change adapter settings."
Configure Network Properties:
- Right-click on your network connection and choose "Properties." Administrative access is required.
Enable IPv6 Protocol:
- Locate "Internet Protocol Version 6 (TCP/IPv6)" in the Properties window and double-click on it.
Input IPv6 Configuration:
- Follow the same steps as outlined for Windows 10 to configure IPv6 settings.
Testing the Configuration:
- If you want to make sure that you set up IPv6 on Windows properly, use Command Prompt to ping an IPv6 address to verify connectivity.
Set Up IPv6 on Windows 7
Access Network Connections:
- Open the Start menu and select "Control Panel." Go to "Network and Internet" > "Network and Sharing Center" > "Change adapter settings."
Explore More on CMD Commands for Networking!
Dive deeper into the world of networking with our comprehensive guide on CMD Commands. Learn how to streamline your network setup, troubleshoot issues efficiently, and unlock the full potential of command-line tools. Click here for detailed tutorials, expert tips, and practical examples. Your journey to mastering networking commands starts now!
Configure Network Properties:
- Right-click on your network connection and select "Properties." Administrator privileges are necessary.
Enable IPv6 Protocol:
- Double-click on "Internet Protocol Version 6 (TCP/IPv6)" in the Properties window.
Input IPv6 Configuration:
- Configure IPv6 settings as explained in the Windows 10 steps.
Testing the Configuration:
- To check if you set up IPv6 on Windows correctly, ping an IPv6 address via Command Prompt.
Conclusion
Congratulations on successfully setting up IPv6 on your Windows machine! With this new configuration, you've not only expanded your network capabilities but also stepped into a more secure and efficient online world. As we wrap up this guide, remember that embracing IPv6 is more than just a technical upgrade; it's a leap toward future-proofing your digital presence. Keep exploring, stay connected, and leverage the power of IPv6 to its fullest. For more insights and tech tips, keep following our blog.
