List of content you will read in this article:
A damaged database might be the cause of problems or slower than normal displaying on your PHP website. Maintaining the health and speed of your website depends on your knowing of how to fix PHP databases. This post will lead you through basic and quick solutions to get your PHP database back in shape and your site working normally whenever you are experiencing connection problems or database discrepancies.
Signs Your WordPress Database Needs Repair
All important information (like pictures, posts, and pages) on your website is stored in a database. When this database is corrupted, the performance and usability of your website will not work as well. The following signs show repair WordPress database is necessary:
- White Screen of Death (WSoD): When you open your website and see a blank white page instead of your content, you need to repair your database.
- Error Messages: When you see error messages like “Error establishing a database connection” or “Unable to select database”, it means your database has problems and needs to be fixed.
- Missing Content or Formatting Problems: Your content is missing? Or have you encountered broken formatting? So, it shows there’s something wrong with your database.
- Plugin or Theme Malfunctions: Your plugins and themes don’t work like they did before. Or they stopped working? So, there may be problems with your database and you need to repair WordPress database online.
What Can Damage a WordPress Database? (Common Reasons)
If you know the common reasons for WordPress database corruption, you can prevent it from damage and fix it easily. Sometimes, problems with your web server, like power cuts or broken hardware can cause damage to a database. Providing incorrect database credentials such as a username or password in your wp-config.php file can cause problems and as a result, your website won't be able to connect to the database. Also, when your website consumes too much memory (more than PHP memory limit), other problems can arise which result in database issues and damage. Finally, a dangerous attack on your website could target your database, resulting in corruption. In all these situations, a repair WordPress database is needed.
The preparation process before repair WordPress database
Before you start to repair WordPress database online or offline, you need to prepare carefully. There are two necessary preparation methods including backing up your data to prevent data loss and bling error logs in the wp-config.php file to find the cause of the problem. Let’s see how to do them:
1- Back Up Your WordPress Site
Sometimes repairing a database can harm your site and result in losing information. So, it’s so important to back up your data before starting the process. In this case, if anything goes wrong, you’ll ensure you won’t lose important data. Most hosting providers offer reliable backup tools that you can use. If you can’t, you can manually back up your website to prevent data loss.
Best WordPress Hosting Providers
Looking for top-notch speed and reliability? Discover our picks for the Best WordPress Hosting Providers here!
2- Enable Error Logs to Find the Cause
To repair WordPress database effectively, you need to find out what caused that error. To do that, you can use wp-config.php file. You should review WordPress error logs within the wp-config.php file. This core WordPress file contains your site's setup and database information, as well as error logging to help you solve issues. Do the following steps to enable error logs:
- Access the wp-config.php file via your hosting account’s cPanel (or connect using FTP if your host doesn't offer cPanel).
- Go to `public_html → wp-config.php` and edit the file.
- Add the following code above the line `/* That's all, stop editing! Happy publishing. */`:
define('WP_DEBUG', true);
define('WP_DEBUG_LOG', true);

You need to change the debug mode from `false` to `true` to enable debug mode and store error logs in the `debug.log` file.

After activating, check the debug file to find warnings and errors. Here you can find out what is the cause of the issue. For example, a plugin, theme, or anything else.
How to Repair WordPress Database?
WordPress database runs on the database management system, MySQL. Although rare, your Database has the chance of corrupting, which makes your website buggy or completely dysfunctional. We can help you fix such database errors.
Using WP_ALLOW_REPAIR
WordPress comes with a database repair feature that allows you to repair the corrupted database without in-depth technical knowledge.
Connect via FTP to your website and download the wp-config.php file. It is residing at the root folder of the WordPress installation.
Open the wp-config.php file with a text-editor and insert this line at the end of the file, just before the if ( !defined('ABSPATH') ) line.:
define('WP_ALLOW_REPAIR', true);
Don’t edit or change any other stuff in the wp-config.php file unless you know what you are doing. Save the changes and upload this file back to your server. Make sure you overwrite the existing copy in the server.
In your browser, go to the URL http://yoursite.com/wp-admin/maint/repair.php. Don’t forget to replace “yoursite.com” with your own website’s URL. This is what you will see.
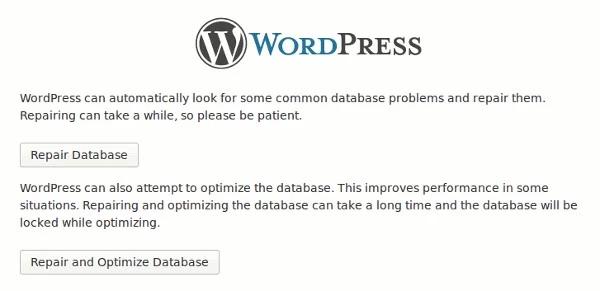
You can click either the “Repair Database” button or the “Repair and Optimize Database” button. Both will repair your database. We recommend to select the “Repair and Optimize Database” option since it optimizes your database as well.
You should now see a bunch of code. Scroll down to the end of the page and you should see “Repairs complete. Please remove the following line from wp-config.php to prevent this page from being used by unauthorized users.” That’s it. Your database is now repaired.
Reload your website to see if it is working and if you are able to login.
Lastly, remove the “WP_ALLOW_REPAIR” line from your “wp-config.php” file and re-upload it to your server.
Using Your Control Panel
open your WordPress server's control panel from your hosting account.
You'll probably need to log in with the password and username you set when you created your hosting account.
Once you're logged in, you'll be presented with a panel that looks something like the screenshot below.
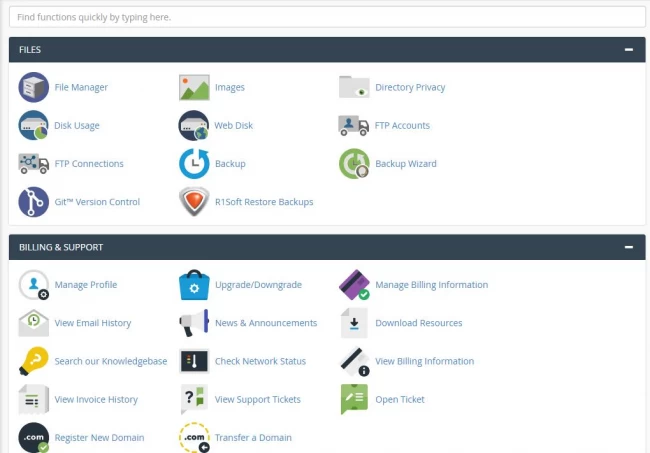
You need to find and click the phpMyAdmin button.

If your control panel looks different, don't be concerned.
Most hosting providers use cPanel, but if your host provides alternative management software, that won't be a problem. No matter what control panel you have, phpMyAdmin will probably be located under a 'Databases' header.
Now that you've entered the phpMyAdmin interface, select the correct WordPress database.
Your internal database folders will then appear in the sidebar. This will allow you to double check that you've selected the correct database: the folder names should all begin with 'wp_'.
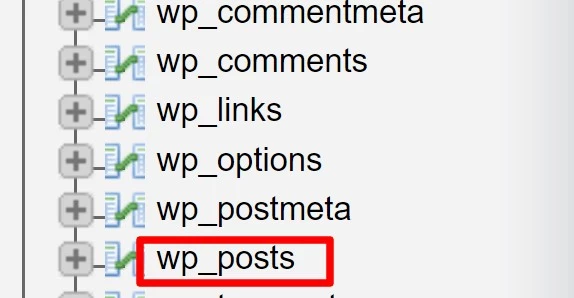
Please Note: if you have multiple WordPress sites on your server, there'll be more than one WordPress database.
As the database naming system is random, you'll need to expand the 'wp_posts' table and check that the names of the posts match those of the corrupted site.
Using phpMyAdmin
phpMyAdmin is a web-based tool for managing MySQL databases. Using phpMyAdmin to repair WordPress databases online is easy and straightforward, especially if you’re comfortable working with databases. Here we tell you how to do that step-by-step:
Step 1: Log in to Your Hosting Dashboard
Begin by signing into your WordPress hosting account and accessing cPanel. To do so, click on the "Advanced" tab in your website settings and select the "Manage" button under the cPanel section.

Step 2: Open phpMyAdmin
Once in cPanel, find the phpMyAdmin option and click on the link to open it.

Step 3: Select Your Database
The left column of the phpMyAdmin window displays a list of databases. Choose the WordPress database you wish to fix. Instead, you can click the "Databases" option at the top and select the appropriate database.

Step 4: Check All Tables
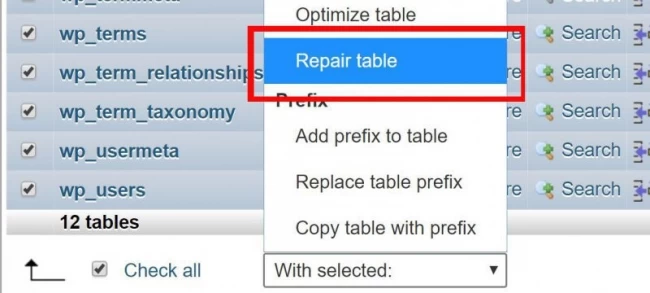
After picking the desired database, you will be presented with a selection of tables. In this step, you need to scroll down and click the "Check All" button to pick all of the tables. Then, open the "With selected" dropdown menu and pick "Repair table".

Step 5: Repair the Tables
phpMyAdmin will attempt to fix the tables you specified. If it finds any issues, it is going to try to resolve them. When it's completed, you'll see a notification indicating that it was successful.

4- Using a Plugin
For some people, it may not be easy and comfortable to work with phpMyAdmin. Don’t worry because we have a simpler and faster way for beginners. Using a plugin is an easy way to repair WordPress database. There are different plugins for WordPress database that you can use. But in this guide, we’re using WP-DBManager plugin. It is free and you can repair, optimize, back up, and perform other database actions using it. Let’s see how to use it for repairing WordPress database.
Step 1: Install and Activate WP-DBManager
Before anything, you need to install it. Install and activate the WP-DBManager plugin on your site:
- Log in to your WordPress dashboard.
- Go to Plugins » Add New.
- In the search bar, type WP-DBManager.
- Click Install Now next to the plugin.
- Once installed, click “Activate” to enable the plugin.
Step 2: Access the Repair DB Page
After activating the plugin, go to the “Database » Repair DB” page in your WordPress dashboard.

Step 3: Select Tables to Repair
Again, you’ll see a list of tables in your database. Choose the ones that you want to repair. If you’re unsure which needs repair, you can select all. Then, click the "Repair" button at the bottom of the page.
Step 4: Repair the Database
The plugin will try to fix your database and any problems it finds.
4. Using the Built-in WordPress Database Repair Tool
You can repair the WordPress database using WordPress! It offers a built-in repair tool to fix minor database problems. Using this method, you need to enable it manually by editing the wp-config.php file. Here we explain how to do that:
Step 1: Edit the wp-config.php File
To find the files on your website, you can use an FTP client. Look for the wp-config.php file in your WordPress installation's root directory. Open a text editor and paste this code just before the line '/* That's all, stop editing! Happy publishing! */':
define('WP_ALLOW_REPAIR', true);
Step 2: Access the Repair Tool
In your web browser, go to this link: http://www.yourlink.com/wp-admin/maint/repair.php.
Instead of “yourlink” use your domain. Now, after opening the page, click on “Repair Database” button.
Step 3: Remove the Code
As this tool doesn’t need any login access, you need to delete the code from the wp-config.php file after the repair process. If not, some security risks may happen. So, make sure to delete it after the process.
5- Using Hosting Service cPanel
In your hosting provider’s cPanel a repair tool is available that you can use to repair WordPress database online. To do that, follow these steps:
Step 1: Access cPanel
Go to your hosting account and locate the cPanel." This normally appears in the settings or tools section. You are able to manage your website through the cPanel.
Step 2: Navigate to MySQL Databases
Now, scroll down in cPanel to find the “Database” section. After that, click on “MySQL Databases”.

Step 3: Repair the Database
In the "Repair Database" box, select the database you want to repair, and then click "Repair Database."
After that, you need to wait until the hosting service repairs your database automatically. When the process is done, you’ll see a message which shows the process is done successfully.

Select All of the Tables in Your Database for Repair
Once you've opened the correct WordPress database, you need to ensure that every part of it is repaired (unless your error message told you that only one part of your database was corrupted).
To do that, go to the bottom of the main directory window and select the 'Check all' box. This will highlight all the subdirectories within your WordPress database.
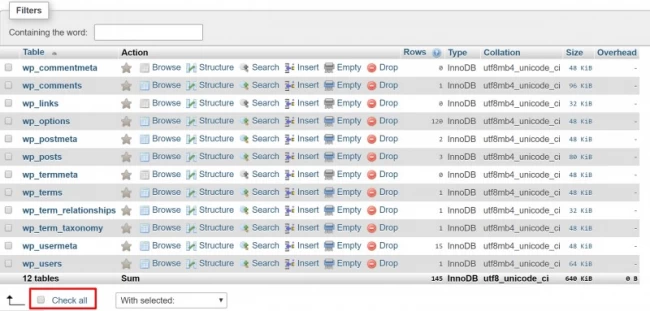
Once every subdirectory is selected, open the list next to the 'Check all' field and select 'Repair table'.
Congratulations, you've now managed to start the repair WordPress database process!
But you need to check that the repair worked.
You'll now be taken to the repair results screen. The messages displayed here will tell you if the repair was successful. Along the top, you should see the following message:

Conclusion
Understanding how to fix a WordPress database helps reduce website performance and data management issues. You may resolve database difficulties in a variety of methods, including using built-in WordPress features or additional plugins. Regular maintenance and fixes keep your website running fast, safe, and user-friendly.
My name is Linda, I have Master degree in Information Technology Engineering. I have some experiences in working with Windows and Linux VPS and I have been working for 2 years on Virtualization and Hosting.