As you may know, Microsoft constantly releases new updates to tackle newly arising Windows security threats, as well as to improve the overall user experience. While being extremely important, these updates are rolled out automatically which could be an inconvenience to some. Thus, these automatic updates could be disabled, however, in Windows 10, the process is a bit more complicated than its predecessors.
Before we dive into the tutorial, let us briefly explain why we recommend enabling automatic Windows updates.
The Importance of Windows Updates
While new and improved features are the most attractive factors in updating your operating system, there is a more important “under-the-hood” reason for conducting Windows updates: security. In order to protect your computer from malicious software and attacks, it is critical to install the latest Windows security updates.
It should come as no surprise to anyone that the perfect operating system does not exist, especially from a cybersecurity point of view. While the developers try their best, there are still security loopholes and exploits that are present even in the released versions of different OS versions. This is the precise reason why security updates are released for Windows and other operating systems: to fix these loopholes and exploits.
Now that you understand the importance of security updates, let us show you how to disable them if you still wish to proceed.
How to Disable Automatic Updates in Windows
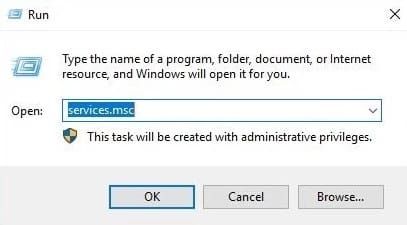
Step 1: Open run (press Windows key + R) and type services.msc, then click on the OK button.
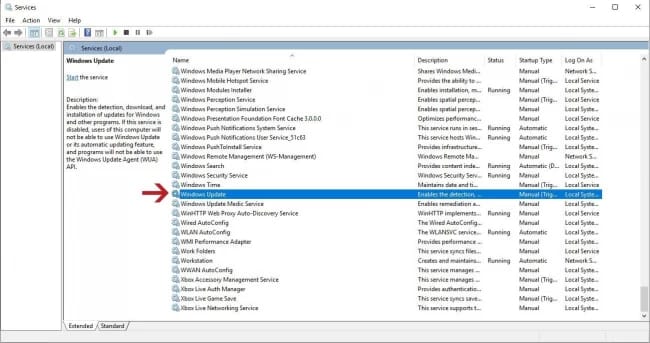
Step 2: In the services window, find Windows Update and double-click on it.
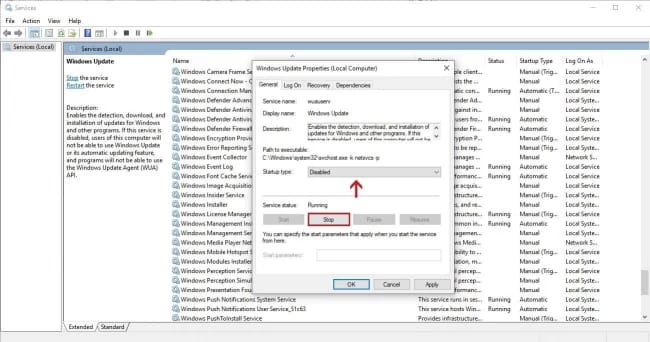
Step 3: Change the Startup type option to Disabled and click on Apply. Then, Stop the service.
Now that you have stopped the windows update service, you have to prevent it from restarting.
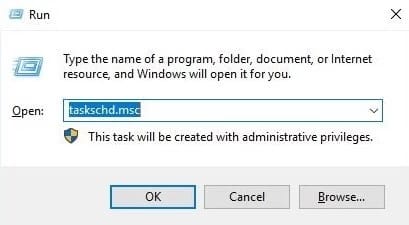
Step 4: Open run and type taskschd.msc to open the Task Scheduler console.
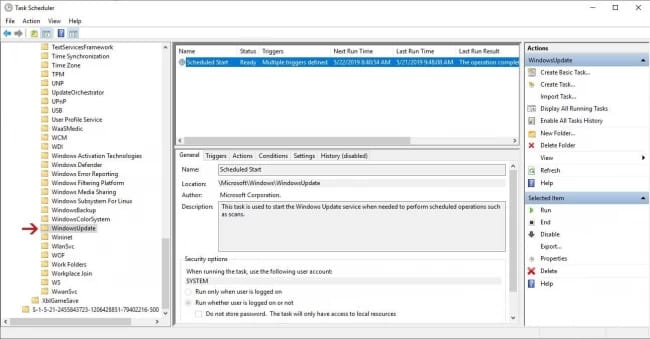
Step 5: In this console, head to the following directory: Microsoft > Windows > Windows Update.
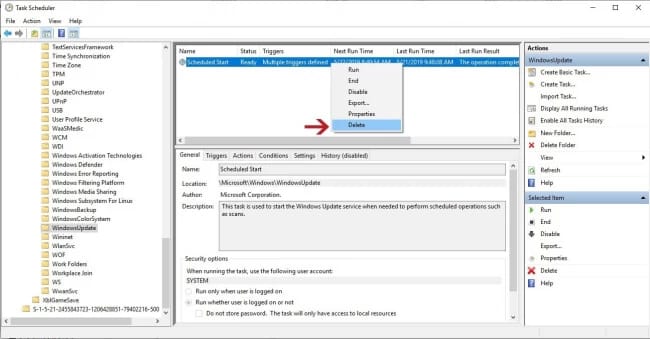
Step 6: Delete Scheduled Start.
That's all! Do remember, however, that doing this could make you vulnerable to cyberattacks and malware.
Conclusion
In today’s Windows tutorial, we discussed the importance of automatic Windows updates and why we recommend you keep them enabled. If you still desire to not have them, we outlined a simple step-by-step tutorial on how to disable the automatic updates in Windows OS or Windows VPS. If you wish to do so for multiple systems at the same time, check out outs complete guide on how to disable Windows updates from Group Policy. If you run into any issues throughout the process or have any questions/suggestions, please leave them in the comment section below.