The Remote Desktop Protocol (RDP) is a communication protocol developed by Microsoft. It allows users to access and manage remote servers or desktops. Here's why RDP is widely used:
- Remote Access: IT administrators and support teams can maintain systems remotely.
- Essential Tool for Organizations: Helps organizations connect to their resources for system management, troubleshooting, and collaboration.
- Rise in Remote Work: The demand for RDP has surged due to remote work, virtual collaboration, and the need for server management away from the office.
Though Windows provides a Graphical User Interface (GUI) to enable RDP, the Command Prompt (CMD) method sometimes becomes more practical. This is useful in cases where the graphical interface is unavailable or administrators need more control.
What is RDP?
- A Proprietary Network Protocol: RDP allows users to connect to a remote system over a network and interact with it as if they were physically present.
- Widely Used in IT Management: It’s used for system administration, troubleshooting, and enabling remote workers to access secure systems.
Top Reasons to Enable RDP in CMD
Enabling RDP through CMD can be particularly useful for several reasons:
- When the GUI is Unavailable: If your system is experiencing issues or crashes, CMD ensures you can still access and manage your desktop remotely.
- Better Flexibility: With CMD, you can enable or disable RDP, customize settings, and manage connections quickly and efficiently, offering greater control over the process.
- Remote Adjustments: For IT administrators, CMD provides a way to make system adjustments remotely, ensuring continuous access for troubleshooting or maintenance.
In this article, we'll explore the steps to enable RDP in CMD, discuss its significance, and the advantages it offers over the GUI method.
 for Remote Desktop Protocol (RDP).jpg)
Why Use Command Prompt (CMD) for Enable RDP?
Before diving into the steps, let's explore why both RDP and Command Prompt (CMD) are essential for managing remote desktop connections:
When to Use CMD for RDP Activation?
- When Windows GUI Fails: If the GUI is malfunctioning or unavailable, CMD allows you to enable RDP remotely.
- For System Customization: CMD allows administrators to fine-tune settings, activate or deactivate RDP, and manage connections as needed.
- During System Issues: After system crashes, Windows upgrades, or when there are corrupted operating system files, CMD becomes a crucial tool for maintaining remote access.
Using CMD for enabling RDP provides the flexibility needed for remote access and system management, making it an invaluable tool for IT administrators.
How to Enable RDP Using CMD
Step-by-Step Guide to Enabling RDP Using CMD
Now that we’ve covered the basics, let's get into the practical steps of enabling RDP from the Command Prompt (CMD). This process is relevant for all Windows versions, including Windows 10, 8, 7, and even Windows Server editions.
Step 1: Verify Administrator Access
Before proceeding, it’s essential to confirm that you are using an administrator account. CMD requires administrator privileges to change system settings, such as enabling RDP and modifying registry keys.
- Open the Control Panel.
- Go to User Accounts and Family Safety.
- Check if your account is listed as an Administrator.
If you're not logged in as an Administrator, log in to an admin account or elevate your permissions to proceed.
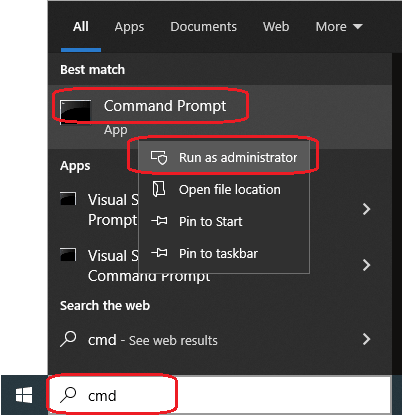
Step 2: Open CMD with Admin Privileges
To enable RDP from the Command Prompt, follow these steps to run CMD as an administrator:
- Press Windows + S to open the search bar.
- Type in “CMD” and right-click on the Command Prompt result.
- Select “Run as Administrator”.
- When prompted, click Yes to grant administrator privileges.
This ensures that you have the necessary permissions to make system-level changes.
Step 3: Enable RDP via Command Line
To enable RDP through CMD, execute the following commands in the Command Prompt (Admin) window:
- Activate Remote Desktop by modifying the registry:
reg add "HKEY_LOCAL_MACHINE\SYSTEM\CurrentControlSet\Control\Terminal Server" /v fDenyTSConnections /t REG_DWORD /d 0 /f
This command allows remote connections to the machine by setting the fDenyTSConnections value to 0, which is the key to enabling RDP.
2. Enable Firewall Rules to allow remote desktop traffic:
netsh advfirewall firewall set rule group="remote desktop" new enable=yes
This command ensures that the necessary firewall rules are in place to allow RDP connections.
Step 4: Use PowerShell to Activate RDP
In some cases, PowerShell might be required to activate RDP or configure additional settings. To activate RDP using PowerShell, follow these steps:
- Press Windows + S, search for PowerShell and run as administrator.
- Use the following command in PowerShell to enable RDP:
Set-ItemProperty -Path 'HKLM:\System\CurrentControlSet\Control\Terminal Server' -Name "fDenyTSConnections" -Value 0
This will configure the fDenyTSConnections registry key to enable RDP access.
Step 5: Set Up Firewall Rules in PowerShell
Once RDP is enabled, configure firewall rules in PowerShell to ensure remote connections remain uninterrupted. Enter the following command:
Enable-NetFirewallRule -DisplayGroup "Remote Desktop"
This ensures that RDP traffic is not blocked by Windows Firewall.
Step 6: Confirm RDP Activation Status
Finally, verify that RDP has been enabled successfully. To do so, check the Windows Registry:
- Press Windows + R to open Run.
- Type regedit and press Enter to open the Registry Editor.
- Navigate to the following path:
HKEY_LOCAL_MACHINE\SYSTEM\CurrentControlSet\Control\Terminal Server
- Look for the fDenyTSConnections key. A value of 0 indicates RDP is enabled, while 1 means it is disabled.
How to Disable RDP Using CMD
Step-by-Step Guide to Disabling RDP Using CMD
While RDP is a valuable tool for remote access, it’s important to disable it when not in use to minimize security risks. To disable RDP through the Command Prompt (CMD), follow these steps:
Step 1: Modify the Configuration Value
- Open CMD as an administrator.
- Run the following command to disable RDP:
reg add "HKLM\SYSTEM\CurrentControlSet\Control\Terminal Server" /v fDenyTSConnections /t REG_DWORD /d 1 /f
This sets the fDenyTSConnections value to 1, preventing remote desktop connections.
Step 2: Update Firewall Settings
- Open PowerShell as an administrator.
- Run the following commands to remove the RDP firewall rules:
netsh advfirewall firewall set rule group="remote desktop" new enable=No
Disable-NetFirewallRule -DisplayGroup "Remote Desktop"
These actions will effectively disable RDP and block all remote connections.
The Role of Command-Line in Remote Desktop Management
Using the command line is essential for administrators who need to manage RDP settings remotely or troubleshoot connection issues. By using CMD and PowerShell, administrators can quickly enable or disable RDP, configure firewall rules, and adjust settings for multiple machines.
Enhanced Security Management with CMD
One of the main benefits of using the Command Prompt (CMD) and PowerShell for RDP management is the ability to enhance security. By managing RDP remotely and adjusting firewall rules, admins can mitigate security risks and prevent unauthorized access to systems. This makes it easier to manage RDP across large networks and quickly respond to security threats.
Conclusion
Enabling RDP from CMD is a versatile and effective way to manage remote access on Windows systems. Whether you’re troubleshooting an issue, managing settings, or enhancing security, CMD and PowerShell offer a reliable solution for system administrators. By following the steps outlined in this guide, you can easily enable or disable RDP, manage remote desktop connections, and maintain secure access to your systems.