
An SSH key is not new if you're familiar with the IT environment and understand cloud infrastructure. SSH, or Secure Shell, keys are an access credential for the SSH secure shell network — a pair of cryptographic keys that let you prove who you are to a remote server, Git service, or SFTP endpoint without sending a password across the network. Authentication and encryption are used for remote communication between machines on an unsecured open network. Some of its uses include remote file transfer, remote operating system, and network management.
In this guide, you'll get thorough information about SSH keys — what they are, how they work, which type to choose, and how to set them up properly. This version reflects current OpenSSH defaults, Ed25519-first guidance, and current Windows, macOS, and Linux workflows.
🔑 What is an SSH Key?
SSH keys have different sizes, but one of the most famous variants is an RSA 2048-bit encryption — comparable to a 617-digit-long password. However, modern best practice in 2026 favors Ed25519 keys for their speed, compactness, and strong security. If you're new to SSH protocol explained topics, think of a key pair as two linked files: one public, one secret. The public key can be shared freely. The private key absolutely cannot — treat it like a root password with extra consequences.
On operating systems like Linux and Mac, you can generate SSH key pairs using the Terminal. On Windows, you can use OpenSSH in PowerShell or a client like PuTTYgen.
⚙️ How SSH Keys Work
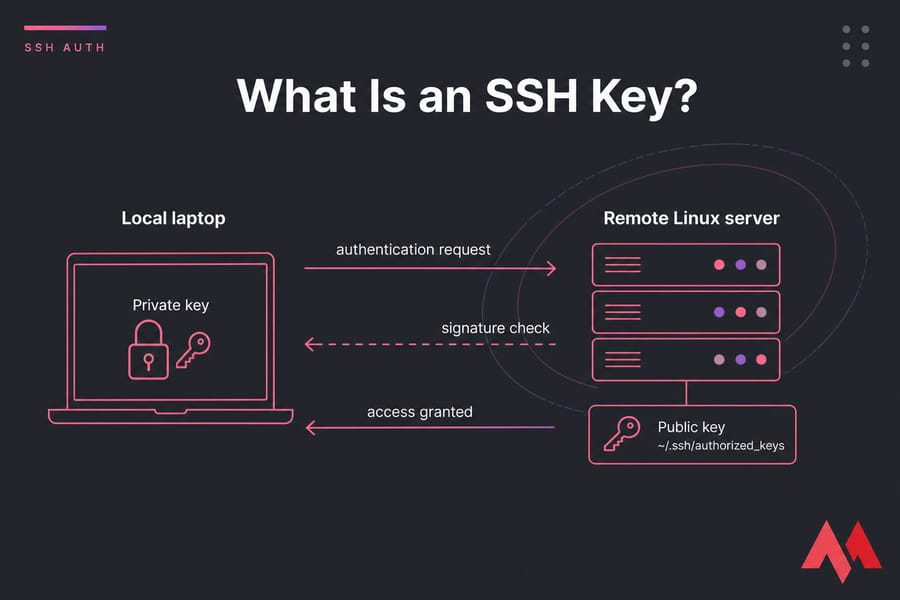
SSH keys use public-key cryptography, sometimes called asymmetric encryption. The server keeps your public key. Your device keeps the private key. During SSH authentication, the server checks that you really hold the matching private key by sending a challenge, your client signs it with the private key, and the server verifies the signature using the public key it already has. If it matches, login is allowed. No magic — just a better authentication method.
Public Key vs Private Key
The public key goes on the server, usually inside ~/.ssh/authorized_keys. The private key stays on your machine in the .ssh directory. I've seen people paste private keys into tickets and screenshots by accident — don't do that.
What is an SSH Key Fingerprint?
A fingerprint is a short identifier for a key. You'll see it when verifying a host key or checking that the right public key was added. Fingerprints matter because they help you confirm you're talking to the expected server, not an impostor.
🛡️ Why Use SSH Keys Instead of Passwords?
Because passwords are usually the weak link. Short, reused, guessed, sprayed at login forms — you know the story. A passphrase-protected private key is generally much harder to brute-force, and it works far better for automation. Tools like Ansible, deployment jobs, and scheduled backups can authenticate without storing plain passwords.
| Method | Security | Convenience | Best Use |
| Password login | Weaker if the password is reused or simple | Easy to start, annoying to scale | Temporary access, basic setups |
| SSH key login | Stronger, especially with passphrase protection | Excellent for scripts and regular admin work | Servers, SFTP, Git, CI/CD |
📊 Types of SSH Keys Explained
RSA
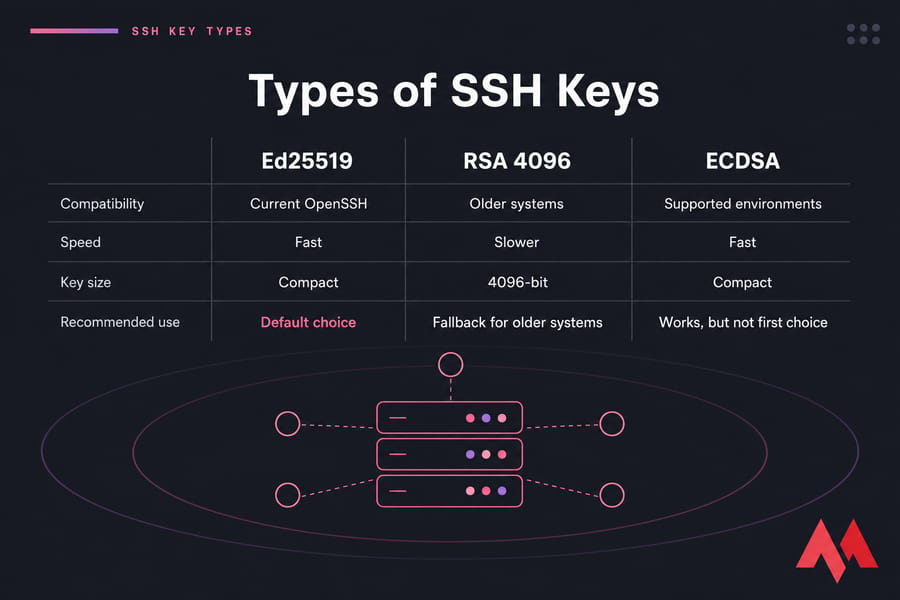
RSA is older but still common. It's often used for compatibility with older systems and appliances. If you need it, use 4096 bits today, not 2048 unless you're stuck with a very specific legacy requirement.
Ed25519
Ed25519 is the modern default for most users. It's fast, compact, and well supported in current OpenSSH releases on Linux, macOS, and modern Windows installs. This is what you should generate first unless compatibility says otherwise.
ECDSA
ECDSA exists, works, and is supported in plenty of environments. That said, it's rarely the first recommendation for a general-purpose setup when Ed25519 is available.
Which SSH Key Type Should You Choose?
Use Ed25519 unless you have an older server or client that doesn't support it. Use RSA 4096 as the fallback.
🖥️ How to Generate an SSH Key
On Linux or macOS, generate an Ed25519 key like this:
ssh-keygen -t ed25519 -C "your_email@example.com"RSA fallback:
ssh-keygen -t rsa -b 4096 -C "your_email@example.com"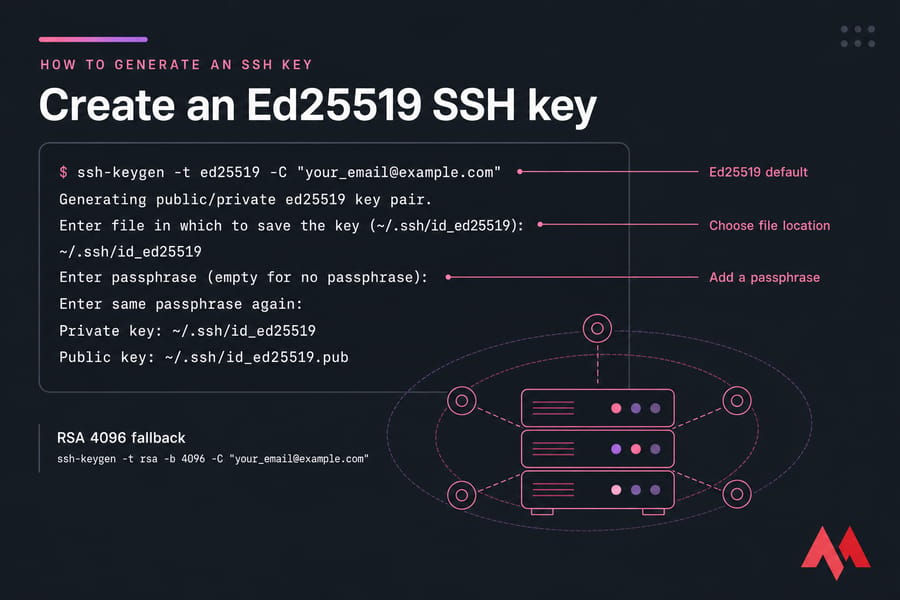
Once you execute the command, your system will provide output like this:
laptop1:~ yourname$ ssh-keygen
Generating public/private rsa key pair.
Now the system will ask you to select the location in which you want to store the keys:
Enter file in which to save the key (/Users/yourname/.ssh/id_rsa):After choosing the location, the system will ask you to choose the passphrase:
Enter passphrase (empty for no passphrase):
Enter the same passphrase again:
Add a passphrase. Yes, it's one more step. It's worth it — a passphrase-protected private key adds another layer of protection if your key file is ever copied or stolen. Once you provide storage location and passphrase information, the system will generate public and private keys:
- id_rsa (or id_ed25519) is your private key
- id_rsa.pub (or id_ed25519.pub) is your public key
Your identification has been saved in /Users/yourname/.ssh/id_rsa.
Your public key has been saved in /Users/yourname/.ssh/id_rsa.pub.
You will get a "visual fingerprint" of your key:
The key fingerprint is:
D7:21:c7:d6:b8:3a:29:29:11:ae:6f:79:bc:67:63:53 yourname@laptop1
The key's randomart image is:
+--[ RSA 2048]----+
|                 |
|        . o      |
|       . * .     |
|      . = o      |
|     o S . o     |
|    . . o oE     |
|     . .oo +.    |
|      .o.o.*.    |
|      ....= o    |
+-----------------+
After completing the above procedure, your authorized key will look like this:
Ecdsa-sha2-nistp256 AAAAE2 VjZHNhLXN0YTtbmlzdHAyNTYAAAAIbmlzdHAyNTYAAABBBN+ Mh3U / 3We4VYtV 1QmWUFIz FLTUeegl1Ao5 / QGtCRGAZn8bxX9KlCrrWISIjSYAwCajIEGSPEZwPNMBoK8XD8Q = ylo@klarFinally, your identity key will look like this:
-----BEGIN EC PRIVATE KEY-----
MHcCAQEEIJWbvSW7h50HPwG+bWR3DXgQ6YhOxYbe0ifr1rRUvsUuoAoGCCqGSM49
AwEHoUQDQgAE34yHdT/dZ7hVi1XVCZZQUjMUtNR56CXUCjn9Aa0JEYBmfxvFf0qU
KutYhIiNJgDAJqMgQZI8RnA80wGgrxcPxA==
-----END EC PRIVATE KEY-----
Generate an SSH Key on Windows with OpenSSH
In PowerShell, the same ssh-keygen commands work if OpenSSH is installed. If you want a step-by-step walkthrough, here's how to generate an SSH key in Windows.
Generate an SSH Key with PuTTYgen
If you use PuTTY, open PuTTYgen, choose Ed25519 or RSA, click Generate, move the mouse to add randomness, then save both the private and public key. PuTTY users may also use Pageant instead of the standard OpenSSH agent.
📤 How to Add Your SSH Public Key to a Server
There are two methods to configure an SSH/SFTP user for the key:
Method 1: Using ssh-copy-id
The quickest method. Run the following command and replace x.x.x.x with your IP address and sysuser with your computer name:
ssh-copy-id SYSUSER@x.x.x.xMethod 2: Manual Configuration
When you do not have the ssh-copy-id command, you can SSH it to your server manually. Create the .ssh/authorized_keys and run the following command:
(umask 077 && test -d ~/.ssh || mkdir ~/.ssh)
(umask 077 && touch ~/.ssh/authorized_keys)
Edit the file .ssh/authorized_keys with the help of your preferred editor and paste your id_rsa.pub content. Only the public key goes there, one line per key.

🔓 How to Log In Using an SSH Key
SSH or SFTP into your server using your private key with the help of the following command:
ssh SYSUSER@x.x.x.xIf you haven't created the default location, you will have to type the following:
ssh -i ~/.ssh/custom_key_name SYSUSER@x.x.x.xIf the wrong identity keeps being offered, verbose mode helps:
ssh -v SYSUSER@x.x.x.xThat output shows which key files were tried and why the server refused them. For a fuller walkthrough, see how to connect to SSH with a private key. And if you're planning to SSH into a Linux server regularly, get these basics right once and save yourself future pain.
👥 Granting Access to Multiple Keys
The .ssh/authorized_keys file uses a simple format — so if you have multiple users or developers, you can grant them access. Follow the instructions to use ssh-copy-id, or you can manually paste additional keys, one per line.
After completing the process, your .ssh/authorized_keys file will look something like this (don't copy this — use your own public keys):
ssh-rsa AAAAB3NzaC1yc 2EAAAADAQABAAABA QDSkT3A1j89RT / 540ghIMHXIV w NlAEM3W tmqVG7YN / wYwtsJ8iCszg4 / lXQsfLFxYmEVe8L9 atgtMGCi5QdYPl4X / c+5YxFfm88Yjfx+ 2xEgUdOr 864eaI22ya NMQ0AlyilmK + PcSyxKP4dzkf6 B5Nsw 8lhfB5n 9F5md 6GHLLjOGu BbHYlesKJKnt2c MzzS90 BdRk73qW6wJ+ MCUWo +cyBFZVGOzrjJGEcHewOCbVs +IJWBFSi6w1enbKGc +RY9KrnzeDKWWqzYnNofiHGVFAu MxrmZOasqlTIKiC2UK3RmLx ZicWiQmPnpnjJRo 7pL0oYM9r/ sIWzD6i2S9szDy6aZ  mike@laptop1

ssh-rsa AAAAB3NzaC1yc 2EAAAADAQABAAABAQC zlL9Wo8yw EFXSvMJ8FY mxP6HHHMD TyYAWwM3AO tsc96DcYVQIJ5V sydZf5 /4NWuq55Mqnzdn GB2IfjQvOrW4Jen 0cI5UFTvAG4PkfYZb 00Hbvwho8JsS AwChvWU6I uhgiiUBofKSMMifKg+ pEJ0dLjks 2GUcfxeBwbNn AgxsBvY6BCXRfezIdd PlqyfWfnftqnafIFvuiRFB1 DeeBr24kik /550MaieQpJ848 +MgIeVCjko4NPPLssJ /1jhGEHOTlGJpWKGDqQK + QBaOQZh7JB7ehTK +pwIFHbUaeAkr66i VYJuC05iA7ot 9FZX8XGkxgmhlna FHNf0l8ynosanqt henry@laptop2
🔒 Correcting Permissions on the .ssh Directory
First, run these commands on your server while SSH'd in as your app's system user:
chmod 700 ~/.ssh
chmod 600 ~/.ssh/authorized_keys
Wrong ownership or loose file permissions break logins all the time. If anyone tries to enter a password after key-only authentication is configured, they will receive a message like:
Permission denied (publickey,password).
Or
No supported authentication methods available
🗂️ How to Manage Multiple SSH Keys
Once you use SSH for servers and Git repositories, one key stops being enough. Separate keys are cleaner and safer.
SSH Config
First, create a new file: ~/.ssh/config, and open it for editing:
nano ~/.ssh/configManaging Custom Named SSH Key
Configure the file to avoid adding custom-named SSH keys using ssh-add all the time. Suppose your SSH key is named ~/.ssh/id_rsa, add the following to the config file:
Host github.com
  HostName github.com
  User git
  IdentityFile ~/.ssh/id_rsa
  IdentitiesOnly yes
In the above syntax, ~/.ssh/id_rsa is not in ssh-agent by opening another terminal and edit:
ssh-add -DAll keys will be removed which has an active ssh-agent session. Now the configured file will use the key at ~/.ssh/id_rsa. Here are some of the best configuration examples for multiple services:
Host bitbucket-corporate
    HostName bitbucket.org
    User git
    IdentityFile ~/.ssh/id_rsa_corp
    IdentitiesOnly yes

Host bitbucket-personal
    HostName bitbucket.org
    User git
    IdentityFile ~/.ssh/id_rsa_personal
    IdentitiesOnly yes
Now you can use:
git clone git@bitbucket-corporate:company/project.git
git clone git@bitbucket-personal:username/other-pi-project.git
Host myserver
HostName ssh.username.com
Port 1111
IdentityFile ~/.ssh/id_rsa_personal
IdentitiesOnly yes
User usernameThis ssh config approach keeps GitHub, Bitbucket, and server identities separate. It also makes it easier to use SSH keys with Git repositories without mixing deploy keys and admin keys. For agent-based loading, use ssh-agent and ssh-add. On Windows, you can add the key to the Windows SSH agent; on PuTTY setups, Pageant fills the same role. Just be careful with agent forwarding — handy, but easy to misuse on untrusted hosts.
🔍 Retrieve Your Public Key from Your Private Key
You can retrieve the public key from a private key by using this command:
ssh-keygen -y -f /path/to/your_private_key_file (eg. /root/.ssh/id_rsa or ~/.ssh/custom_key_name)📁 Moving SSH Keys to a Root-Owned Location
Moving SSH keys to a root-owned location is easy. Here's why and how:
- Create a suitable root-owned directory, e.g., /etc/ssh/keys, under which authorized keys are stored.
- Create a subdirectory under this directory for each user, and move each user's authorized_keys file to /etc/ssh/keys/<user>/authorized_keys.
- Finally, change set AuthorizedKeysFile /etc/ssh/keys/%u/authorized_keys in /etc/ssh/sshd_config.
⚠️ Common SSH Key Errors and Fixes
Permission denied (publickey): usually means the server doesn't have your public key, the wrong username was used, or the wrong private key was offered. Start with ssh -v, then fix Permission denied (publickey) systematically.
Bad permissions on .ssh: your .ssh directory or files are too open. Use chmod 700 ~/.ssh and chmod 600 on private keys and authorized_keys.
Wrong key loaded in ssh-agent: list loaded identities, remove the wrong one, then add the right file. This bites people managing multiple accounts.
Server not accepting your key: confirm the key is in authorized_keys, the account home directory is correct, and the SSH service configuration allows public key authentication. If you changed settings, restart the SSH service securely.
Host key verification failed: this usually points to a changed host key in known_hosts. Don't blindly delete warnings in production. Verify the new host fingerprint first.
🛡️ SSH Key Security Best Practices
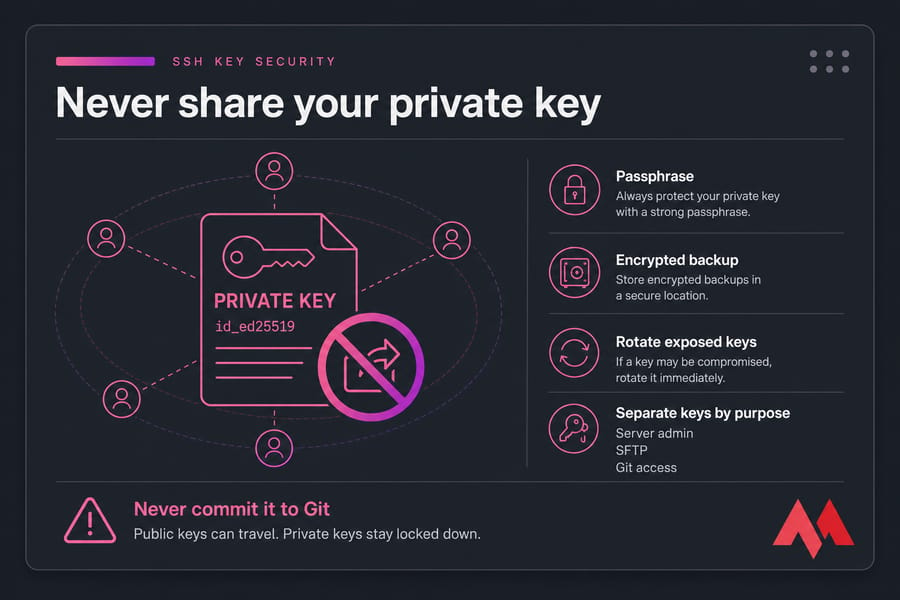
Never share your private key. Never commit it to Git. Never paste it into a doc because "it's just a test box." I've seen all three, and none end well.
Use a passphrase, store private keys securely, and keep encrypted backups. Rotate and revoke compromised keys fast by removing old entries from authorized_keys. Avoid using one key everywhere; separate server admin, SFTP, and Git access. For broader hardening, review these VPS security best practices.
SSH keys are also great for use SSH keys for SFTP access and secure file transfer with SFTP, but the same rule applies: public keys can travel, private keys stay locked down.
🎯 Conclusion
An in-depth understanding of SSH keys helps users understand the important aspects and security regarding this technology. The computer takes less than a second to calculate a hash and authenticate a user — most people don't realize this extremely low time and think it might take a few seconds to process such complicated information. The maximum time a computer uses is taken on the internet where it sends and receives data.
This tutorial is made to show you that these various technologies are adaptable and responsive. You can combine them together to create a state-of-the-art system — but each mechanism and process has a vital role to play. An SSH key is just a key pair, but it solves a big problem: secure authentication without relying on passwords. If you set it up with Ed25519, proper permissions, a passphrase, and sensible key separation, you'll have a cleaner and safer workflow.
If you're building or hardening a server, start with a Linux VPS, then work through the SSH setup steps above. It's not glamorous work, honestly. But it prevents a lot of avoidable mess later.

I'm fascinated by the IT world and how the 1's and 0's work. While I venture into the world of Technology, I try to share what I know in the simplest way with you. Not a fan of coffee, a travel addict, and a self-accredited 'master chef'.