![Basic Git Commands with Examples [Git Cheat Sheet]](/wp-content/uploads/2022/11/git-commands975-main.webp)
Git is the most highly used tool after DevOps tools to work on small and large-scale projects effectively. Through these tools, you can work simultaneously with your colleague and teammate without affecting each other’s work and can pace up your productivity. This is an amazing tool and also it is important with GIT Commands and without it, it is nothing. So through this blog post, you will get to know all the basic git commands with examples and it covers the git cheat sheet too.
What is Git?
Git is used as a version control system that helps in tracking any changes within the code. Most web and application developers use it for efficient coding processes. Every change corresponds to a version number to which you can revert without impacting the delivery process. It is suitable when many team members work together on the same project and the same code without interfering with each other’s work. It improves team collaboration and provides them with better visibility of code changes at every stage of the application development.
You can run the Git software on your local machine to track files and their history. Git allows you to store files on its online hosts, providing you a centralized place to store files for easy file access. With Git, developers can make parallel changes that can be merged later without any issues.
Also, if you want to learn git commands, you should practice them with our Linux VPS. To create a local repo on GitHub you have to practice a lot on the vps, you can read what is vps. For committing changes to the local repo you have to familiar with the git command and how to commit it.
Features of Git
- It helps you in tracking your work history.
- It comes as an open-source and distributed version control system.
- It helps the developers process non-linear development.
- You can create data backups.
- It improves team collaboration.
Git Workflow
Git workflow has three different stages:
- The working directory allows you to make changes to the files and existing codes within your local or remote working directory.
- Staging area- you can stage the files while adding their snapshots to the staging area.
- Git directory or repository- you can make the changes permanently.
20 Basic Git Commands [Git Cheat Sheet]
Let’s move, Before starts, you have to look below-listed basic git commands cheat sheet:
- Configuration Command
- Creating Git Repository
- Creating Git Branch
- Checkout Command
- Checking Git Status
- Add Command
- Commit Command
- Push Command
- Pull Command
- revert Command
- Rename Branch Command
- Rename Remote Branch Command
- Clone Command
- Log Command
- Reset Command
- Clean Command
- Delete Command for the Local Repository
- Delete Command for the Remote Repository
- Stash Command
- Diff Command
1. Git Configuration Command
With this command, you can set the author’s name, email address, create an alias, set a default text editor, and open a global config file. You can use the following syntax.
git config --global user.name "[your_name]"
git config --global user.email "[email_address]"
git config --global alias.[alias_name] [git_command]
git config --system core.editor [text_editor]
git config --global --edit
2. Creating Git Repository
You can run the following command to create a local repository with a default branch.
git init
![]()
You can connect the locally created repository to GitHub by creating a remote repository on GitHub. Once you are done, you can connect the remote repository’s origin with the locally created repository. To create the remote repository, run this command:
git remote add origin https://github.com/YOUR-USERNAME/YOUR-REPOSITORY
![]()
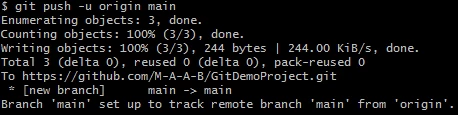
To complete the process, you need to push the main branch on GitHub remote repository:
git push -u REMOTE-NAME BRANCH-NAME
3. Creating Git Branch
Git branches are essential for developers, allowing them to work in parallel on the same project. With the Git branch command’s help, you will create, list, and delete branches. Having branches protects the code from interfering with other codes.
The following command will create the branch locally.
git branch
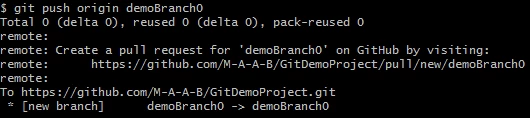
Once you create the branch, push it to the remote repository using the command:
git push -u
With the following command, you can view branch details.
git branch
or
git branch --list
To delete the branch, you can run the command:
git branch -d
4. Git Checkout Command
Before you start working on any branch, switch to that branch. You can use the checkout command to create a local branch if it does not exist in the repository. -b option is used for a branch that allows you to check out from the current branch and moves to the newly created branch.
git checkout -b NEW-BRANCH-NAME
Before switching from one branch to another, make sure:
- You commit the changes in your current branch.
- The branch to which you are switching exists in your local repository.
![]()
After creating the branch, you need to push it to GitHub's remote repository.
5. Checking Git Status
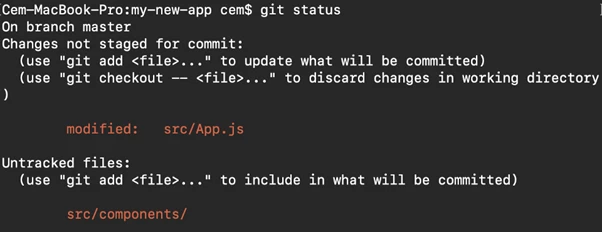
To get all possible details about the Git branch, you can use the status command.
git status
You can check information like:
- If your current branch is updated with all details.
- If there is any pending commit, push, or pull.
- If it has any unstaged, staged, or untracked files.
6. Git Add Command
If you are deleting, creating, or modifying any file and there is a possibility that these changes will not be mentioned in the next commit. So to add the file changes in the next commit, you can use the command:
git add
If you want to add every change at once, you can run the command:
git add -A
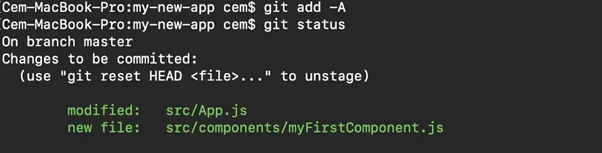
The add command will not change the repository, and any change will not get saved until you use the commit command.
7. Git Commit Command
If we are developing code in any project, we need to make the changes permanent and use the commit command. This command will allow you to set a checkpoint to roll back to later if required. This command enables the save the code changes locally.
git commit -m "commit message"
You can also mention some commit messages to explain the code changes.
8. Git Push Command
You can update the committed changes to the remote server. You can only push the committed changes.
git push
If you have created a new branch, it also needs to be pushed to the remote repository using the following command.
git push --set-upstream
or
git push -u origin
9. Git Pull Command
This command will get you the latest updates from the remote repository. Once you get the updates, they will be implemented locally. You can run this command:
git pull
10. Git revert Command
You can use this command if you want to revert any changes done locally or remotely. But make sure that you do not end up deleting something important. You can check the commit history using git log --online to check the hash code.

git revert 3321844
Then we can undo the commit specified by the particular hash code. After running the above command, you will get the following screen, and to exit the screen, you can press shift+q.
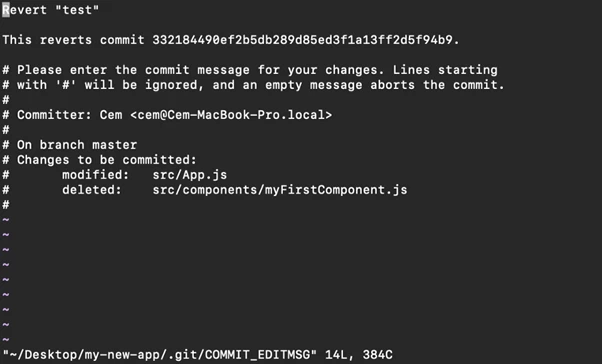
The mentioned commit with the hash code will be undone, but it will create a new commit without deleting the old one.

With this command, your commit history will remain unaffected along with the new revert commits.
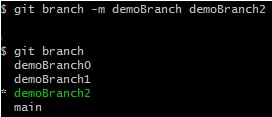
11. Git Rename Branch Command
This command may not be of much use, but you can use it if there is an error in the name. You can run the following command to rename the local git branch situated in the local repository.
git branch -m OLD-BRANCH-NAME NEW-BRANCH-NAME
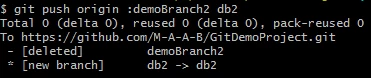
12. Git Rename Remote Branch Command
After you rename the branch name locally, you need to update the branch name of the corresponding branch on the remote repository using the below command. This command will allow you to delete the old branch and create a new one with the same code base.
git push origin :OLD-BRANCH-NAME NEW-BRANCH-NAME
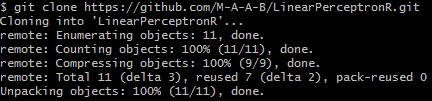
13. Git Clone Command
This command will help you create a clone of an existing project on your local system to understand the code better. You can then add new features and functionalities to the code and push the code back using the merge command.
You can use this command to create a clone:
git clone https://github.com/YOUR-USERNAME/YOUR-REPOSITORY
14. Git Log Command
Git maintains the log to track all the commits done in the past. You can see all the details by running the command:
git log
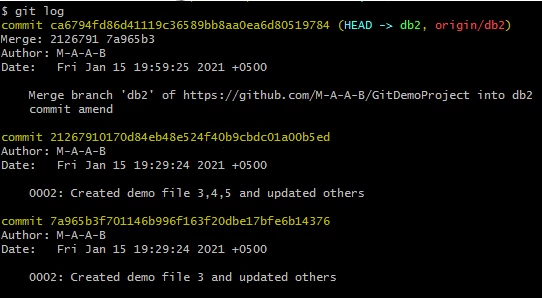
15. Git Reset Command
In case of a mistake occurring, you can reset the changes by using the reset command. You can revert all the changes within a second to the last working commit.
git reset -hard origin/BRANCH-NAME
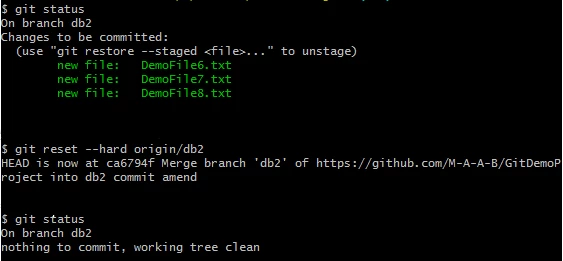
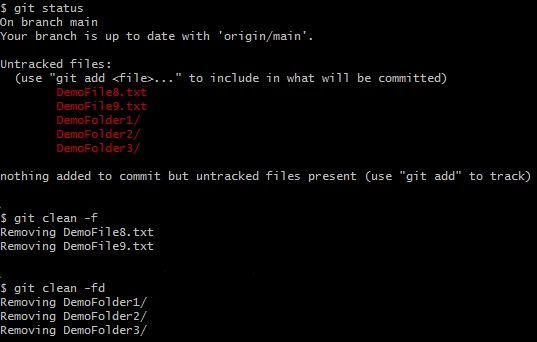
16. Git Clean Command
If you do not have committed your files and directory, they can be quickly deleted using the git clean command. This command will allow you to remove unwanted files and directories from the IDE.
# removing untracked files
git clean -f
# removing untracked directories
git clean -fd
17. Git Delete Command for the Local Repository
You can always delete any unwanted branch from your local repository. You can use the following command to delete the branch.
git branch -d BRANCH-NAME
# forcefully deleting a local branch.
git branch -D BRANCH-NAME

18. Git Delete Command for the Remote Repository
You can delete a branch on the remote repository using the same process as you push an update on the remote repository. You can run the command:
git push REMOTE-NAME --delete BRANCH-NAME
![]()
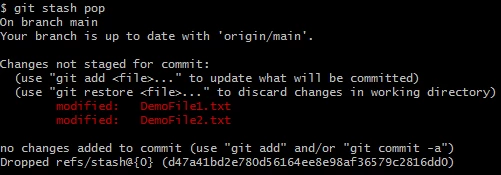
19. Git Stash Command
If you want to resolve the checkout error, you can use the stash command. It will temporarily save the current branch’s work if you do not want to commit the changes yet. You can use the following command.
git stash
![]()
If you want to recover the stashed changes, we can navigate the place where we stashed the changes and then run this command to pop them.
git stash pop
20. Git Diff Command
You can check the difference between the working directory and the index using the following command.
git diff
Conclusion
After reading this article, you will be able to run basic Git commands on your own. With this Git cheat sheet, you can easily track down the code changes. Working with Git is easy and comfortable; you do not have to worry about learning complicated concepts. We have mentioned various git commands that developers frequently used. If you want to learn more and get into in-depth concepts, you can explore more anytime. Also, you can comment if we missed any git command in this list.
People are also reading:
