
MySQL is a widely used open-source relational database management system that provides a robust and scalable solution for storing and retrieving data. If you install MySQL on Ubuntu, you’ll harness the power of this database management system while taking advantage of the stability and flexibility Ubuntu offers. This article outlines how to install MySQL on Ubuntu, enabling users to set up a reliable and efficient application database environment. Whether you are a developer, system administrator, or database enthusiast, understanding the installation and configuration process is key to utilizing the full potential of MySQL on Ubuntu.
What is MySQL & How is it Different From SQL?
MySQL is a powerful and widely used open-source relational database management system (RDBMS) that has gained popularity for its reliability, performance, and ease of use.
Developed by Oracle Corporation, MySQL is designed to efficiently handle large volumes of data while offering flexibility and scalability for various applications and systems.
MySQL vs. SQL
SQL (Structured Query Language) is a standard language used for managing relational databases, allowing users to create, modify, and retrieve data, while MySQL is an open-source relational database management system (RDBMS) that uses SQL as its language to interact with databases.
Now that we’ve covered the basics of MySQL vs. SQL let’s take a deeper look into the topic. MySQL is a specific implementation of that language, providing additional features and functionality beyond the standard SQL commands.
MySQL is known for its ease of use, scalability, and reliability, making it a popular choice for web applications and small to medium-sized databases. In contrast, SQL is a language that can be implemented across various database management systems, including MySQL, Oracle, Microsoft SQL Server, and PostgreSQL, among others.
MySQL Features
One of the key strengths of MySQL is its robust architecture, which allows for the management of structured data in tables, rows, and columns. It supports a wide range of data types, including integers, strings, dates, and more, enabling developers to store and manipulate data in a format that suits their specific needs.
MySQL follows the ACID (Atomicity, Consistency, Isolation, Durability) properties, ensuring data integrity and reliability. It supports transactions, which allow multiple database operations to be grouped, ensuring that either all operations are executed successfully, or none of them is, thus preventing data inconsistencies.
Another notable feature of MySQL is its scalability. It can handle high traffic and large datasets efficiently, making it suitable for applications with demanding workloads. MySQL also supports replication, allowing for the creation of multiple copies of a database to distribute the load and provide redundancy for increased availability.
MySQL integrates seamlessly with various programming languages and frameworks, making it a popular choice among developers. It offers a comprehensive set of APIs and connectors, allowing applications written in languages like PHP, Python, Java, and more to interact with the database.
Security is vital to any database management system, and MySQL provides several features to protect data. It supports user authentication and access control mechanisms, allowing administrators to define user privileges at the database, table, or column level. Additionally, installing MySQL allows for encryption for secure data transmission and storage.
In the next sections of this guide, we will delve into the step-by-step process of installing MySQL on Ubuntu, ensuring a smooth setup and configuration of the database server.
Preparing the Environment for Installing MySQL on Ubuntu
Before you install MySQL on Ubuntu, it’s crucial to ensure that your system meets the requirements and that you have a well-prepared environment for a successful installation.
Checking System Requirements:
Before installing MySQL, verifying that your Ubuntu system meets the minimum requirements is recommended. These requirements typically include specifications such as the processor type and speed, available memory (RAM), and disk space. Checking these requirements ensures that your system can effectively handle the workload and performance demands of running MySQL.
Updating Ubuntu Packages:
It is essential to update your Ubuntu system packages to the latest versions before installing MySQL. This ensures you have the most recent bug fixes, security patches, and updates for other software components that MySQL relies on. You can use the package manager (apt) to update the system by running the following command:
sudo apt update && sudo apt upgrade
Installing Necessary Dependencies:
Installing MySQL requires certain libraries or software packages to be installed beforehand. These dependencies may include packages related to SSL encryption, authentication methods, or other system requirements. Installing these dependencies ensures that MySQL has all the necessary components to function properly. You can use the package manager to install dependencies using the apt command followed by the package name.
For example:
sudo apt install libssl-dev
It is advisable to refer to the official MySQL documentation or specific installation guides for the recommended dependencies based on your Ubuntu version and MySQL version.
Installing MySQL on Ubuntu
Installing MySQL on Ubuntu can be accomplished through different methods. This section will explore two common approaches: using the default Ubuntu repositories and downloading MySQL from the official website.
Option 1: Using the Default Ubuntu Repositories to Install MySQL on Ubuntu
1. Adding the MySQL Repository:
Ubuntu includes a repository that contains the MySQL package. To add the repository, you must import the MySQL APT repository key and add the repository to the package manager's sources list.
2. Updating the Package List:
After adding the repository, you should update the package list to ensure that the latest version of MySQL is available for installation. This can be done by running the command:
sudo apt update
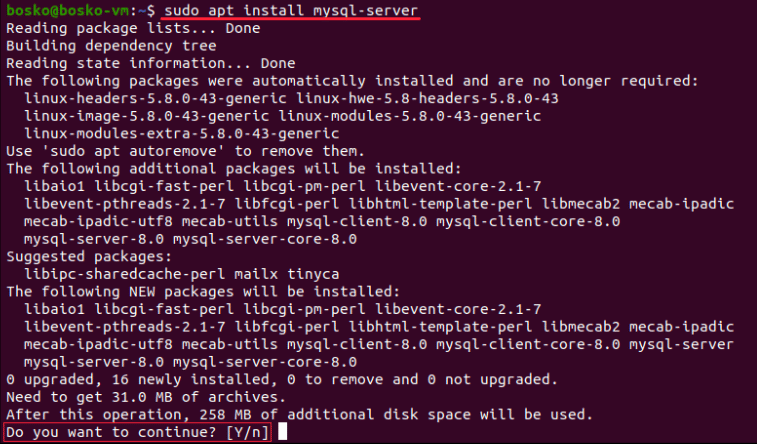
3. Installing MySQL:
Once the package list is updated, you can proceed with installing MySQL by running the following command:
sudo apt install mysql-server
4. Configuring MySQL:
During installation, you will be prompted to set a password for the MySQL root user. Choose a strong password and keep it secure, as it grants full administrative access to the MySQL server. Follow the prompts to complete the configuration.
Option 2: Downloading MySQL from the Official Website
1. Downloading the MySQL Package:
Visit the official MySQL website and navigate to the Downloads section. Select the MySQL version for your Ubuntu system and download the package file (usually in .deb format).
2. Installing the Downloaded Package:
Once the package is downloaded, please navigate to the directory where it is saved and install it using the dpkg package manager. Run the following command, replacing "package-name.deb" with the actual name of the downloaded package:
sudo dpkg -i package-name.deb
3. Configuring MySQL:
After the installation is complete, MySQL will need to be configured. This includes setting up the root password and other initial configurations. The configuration process may vary depending on the specific MySQL version and installation method.
Regardless of the installation method chosen, once MySQL is installed and configured, you will have a functional MySQL server running on your Ubuntu system. You can then proceed with securing the installation, verifying the installation, and configuring MySQL to meet your specific requirements.
Securing MySQL Installation on Ubuntu
Securing your MySQL installation is crucial to protect your data and ensure the integrity and confidentiality of your database. Following the steps below, you can implement essential security measures for installing MySQL on Ubuntu.
1. Running the MySQL Security Script:
After the initial installation, MySQL provides a built-in security script that helps secure the installation. You can run this script by executing the following command in the terminal:
sudo mysql_secure_installation
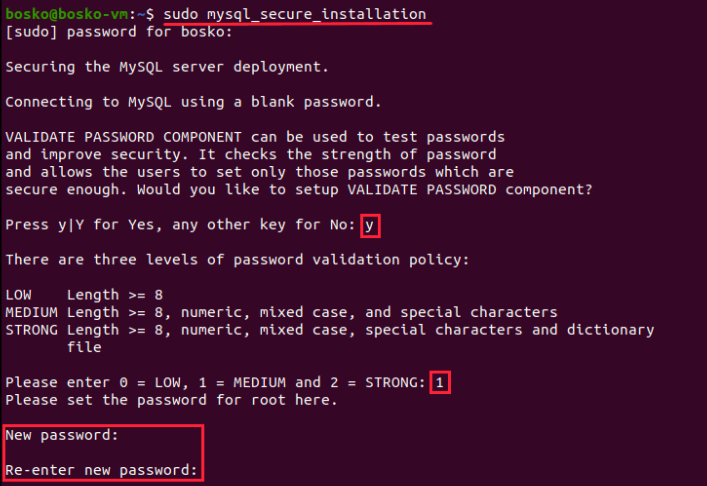
The script will guide you through several prompts to configure various security aspects, such as removing anonymous users, disabling remote root login, and removing test databases. Follow the prompts and provide the necessary information to enhance the security of your MySQL installation.
2. Setting a Strong Root Password:
During the security script or immediately after installation, setting a strong password for the MySQL root user is essential. This password grants administrative access to your MySQL server. Choose a complex and unique password that combines uppercase and lowercase letters, numbers, and special characters. Avoid using common words or easily guessable combinations. After putting in the password, you’ll have to confirm it by pressing ‘y’.

3. Disabling Remote Root Login:
By default, MySQL allows root login from remote machines, which can pose a security risk. It is recommended to disable remote root login for enhanced security. Open the MySQL configuration file using a text editor:
sudo nano /etc/mysql/mysql.conf.d/mysqld.cnf
Locate the line that begins with "bind-address" and add a "#" symbol at the beginning of the line to comment it out. Save the changes and exit the text editor. Then, restart the MySQL service for the changes to take effect:
sudo service mysql restart
Remember to regularly update and patch your MySQL installation to protect against emerging security threats. You can also purchase MonoVM’s Ubuntu VPS to ensure high security for your business.
Verifying MySQL Installation on Ubuntu
After you install MySQL on Ubuntu, it is important to verify that the installation was successful and that the MySQL service is running properly. Verifying the installation ensures you can start working with your MySQL databases without issues. Here are the steps to verify the MySQL installation on Ubuntu:
1. Checking the MySQL Service Status:
To check the status of the MySQL service, you can use the following command:
sudo systemctl status mysql
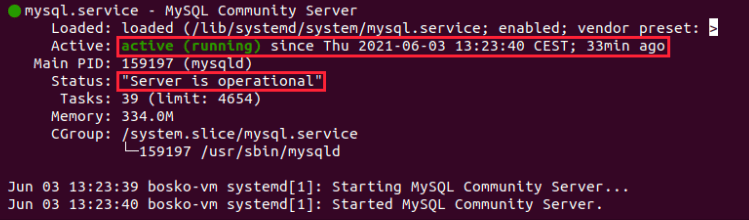
This command will display information about whether the MySQL service is running. You will see a message indicating the service's status if it is active and running.
2. Testing MySQL Connection:
To test the MySQL connection and ensure you can connect to the server, you can use the MySQL command-line tool. Open the MySQL client by running the following command:
mysql -u root -p
You will be prompted to enter the password for the MySQL root user. After entering the password, if the connection is successful, you will be presented with the MySQL command-line prompt, indicating that you have successfully connected to the MySQL server.
You can also check which version of MySQL you’re running by using the command below:
Mysql –version

🚀 Experience blazing-fast performance and ultimate control with our 🐧 Linux VPS! Unleash the power of open-source technology for your online projects. 💻🔒🔧
Configuring MySQL on Ubuntu
Configuring MySQL allows you to customize various settings and parameters to optimize its performance, security, and functionality. This section will guide you through some essential configuration steps for MySQL on Ubuntu.
Adjusting MySQL Configuration File:
The MySQL configuration file contains important settings that control the behavior of the MySQL server. It is located at `/etc/mysql/mysql.conf.d/mysqld.cnf`. You can open the file using a text editor:
sudo nano /etc/mysql/mysql.conf.d/mysqld.cnf
Within the configuration file, you can modify parameters such as the port number, character set encoding, cache sizes, and other performance-related options. Make any necessary changes based on your requirements. Save the file and exit the text editor.
Setting up User Accounts and Privileges:
MySQL allows you to create multiple user accounts with different privileges to control access to databases and resources. It is recommended to create dedicated user accounts for specific applications or users. To create a new MySQL user account, use the following command within the MySQL command-line tool:
CREATE USER 'username'@'localhost' IDENTIFIED BY 'password';
Replace 'username' with the desired username and 'password' with the password for the user account. Additionally, you can grant specific privileges to the user account using the `GRANT` statement. For example:
GRANT ALL PRIVILEGES ON database_name.* TO 'username'@'localhost';
This grants all privileges on the specified database to the user account. Remember to replace 'database_name' with the actual name of the database.
Enabling Remote Access if Required:
By default, MySQL is configured to accept connections only from the localhost (the same machine). If you need to allow remote access to the MySQL server, you need to modify the MySQL configuration file. Open the configuration file:
sudo nano /etc/mysql/mysql.conf.d/mysqld.cnf
Locate the line that begins with "bind-address" and comment it out by adding a "#" symbol at the beginning of the line. Save the file and exit the text editor. Then, restart the MySQL service for the changes to take effect:
sudo service mysql restart
Keep in mind that allowing remote access introduces security considerations. Ensure you have proper firewall rules and secure user authentication mechanisms.
After configuring MySQL according to your specific needs, you can restart the MySQL service to apply the changes. Customizing the configuration, creating user accounts, and granting appropriate privileges provide you with the flexibility to tailor MySQL to your application requirements and ensure secure and efficient database management.
Starting and Stopping MySQL on Ubuntu
Managing the start and stop operations of the MySQL service is essential for controlling the availability and accessibility of your MySQL databases. This section outlines the basic commands to start, stop, and restart the MySQL service on Ubuntu.
Starting MySQL:
To start the MySQL service, you can use the following command:
sudo service mysql start
This command initiates the MySQL server and makes it available for connections. After starting MySQL, you can connect to the server and work with your databases.
Stopping MySQL:
To stop the MySQL service, use the following command:
sudo service mysql stop
This command gracefully shuts down the MySQL server, ensuring all pending transactions are completed and data integrity is maintained. It is recommended to stop the MySQL service before performing any system maintenance tasks or making configuration changes.
Restarting MySQL:
If you need to restart the MySQL service, you can use the following command:
sudo service mysql restart
This command stops the MySQL service (if running) and then starts it again. Restarting MySQL is often useful after making configuration changes that require the service to be reloaded.
Checking the Status of MySQL:
To check the status of the MySQL service, you can use the following command:
sudo service mysql status
This command provides information about the current status of the MySQL service, including whether it is running or stopped.
Note: If at any point in this guide you find that you’ve lost or forgotten the root password, read our blog on resetting MySQL’s root password.
People also read:

I'm fascinated by the IT world and how the 1's and 0's work. While I venture into the world of Technology, I try to share what I know in the simplest way with you. Not a fan of coffee, a travel addict, and a self-accredited 'master chef'.