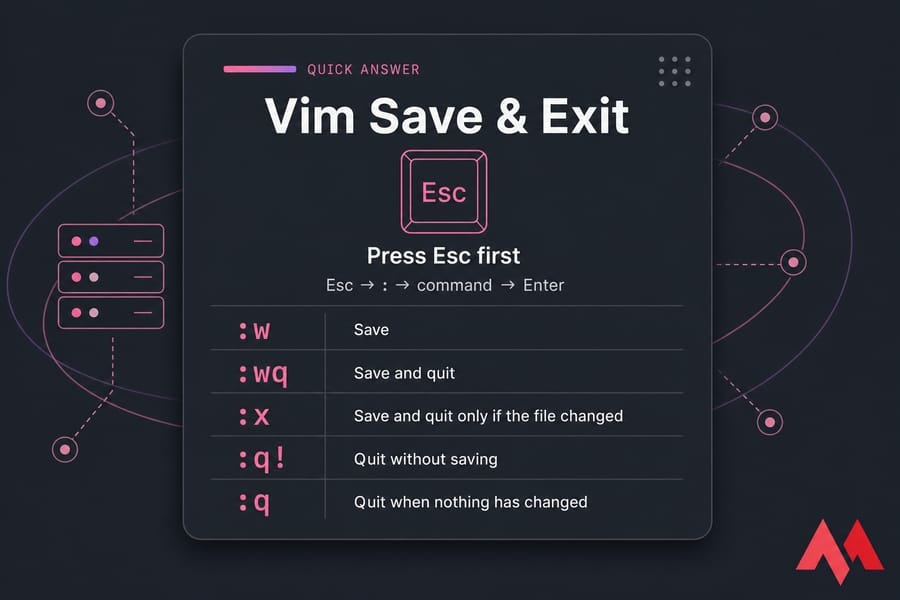
Press Esc first, then type one of these. That's the whole trick to save and exit in Vim.
- Save:
:w - Save and quit:
:wq - Save and quit only if the file changed:
:x - Quit without saving:
:q! - Quit when nothing has changed:
:q
If typing :w just inserts the characters ":w" into your file, you're still in insert mode. Hit Esc and try again. That single keystroke is responsible for roughly 90% of "I can't get out of Vim" panic, in my experience.
Vim is one of the most reliable and powerful open-source text editors available for several operating systems. Commonly, the Vim text editor is also known as Vi. Initially, Bill Joy discovered this editor in the 1970s. At that time, Vi was short form for the visual editor.
Vim is an extremely fast and efficient UNIX text editor. It is also inclusive of Linux and macOS. You can feel free to write or edit text with the help of this tool via a command-line interface or as an application. There are ample features and commands associated with Vim. Here, we will learn how to save Vim and exit Vim methods. If you're still choosing an editor for your workflow, see how Vim stacks up against Vim vs Nano and the broader Nano vs Vim vs Emacs comparison. Discover Your Perfect Text Editor: Explore the Pros and Cons of Emacs and Vim
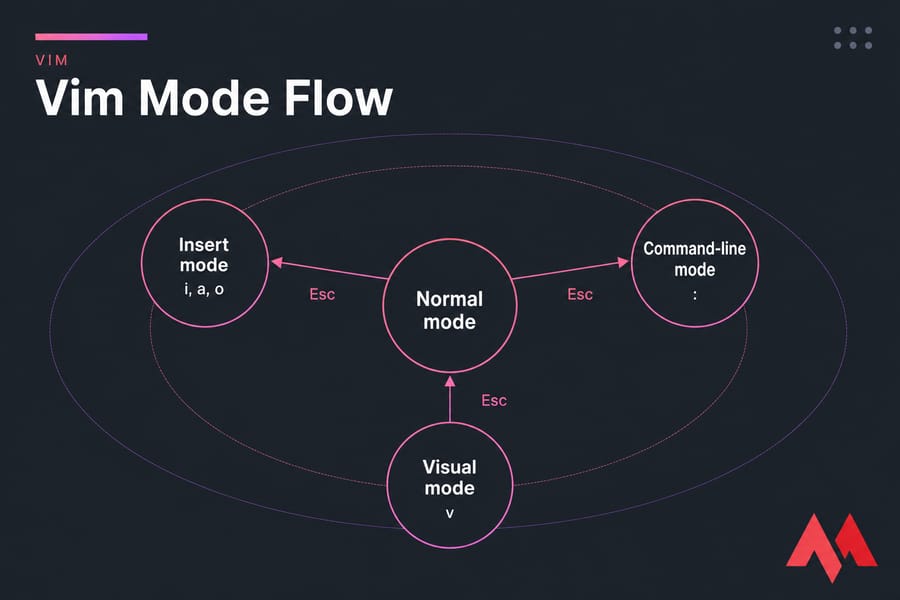
By default, when you launch Vim, the file opens in the command mode; it tells you that you cannot enter any new text. Instead, you can edit or move the file. If you wish to enter the text, switch on the insert mode. For that, you have to Press I, which will allow you to type any text in the file.
📋 Prerequisites
Before you can efficiently use Vim for text editing and follow the methods outlined in this guide, you need to ensure that your system meets the following prerequisites:
- Linux Operating System: Vim is a powerful text editor primarily used in Linux environments. Therefore, you must have a system running a Linux distribution.
- User with sudo Privileges: To install or make system-level changes, it is essential to have a user account with sudo privileges. Sudo allows you to execute commands with administrative permissions, which may be necessary for installing or configuring Vim if it's not already installed. This is the same access model you'd have on a dedicated server or a Linux VPS.
- Access to a Terminal/Command Line: Vim is primarily operated from the command line interface (CLI). You need to have access to a terminal or command line on your Linux system. Most Linux distributions provide a terminal application by default.
- Vim Installed (or Use Default Vi): While Vim is commonly available on most Linux distributions, it's possible that it may not be pre-installed on your system. You should either have Vim installed or be familiar with using the default Vi text editor. The commands and methods discussed in this guide apply to both Vim and Vi, with Vim offering extended functionality.
🎛️ Using Vim Modes
Vim employs different modes to provide a versatile and efficient text editing experience. Understanding these modes is essential for the productive use of the text editor. Here's an overview of the two primary modes in Vim:
Command Mode (Default Mode)
- When you launch Vim, it opens files in the command mode by default.
- In this mode, you have the ability to navigate through the file, make edits, and perform various tasks, but you cannot directly insert new text.
- Command mode is where you execute most of Vim's powerful editing commands, making it the mode where you spend a significant portion of your time.
Insert Mode
- To input or edit text in a file, you must switch to insert mode.
- You can enter insert mode by pressing the "i" key while in command mode. After doing so, you'll notice that the cursor changes, indicating that you are now in insert mode.
- In insert mode, you can type, edit, and delete text as you would in any other text editor. Characters you type will be directly inserted into the document.
- This mode is particularly useful when you need to add or modify content in your file, as it allows you to work with text naturally, similar to other word processors or text editors.
To transition between these modes:
- From Command Mode to Insert Mode: Press the "i" key to enter insert mode. You can then start typing or making changes to your text.
- From Insert Mode to Command Mode: To return to command mode and execute Vim commands, simply press the "Esc" (Escape) key. The cursor will change back to its command mode appearance, and you can navigate and perform various editing tasks using Vim's command-based functionality.
🧭 Basic Navigation in Command Mode
For learning how to save in Vim and its command modes, efficient text navigation is a fundamental skill. Here are the basic navigation commands along with explanations and examples:
- "h": Pressing "h" moves the cursor one character to the left. For instance, typing "3h" will move the cursor three characters to the left.
- "j": The "j" key moves the cursor down one line. To move down multiple lines, you can use a numeric prefix. For example, "4j" moves the cursor down four lines.
- "k": Conversely, "k" moves the cursor up one line. As with "j," you can use numeric prefixes like "2k" to move up two lines.
- "l": Pressing "l" moves the cursor one character to the right. Similar to "h," you can use numeric prefixes to move the cursor multiple characters to the right. For instance, "5l" moves the cursor five characters to the right.
Get Started with VIM Shortcuts for Linux - Click Here!
💾 How to Save a File in Vim
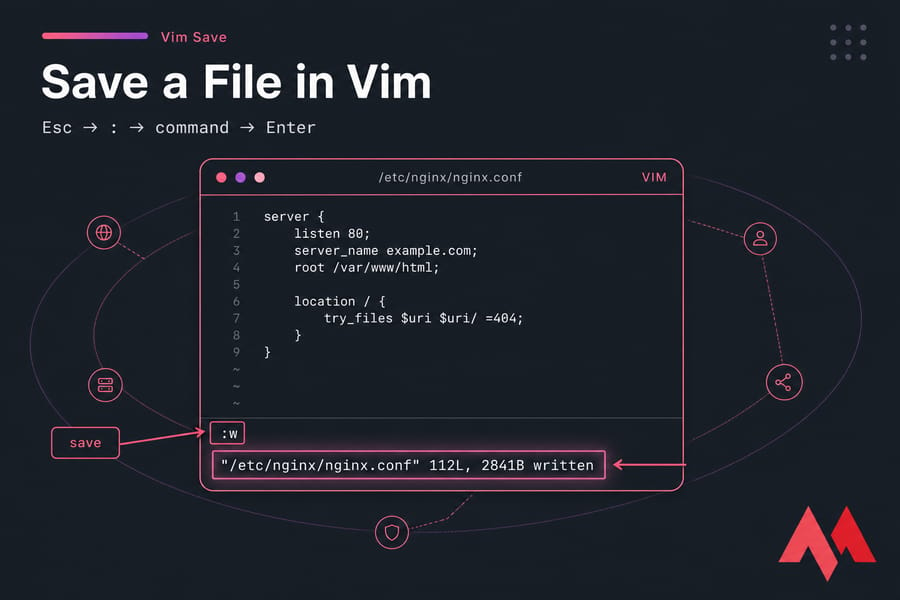
Vim commands that start with a colon are typed in command-line mode. You get there from normal mode, and you get to normal mode by pressing Esc. Sequence matters: Esc → : → command → Enter.
Use :w to save changes
:w writes the current buffer to disk. The file stays open, you stay in Vim, and you keep editing. This is what you want during long edits — a config file at 300 lines is not the place to gamble on a stable SSH session.
:w
Vim confirms at the bottom of the screen with something like "/etc/nginx/nginx.conf" 112L, 2841B written.
Additionally, you can also accomplish this task by using a command. Take a look:
:wq
# w = write (save)
# q = quit
Use :write as the full save command
:w is just an abbreviation. :write does exactly the same thing. There's also :update, which writes only if the buffer was actually modified — handy inside mappings and scripts where you don't want to touch the file's timestamp for nothing.
🚪 How to Save and Exit Vim
Three commands do this. They're close cousins, but not identical.
Use :wq to write and quit
:wq
Writes the file, then closes the window. Always writes — even if you changed nothing. That means the modification timestamp gets bumped every time. Usually harmless. Occasionally annoying if you've got make, a file watcher, or a deployment hook keyed to mtime.
Use :x to save and quit if the file changed
:x
Same result, smarter behavior: :x writes only when the buffer has been modified, then quits. No changes means no write and no timestamp change. It's a real command — note the colon. Typing a bare x in normal mode deletes the character under the cursor, which is a very different outcome.
So the difference between :x and :wq comes down to one thing: unconditional write versus conditional write. I default to :x and haven't missed :wq once.
Use ZZ to save and exit from normal mode
ZZ — capital Z, twice, no colon — behaves like :x. No Enter needed. Fastest option on the keyboard once your fingers learn it.
🚫 How to Quit Vim Without Saving
Use :q if nothing has changed
Here's the correction to a myth you'll see repeated on a lot of pages: :q is not "quit without saving." It quits only when the buffer has no unsaved edits. Touch a single character and :q refuses.
Use :q! to force quit without saving
:q!
The bang tells Vim you mean it. Every unsaved edit in that buffer is discarded permanently — there's no undo after you're back at the shell. If you have several files open, :qa! dumps all of them at once.
Use ZQ to quit without saving from normal mode
ZQ is the no-colon equivalent of :q!. Same destructive behavior, fewer keystrokes.
⌨️ How to Exit Insert Mode Before Saving or Quitting
Press Esc to return to normal mode
Vim has modes, and that's the part beginners trip over. In insert mode, everything you type becomes text. Colon commands don't register as commands — they register as the literal characters :, w, q. Press Esc once (twice if you're unsure; the second press is a harmless beep or flash) and you're back in normal mode.
How to tell which mode you are in
Look at the bottom-left of the screen. -- INSERT -- or -- VISUAL -- means you're not in normal mode. A blank status line, or a line starting with : that you just typed, means you're good to go.
📋 Vim Save and Exit Command Cheat Sheet
| Task | Command | Notes |
| Save file | :w |
Writes to disk, stays in Vim |
| Save and quit | :wq |
Always writes, even if unchanged |
| Save and quit if modified | :x |
Skips the write when nothing changed |
| Save and quit (no colon) | ZZ |
Normal mode shortcut for :x |
| Quit if no changes | :q |
Fails when edits are pending |
| Quit without saving | :q! |
Discards all unsaved edits |
| Quit without saving (no colon) | ZQ |
Normal mode shortcut for :q! |
| Save as a new file | :saveas filename |
Switches editing to the new file |
| Quit all open files | :qa! |
Force-closes every buffer |
Copy this block and keep it somewhere:
:w      " save
:q      " quit if no changes
:q!     " quit without saving
:wq     " save and quit
:x      " save and quit if modified
ZZ      " save and quit
ZQ      " quit without saving
For the full command reference beyond save and quit, see the Vim cheat sheet.
📁 Save a File As a New Name in Vim
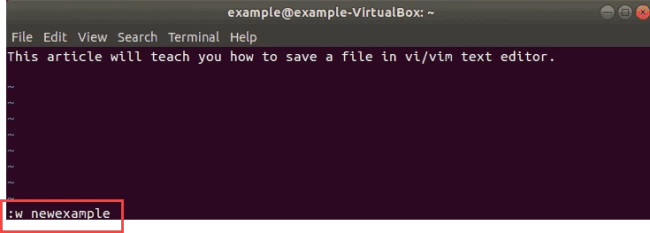
Use :w newfilename
:w backup.conf
This writes a copy to backup.conf. You keep editing the original file — Vim doesn't switch context. Great for snapshotting a config before you break it. You can pass a full path too: :w /tmp/nginx.conf.bak.
Besides you can also rename files, and to do so. You have to follow the below-listed Linux command.
:w [newfilename]
Use :saveas newfilename
:saveas newconfig.conf
:saveas writes the file and makes the new name the current buffer. Every subsequent :w hits the new file. That's the difference people miss.
🔐 How to Save Read-Only Files in Vim
Use :w! when overwrite is allowed
If Vim opened the file with a [readonly] flag but your user actually has write permission on it, :w! forces the write. Same for :wq! to force write and quit.
Use a sudo workaround when permissions block saving
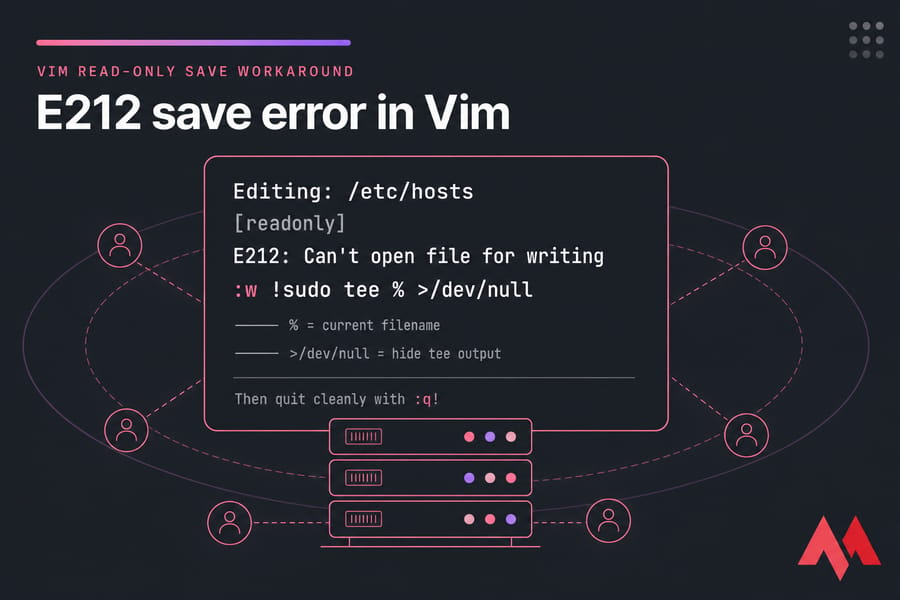
Different problem: you ran vim /etc/hosts as a normal user and now you're staring at E212: Can't open file for writing. Don't lose the edits. Run this from normal mode:
:w !sudo tee % >/dev/null
Vim pipes the buffer to tee running under sudo; % expands to the current filename, and >/dev/null keeps tee's echo off your screen. Enter your password, press L when Vim asks about the changed file, then :q! to leave cleanly. Works on virtually every Linux server I've touched.
⚠️ Common Vim Save and Quit Errors
E37: No write since last change
Plain English: you edited the file and asked to quit without saving it. Vim is protecting you. Pick one — :wq to keep the changes, :q! to throw them away. If you're still learning the editor, the fundamentals in essential Vim commands cover all the basics like how to delete lines in Vim and how to undo and redo in Vim when you need to back out of a mistake.
Permission denied or read-only file
E45: 'readonly' option is set means the buffer is flagged read-only; add the bang. E212 means the filesystem is refusing you, which is a permissions problem — use the sudo tee trick above or reopen with sudo vim.
Why :q does not work
Three usual suspects. You have unsaved changes (see E37). You're still in insert mode, so :q got typed into the file — press Esc first. Or you have multiple buffers or split windows open, and :q closed only one of them; use :qa or :qa!.
Swap file warning on open (ATTENTION: Found a swap file)? That's a leftover .swp from a crashed session. Press R to recover, or D to delete it if you know the on-disk version is current.
🆚 Vim vs Vi: Are Save and Exit Commands the Same?
Yes, for everything that matters here. :w, :q, :q!, :wq, :x, ZZ — all inherited from vi and all working identically in Vim. Vim ("Vi IMproved") adds syntax highlighting, multi-level undo, plugins, and :saveas, but it never broke the core write/quit vocabulary. So vi save and exit is the same muscle memory as Vim save and exit. Only the extras differ.
For the authoritative reference, check :help write and :help quit inside Vim, or the online docs at vimhelp.org. More terminal and Linux walkthroughs live on the MonoVM blog.
📂 Working with Multiple Files
Vim allows you to work with multiple files simultaneously, enhancing your productivity. Here's a brief guide:
- Open Files: To open multiple files, run Vim with multiple file names as arguments. For example, vim file1.txt file2.txt will open both "file1.txt" and "file2.txt" in separate tabs or buffers.
- Switch Between Files: While in command mode, use :bnext to switch to the next buffer and :bprev to go to the previous buffer. You can also use :b <filename> to switch to a specific file.
- Edit Multiple Files: You can navigate and edit different files by switching between buffers, making it convenient for managing and editing multiple files in a single Vim instance.
This capability streamlines your workflow when dealing with various text files, making Vim a versatile editor for multiple tasks.
🚀 Advanced Tips and Tricks
Vim offers a plethora of advanced features and shortcuts to enhance your productivity. Here are some lesser-known tips and tricks for advanced users:
- Registers: Vim has registers that act as clipboards for copying and pasting text. Use "{register}y to yank (copy) text to a specific register and "{register}p to paste from it. For a full walkthrough, see how to copy, cut, and paste in Vim.
- Marks: Set marks to quickly jump to specific locations in a file. Use m{letter} to set a mark and ' or ` to jump to it.
- Macros: Record and playback complex editing sequences with macros. Start recording with q{register} and stop with q. Replay the macro with @{register}.
- Folding: Collapse and expand sections of code or text using folding commands like zf, zo, and zc. Vim can automatically detect code blocks to fold.
- Window Splits: Split your Vim window horizontally with :split or vertically with :vsplit. Navigate between splits using Ctrl-w followed by an arrow key.
- Search and Replace with Confirmation: Use :%s/{search}/{replace}/gci for a global search and replace with confirmation (c) and case-insensitivity (i). If you want to go deeper on search in Vim, that guide covers regex patterns and jumping between matches.
- Plugins: Explore Vim plugins to extend its functionality for tasks like code completion, version control, and more.
- Custom Keybindings: Define your own custom keybindings in your .vimrc file to tailor Vim to your specific needs.
- Regular Expressions: Vim's support for regular expressions allows powerful search and replace operations.
- Line Numbers: For editing long files, enabling line numbers makes navigation and referencing much easier — see how to display line numbers in Vim.
🎯 Conclusion
We hope you are now familiar with how to save Vim and quit Vim/exit the Vim editor. These have been listed above in the two methods. VIM editor has a lot of shortcuts to accomplish your work in less time, and it will increase your productivity level too. Every time an expert is looking for shortcuts or to save a file or exit a file should implement the above-listed commands.
Also, if you think there can be any other methods to save a file or exit a file in the Vim editor, do let us know via the comment box listed below.
To learn more about text editors, read our article on Vi vs Vim to choose the right tool for your workflow. And if you spend most of your day editing config files over SSH, a VPS hosting plan gives you full root access to install Vim, set up your .vimrc, and manage the server on your own terms.