In an era dominated by digital communication, email remains a cornerstone of our daily interactions. Whether you're a seasoned system administrator, a tech enthusiast, or simply someone who values data privacy and control, the idea of running your own email server on a Linux-based system may have crossed your mind. But why venture into the realm of self-hosted email servers when there are numerous readily available email services? What are the benefits and potential pitfalls of embarking on this journey? Who is the intended audience for this endeavor? These are the questions we'll delve into as we explore the world of setting up your own mail server on a Linux platform. Whether you seek complete autonomy over your email infrastructure, heightened security, or the sheer joy of mastering the art of email administration, this article is your comprehensive guide to understanding, configuring, and managing a Linux email server.
Find Your Perfect Fit: Best Linux Mail Servers Revealed!
What is an SMTP Server?
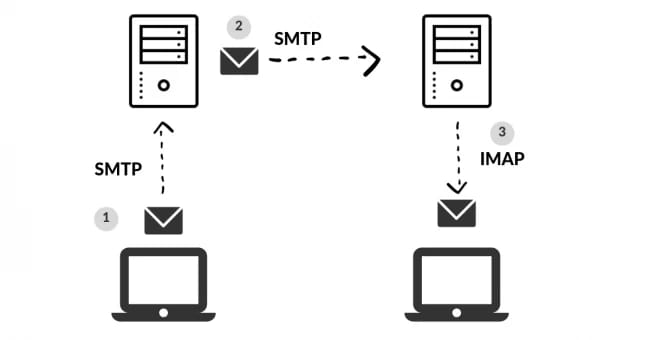
SMTP is a part of the application layer of the TCP/IP protocol. With the use of a process named “store and forward”, it transfers emails across networks. An SMTP server is an application whose primary purpose is to send, receive, and/or relay outgoing mail between email senders and receivers. Explained: How Does SMTP Work? Unraveling the Basics
Without an SMTP server, your email wouldn’t make it to its destination. Once you hit “send,” your email transforms into a string of code that is then sent to the SMTP server. The SMTP server is able to process that code and pass on the message. If the SMTP server wasn’t there to process the message, it would be lost in translation.
Mail Server Components
When it comes to setting up a Linux email server, understanding its key components is essential. There are three primary components that work together to ensure seamless email communication:
- Mail User Agent (MUA): The Mail User Agent is the graphical interface you use to compose, send, and receive emails. Common MUAs include Thunderbird and Outlook. MUAs are responsible for providing you with a user-friendly way to interact with your email.
- Mail Transport Agent (MTA): The MTA, such as Postfix or Sendmail, plays a crucial role in email delivery. It's responsible for routing and transporting emails between different email servers. When you hit "send" on your email client, the MTA takes charge of delivering your message to its intended destination.
- Mail Delivery Agent (MDA): The MDA is responsible for delivering emails to the recipient's mailbox, whether it's a local mailbox on the server or an external one. Postfix-maildrop and Procmail are examples of MDAs. They ensure that incoming messages reach the appropriate user's mailbox.
Prerequisites for Running a Mail Server on Linux
Before embarking on the journey of setting up your own Linux-based email server, it's essential to ensure that you have the necessary prerequisites in place. To successfully configure and manage an email server, you should possess the following:
- Linux Proficiency: A fundamental understanding of the Linux operating system is crucial. You should be comfortable navigating the Linux command line, performing basic system administration tasks, and managing user accounts. Get Hands-On with Essential Linux Commands!
- Command-Line Skills: Much of the configuration and administration of a Linux email server involves using the command line. Familiarity with commands, file manipulation, and system utilities is highly beneficial.
- DNS Configuration: Email server setup often requires DNS (Domain Name System) configuration. You should have a grasp of DNS concepts, including how to manage DNS records such as MX (Mail Exchanger) and A (Address) records.
- Server Access: You should have access to a Linux server or virtual machine (VM) running a supported Linux distribution. Ensure that you have administrative (root) access to the server or have sudo privileges.
- Domain Name: To host your email server, you'll need a domain name (e.g., example.com). Register a domain if you don't already have one, and have access to the domain's DNS settings.
- Basic Networking Knowledge: Understanding networking fundamentals, including IP addresses, ports, and firewall configuration, will aid in troubleshooting and securing your email server.
- Patience and Dedication: Setting up and maintaining an email server can be complex, and issues may arise along the way. Patience and a willingness to learn are invaluable traits for a successful email server administrator.
By ensuring that you meet these prerequisites, you'll be better prepared to tackle the process of setting up your Linux email server with confidence and efficiency.
Setting Up a Linux Mail Server
To set up a Linux mail server, you'll first need to check if the Postfix mail server is already installed on your system. Postfix is the default MTA for most Linux distributions due to its reliability and popularity among server administrators.
To check if Postfix is installed, you can use the following command:
$ rpm -qa | grep postfix
If it's not installed, you can easily install it on Red Hat-based distributions like CentOS using:
$ dnf -y install postfix
On Debian-based distributions like Ubuntu, you can use:
$ apt-get -y install postfix
Once installed, start and activate Postfix on system startup with these commands:
$ systemctl start postfix $ systemctl enable postfix
These commands ensure that Postfix is up and running, and ready to handle email transmission on your Linux server.
Configuring Linux Mail Server
With Postfix installed, it's crucial to configure it properly for your specific needs. Most of the configuration files for Postfix are located in the /etc/postfix/ directory. The primary configuration file is /etc/postfix/main.cf.
In this configuration file, you can specify essential settings like:
- myhostname: Set the hostname of your mail server, such as mail.example.com or smtp.example.com. This helps Postfix identify its email source.
myhostname = mail.example.com
- mydomain: Define the mail domain you'll be servicing, such as example.com.
mydomain = example.com
- myorigin: Determine how outgoing emails will appear in terms of their origin. You can set this to $mydomain to maintain consistency.
myorigin = $mydomain
- mydestination: Specify the domains for which the Postfix server is responsible for incoming emails. For instance, if your server handles emails for example.com, you'd set it like this:
mydestination = $myhostname, localhost.$mydomain, $mydomain, mail.$mydomain, www.$mydomain
- mail_spool_directory: Define where incoming mail should be stored. You can choose to deliver mail directly to user mailboxes or to a central spool directory. If you opt for a central spool directory, the mail will be stored in /var/spool/mail with a separate file for each user.
mail_spool_directory = /var/spool/mail
- mynetworks: This parameter allows you to specify which servers can relay through your Postfix server. It's crucial to limit this to local addresses to prevent spammers from exploiting your server for unauthorized relaying.
mynetworks = 127.0.0.0/8, 192.168.1.0/24
- smtpd_banner: Customize the banner message that is displayed when a client successfully connects to your Postfix server. Consider modifying it to avoid revealing potentially compromising information about your server.
- inet_protocols: Designate which IP protocol version your server should use for connections. Use ipv4 if you want to stick with IPv4.
inet_protocols = ipv4
After making changes to your configuration files, don't forget to reload the Postfix service for the changes to take effect:
$ systemctl reload postfix
However, it's a good practice to run a check to ensure there are no typos or configuration errors that might compromise your Linux mail server:
$ postfix check
By carefully configuring these settings, you can fine-tune your Linux email server to meet your specific requirements, ensuring reliable email communication.
How to Run a Mail Server on Linux
Please note that this tutorial is made for Ubuntu/Debian.
In this tutorial, we will use the Postfix mail server and the Roundcube webmail application.
- First, set a valid FQDN (i.e. Fully Qualified Domain Name) for your server with the following command. Do not forget to replace “monovm.com” with your domain name.
sudo hostnamectl set-hostname mail.monovm.com
![]()
- Now, add a MX and A records for your domain in your DNS control panel.
MX record @ mail.monovm.com
mail.monovm.com
- Once that is done, you will need to install Apache2, MariaDB, and PHP :
sudo apt-get update -y
sudo apt-get upgrade -y
sudo apt install apache2 apache2-utils mariadb-server mariadb-client php7.4 libapache2-mod-php7.4 php7.4-mysql php-net-ldap2 php-net-ldap3 php-imagick php7.4-common php7.4-gd php7.4-imap php7.4-json php7.4-curl php7.4-zip php7.4-xml php7.4-mbstring php7.4-bz2 php7.4-intl php7.4-gmp php-net-smtp php-mail-mime php-net-idna2 mailutils
![]()
![]()

- Now you should install Postfix using the following command
sudo apt-get install postfix
![]()
- Once that is installed, you need to install an MDA (i.e. Mail Delivery Agent), we chose Dovecot
sudo apt-get install dovecot-imapd dovecot-pop3d
![]()
- Next, restart the Dovecot service with the following command:
sudo systemctl restart dovecot
![]()
- Now you need to install a webmail service, we picked Roundcube
wget https://github.com/roundcube/roundcubemail/releases/download/1.4.8/roundcubemail-1.4.8.tar.gz
tar -xvf roundcubemail-1.4.8.tar.gz
sudo mv roundcubemail-1.4.8 /var/www/html/roundcubemail
sudo chown -R www-data:www-data /var/www/html/roundcubemail/
sudo chmod 755 -R /var/www/html/roundcubemail/
![]()
![]()
![]()
![]()
![]()
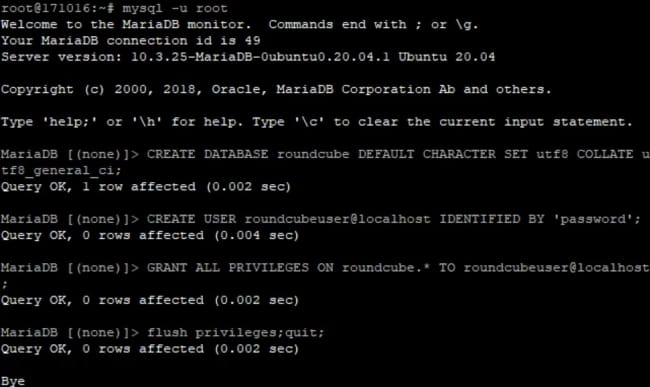
- Once the above steps are completed, you need to create a new database and a user for Roundcube as well as grant all the permissions. Note: do not include “MariaDB [(none)]>” in the commands you are writing.
mysql -u root
MariaDB [(none)]> CREATE DATABASE roundcube DEFAULT CHARACTER SET utf8 COLLATE utf8_general_ci;
MariaDB [(none)]> CREATE USER roundcubeuser@localhost IDENTIFIED BY 'password';
MariaDB [(none)]> GRANT ALL PRIVILEGES ON roundcube.* TO roundcubeuser@localhost;
MariaDB [(none)]> flush privileges;
MariaDB [(none)]> quit;
- Now, import the initial tables to the Roundcube database
sudo mysql roundcube < /var/www/html/roundcubemail/SQL/mysql.initial.sql
![]()
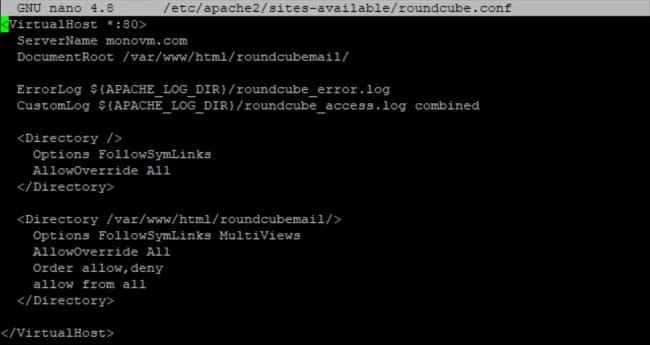
- Create an Apache virtual host for Roundcube webmail.
sudo nano /etc/apache2/sites-available/roundcube.conf
![]()
Then, add the following configuration to it:
<VirtualHost *:80>
ServerName monovm.com
DocumentRoot /var/www/html/roundcubemail/
ErrorLog ${APACHE_LOG_DIR}/roundcube_error.log
CustomLog ${APACHE_LOG_DIR}/roundcube_access.log combined
<Directory />
Options FollowSymLinks
AllowOverride All
</Directory>
<Directory /var/www/html/roundcubemail/>
Options FollowSymLinks MultiViews
AllowOverride All
Order allow,deny
allow from all
</Directory>
</VirtualHost>
- Next, enable this virtual host and reload Apache with the following commands:
sudo a2ensite roundcube.conf
sudo systemctl reload apache2

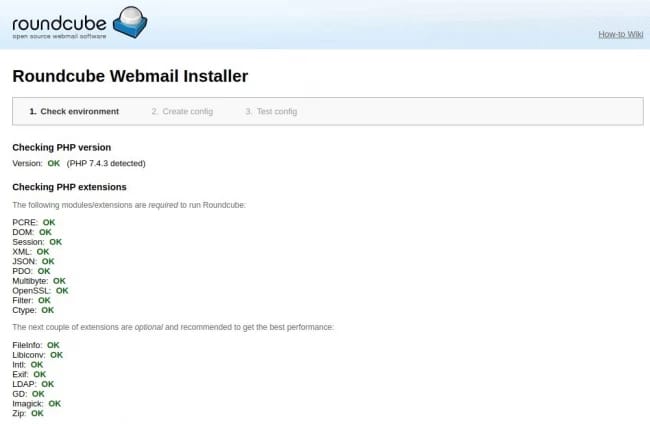
- The webmail is now accessible through http://yourdomain.com/roundcubemail/installer/. It should look something like this:
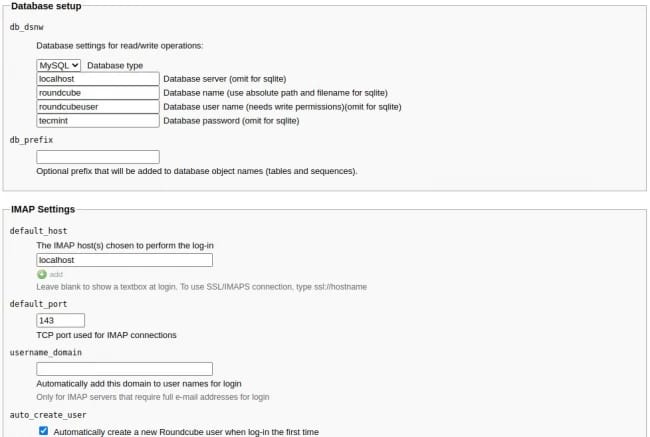
Now, go to database settings and add the database details.
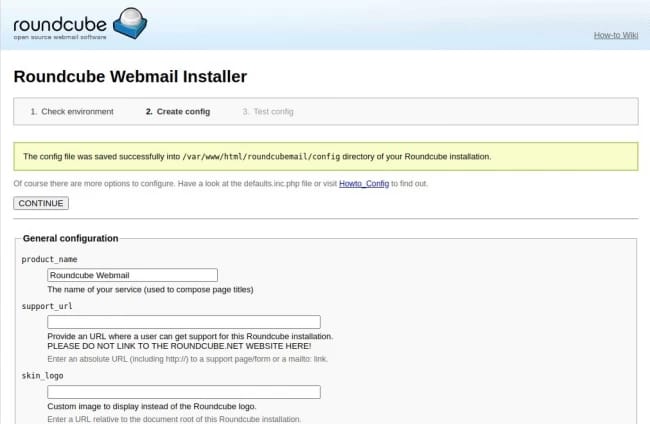
- Once the changes are made, create a config.inc.php file.
- Now the installation is finished. Delete the installer folder and make sure that the enable_installer option in inc.php is disabled.
sudo rm /var/www/html/roundcubemail/installer/ -r
![]()
- To add users, enter the following commands:
sudo useradd username
Where “username” is replaced with the desired name.
sudo passwd username
You should now be able to use your Linux email server with the accounts you created. Did it work for you? Leave a comment below.
POP3 and IMAP Protocol Basics
In addition to understanding the email server components, it's essential to grasp the basics of two crucial email access protocols: POP3 (Post Office Protocol 3) and IMAP (Internet Message Access Protocol).
POP3 (Post Office Protocol 3)
POP3 is a protocol designed for downloading emails from the server to the user's device. It's ideal for scenarios where users want to keep a local copy of their emails. When a user accesses their mailbox using a POP3 client, emails are typically downloaded and removed from the server, making them accessible offline. However, this means that emails are stored only on the user's device, and changes made to emails (e.g., marking as read) aren't synchronized with the server.
IMAP (Internet Message Access Protocol)
IMAP is a protocol that offers more advanced email management capabilities. With IMAP, emails remain on the server, and clients synchronize with the server to access messages. This allows users to access their emails from multiple devices and ensures that changes made to emails (e.g., moving to folders, marking as read) are reflected consistently across all devices. IMAP is ideal for users who need access to their emails from various locations and devices.
Your choice of protocol depends on your users' needs and preferences. POP3 is suitable for those who want to maintain local copies of emails, while IMAP is preferable for users who require synchronized access from multiple devices.
Dovecot Installation
Dovecot is a popular software package that provides both POP3 and IMAP functionality to your Linux email server. It allows users to access their emails using these protocols, offering flexibility in how they manage their messages.
To install Dovecot on your Linux server, follow these steps:
For Red Hat-based distributions like CentOS:
$ dnf -y install dovecot
For Debian-based distributions like Ubuntu:
$ apt-get -y install dovecot-imapd dovecot-pop3d
During the installation process, you may be prompted to create self-signed SSL/TLS certificates for IMAP and POP3. It's advisable to accept this option to secure email communication with encryption.
Once installed, start the Dovecot service and enable it to run at system startup:
$ systemctl start dovecot $ systemctl enable dovecot
Dovecot is now ready to provide POP3 and IMAP services to your users, allowing them to access their emails securely.
Configure Dovecot
Dovecot's configuration is crucial to ensure the proper functioning of POP3 and IMAP services. The main configuration file for Dovecot is typically located at /etc/dovecot/dovecot.conf. However, some Linux distributions organize Dovecot's configuration into multiple files within the /etc/dovecot/conf.d/ directory.
Here are key parameters you should consider configuring in Dovecot:
- protocols: Specify which protocols Dovecot should support. To enable both IMAP and POP3, include these in the list:
protocols = imap pop3
- listen: Define the IP addresses that Dovecot should listen on for incoming connections. Using * indicates all available interfaces, while :: represents all IPv6 interfaces:
listen = *, ::
- userdb and passdb: Configure the user and password databases for authenticating users. Common settings are:
userdb { driver = pam } passdb { driver = passwd }- mail_location: Determine where user mailboxes and emails are stored. You can use a format like this:
mail_location = mbox:~/mail:INBOX=/var/mail/%u
This configuration instructs Dovecot to use the mbox format for mailboxes and specifies the location for incoming mail.
Conclusion
In conclusion, setting up and managing your own Linux-based email server is a rewarding endeavor that offers greater control, privacy, and security over your digital communication. While it comes with its challenges, the knowledge and skills you gain along the way are invaluable.
So, whether you're a seasoned system administrator or an eager enthusiast, take the plunge into the world of Linux email servers. By following the steps outlined in this guide, you'll be well-prepared to embark on this empowering journey and enjoy the benefits of hosting your own email infrastructure.

I'm fascinated by the IT world and how the 1's and 0's work. While I venture into the world of Technology, I try to share what I know in the simplest way with you. Not a fan of coffee, a travel addict, and a self-accredited 'master chef'.