List of content you will read in this article:
- 1. How to install PIP on Windows? [A Step-by-Step Guide]
- 2. How to install PIP on Linux? [A Step-by-Step Guide]
- 3. How to install pip on Ubuntu
- 4. How to install pip using WSL
- 5. How to Install Pip on macOS?
- 6. Verifying pip installation
- 7. Basic pip commands
- 8. Troubleshooting common issues
- 9. Conclusion
- 10. FAQ
In this article, we will learn how to install PIP on Windows and Linux operating systems, but first, we should know why we need PIP. When you are dealing with Python, there is a requirement for tons of packages. You can use the available ones with the help of the default package manager; however, PIP might be required to install some. with PIP or Package Installer for Python, You can install the software packages or libraries that are not included in the Python Standard Library.
Moreover, if you seek to install additional dependencies or packages, you can simply install PIP on Windows and Linux operating systems. PIP uses Python Package Index for all the packages. You must be familiar with the term package manager if you know the programming world. This tutorial will guide you on how to install PIP on Windows and Linux.
Let us now head towards the process of installing PIP in Windows first!
How to install PIP on Windows? [A Step-by-Step Guide]
Let's move to understand the complete step/procedure.
- The first step is to check whether PIP is installed on your desktop or not to install PIP on Microsoft Windows.
- To check that, simply go to your command prompt, and write the following:
pip help
- Now, If a response occurs, that’s a clear indication that your system has already PIP installed. If it doesn’t, an error message appears on the screen, ‘program could not be found.
- Next up is the verification of the Python installation. PIP needs an active Python installation in the system. To confirm whether you have Python already installed or not, head on to the command prompt window and type:
python
- If the command goes unresponsive and nothing shows on the screen, you need to install Python before installing PIP.
- Once you install Python, this is what your screen is going to display. Take a look:
Python 3.7.0 (v3.7.0:1bf9cc5093, Jan 25 2019, 07:44:31) [MSC v.1914 64 bit (AMD64)] on win32
Let us quickly understand how to install PIP on the Microsoft Windows process.
Follow these steps to achieve your task:
Step 1: You need to download PIP get-pip.py
You have to download get-pip.py before installing PIP. Now, remember the location where you save the file as this path is required in the process later.
Step 2: Open the Windows Command Line
The next step is to open the Command prompt window. Simply follow these steps:
-
- Select Windows key + X
- Hit run
- Now type cmd.exe
If not these steps, you can simply type cmd in the search bar, and the command prompt will be displayed on your screen.
Additionally, there are instances where you have to run/access the prompt window as an administrator. Now, when can you encounter these situations? Sometimes, while you perform a task, you may encounter a message saying that you do not have access to some specific permissions to run an application or a program. In such situations, you are required to run the app as an admin.
To conclude, click right on the Command Prompt and choose ‘Run as,’ then select As Administrator. And you’re done!
Step 3: Install PIP on Windows
Check the file path in the family of computer operating systems developed by Microsoft, as not knowing this path may cause problems later in the installation process.
Now, follow this command:
python get-pip.py
After this, the installation process begins.
Moving on, to display the list of your current directory, type:
dir
Step 4: Check the PIP version
If you wish to see the version of your PIP, go to the Command Prompt and type the following command:
pip --version
The current version is displayed on the screen.
Step 5: Installation verification
As you had earlier initiated the installation process, you can now check whether the process is successful.
pip help
If your installation is successful, you will encounter this message.
pip 18.0 from c:\users\administrator\appdata\local\programs\python\lib\site-packages\pip (python 3.7)
If not, kindly repeat your installation.
Step 6: How to configure?
The PIP configuration file in Windows is %HOME%\pip\pip.ini located at %APPDATA%\pip\pip.ini. Now, if you want to set the location as per your wish, use PIP_Config_File.
Moreover, if you wish to upgrade your PIP version, you can do that. It discards the older version and installs the latest one. To accomplish this task, type the following command:
python -m pip install --upgrade pip
Moving onto the last segment, what if you want to downgrade the installed PIP version in your system? Well, you may think, why is this necessary?
Well, there are times when you install a new version, and it does not work seamlessly. To sort that issue, you need to downgrade the version to revert to the previously installed version. Use this command:
python -m pip install pip==18.1
That’s it! Yes, it is this simple process through which you can install PIP on Windows. Let us head toward our next segment.
How to install PIP on Linux? [A Step-by-Step Guide]
Now, Python Package Index is used by PIP as the default source for the packages in the Linux Operating System. Hence, when you type "pip install package_name".
pip install package_name
This command is designed to search for a specific package in PyPI. When the package is detected among the family of Unix-like operating systems that use the Linux kernel and are open source, it is promptly downloaded and installed. The execution of the command depends on whether you're working with Python pip or Python3-pip, depending on your system's Python version.
Here is a step-by-step guide to the whole process screenshot.
Step 1: Start by typing the following command:
Sudo apt-get install python3-pip python-dev

Step 2: Next up, you will see this window.

Here, the installer is simply providing the disk space.
Step 3: Next, it downloads the libraries as shown below.
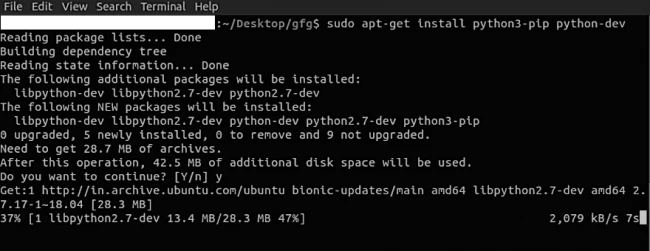
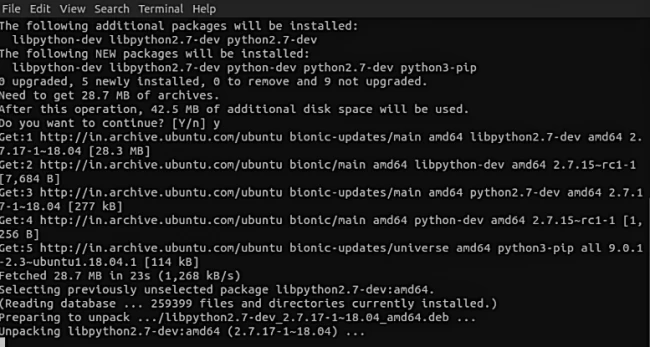
Step 4: Now, all the files and packages start unpacking.
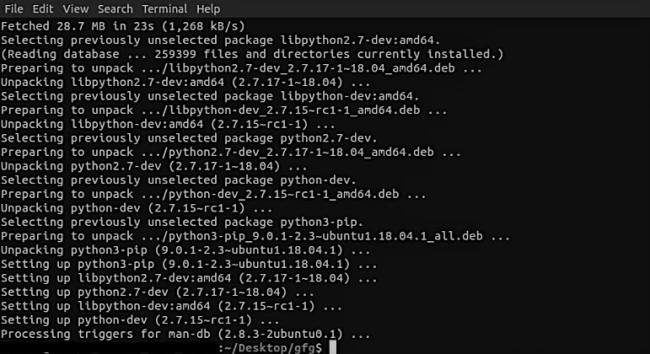
Step 5: Lastly, the few more steps of the installation look like this.
General syntax:
root@ubuntu:~# pip3 install <package name>
As we have taken the example of the Numpy library, just write NumPy in the place of the package name. Here is how:
root@ubuntu:~# pip3 install numpy

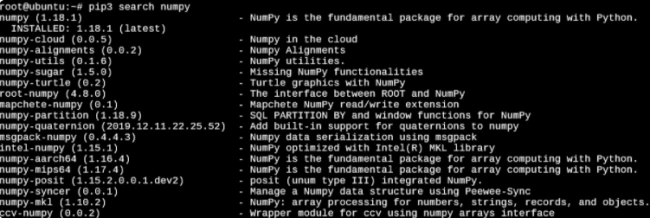
Step 6: Moving on, let’s say you want to search for the availability of some packages. Use this command:
root@ubuntu:~# pip3 search numpy
Step 7: Next, to know all the Python packages installed in the system, follow this command:
root@ubuntu:~# pip3 list
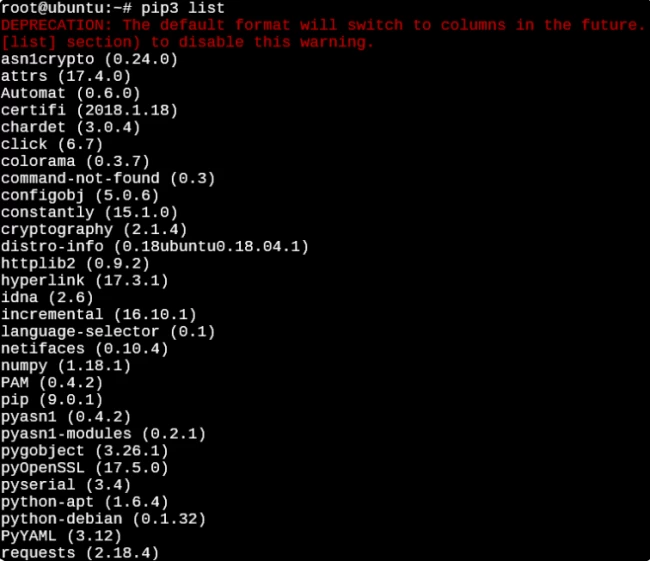
To gain any additional information about the installed packages, use the following:
root@ubuntu:~# pip3 show numpy

Step 8: Now, finally, if you wish to uninstall the packages, use this simple command:
root@ubuntu:~# pip3 uninstall numpy

That’s it!
How to install pip on Ubuntu
In this section, we will guide you through installing a package management system for Python on Ubuntu.
Step1: Open a terminal:
Begin by opening a terminal on your Ubuntu system. You can do this by searching for "Terminal" in the Ubuntu applications or using the keyboard shortcut Ctrl+Alt+T.
Step 2: Update the package index:
Before installing pip, it's a good practice to update the package index of your system. This ensures that you have the latest information about available packages. In the terminal, type the following command and press Enter:
sudo apt update
You will be prompted to enter your password. Note that you won't see any characters on the screen when typing the password. Press Enter after entering the password.
Step 3: Install pip
To install pip on Ubuntu, you can use the apt package manager. In the terminal, enter the following command and press Enter:
sudo apt install python-pip
This command installs pip for Python 2. If you're using Python 3, you can install pip for Python 3 by running the following command instead:
sudo apt install python3-pip
The system will prompt you to confirm the installation. Type "Y" and press Enter to proceed.
Step 4: Verify the installation
After the installation process is finished, you can confirm the successful installation of pip by executing a command in the terminal. Simply type the provided command and press Enter:
pip –version
If the pip is installed correctly, it will display its version number and other details.
That's it! You have now successfully installed pip on your Ubuntu system. You can start using pip to install Python packages and manage your Python environment.
How to install pip using WSL
The upcoming section will explain the steps to install the Python package management system using WSL (Windows Subsystem for Linux).
Step 1: Launch the WSL terminal
Start by opening your preferred WSL distribution. This can be done by locating and launching the "WSL Terminal," "WSL Shell," or the specific distribution executable such as "Ubuntu."
Step 2: Update the package index
To ensure you have the most up-to-date package information, updating the package index of your WSL distribution before proceeding with the installation is advised. Within the WSL terminal, enter the provided command and press Enter:
sudo apt update
If prompted, enter your user password and press Enter to continue.
Step 3: Install pip
To install pip within your WSL environment, execute the following command in the terminal:
sudo apt install python3-pip
When you run this command, you will install the recommended version of the pip for Python 3. To confirm the installation, press Y followed by Enter. Afterwards, the system will automatically begin downloading and installing the necessary packages.
Step 4: Verify the installation
After the installation is finished, you can confirm the successful installation of The pip by executing the provided command within the WSL terminal:
pip3 –version
When pip is installed correctly, the terminal will show the version number of pip, along with additional details.
After the installation is finished, you can confirm the successful installation of The pip by executing the provided command within the WSL terminal.
How to Install Pip on macOS?
Option 1: Using Homebrew If you have Homebrew installed, you can install pip by running the following command:
$ brew install python
This will install both Python and Pip on your system.
Option 2: Installing pip manually If you already have Python installed but need to install pip, follow the same steps as mentioned in the Windows section
Step 1: Download the get-pip.py file from https://bootstrap.pypa.io/get-pip.py
Step 2: Open a command prompt and navigate to the directory containing the get-pip.py file.
Step 3: Run the following command:
python get-pip.py
Verifying pip installation
To verify that pip is installed correctly, open a terminal (or command prompt) and type the following command:
$ pip --version
If pip is installed correctly, you should see output similar to the following:
pip 21.0.1 from /path/to/pip (python 3.x)
Basic pip commands
To install a package using pip, use the following command:
$ pip install package_name
To uninstall a package using pip, use the following command:
$ pip uninstall package_name
To list installed packages, use the following command:
$ pip list
Troubleshooting common issues
If you encounter issues during the installation process, ensure that:
- Your system's PATH variable includes the Python and pip directories.
- You have the appropriate permissions to install packages.
- You have a stable internet connection to download packages.
Conclusion
We hope that with the help of this article, you have successfully learned how to install PIP on Windows and Linux operating systems. You can now easily manage your packages with the help of Python PIP. If you face any issues during the installation or have questions, please leave them in the comment box below.
Keep learning and Keep Sharing!
People also read:
![How to Install PIP on Windows/Linux? [A Complete Guide]](/wp-content/uploads/2021/06/cover390-main.webp)