LEMP is an acronym which stands for the software stack: Linux kernel, Nginx web server, MySQL database (or MariaDB) and PHP server-side programming language. These pieces of software are widely used on servers to deploy dynamic websites or interactive web applications. Nginx is a modern and resources efficient web server, actively under development, and the second most used on the internet after Apache HTTP server due to the fact that it uses an asynchronous event-driven approach to handle requests. This tutorial will guide you on how to install LEMP on Debian 9.
Install LEMP Stack on Debian 9
Step 1: Connect to your Linux server via SSH
If you are running Windows as your local computer, consider downloading PuTTY SSH client and connect to your Debian server with your public IP address that was allocated to you.
You can also initiate an SSH connection from Mac or Linux using the inbuilt SSH client terminal.
Step 2: Installation of the Nginx Web Server
At first, update the system repository index.
apt update
Then you can install the Nginx by issuing the following command:
apt install nginx
If you have the ufw firewall running, you will need to allow connections to Nginx.
ufw allow 'Nginx HTTP'
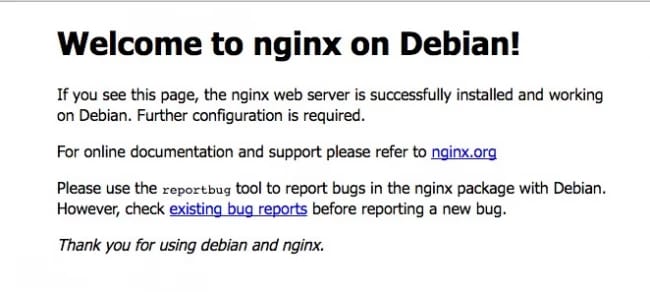
Now, test if the server is up and running by accessing your server's domain name or public IP address in your web browser. If you do not have a domain name pointed at your server and you do not know your server's public IP address, you can find it by typing the following command into your terminal:
ip addr show eth0
This will print out a few IP addresses, type one of them in your web browser. It should take you to Nginx's default landing page:
Step 3: Installing MySQL to manage site data
We need to install MySQL, a database management system, to store and manage the data for our site.
Install it easily using the command below:
apt install mysql-server
In this step configure the mysql through the bellow command line. Click "y" for every question and set the mysql root password.
mysql_secure_installation
Now we have our PHP components installed. Next, we'll configure Nginx to use them.
Step 4: Installing PHP for Processing
We now have Nginx installed to serve our pages and MySQL installed to store and manage our data. However, we still don't have anything that can generate dynamic content. That's where PHP comes in.
Since Nginx does not contain native PHP processing like some other web servers, we will need to install fpm, which stands for "fastCGI process manager". We will tell Nginx to pass PHP requests to this software for processing. We'll also install an additional helper package that will allow PHP to communicate with our MySQL database backend. The installation will pull in the necessary PHP core files to make that work.
Then install the php-fpm and php-mysql packages:
apt install php-fpm php-mysql
We now have our PHP components installed. Next, we'll configure Nginx to use them.
Step 5: Configuring Nginx to use the PHP processor
In this step, we will configure Nginx to use our PHP processor for dynamic content.
At first, create a new directory in /var/www to hold the PHP site.
mkdir /var/www/your_domain
Open a new configuration file in Nginx's sites-available directory
nano /etc/nginx/sites-available/your_domain
After that, paste the following lines on the newly created blank file.
server {
listen 80;
listen [::]:80;
root /var/www/your_domain;
index index.php index.html index.htm;
server_name your_domain;
location / {
try_files $uri $uri/ =404;
}
location ~ \.php$ {
include snippets/fastcgi-php.conf;
fastcgi_pass unix:/var/run/php/php7.0-fpm.sock;
}
}
Save and close the file when you're done customizing it.
Link to config file from Nginx's sites-enabled directory and activate your configuration:
ln -s /etc/nginx/sites-available/your_domain.conf /etc/nginx/sites-enabled/
This will tell Nginx to use the configuration next time it is reloaded. First, test your configuration for syntax errors by typing:
nginx -t
If any errors are reported, go back and double-check your file before continuing.
When you are ready, reload Nginx to make the changes:
systemctl reload nginx
Now to test our PHP processing we'll create a file in our new web root directory to test out PHP processing.
Step 6: Create a PHP file to test configuration
We will test our LEMP stack to validate that Nginx can correctly hand .php files off to our PHP processor. So we create a test PHP file in our document root. Open a new file called info.php within your document root in your text editor
nano /var/www/your_domain/info.php
We type the following lines into the new file. This is a valid PHP code that will return information about our server:
<?php phpinfo(); ?>After verifying that Nginx renders the page correctly remove the file you created by typing:
rm /var/www/html/info.php
Congratulations! You have installed LEMP successfully.

My name is Linda, I have Master degree in Information Technology Engineering. I have some experiences in working with Windows and Linux VPS and I have been working for 2 years on Virtualization and Hosting.