Hosting a website is no easy task and requires a plethora of technical knowledge. There are, however, tools that make the job a little easier for you. One such tool is a control panel, especially one with a graphical user interface (GUI). A control panel lets you monitor and manage all the hosted services you use.
Today, we will discuss one of the most popular control panels for CentOS: the CentOS Web Panel. More precisely, we will provide a step-by-step tutorial on how to install it on your system for both CentOS 6 and 7 versions.
What is CentOS Web Panel?
CentOS Web Panel, or CWP for short, is a free web hosting control panel that offers easy management of multiple servers (both Dedicated and VPS) without the need to access the server through SSH for every small task that you need to complete. It is a feature-rich control panel, which comes with a high number of options and features for quick server management.
Some of CWP’s best features include:
- A powerful built-in file manager with a code editor for hosted sites.
- Detailed logs of all processes that occur on the server.
- Multiple monitoring tools, including Netdata, Monit monitoring, and MySQL live to monitor.
- Configurable client packages for reseller purposes.
- Advanced regular backup system.
- A plethora of security functions are integrated into CWP.
- Migration wizard to transfer sites from cPanel to CWP.
CWP Feature
All our VPS server packages come packed with a multitude of features, all designed exclusively for improved uptime, customer satisfaction, and easily managed servers.
FLEXIBLE SOFTWARE OPTIONS
We provide full root or administrative access where you will have total control over your environment allowing you to install applications or host websites on your VPS.
UNMETERED BANDWIDTH
All of our VPS come with an unmetered bandwidth. No more extra fees and server downtime due to passing an allocated bandwidth limit.
FAST VPS PERFORMANCE
Using first-class powerful hardware, SSD storage, and RAID10 technology on our VPS servers. We assure fast and stable performance on all our servers.
MULTIPLE LOCATIONS
We provide VPS from more than 20 locations: USA VPS, UK VPS, Netherlands VPS, France VPS, Canada VPS, and Germany VPS.
FAST DELIVERY
We guarantee that all VPS services will be up and running in less than 2 minutes. Linux VPS will be provisioned instantly and the Windows VPS servers will be available within 2 minutes.
VMWARE HYPERVISOR
Monovm VPS services are based on a stable and powerful VMware ESXi hypervisor. We provide dedicated resources and stable performance to your virtual machine.
LIGHT-SPEED INTERNAL NETWORK
In our data centers, the internal network is based on fiber optic connections which allow for almost zero latency.
MULTIPLE PAYMENT GATEWAYS
You can pay with credit card payments, direct bank transfers, many e-wallet systems, and nearly any cryptocurrency.
UPTIME GUARANTEE
We guarantee a 99.99% uptime due to our trustful enterprise network structure and unlimited traffic bandwidth provided within the world-class data centers.
WHY CHOOSE MONOVM CWP VPS HOSTING?
Our CentOS Web Panel VPS servers have been configured and optimized to run the said software. Here are some of the benefits of your VPS, among many others.
Full Root Access
Along with your CWP VPS server, you will also get root access to have complete control over the VPS and install any software and applications you might need.
Powerful Hardware
We utilize the latest enterprise-grade hardware components from Intel and Supermicro allowing us to give you the best server performance while maintaining maximum efficiency.
Advanced Control Panel
The control panel allows you to perform server tasks such as resizing, rebuilding, root access and graphs, firewall, reverse DNS, network back-up, and many more.
24/7 Tech Support
Our team of computer hardware and software experts are online and ready to help you with any issues you might experience, regardless of time of day, or day of the week.
Light-speed Activation
Our use of advanced virtualization technology allows us to set up Linux VPS servers in under a minute and Windows VPS servers within only a few minutes so that you can start using your VPS straight away.
How to Install CWP on CentOS 6
To install CentOS Web Panel, your system must have a minimum of 512MB RAM for a 32-bit Server and 1024MB RAM for a 64-bit Server. You will also need to update your server to the latest version and install the wget utility to fetch and install the CWP installation script.
Step 1: Before starting the installation of CWP, first, install some required packages and update all packages on the system with the following commands.
yum install wget
yum update
Step 2: After completing the update, reboot your cwp vps.
reboot
Step 3: Now, start the installation of CWP on your system. Download the installation script from the CWP official site using the following command.
cd /usr/local/src
wget http://centos-webpanel.com/cwp-latest
Step 4: Next, simply execute the cwp-latest script to begin the installation. This process may take a long time depending on your Internet speed and server configuration.
sh cwp-latest
How to Install CWP on CentOS 7
Step 1: Download the installation script from the CWP official site using the following command.
cd /usr/local/src
wget http://centos-webpanel.com/cwp-el7-latest
Step 2: Now, just execute the cwp-el7-latest script to start the installation.
sh cwp-el7-latest
Please be patient as the installation progress can take between 10 and 20 minutes to complete.
Step 3: Once the installation has finished you should see a screen saying “CWP” installed and a list of credentials required to access the panel. Make sure to copy or write down the information and keep it safe:

Step 4: When ready, press “ENTER”, and the server will reboot. If the system does not reboot automatically, simply type “reboot” to reboot the server.
Step 5: Once the server boots up, access CWP from your favorite browser by entering either http://SERVER_IP:2030 or https://SERVER_IP:2031 into the address bar.
You should see a screen similar to the figure below.
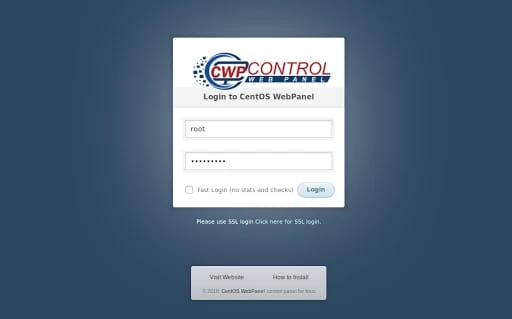
Step 6: Log in to the panel using the system’s root account. You got the password in the previous step. You should see a dashboard page similar to the one below.
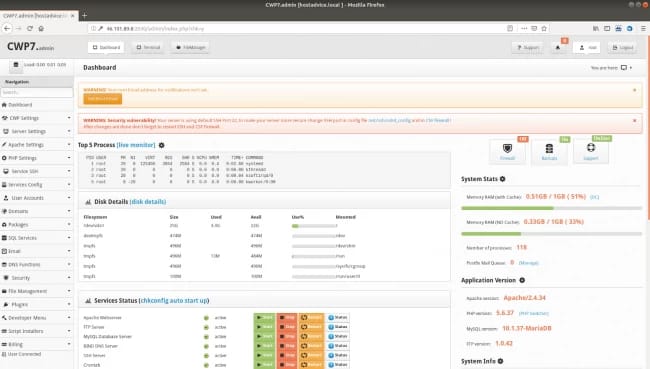
You have now successfully installed the CentOS Web Panel.
How to Create and Restore Backups in CentOS Web Panel
To download backups to your computer in CWP:
Firstly, login to your CWP account
Navigate to File Management->Backup->Download a backup copy tab
Now you will have some options:
- Download a full website backup – with this action, you will be able to download a full backup of your site. It’s very useful if you want to transfer the site to another server or restore it in case an issue arises.
- Home Directory – download an archive containing your home directory
- All MySQL – download a backup of all your MySQL/MariaDB databases
- All Account Email – backup of all your email accounts.
To restore a backup of your computer in CWP:
Login to your CWP account
Navigate to File Management->Backup->Restore a backup copy tab
Upload a home directory backup or a MySQL database backup.
Congratulations! You made it to the end. Now start creating (or restoring) the backups in CWP.
How to Create a New Account in CWP
In this article, we will be explaining to you how to set up the first user and domain in Centos Web Panel. Let's get straight to the process.
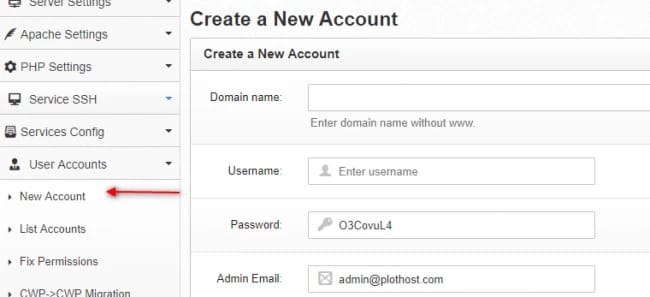
Navigate to User Accounts --> New Account
Here enter the Domain name, Username, Password, Package(Create package in CWP), Inodes limit, etc.
Click the Create button
Now you can access the new account. To edit the account at a later time, go to User Accounts-> List Accounts.
how to create and delete hosting packages in CWP
To create a hosting package:
Secure login to CWP at yourdomain.com:2087
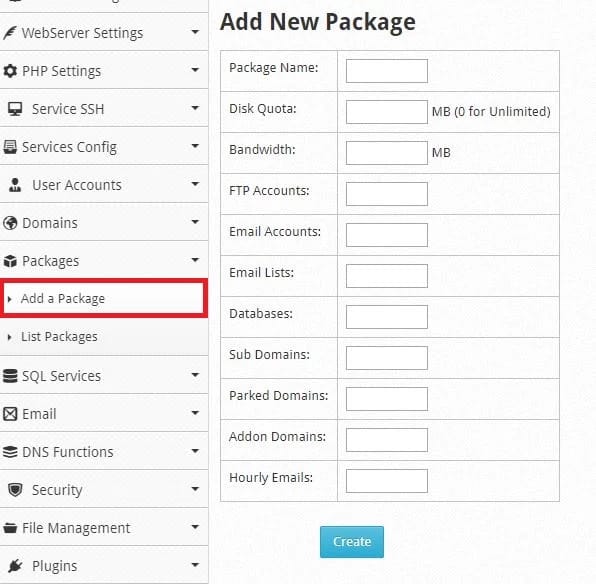
Navigate to Packages->Add a Package
Enter the details such as Package Name, Disk Quota, Bandwidth, etc.
Click the Create button. The new package will be created and you will able to see it in Packages->List Packages (here you can also edit the packages at any time).
Please note that CWP comes with a default package.
To delete a web hosting package in CWP:
Navigate to Packages->List Packages
Look for the package you want to delete and click the Delete button on the corresponding row.
CWP is a Linux hosting control panel that can be installed on Linux VPS servers and dedicated servers, it's an alternative solution for cPanel, DirectAdmin, Plesk, and some other control panels.
Conclusion
Everything should be straightforward henceforth as you explore the various features offered. Go ahead and add a new email account, configure your nameserver, and DNS, and create a new hosting package. It is however recommended that you install an SSL certificate and use it to authenticate users who log in. For MySQL login, kindly use the credentials offered after the installation of CWP.


My name is Linda, I have Master degree in Information Technology Engineering. I have some experiences in working with Windows and Linux VPS and I have been working for 2 years on Virtualization and Hosting.