![How to Install and Configure DNS Server on CentOS 8 [What is CentOS DNS]](/wp-content/uploads/2021/09/cover72-main.webp)
Every machine has a specific number that helps it to be recognized on the network and it is called an IP address. If we want to establish any connection to another machine or website, you need to know its IP address. The problem is, remembering an IP address is difficult for people as it is just a series of numbers, so we use the associated system name or website name that is much easier to remember to gain access. Such a system is called DNS.
DNS stands for domain name server and it helps in converting hostnames or URLs to the relevant IP address. Whatever website name you type into your browser’s address bar, the DNS server converts into its corresponding IP address.
In this article, we will work on configuring the local DNS server within the CentOS 8 system. You can follow the simple steps outlined below to set up the DNS server. Throughout this article, we are using the BIND 9 DNS server that we will configure efficiently and effortlessly on CentOS 8.
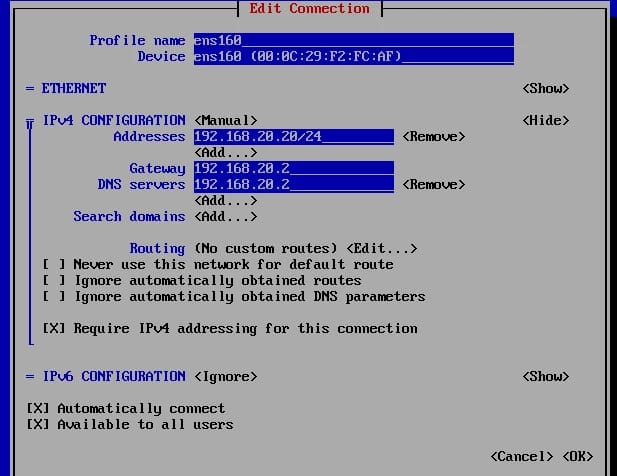
For the purposes of this demonstration, we are explaining the steps with an example. We are going to configure a CentOS 8 machine as a DNS server with a static IP address: 192.168.20.20. The other available systems on the network will access this DNS server to resolve the domain names.
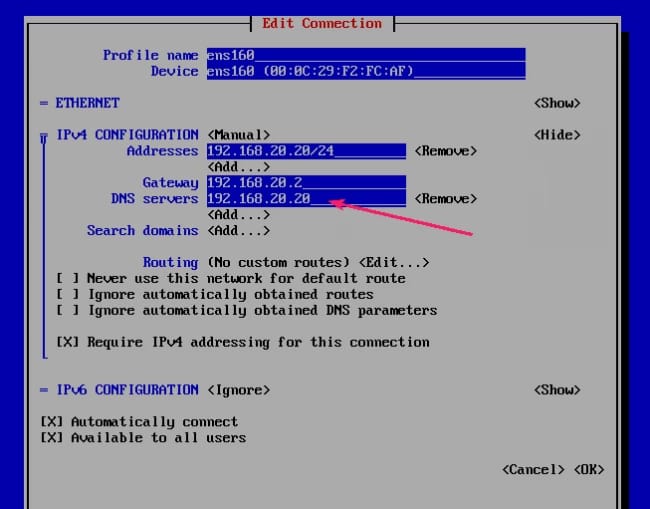
Setting a Static IP address
Before you set up a BIND 9 DNS server, make sure to set up a static IP address on your CentOS 8 machine.
Install DNS Server on CentOS 8
If you want to install BIND 9 on CentOS 8, you can use the official package repository of CentOS 8. We have mentioned a few simple steps you should follow to install it.
- First, make sure to update the DNF package repository cache by running the following command.
$ sudo dnf makecache

- Then, you can start the installation process for BIND 9 server software using the command seen below.
$ sudo dnf install bind
![]()
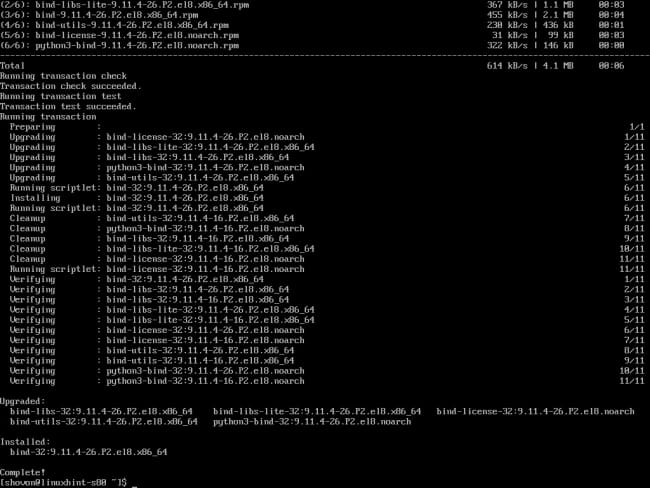
- To confirm the installation process, then press Y and hit enter. This will cause you to get the following output.
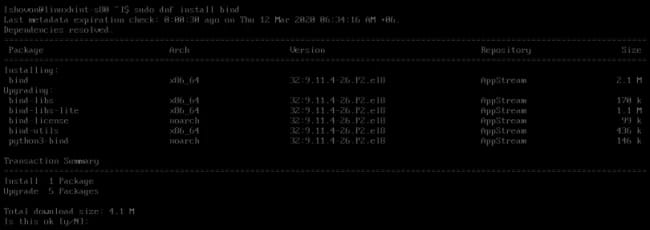
- Now, you can see that BIND 9 has been successfully installed.
How to Configure the BIND 9 DNS Server
You can find the main configuration file of BIND9 at path /etc/named.conf. If you want to add your custom DNS databases, you can do it at the path /var/names directory. After creating the DNS databases, you can add your customized zone files at path /etc/named directory. To include the zone files, you need to go to the path /etc/named.conf configuration file. In short, it is the complete process of configuring the BIND 9 DNS server.
Now we see the complete process step-by-step with the required commands. We will first, create a DNS database for xyz.local domain name. Follow the steps outlined below in order to do so.
- First, create a new file db.xyz.local under the path /var/named directory as shown below.
$ sudo vim /var/named/db.xyz.local
- Then, type the following code snippet in the db.xyz.local file and save it.
$TTL 1d$ORIGIN xyz.local.@ IN SOA ns root ( 2020031201 ; Serial 12h ; Refresh 15m ; Retry 3w ; Expire 2h ; Minimum)@ IN A 192.168.20.20@ IN NS nsns IN A 192.168.20.20@ IN MX 10 mailmail IN A 192.168.20.20help IN A 192.168.20.111support IN A 192.168.20.112www IN A 192.168.10.12router IN A 192.168.2.1ftp IN CNAME www- After you have added the DNS database for the xyz.local domain, you should check the syntax of the file using the following command.
$ sudo named-checkzone xyz.local /var/named/db.xyz.local
If there is no syntax error, you will not get any message or output regarding the above-mentioned command.
- Next, you need to create a zone file named as xyz.local.zones under the path /etc/named directory for the previously created xyz.local domain. Run the following command to achieve this.
$ sudo vim /etc/named/xyz.local.zones
Now, you need to add the following code snippet in the zones file xyz.local.zones created above.
zone "xyz.local" IN { type master; file "db.xyz.local";};- Use the following command to make changes to the /etc/named.conf file.
$ sudo vim /etc/named.conf
- First, make sure that you have added your network subnet to allow-query. If you missed this, then no computers within your network will be able to access the DNS server.
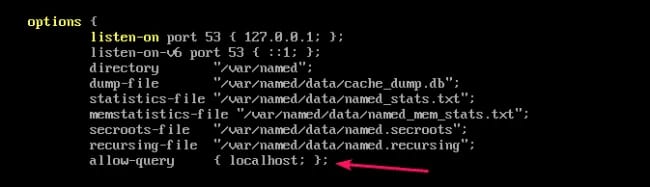
- We are using the network subnet- 192.168.20.0/24 to add as shown below.
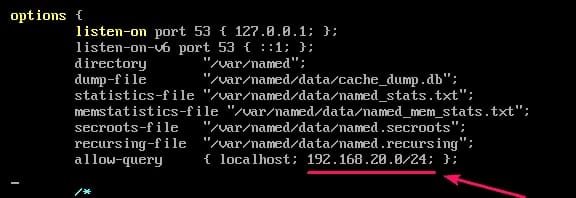
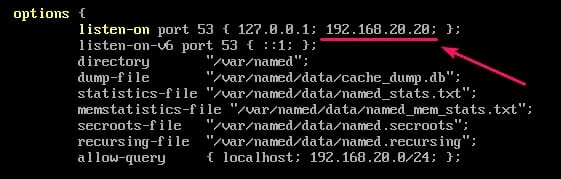
- Apart from that, you also have to add the IP address of the machine that you are configuring as the DNS server as the listen-on address. As we are using the IP address 192.168.20.20, we are adding it as shown below.
- Now, at last, we are including the xyz.local.zones file from the path /etc/named/ directory at the end of the /etc/named.conf file using the following line.
include "/etc/named/xyz.local.zones";
- Now, to start the named service you can use the command shown below.
$ sudo systemctl start named
- You can check the status of the named service in order to check if it is running or not using the following command.
$ sudo systemctl status named
- Using the following command, you can easily add the named service within the CentOS 8 system startup. This will help the DNS server to automatically start on boot.
$ sudo systemctl enable named
Keep in mind that if you want to make the desired changes to the DNS server config file while the service is running, you will need to restart the named service in order for them to take place.
- To restart the named service, you can run the following command.
$ sudo systemctl restart named
Testing the DNS Server:
Now, it is time that you test your DNS server. You can do this using dig. For checking if the configured DNS server is listening to the other systems present on the outgoing network interface, use the following command.
$ dig @192.168.20.20 xyz.local any
If you do not find any error in the output, then the DNS server is accessible from the outgoing network interface of CentOS 8.
- To check if the DNS server is also accessible locally to the CentOS 8 machine, you can run the below command.
$ dig @localhost xyz.local any
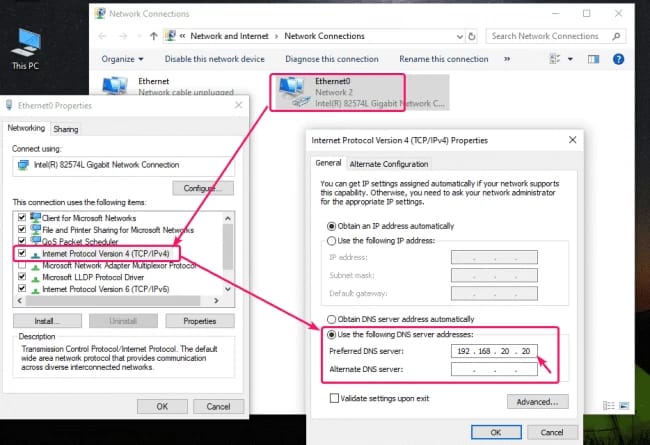
Changing the Network interface’s DNS Server Address
- If you want to use the local DNS server by default, then you can change the DNS server address of the network interface as shown below.
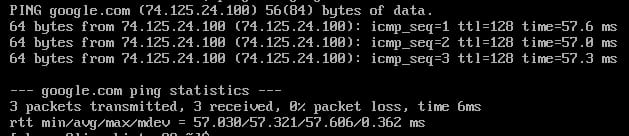
- Using the ping command, you will see that the BIND has resolved the correct internet domain name.
ping -c3 google.com
- BIND will also help in resolving the locally configured xyz.local domain.
ping -c3 ns.xyz.local
Configuring the Firewall:
To allow the DNS requests to pass through the firewall, you need to open the DNS server port 53 using the following command.
$ sudo firewall-cmd --add-service=dns --permanent
![]()
- To make the changes come into effect, you can use the following command.
$ sudo firewall-cmd --reload
![]()
Testing the DNS Server from other Systems.
Here we are configuring the Windows 10 system on the same network as the local domain so that the Windows 10 can use the DNS server.
- The DNS resolution for xyz.local subdomains is working as expected, you can check it by running the following commands.
$ nslookup ns.xyz.local
$ nslookup support.xyz.local
Conclusion
A DNS name server helps in translating the URL name to the corresponding IP address. It will receive the incoming request from the computers on the network and convert their URL address to the corresponding IP address to establish connections. This is done because computers can only understand the IP address system to process connection requests.
In this article, we have discussed how you can configure the BIND 9 DNS server in CentOS 8 operating system and how to check the created connection from the other computers on the network.
