List of content you will read in this article:
Several applications and platforms are available for creating and hosting your website. Today, if you do not have an amazing and interactive website, you do not own the market. WordPress is one of the most commonly used platforms that offers you various features and plugins to create a customizable website without getting into the technical parts. Having this many benefits also comes with some errors; you do not have to worry about resolving them as they can be fixed with straightforward steps.
If you are using WordPress as a web hosting provider, you might have a few errors regarding the upload file limit. You can encounter these errors while installing a plugin, theme or while uploading a file or an image that may hinder your website’s working. It may be possible that you may have a problem with your server settings that are causing you the maximum size errors.
Exceeding the uploaded file size is a widespread problem that can be eliminated easily and without much effort. Many hosting providers or platforms limit the PHP memory designated to run applications and scripts. Whenever the uploaded file’s size exceeds the upload_max_filesize directive value specified in the php.ini file set by the web server, it results in an error occurring on your WordPress site. This error might seem complicated to handle, but you can fix it seamlessly.
The following article will let you learn about what is upload_max_filesize error, prerequisites, and how you will fix this error with a few simple steps and in different ways.
What is an Upload_Max_Filesize Error?
Some settings on your web server prevent you from uploading files exceeding the amount of PHP memory available. If you are running WordPress on your server, you can control the amount you set for PHP memory. But, if you are using the shared hosting server, you may not change the server settings yourself. This is the limit set for a single file to be uploaded on WordPress. Though WordPress comes with various maximum file sizes, mostly 64MB but may vary sometimes.
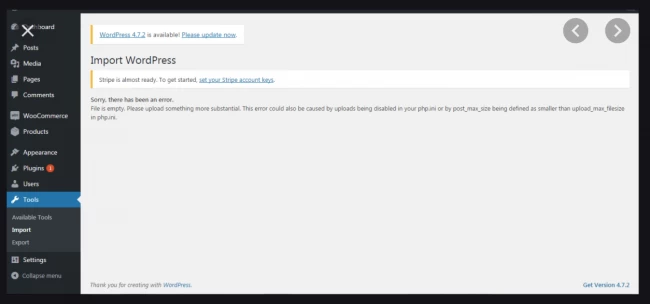
This error prevents you from installing plugins and themes that will exceed this limit and make it difficult for you to continue your work until it is resolved. The error display may be different and may vary from server to server. The following image is one of the displays you may receive.
Prerequisites
- First of all, you will need a working WordPress application installed.
- Next, you must have access to the WordPress hosting the WordPress application, either locally or SSH.
- You will require a file manager like cPanel if you are working from a client system.
- Log in to the server with a sudo privileges account.
- You should have access to the command-line or any other interface and the necessary knowledge to use it.
Various Ways to Fix Upload_Max_Filesize Error
These are the different ways you can use to eliminate such an error from your server.
- Method 1: Modify the details of the .htaccess file using the command-line interface.
- Method 2: Edit the file- wp-config.php.
- Method 3: Update the php.ini file via cPanel to fix the error.
- Method 4: Change the PHP configuration on CPanel.
- Method 5: Contact customer support to resolve the persisting error.
Method 1: Modify the details of the .htaccess file using the command-line interface
It is one of the easiest ways to eliminate the upload_max_filesize parameter error is to increase PHP’s resource limits by modifying the .htaccess file details. You can follow the simple steps outlined below to make that happen.
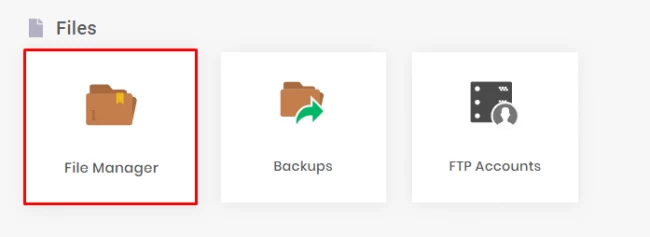
- First, log in to the cPanel console and then go to the File Manager option from the Files section, as shown below.
- From the list of the files, search for the .htaccess file. Right-click the file to make further changes.
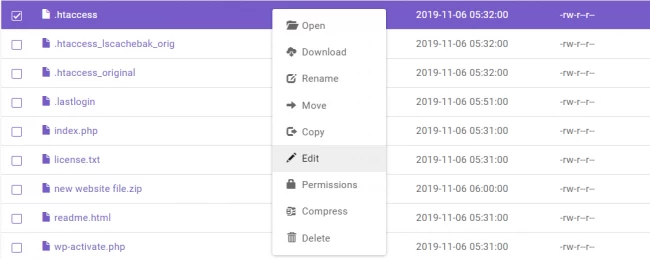
- A file will open and add the below file at the bottom of the file to set the new limit.
php_value upload_max_filesize 256M
After you make the changes, save the file’s content to make the changes permanent. This process will increase the upload_max_filesize parameter and resolve the issue automatically.
- Once you save the changes, you can try uploading the file again, if the error comes again then increase the PHP limits by adding the following lines within your .htaccess file.
php_value post_max_size 256M
php_value memory_limit 512M
php_value max_input_time 180
php_value max_execution_time 180
- You can also try extending the PHP limit until it solves your memory issue. Do not forget to check if the new limit is supported by your web hosting provider. You may also check the PHP info on your website for the available maximum limit.
Method 2: Edit the wp-config.php file
The second method to eliminate the upload_max_filesize error is by modifying the wp-config file stored in your root directory. To make the wp-config file changes, you have to log in to the cPanel and access the public_html.
- Open the wp-config file and add the below line before the “That’s all, stop editing! Happy publishing” line.
@ini_set('upload_max_size' , '256M' );
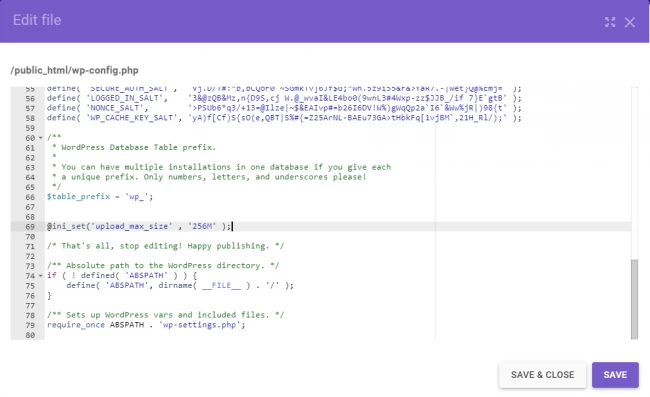
- Once you make the changes, click save to continue and make the changes permanent.
- Refresh your web browser for the changes to come into effect and try uploading the file again.
Method 3: Update the php.ini file via cPanel to Fix the Error.
If you understand the upload_max_filesize error, you might know that it might be related to the php.ini file. You can modify the php.ini file variable to resolve the issue. Some of the shared web hosting providers keep this value at its maximum limit so that you do not have to face the error as you might not be able to change the PHP variable on a shared host. You can modify the PHP settings using the PHP config tool available on cPanel. If you are working on a VPS or a different platform, you can upload the modified php.ini file to resolve the issue. Follow the simple steps outlined below and get it done.
- First, go to the php.ini file to make the changes. If you cannot see the file, you can ask the help from your hosting providers.
- Open the file and look for upload_max_filesize variable to modify. Now, increase the value of this directive as shown below.
upload_max_filesize = 256M
post_max_size = 256M
memory_limit = 512M
max_execution_time = 180
- To make the changes, save the file and you will get rid of the error for sure.
Method 4: Change the PHP Configuration on cPanel.
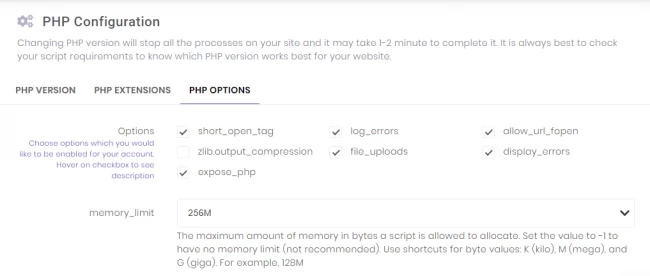
Changing the PHP config may not be easy if you are working on a shared web hosting provider. Follow these simple steps to solve the issue.
- First, log in to the cPanel and navigate to the PHP configuration that falls under the Advanced tab.
- Then click the PHP option menu and search for the upload_mx_filesize variable to make the required changes.
Method 5: Contact Customer Support to Resolve the Persisting Error.
If you have tried every method mentioned above and are still facing the error, you should try contacting the web hosting server’s customer support. You can mention the error you are facing and what steps you have implemented to eliminate the error. Most web hosting providers' support is available 24x7 to help you out.
Conclusion
We have discussed all possible ways that can help you to resolve the upload_max_filesize error on your WordPress site. If you are new to WordPress and do not know about the upload_max_filesize error, you can go through this article to understand its causes.
You can find easy to implement steps to resolve the issue. We have discussed five methods to implement.
- You can increase the upload_max_filesize value and other PHP variables using the .htaccess file.
- You can also set the higher upload_max_filesize by editing the wp-config.php file
- You can edit the php.ini file to increase the upload_max_filesize value.
- You can edit and adjust the PHP configurations by modifying the PHP Configuration feature via cPanel.
- You can contact your hosting providers for further assistance on your issue.
