List of content you will read in this article:
- 1. What is an ERR_CONNECTION_REFUSED Error?
- 2. Common Reasons for the “Site Can’t Be Reached” Error in the Browser
- 3. Potential Server-Side Issues
- 4. How to fix ERR_CONNECTION_REFUSED error?
- 5. How to Fix ERR_CONNECTION_REFUSED (This Site Can’t Be Reached) in Chrome on Android?
- 6. Advanced Troubleshooting
- 7. Seeking Further Assistance
- 8. Conclusion
- 9. FAQ
When browsing the internet, you may sometimes encounter errors that prevent you from accessing a specific website or web page. Due to such errors, you will have a less enjoyable experience using the internet. Among all, one common error users may encounter while using Google Chrome is ERR_CONNECTION_REFUSED or ERR CONNECTION REFUSED .
This error is pretty frustrating and indicates that something major has gone wrong on the client side. It does not indicate any specific cause, like other errors. As a result, novices panic when they receive such errors. However, addressing and fixing ERR_CONNECTION_REFUSED is quite easy.
In this article, we'll discuss the ERR_CONNECTION_REFUSED error, its causes, and potential ways to fix it, allowing you to browse the internet seamlessly using Google Chrome.
What is an ERR_CONNECTION_REFUSED Error?
When you access a specific website through Google Chrome, but the browser cannot establish a connection or refuses to connect, you encounter ERR_CONNECTION_REFUSED. Hence, we can say that it is a connection error. It is a client-side error, and a poor internet connection is a major possibility for the occurrence of this error.
This error is also encountered in browsers like Mozilla Firefox, Microsoft Edge, and Safari. Let us see what the ERR_CONNECTION_REFUSED error looks like in other browsers.
Google Chrome
Error message: This site can’t be reached or This webpage is not available
Microsoft Edge
Error message: Hmmm…can’t reach this page Error
Mozilla Firefox
Error message: Unable to connect
Safari
Error message: Safari Can’t Connect to the Server
|
Error Code |
ERR_CONNECTION_REFUSED |
|
Error Type |
Connection |
|
Error Variations |
● This site can’t be reached ● This page is unavailable ● Unable to connect ● Hmmm…can’t reach this page |
|
Error Causes |
● Poor internet connection ● Faulty Chrome extensions ● Cache issues ● The interference of firewall, antivirus, or VPN (Virtual Private Network) |
Common Reasons for the “Site Can’t Be Reached” Error in the Browser
Understanding the usual causes of the "Site Can't Be Reached" error in a browser serves as essential for effectively fixing and diagnosing connectivity issues. Knowing these typical reasons allows users to better discuss the intricacies of web browsing, resulting in simpler and more reliable access to online resources. The "Site Can’t Be Reached" error in a browser can occur due to various reasons, including:
- Network Connection Issues: The most common cause is a problem with your internet connection. Check if you're connected to Wi-Fi or mobile data and ensure they're functioning properly.
- Incorrect URL: Make sure you've entered the correct website address (URL). Typos or misspellings can lead to this error.
- DNS Issues: Problems with the Domain Name System (DNS) configuration can prevent your browser from resolving the website's IP address. Try using a different DNS server, like Google's public DNS (8.8.8.8 and 8.8.4.4).
- Server Downtime: The website you're trying to access may be experiencing downtime due to server issues or maintenance. In such cases, you'll need to wait until the site is back online.
- Firewall or Antivirus Blocking: Sometimes, firewall or antivirus settings can block access to certain websites. Temporarily disable such software to see if it resolves the issue.
- Browser Cache and Cookies: Corrupted cache or cookies in your browser can interfere with website loading. Try clearing your browser's cache and cookies and then reloading the page.
- Proxy Server Settings: If you're using a proxy server, ensure that the settings are configured correctly. Incorrect proxy settings can prevent access to websites.
- Browser Extensions: Some browser extensions or plugins might conflict with website loading. Try disabling them one by one to identify if any particular extension is causing the issue.
- ISP Restrictions: In some cases, your Internet Service Provider (ISP) may have restrictions or filters that block access to certain websites. Contact your ISP for assistance.
- Website Blocked: It's possible that the website you're trying to access has been blocked by your network administrator or by government regulations.
Potential Server-Side Issues
Sometimes, the ERR_CONNECTION_REFUSED error isn't caused by anything on your computer or network. The website itself might be experiencing problems. Here are a few common server-side causes:
- Incorrect Firewall Settings: The website's server may have firewall rules that are accidentally blocking your connection attempts.
- Server Overloads: If the website is experiencing high traffic, the server might become overwhelmed and refuse new connections.
- Website Downtime: The website might be down for maintenance or due to unexpected technical problems.
How to fix ERR_CONNECTION_REFUSED error?
Fixing this error is pretty easy if you know the exact cause. However, due to the unknown cause, you might need to try out a few things to resolve the error.
The following are some simple and effective ways to fix the ERR_CONNECTION_REFUSED error:
1. Check the Website Status
Before considering other troubleshooting methods, check the status of the website you want to visit. Sometimes problems with your internet connection are not the root cause of the error. Instead, it may be a result of the website server issue.
The best method to rule out the possibility that the website server is the issue is to try to access the website from another browser or internet connection. If the problem exists, this means there are some issues on the server side. But if you have this problem only in your Chrome browser, you should follow the next steps to discover and solve the problem.
Further, check whether the website is not accessible only to you or other users. To check this, you can use Down For Everyone Or Just Me. Enter the website URL and click on the ‘or just me?’ button.
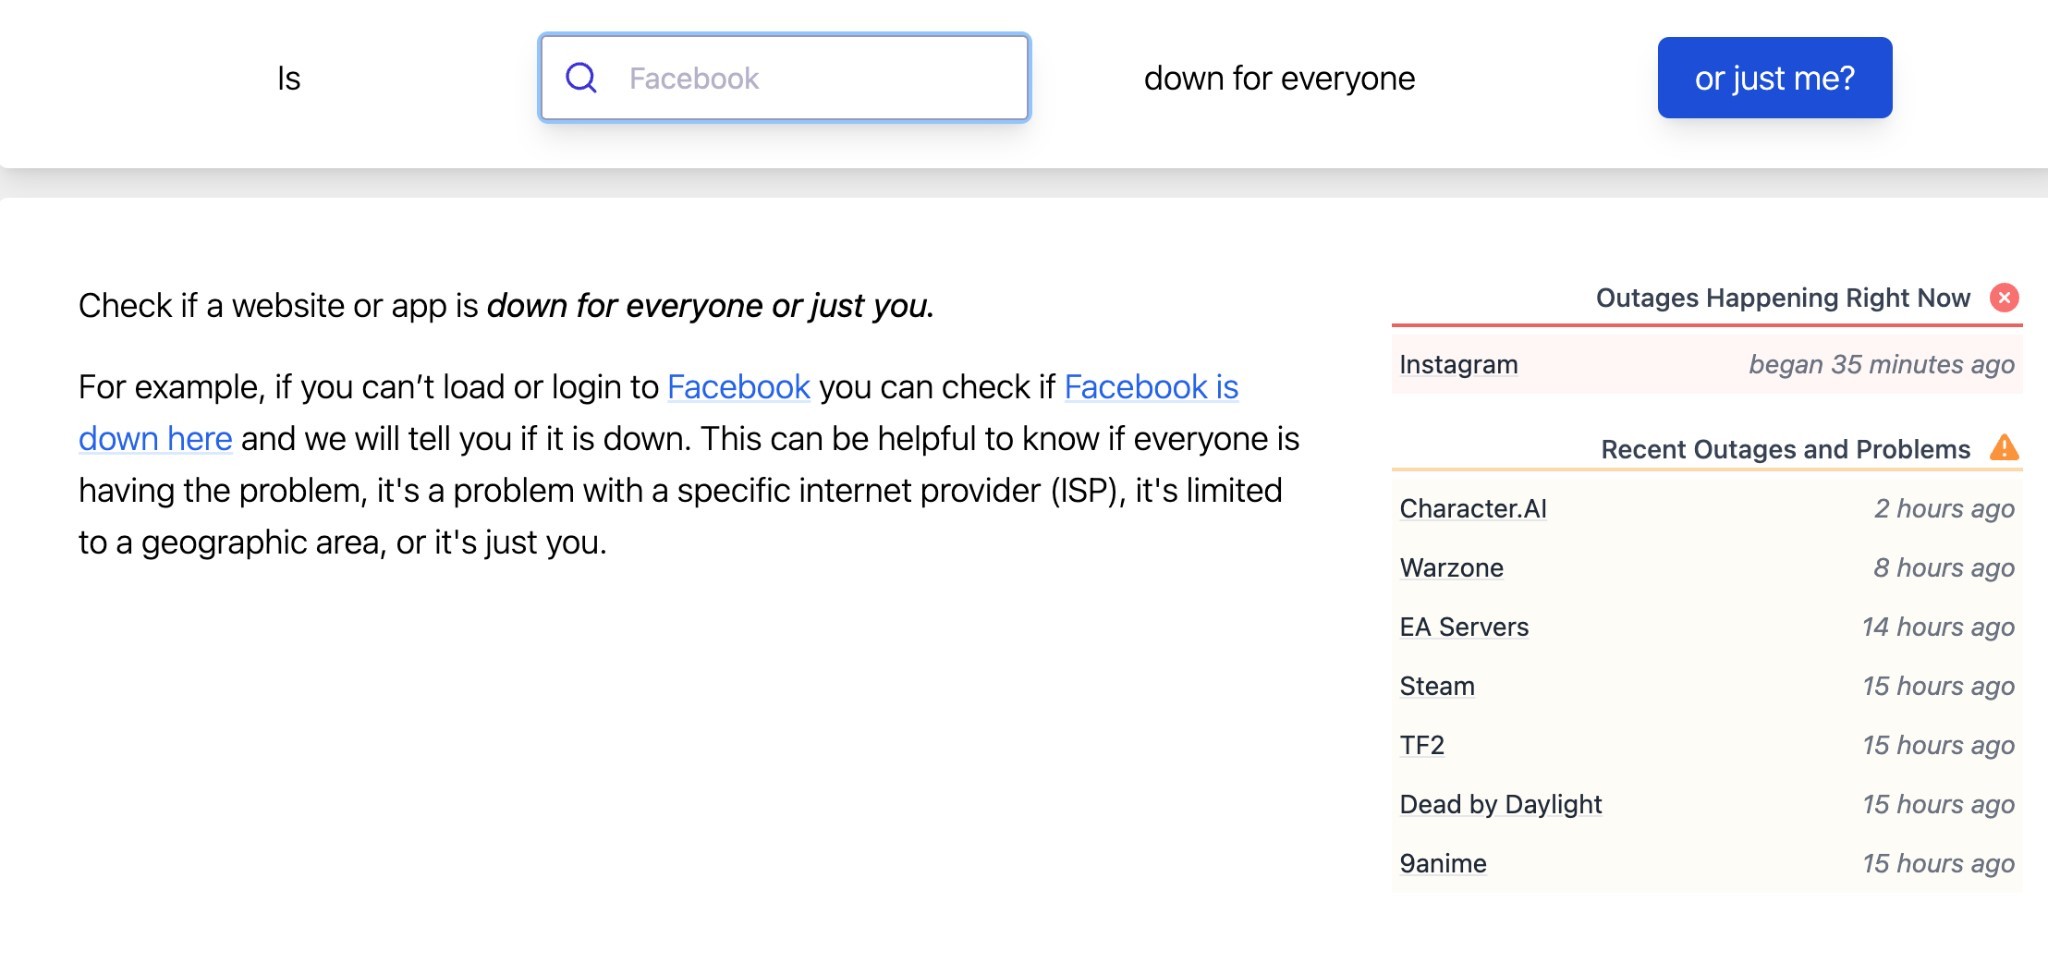
It provides the website's status – online (up) and offline (down). If the website is down, you can simply wait to get it fixed by the owners. If the website is online and you can’t access it, it indicates a problem with your browser, internet connection, etc. In this case, you can follow the below troubleshooting steps.
2. Check Proxy Settings
Many users leverage proxy servers to enhance data security by using a different IP address when going online. This can result in the ERR_CONNECTION_REFUSED error. Proxy servers are useful as they help you filter server communications and cache data, and keep your IP address private.
Usually, the error appears when a website server rejects the IP address linked to the proxy server, denying you the connection to the website.
This means checking your proxy settings if you get the error is a worthwhile shot, as there is a high possibility the proxy is incorrectly configured or is offline.
If you are browsing on Chrome, you can find proxy settings in the Chrome browser. You need to follow the below-listed steps:
Step 1: Open Chromes settings menu
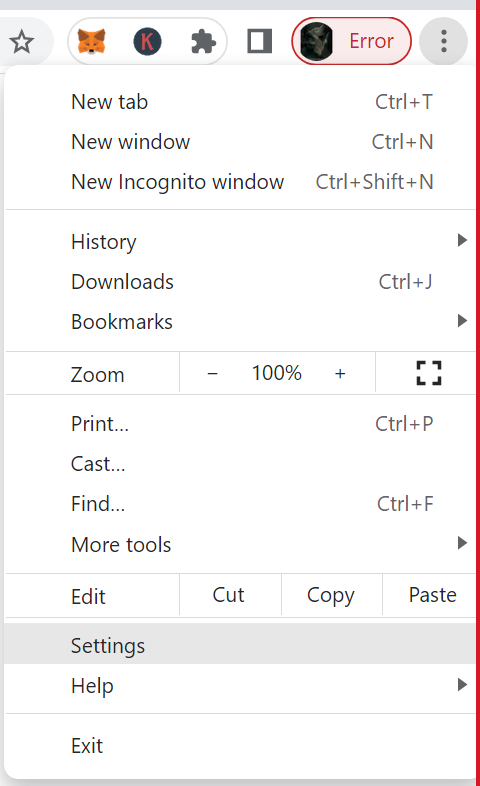
Step 2: Click "Advanced" at the bottom of your screen or type "System" in the search field.
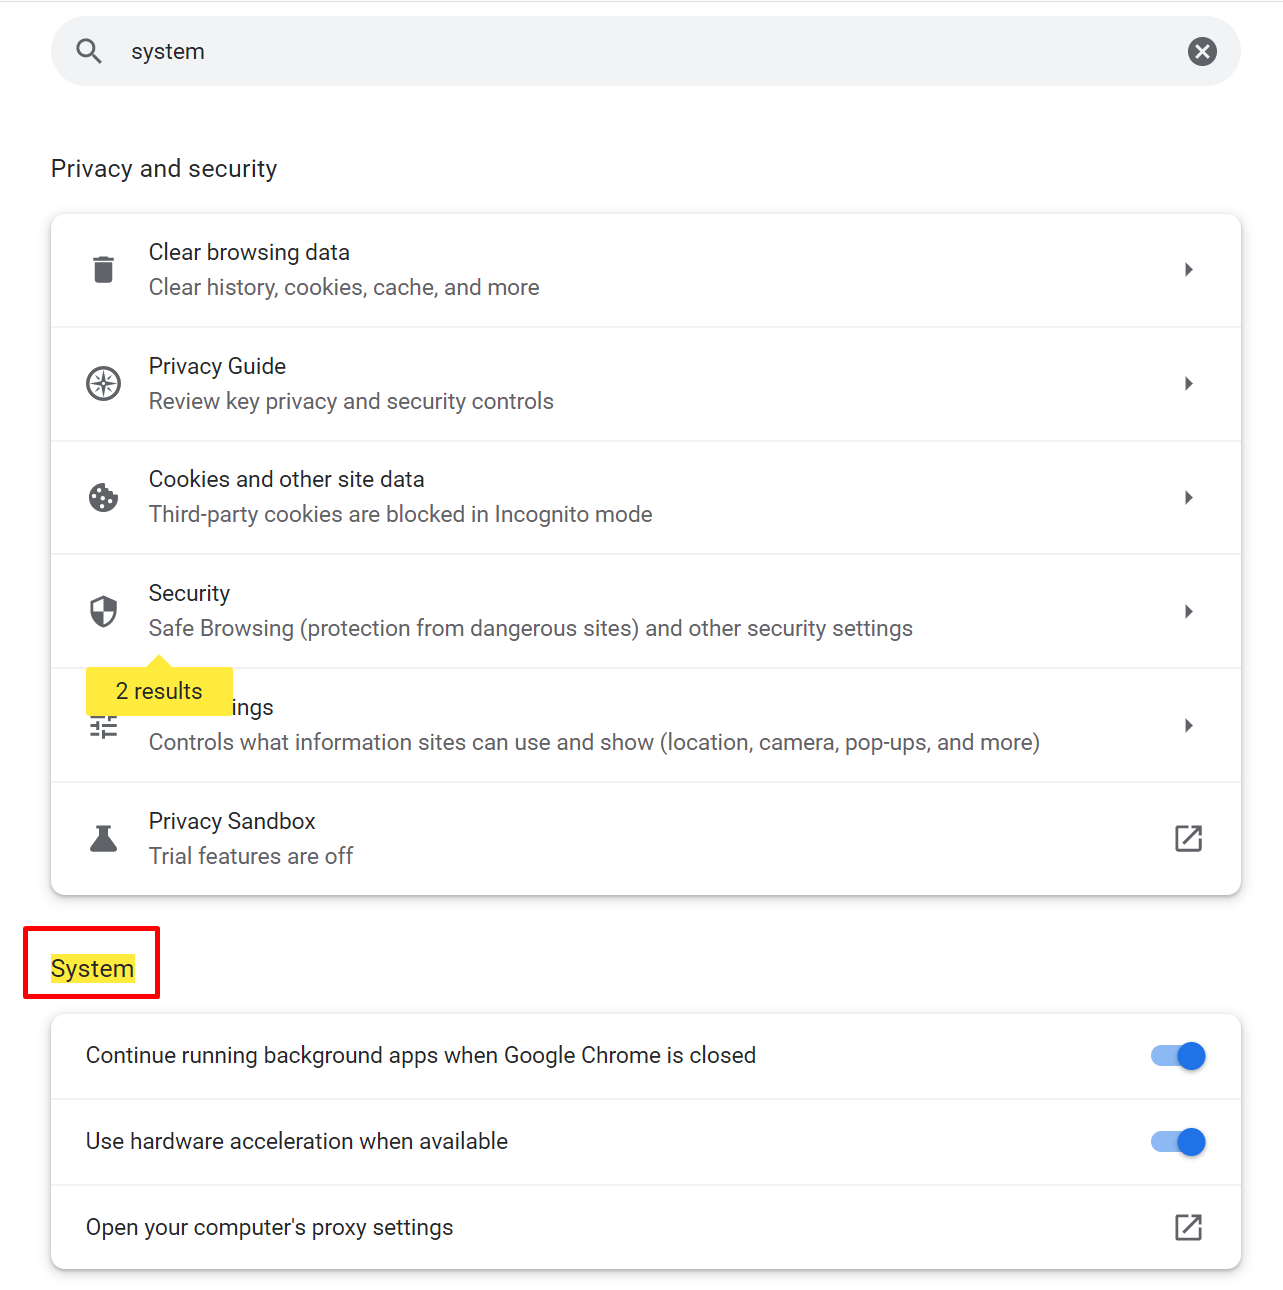
Step 3: Select the "System" option
Step 4: Click "Open your computer's proxy settings."
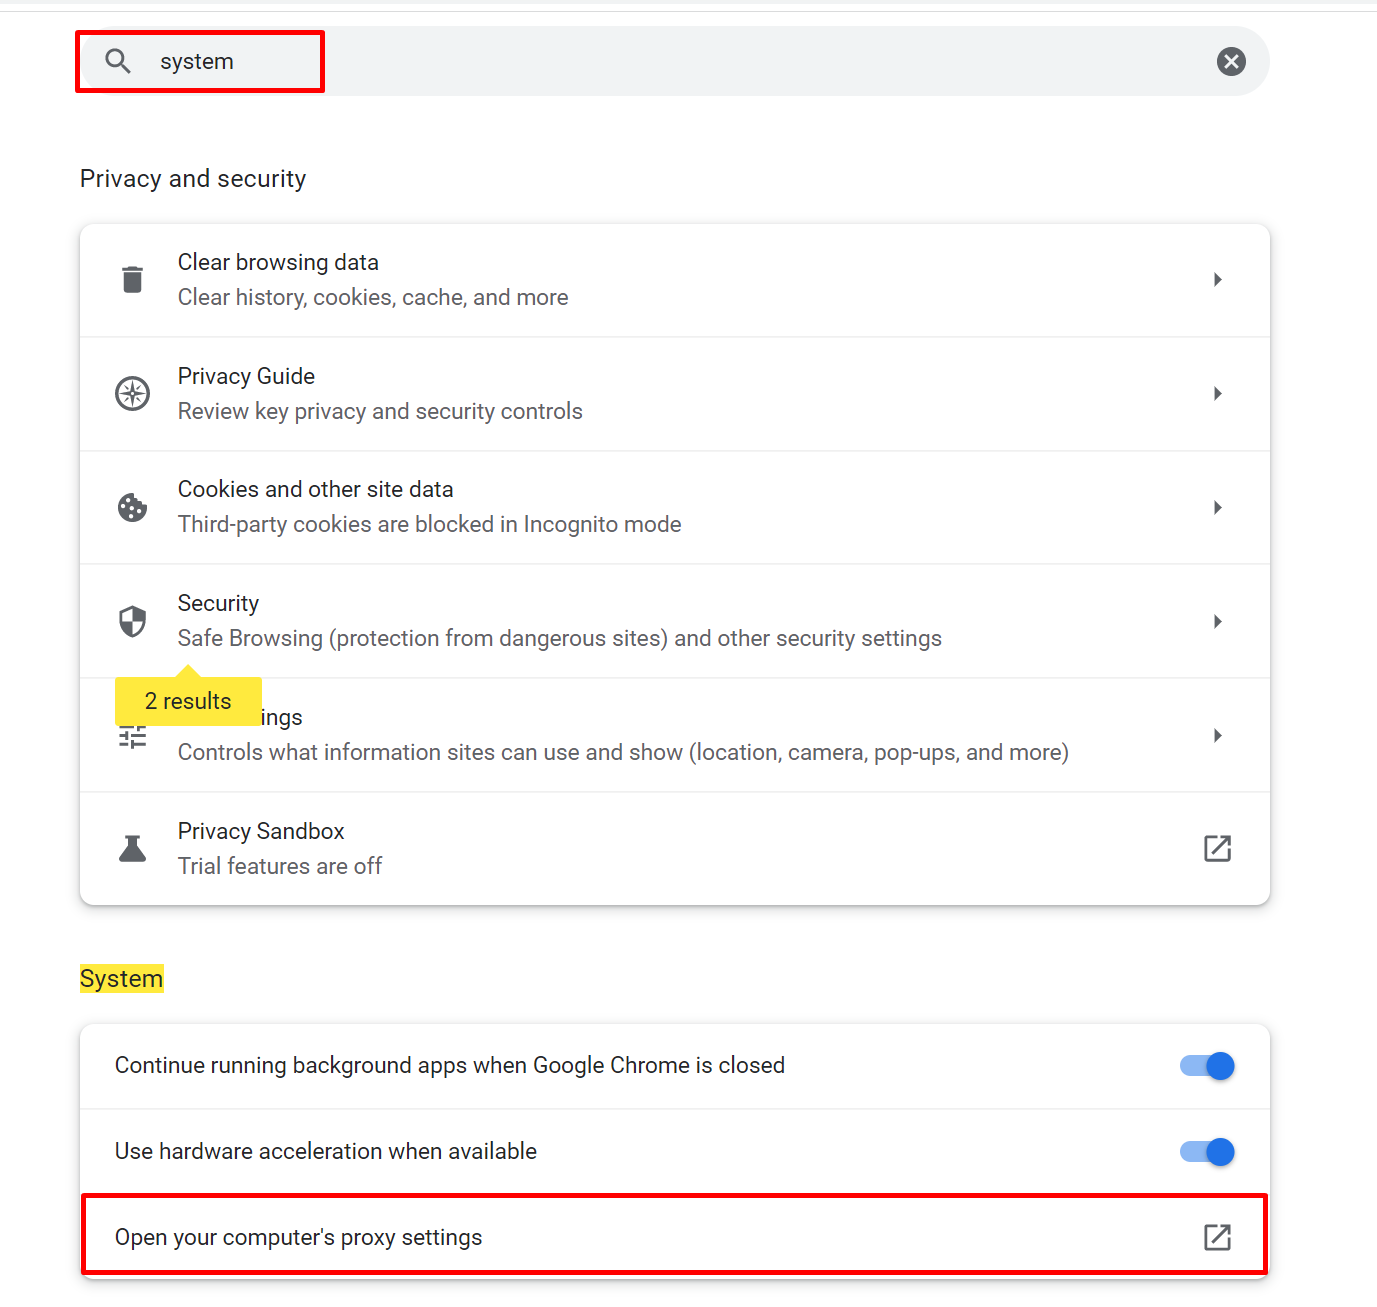
Step 5: Uncheck all the proxy protocols you can access
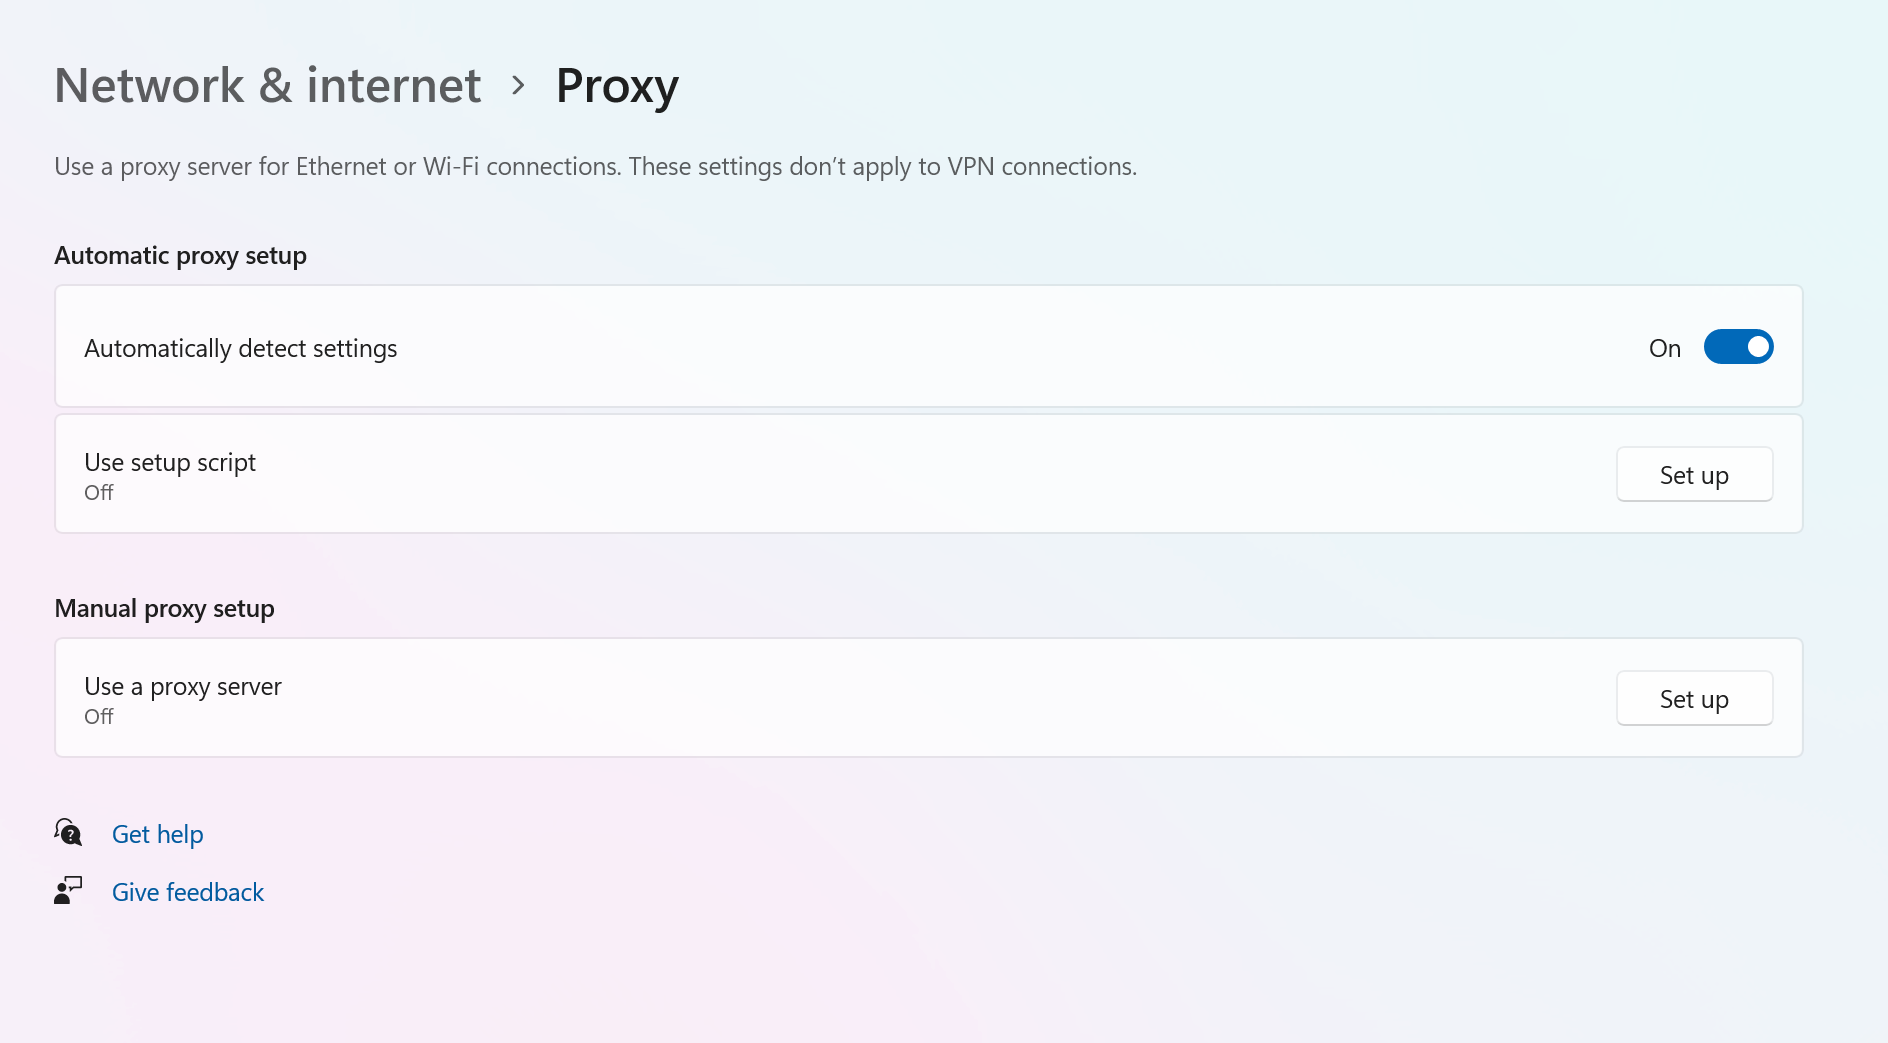
Step 6: Check if you still get the error when accessing the website.
If the err connection refused error does not clear, proceed to the next step.
3. Restart Your Router
If the cause of the error is internet-related problems, restarting your router will help. A hard reboot or switching your router on and off can fix internet-related issues. However, it is still important to remember that this only sometimes fixes internet-related issues.
This is a good starting point before you engage your internet service provider to confirm issues with your connection.
Once the router is up and running, check if you still get the error on your browser. If unresolved, there is likely another cause.
4. Check Your Router and Network Settings
If restarting your router didn't help, there might be a more specific configuration issue preventing connections. Check the following:
- Firewall Settings: Your router might have a firewall that's interfering with website connections. Consult your router's documentation on how to check and adjust firewall rules.
- LAN Settings: Ensure that your computer's local network settings are correct. Incorrect proxy settings or other misconfigurations within your local network setup can cause connection problems.
To fully troubleshoot network-related issues, it's helpful to have a basic understanding of how local area networks (LANs) function. You can find a good explanation on the MonoVM blog.
5. Adjust Your DNS Address
An outdated DNS cache entry and the DNS address can cause ERR_CONNECTION_REFUSED Chrome. The error usually occurs when the DNS address is offline or overloaded.
Usually, your internet service provider automatically assigns the DNS server address, but you can still change it if necessary. The process of changing your DNS address depends on your computer’s operating system.
Enhance your internet speed and security by choosing the right DNS server. Discover our top recommendations and how they can improve your browsing experience in our detailed guide to the best DNS servers.
How to configure DNS in macOS?
Follow the below steps to set DNS on macOS.
Step 1: Open "System Preferences."
Step 2: Select "Network."
Step 3: On the right of your network service, click “Details”.
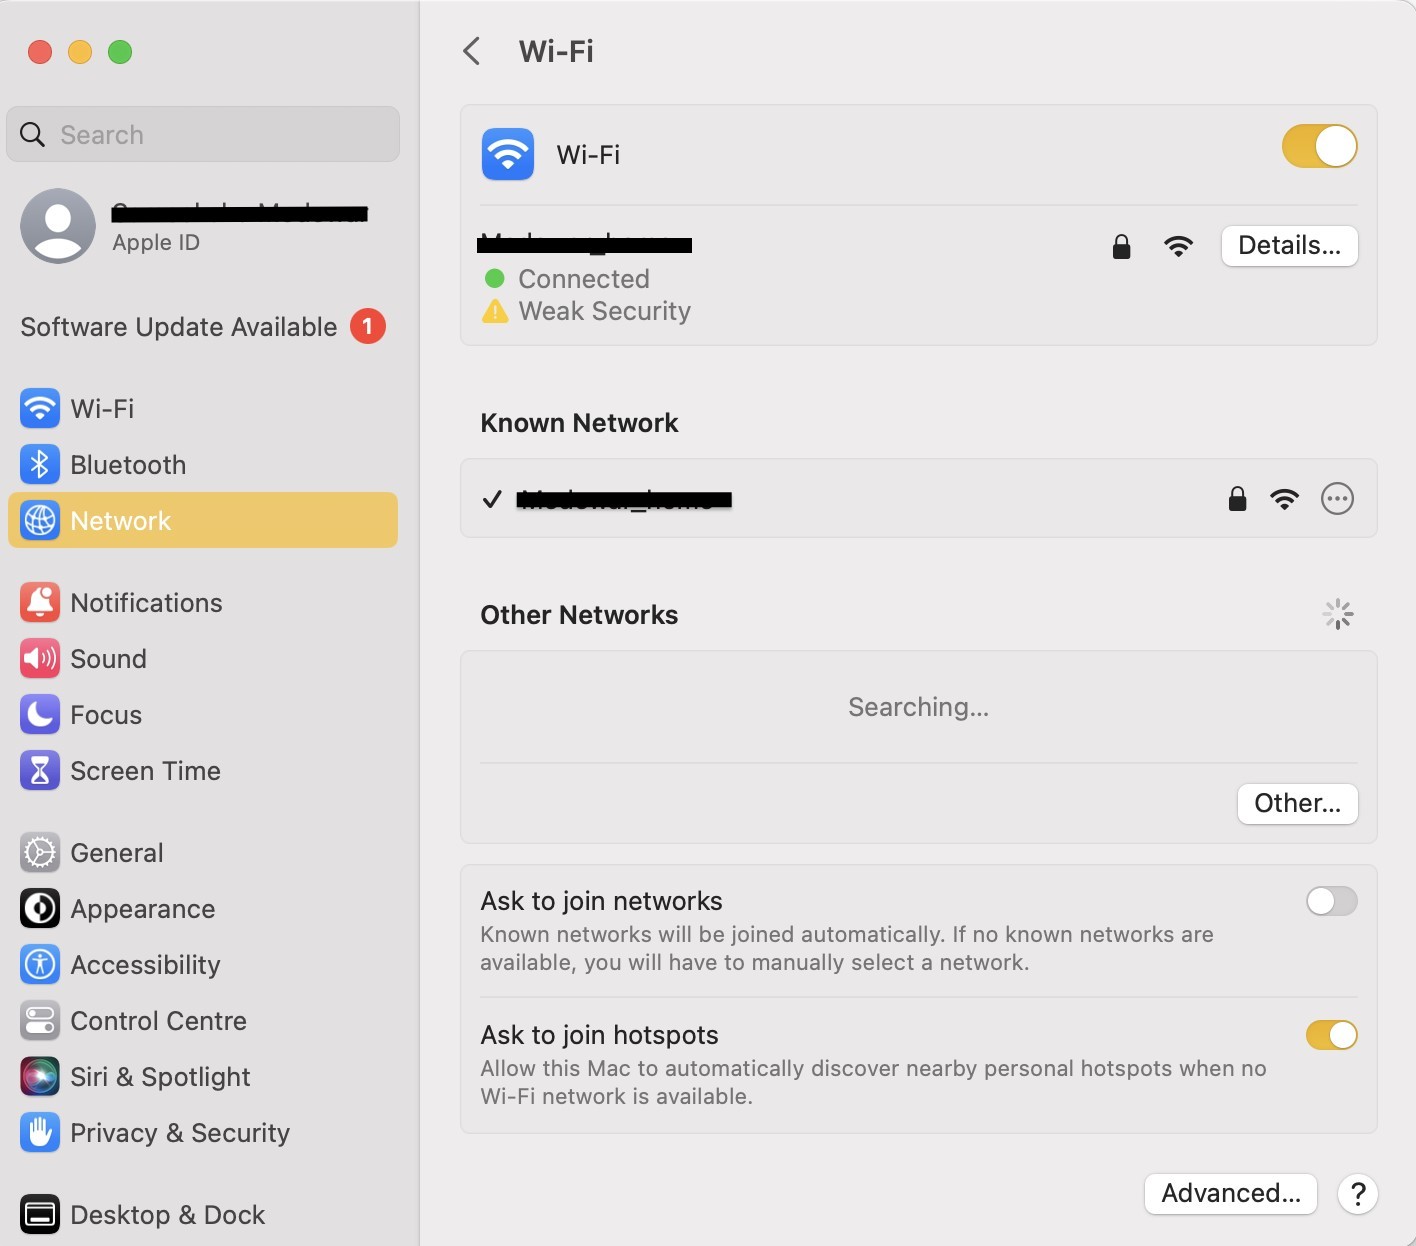
Step 4: Select "DNS."
Step 5: If you want to add a new DNS server, click on the "+" button.
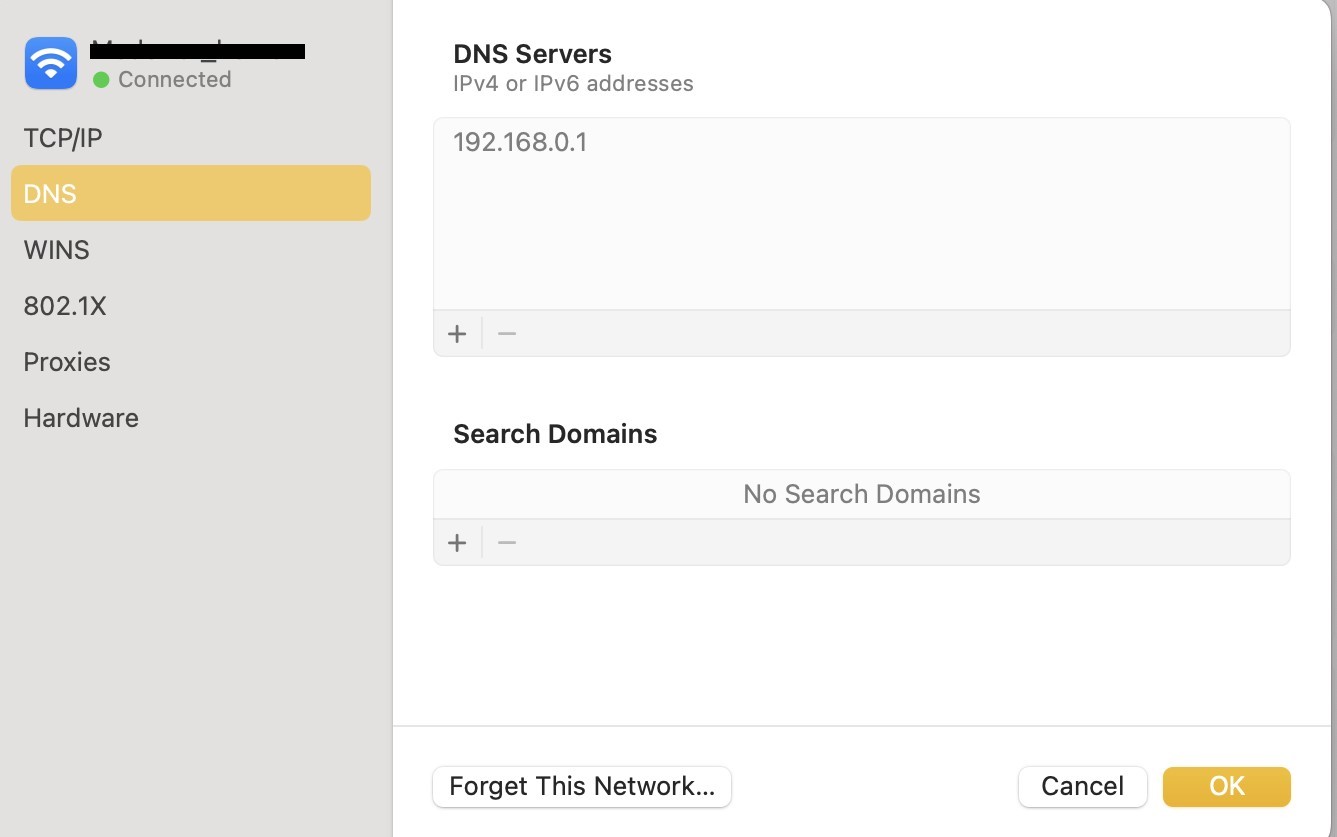
Double-click on the existing DNS IP address to edit an existing DNS.
How to configure DNS in Windows Operating System?
Follow the below steps To change the DNS address on Windows,
Step 1: Go to settings and select "Network and Internet."
Step 2: Select "Change Adapter Setting."
Step 3: Right-click and select “Properties > IPv4> Properties.”
Step 4: Select "Use the following DNS server address."
Step 5: Enter a new address and click "Ok."
You can change your DNS server to a public DNS server temporarily. The following are some public DNS servers available:
- Google’s public DNS: 8.8.8.8 and 8.8.4.4
- Cloudflare’s free DNS: 1.1.1.1 and 1.0.0.1
- OpenDNS Home: 208.67.222.222 or 208.67.220.220
- AdGuard DNS: 94.140.14.14 or 94.140.15.15
- Quad9: 9.9.9.9 or 149.112.112.112
Once you have changed your DNS server settings, try reaccessing the website.
6. Clear Browsing Data
Clearing your browsing data and the cache is one of the fastest methods to fix the Chrome ERR_CONNECTION_REFUSED error.
To clear browsing data, follow the below steps:
Step 1: Open your Chrome browser, and click on the three buttons at the top right side of your screen.
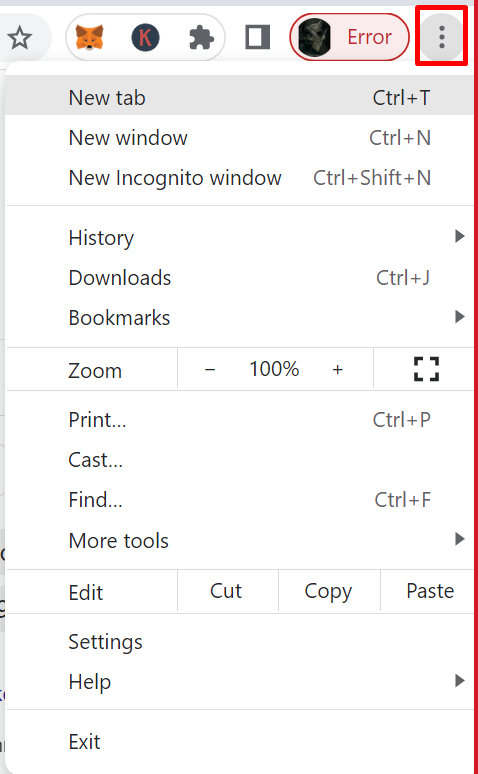
Step 2: Select "More tools" and click "Clear browsing data."
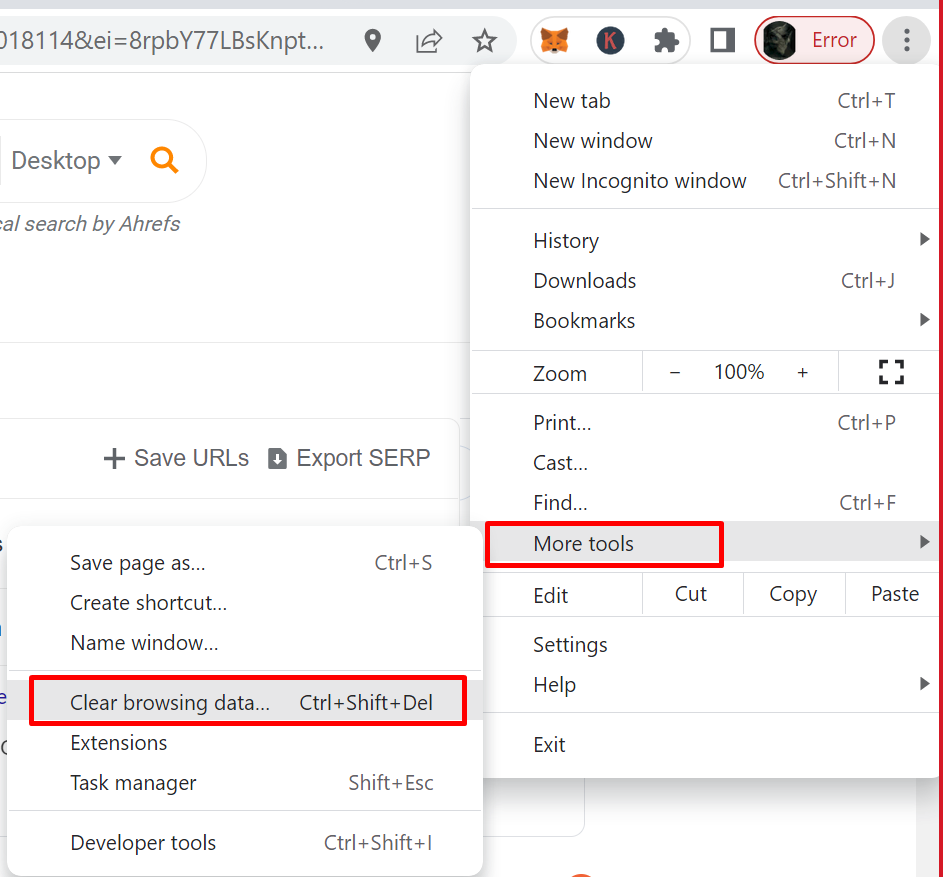
Step 3: When clearing data, select "All time" in the range option and mark browsing history, other site data, cookies, and cached images.
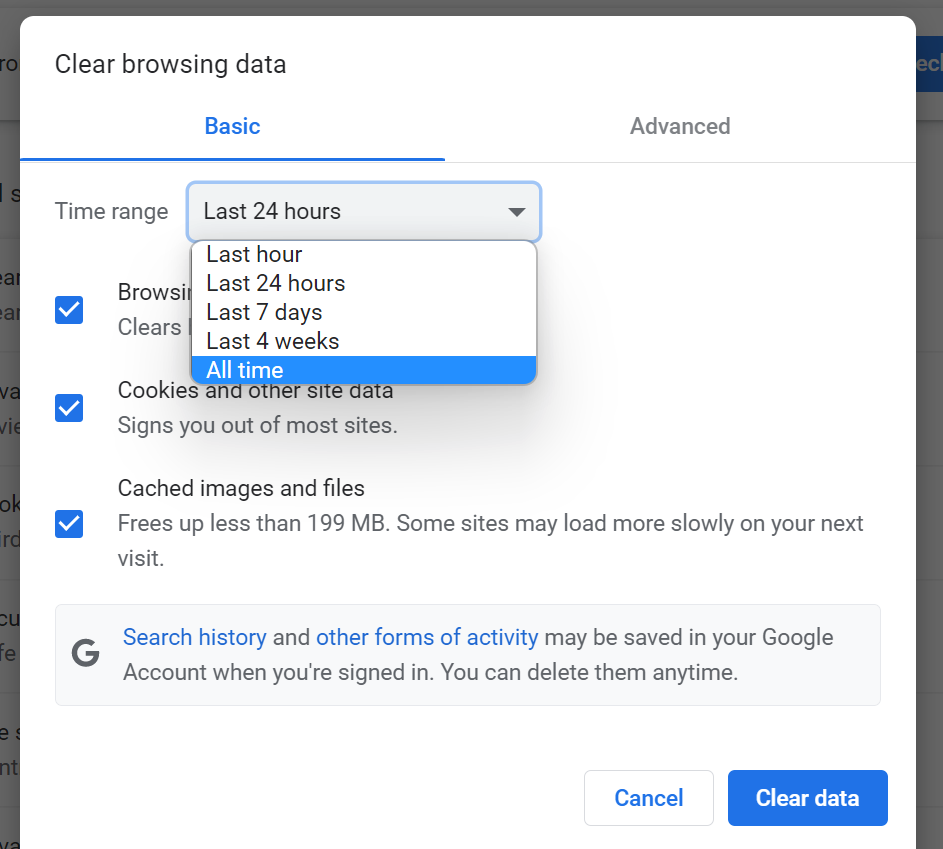
Step 4: Once all the options are checked, click on the "Clear data" option.
Step 5: Restart the browser after the process and check if you still get the error when accessing websites on the browser.
7. Uninstall unnecessary Chrome extensions
With time, you may have several extensions you don't need on your browser. Some extensions may contain harmful code that may interfere with your browsing experience. Disabling or uninstalling extensions you don't need can help you to solve err connection refused error.
Here are the steps to uninstall unnecessary Chrome extensions:
Step 1: Open Chrome and click on the screen's three-dot buttons in the top right corner.
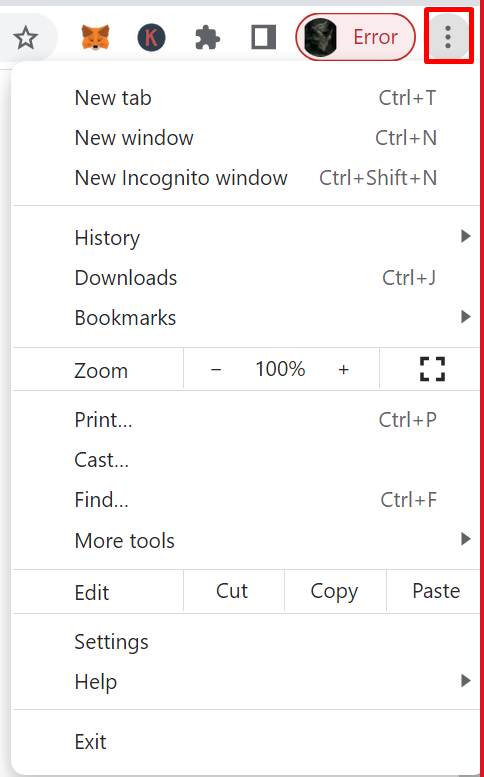
Step 2: Select "More tools" and click on the "Extensions" option.
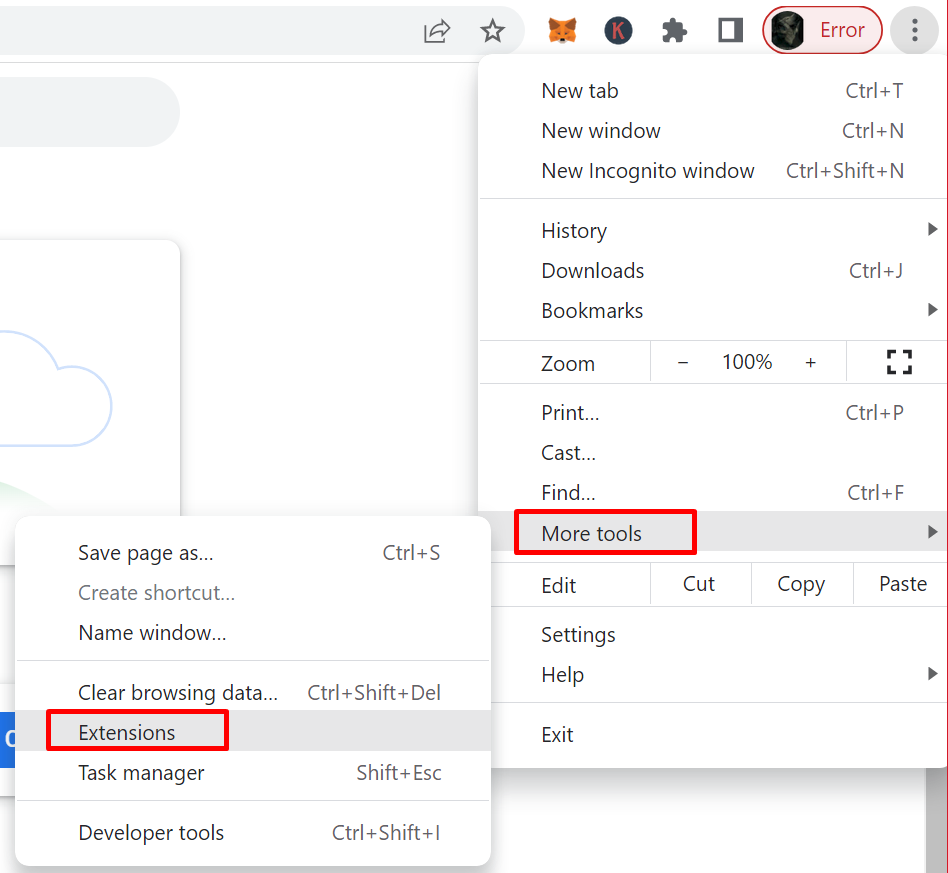
Step 3: You will get a list of extensions on your browser. Click the "Remove" button on extensions that you don't need.
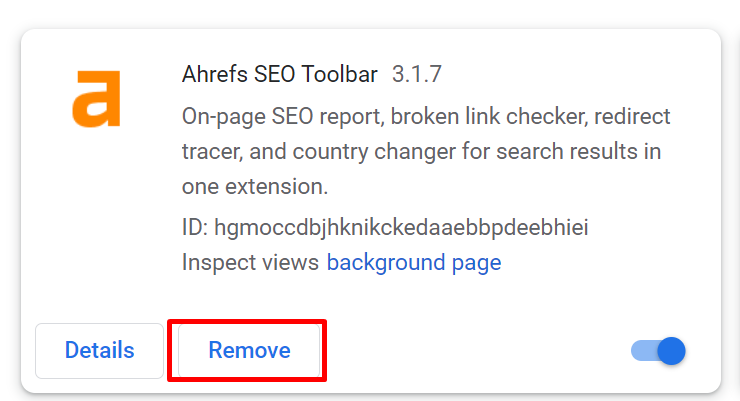
Step 4: Try browsing again to see if you still get the error.
8. Disable Firewall and Antivirus Software Temporarily
A firewall and antivirus software protect computers from viruses and other online threats. They regularly scan your files and network for any malicious or suspicious activities and block them from affecting your computer system.
In addition, these programs also block unsafe websites. Hence, if a website you try to access is not secure, firewall and antivirus software block it and prevent you from accessing it.
In this case, disabling the firewall and antivirus software temporarily would be a great solution. If you use your system’s default firewall or antivirus, you can disable it from your system settings.
However, if you leverage any third-party, specialized software, follow the software-specific steps to disable the firewall and antivirus. Ensure to go through software documentation before implementing any step.
Note: Disable firewall and antivirus software temporarily. Otherwise, you may be at great risk of infecting your computer with viruses and malware.
9. Clear Your DNS Cache
Like a browser creates a cache, our computer’s operating system does the same. The DNS cache comprises temporary entries for all pages you visit within our browser. These entries store the domain names and addresses of all websites you access or visit.
The DNS cache serves the same purpose as the browser cache, i.e., it speeds up the loading process. It does not have to contact the site’s DNS server frequently. If the entry in the DNS cache is too old and does not match the website’s current version, you receive the error ERR_CONNECTION_REFUSED.
In such a scenario, flushing the DNS cache is the solution. It is straightforward to flush the DNS cache.
Flush the DNS Cache on Windows
Step 1: Go to the “Command Prompt” from the Start Menu.
Step 2: In the command prompt, execute the following command:
ipconfig /flushdns
The above command flushes all the DNS resolver cache successfully.
Check out the detailed guide to flush DNS on Windows here.
Flush the DNS Cache on macOS
Step 1: Open “Terminal” from the Spotlight Search.
Step 2: Type the following command in Terminal and hit “return”.
sudo killall -HUP mDNSResponder && echo macOS DNS Cache Reset
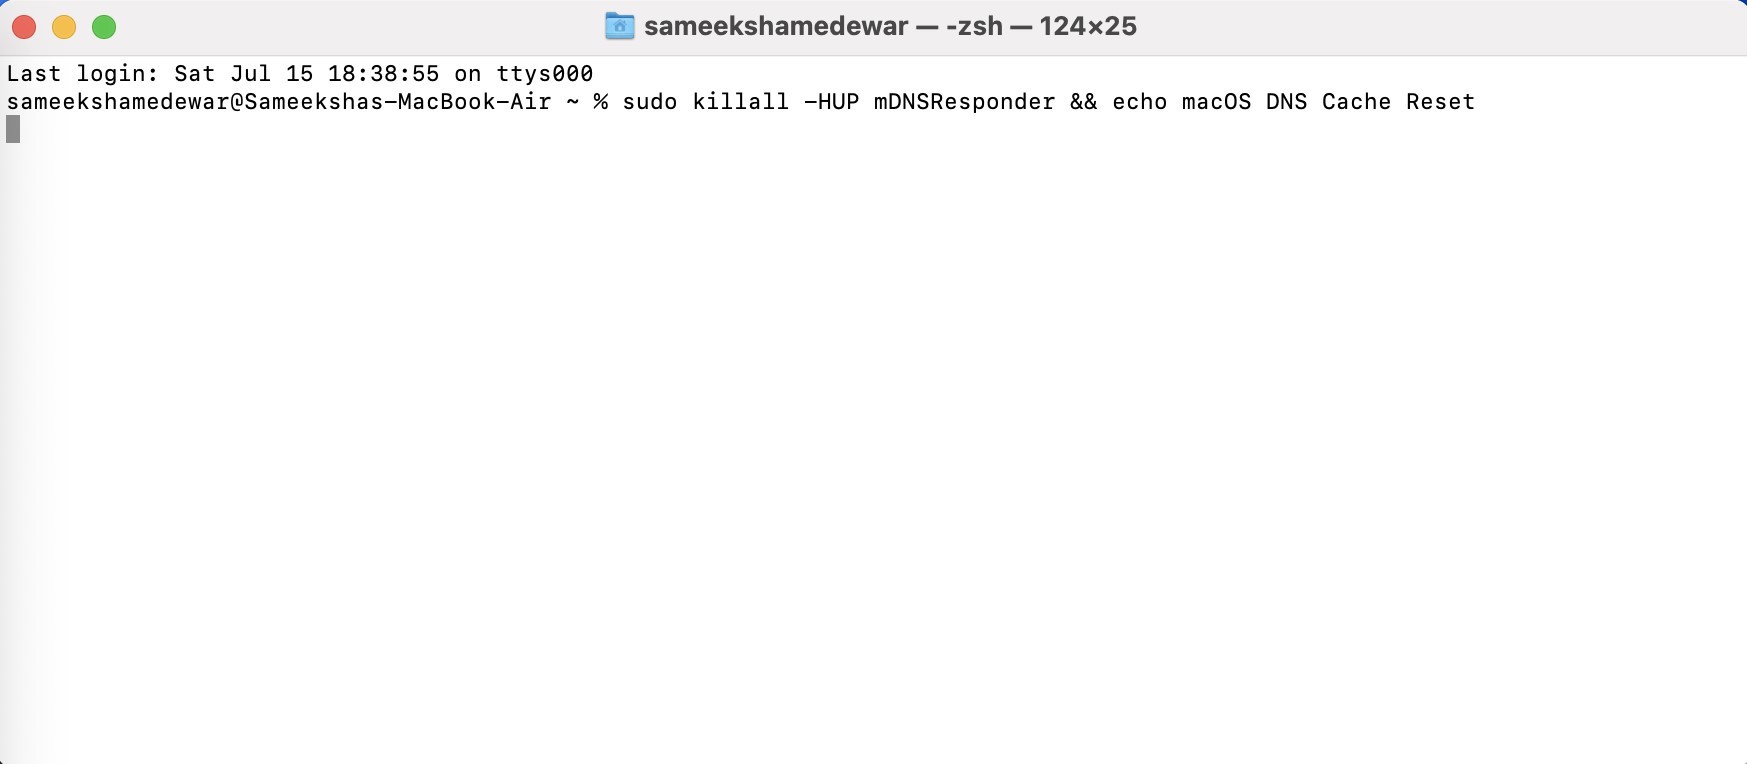
This will clear the DNS cache.
After this, try accessing the website and check if the error has been resolved.
10. Troubleshoot the Internet Connection
If the internet connection is a problem causing the ERR_CONNECTION_REFUSED error, it becomes essential to troubleshoot the internet connection. Windows and macOS systems have built-in troubleshooting tools to identify and fix internet issues.
Troubleshoot the Internet Connection on Windows
Step 1: Go to “Settings” from the Start menu or simultaneously press the keys – Windows key + I –.
Step 2: Choose “Network & Internet”, and click “Troubleshoot”.
Step 3: Select the network adapter you want to troubleshoot and click “Next”.
Step 4: Wait for a while until the system analyzes issues. If issues are found, implement the suggested fixes.
Step 5: Once done, reboot the computer and check whether the error resolves.
Troubleshoot the Internet Connection on macOS
Step 1: Disconnect all external devices from your MacBook except a keyboard and monitor.
Step 2: Shut down the system.
Step 3: Turn the system on and press and hold the key – D.
Step 4: Next, choose the preferred language.
Step 5: Wait until Apple Diagnostics is running.
Step 6: If the system identifies any errors, it suggests possible fixes.
Implement the fixes and reboot the system.
11. Deactivate VPN
VPN stands for Virtual Private Network. It is among the security solutions that mask your original IP address and keep you anonymous while using the internet. This prevents hackers, third parties, and Internet service providers from peeking into your browsing history and Internet activities.
A VPN can interfere with the Internet connection and result in the ERR_CONNECTION_REFUSED error. Deactivating a VPN can help you get rid of this error.
It is better to review a VPN service's software documentation or guidelines and deactivate it temporarily. Once your error resolves, ensure to connect back to the VPN service to surf the internet anonymously.
12. Reinstall Chrome
The last option you can try is to uninstall the Chrome browser. Like other applications, Chrome also cannot be 100% bug-free. Your browser installation may contain issues if you haven’t updated it for a long time. Another reason for the error may be the browser and operating system issues.
In such cases, uninstalling and reinstalling Chrome can be a great solution. Remove the current Chrome installation and install the latest version from its official website.
However, before you uninstall Chrome, try resetting it to bring back its original settings.
Here is how to reset Google Chrome:
Step 1: Open Chrome on your system.
Step 2: Click on the three dots in the top right corner.
Step 3: Choose “Settings” and click “Reset Settings”.
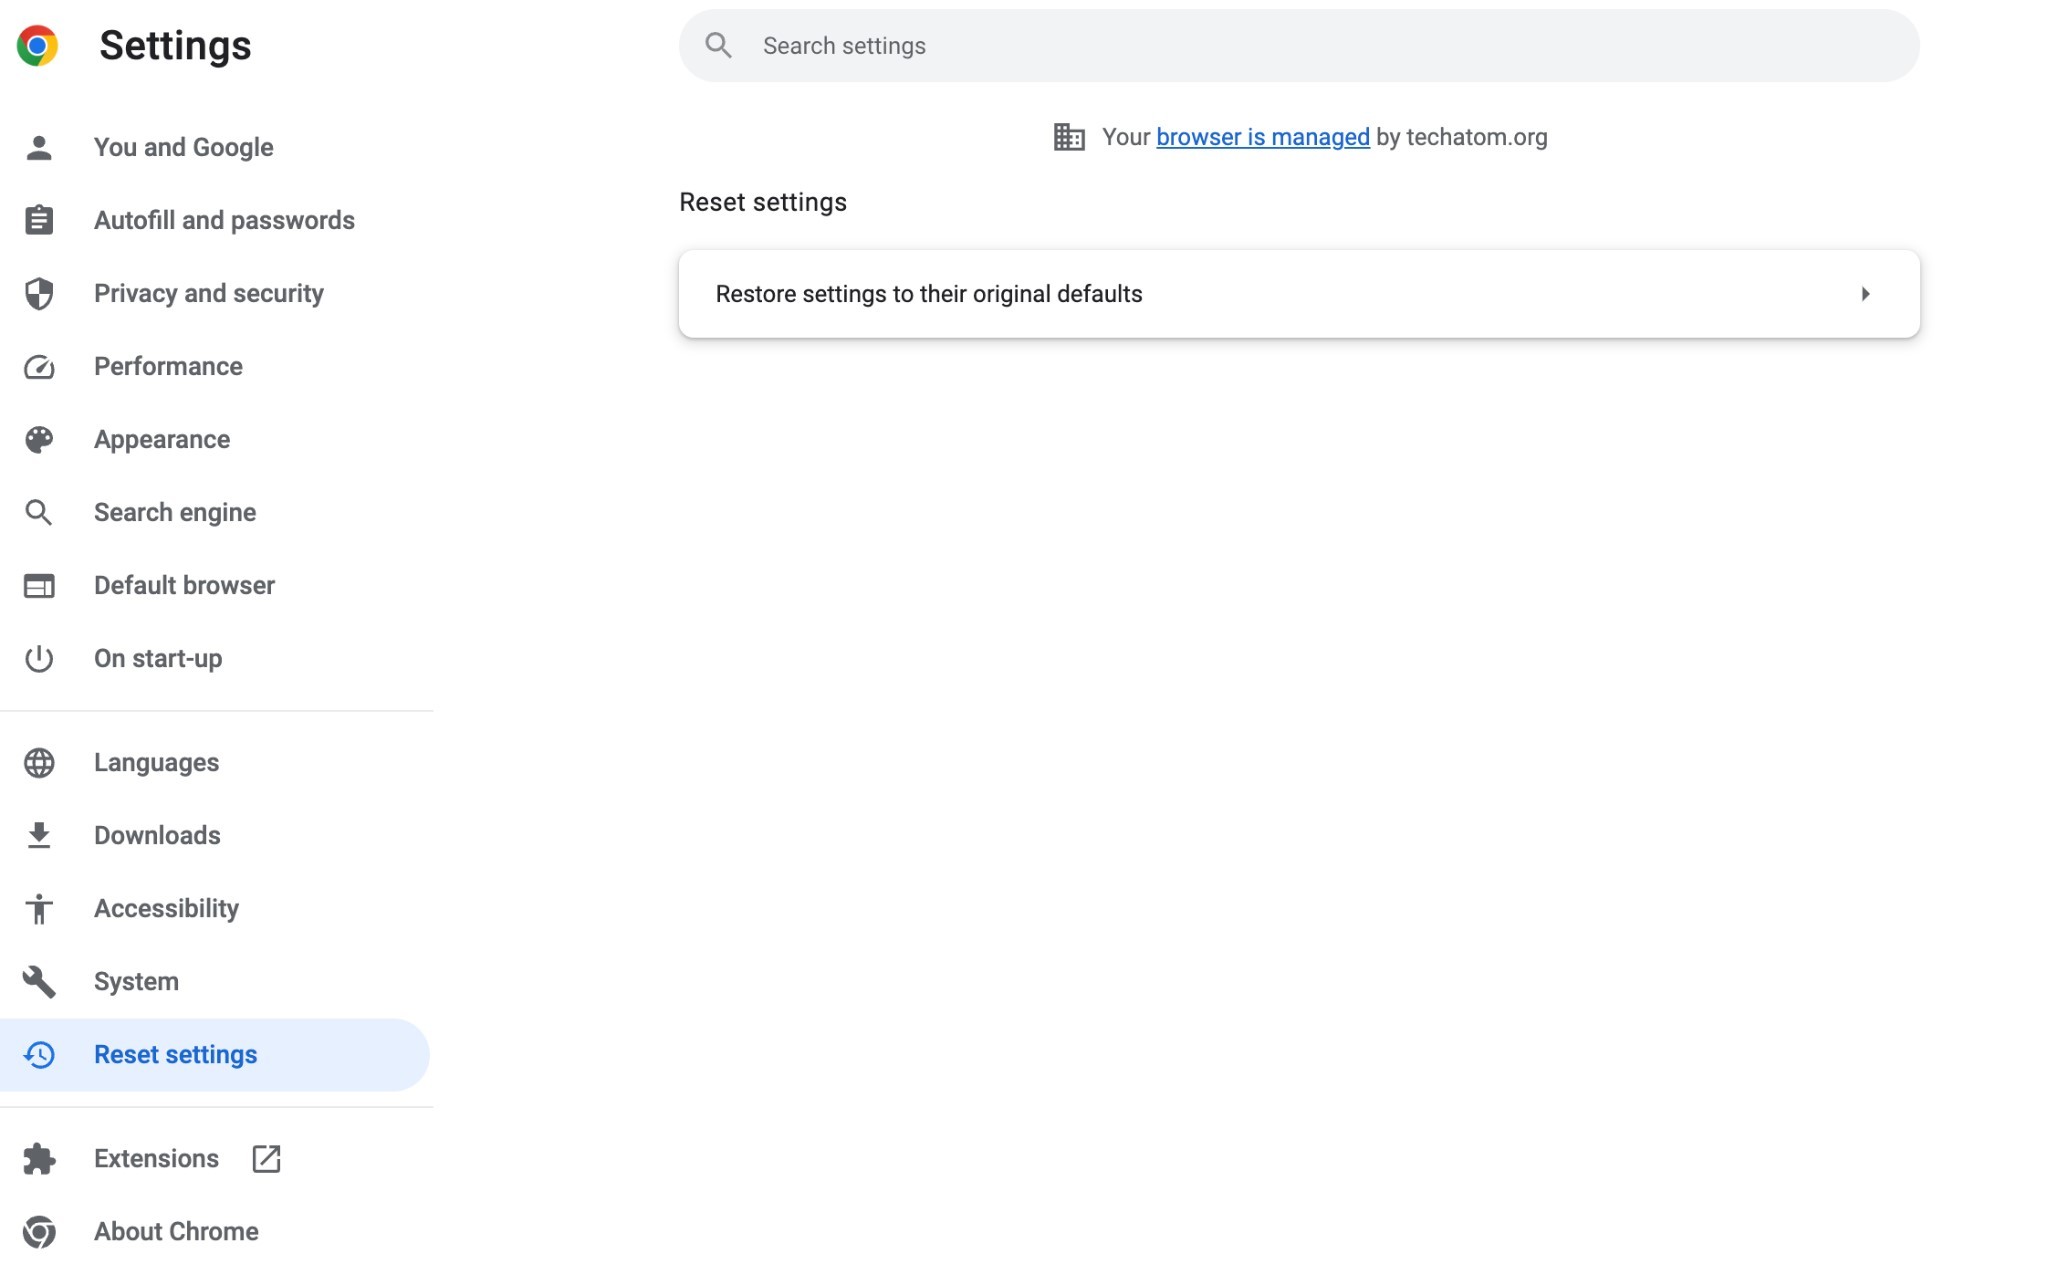
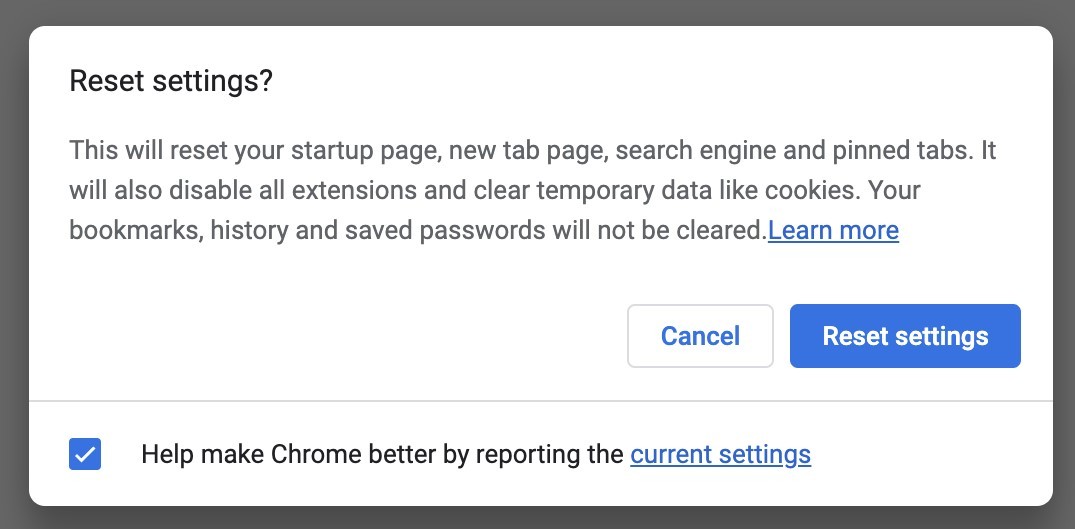
Step 4: Next, choose “Restore settings to their original defaults” and click “Reset Settings”.
How to Fix ERR_CONNECTION_REFUSED (This Site Can’t Be Reached) in Chrome on Android?
If you know how to fix ERR_CONNECTION_REFUSED in Chrome on Android, you can continue to have ideal access to internet resources. Understanding the troubleshooting methods allows you to quickly address connectivity issues when they arise, ensuring uninterrupted browsing experiences on mobile devices. Here's how you can repair this problem on Android:
1. Clear Cache and Cookies for All Browsers
To clear cache and cookies for all browsers on Android, follow these steps:
- Launch Chrome: Open the Chrome browser on your Android device.
- Access Settings: Tap the three dots icon located at the top-right corner of the browser window to open the menu. From the menu, select "Settings."

- Navigate to Privacy Settings: Within the Settings menu, find and tap on "Privacy."
- Clear Browsing Data: Under the Privacy section, select "Clear browsing data."
- Choose Time Frame: From the Clear browsing data menu, select "All time" to clear data accumulated from all browsing sessions.
- Select Data to Clear: Check the boxes next to "Cookies and site data" and "Cached images and files" to include them in the data to be cleared.
- Confirm Clearing: Once you've selected the data to clear, tap on "CLEAR DATA" to initiate the process.


- Clear Site Storage: After clearing data in the Chrome app, you may want to clear site storage. Go back to your Android device's Settings, then navigate to "Apps" or "App Manager." Find and select the Chrome app from the list of installed apps. Within the Chrome app settings, tap on "Manage Space" or a similar option, then choose "Free Up Space." Confirm by tapping "OK" to clear site storage.

2. Scan for Malware
Head over to the Google Play Store. Search for "Malwarebytes Mobile Security" and tap "Install" to download the app. During the initial launch, Malwarebytes might request permission to access certain areas of your device, such as storage, to perform a thorough scan. Review the permissions carefully and tap "Allow" if you're comfortable granting access.
The Malwarebytes app usually offers a free scan option. Tap the "Scan Now" button to initiate a scan of your entire device. This process might take a few minutes depending on the amount of data stored on your phone or tablet.
Once the scan is complete, Malwarebytes will display the results. It will identify any malicious software (malware) found on your device. If the scan detects any malware, don't hesitate! Tap the "Remove" or "Clean" button (whichever option is available) to quarantine and eliminate the threats.
3. Uninstall Dubious Apps
To uninstall dubious apps from your Android device, follow these steps:
- Review your installed apps and identify potentially unwanted apps (PUAs), such as cleaners, boosters, and dubious games.
- Uninstall PUAs one by one through your device's settings.
- Remove apps designed to cheat on licenses and any network-related apps, including VPNs.
- Uninstall any apps installed from sources other than the Google Play Store.
- Confirm each uninstallation and restart your device for thorough removal.
Now, you can increase your device's security and minimize the risk of malware and privacy issues.
4. Manually Assign Google DNS (If ERR_CONNECTION_REFUSED occurs on Wi-Fi)
Note: This strategy only works with connections via Wi-Fi and fails to tackle the problem if it occurs over mobile data.
If you have access to the router settings, you can specify Google DNS directly on the router. Alternatively, if you're unable to access the router settings, you can assign Google DNS on your Android device:
- Modify your current Wi-Fi connection settings.
- Specify 8.8.8.8 and 8.8.4.4 as the DNS servers.
- Save the settings.

Note 2: If your Android device is rooted, remember to check the hosts file to ensure it isn't blocking any websites.
5. Mother of all fixes: Perform a hard reset!
The "ERR_CONNECTION_REFUSED" error can be frustrating, but a factory reset, often referred to as the "mother of all fixes," should be a last resort. It wipes your device clean, erasing all your data, apps, and settings.
Before Resetting: Back Up Your Data including Photos, contacts, messages, and other important information will be deleted during the reset.
Performing the Reset:
- Locate the Settings app on your Android device and tap to open it.
- The specific wording might differ slightly depending on your device's manufacturer. Look for options like "System," "Backup & reset," or "General Management."
- Within the Backup and Reset menu, you'll find the option to "Factory data reset" or "Erase all data (factory reset)." Tap on this option to begin the process.
- You'll likely be prompted to confirm your choice and enter your PIN or password for security reasons. Double-check everything is backed up, then proceed with the reset.
After the Reset: Resist the urge to restore your apps immediately! With your device in its pristine, factory reset state, open the Chrome browser and try accessing the problematic website.
Note: A factory reset is a powerful tool, but it should be used with caution. By following these steps and prioritizing alternative solutions first, you can hopefully resolve the "ERR_CONNECTION_REFUSED" error without losing all your valuable data.
Advanced Troubleshooting
If the previous solutions haven't resolved the ERR_CONNECTION_REFUSED error, here are some more in-depth troubleshooting steps:
- Checking the Windows Hosts File: The hosts file on your computer can override DNS settings. Incorrect entries could be redirecting you away from the website you're trying to access.
- Temporarily Disabling IPv6: In rare cases, incompatibilities with IPv6 can lead to connection problems. [Provide instructions on how to temporarily disable IPv6 on Windows].
- Resetting Network Settings: If there's a deeper network configuration issue, resetting your network settings to defaults might help.
Caution: These steps involve modifying system settings. Before proceeding, make sure you understand the potential consequences or create a backup of your current settings.
Seeking Further Assistance
If you've exhausted all the troubleshooting options and still encounter the ERR_CONNECTION_REFUSED error, it's time to seek additional help:
- Contact Your ISP: Your Internet Service Provider might be able to identify any network-wide issues affecting connections to specific websites.
- Contact the Website Administrators: If you're certain the issue is not on your end, reach out to the website owners to report the problem. They might be able to diagnose and resolve server-side issues.
Conclusion
These were some effective ways to fix the ERR_CONNECTION_REFUSED error. It is the connection error typically occurring in Google Chrome. Client-side issues, such as poor internet connection, Chrome extension issues, antivirus and firewall interference, etc, primarily cause it.
Though connection errors seem daunting, they can be fixed. So, while fixing such errors, you must try out all options available patiently.
Let us know in the comments which solution has helped you resolve the error.
I'm fascinated by the IT world and how the 1's and 0's work. While I venture into the world of Technology, I try to share what I know in the simplest way with you. Not a fan of coffee, a travel addict, and a self-accredited 'master chef'.