
You'll need an SSH key if you want to access your server and make changes remotely. This post will explain how to create SSH key in Windows so that you can start using it. Also, we have explained how to use the SSH key after you have generate SSH Key in Windows.
What is an SSH Key?
An SSH key is a unique string of characters that identify users when they connect to a remote server. This key is used to authenticate the user and allows them to access the server without entering a password.
SSH keys are generated using a public-private key encryption algorithm. The private key is kept on the client's computer and should never be shared with anyone. The public key is uploaded to the server and encrypts data sent from the client to the server.
When a user attempts to connect to a server using SSH, the server will use the public key to decrypt the data that was sent from the client. If the data can be successfully decrypted, the user is authenticated and allowed access to the server.
Why do I need an SSH Key?
Your SSH key is a unique identifier that proves your private key ownership. It can authenticate you when connecting to a remote server or service. This connection can be made using a password, but an SSH key is much more secure.
When you generate a new SSH key, you will use it to connect to your server or service. The SSH key will be stored on your computer, and you must keep it safe. If someone gains access to your SSH key, they could access your server or service.
Generating a new SSH key for each server or service you connect to is important. This way, if one of your keys is compromised, the others will still be safe.
How to create an SSH key in Windows? [Generate SSH Key Windows]
To create an SSH key in Windows, you must first download and install the PuTTYgen software from the official website. Once installed, open the PuTTYgen application and click the "Generate" button. This will generate a public and private key pair for you.
Next, enter a passphrase in the "Key passphrase" field and click on the "Save private key" button to save your private key. Make sure to store this safely, as it will be needed later.
Now that you have generated an SSH key pair, you can use the PuTTY client to connect to your remote server. In the "Host Name" field, enter your server's IP address or hostname. Under the "Connection > SSH > Auth" section, browse for your private key file and click on the "Open" button.
Once connected, you can run commands on your remote server as if you were logged in locally.
Generate Keys in the Command Line
Prerequisites: To generate keys in the command line, you need windows 10 (April 2018 update or later) or Windows 11 (comes pre-installed). Now, follow these steps:
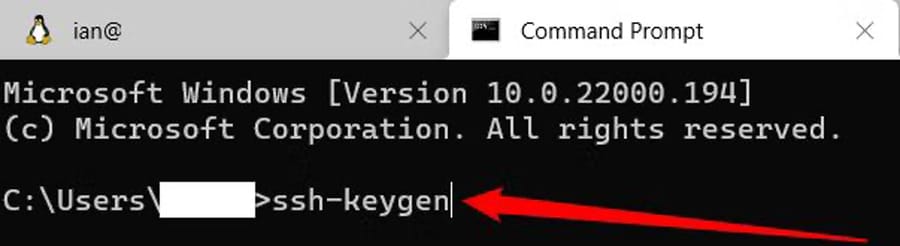
- Open Command Prompt: Press the Windows key and type "cmd".
Alternatively, for frequent command line users, consider installing Windows Terminal (pre-installed on Windows 11) from the Microsoft Store. It allows running Command Prompt, PowerShell, and Windows Subsystem for Linux in a single window.
- Generate the keys: Type `ssh-keygen` and press Enter. This creates default 2048-bit RSA keys.
To use a different algorithm (e.g., Ed25519 recommended by GitHub), type `ssh-keygen -t ed25519`
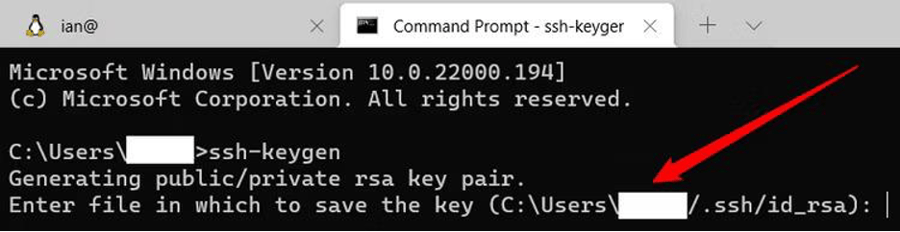
- Save location and passphrase: Press Enter to accept the default location (usually `C:\Users\<your username>\.ssh`).
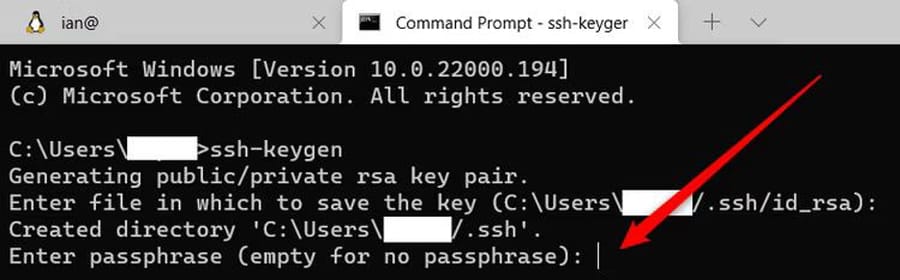
Note: We recommend setting a passphrase for security. Enter your desired passphrase twice when prompted. You can skip this step (by pressing Enter twice), but it's strongly discouraged.
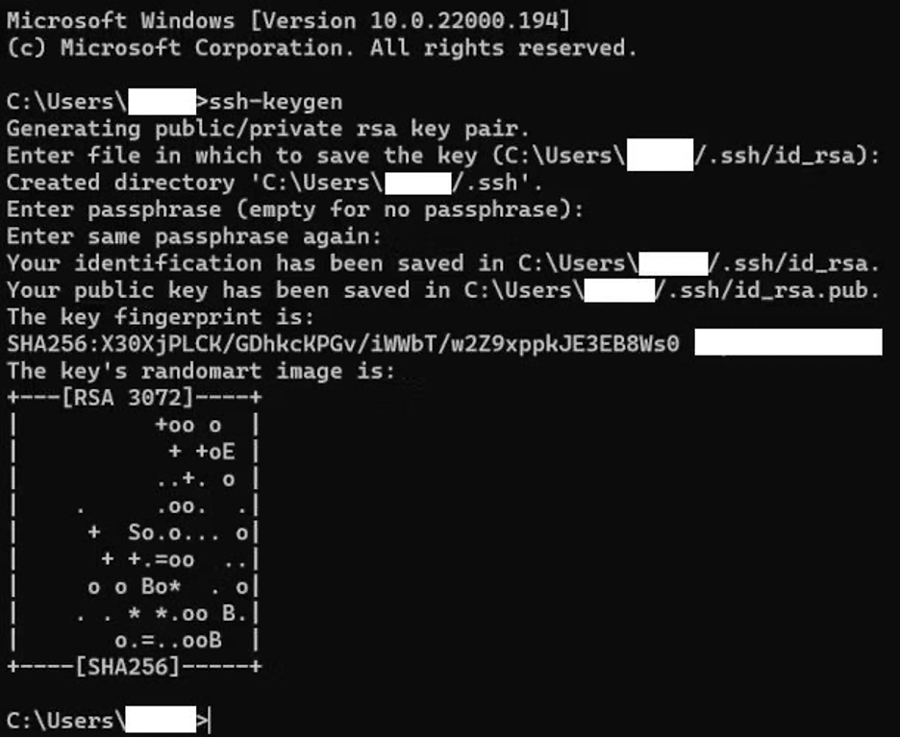
The command line will display confirmation messages and key fingerprints once complete. You'll have two files in the `.ssh` folder:
- id_rsa (private key - never share this)
- pub (public key - upload this to servers for authentication)
Creating Multiple Keys (Optional)
Follow the same steps, but provide a different filename when prompted to save the key (e.g., `id_rsa_github`). Don’t forget that more keys require more management. Back up your keys when switching to a new computer to avoid losing access to servers.
Note: Hidden files and folders might not be visible by default. Refer to a separate guide if you can't locate the `.ssh` folder.
Generate Keys in WSL
For WSL users, generating SSH keys is similar to the Windows method, but within your WSL environment. This makes sense if you primarily use WSL for command-line tasks.
Opening the Terminal: Use Windows Terminal or your WSL distro's built-in terminal (e.g., Ubuntu command prompt).
Generating Keys: Unlike Windows, specifying the key type (e.g., RSA, Ed25519) is recommended.
RSA Key Example:
ssh-keygen -t rsa -b 4096
This creates a 4096-bit RSA key.
Ed25519 Key (Recommended):
ssh-keygen -t ed25519 -C "your@email.address"
Optional: Add your email address for identification. Windows automatically uses your username and PC name for this.
Multiple Keys: Append a suffix like "_github" to the filename when saving keys for different purposes.
Note: More keys require more management. Back up your keys when switching to a new computer to maintain server access.
Generating SSH keys with OpenSSH (Windows 10 and newer)
If you want to know how to generate SSH keys using OpenSSH on Windows 10 and 11, this guide is for you:
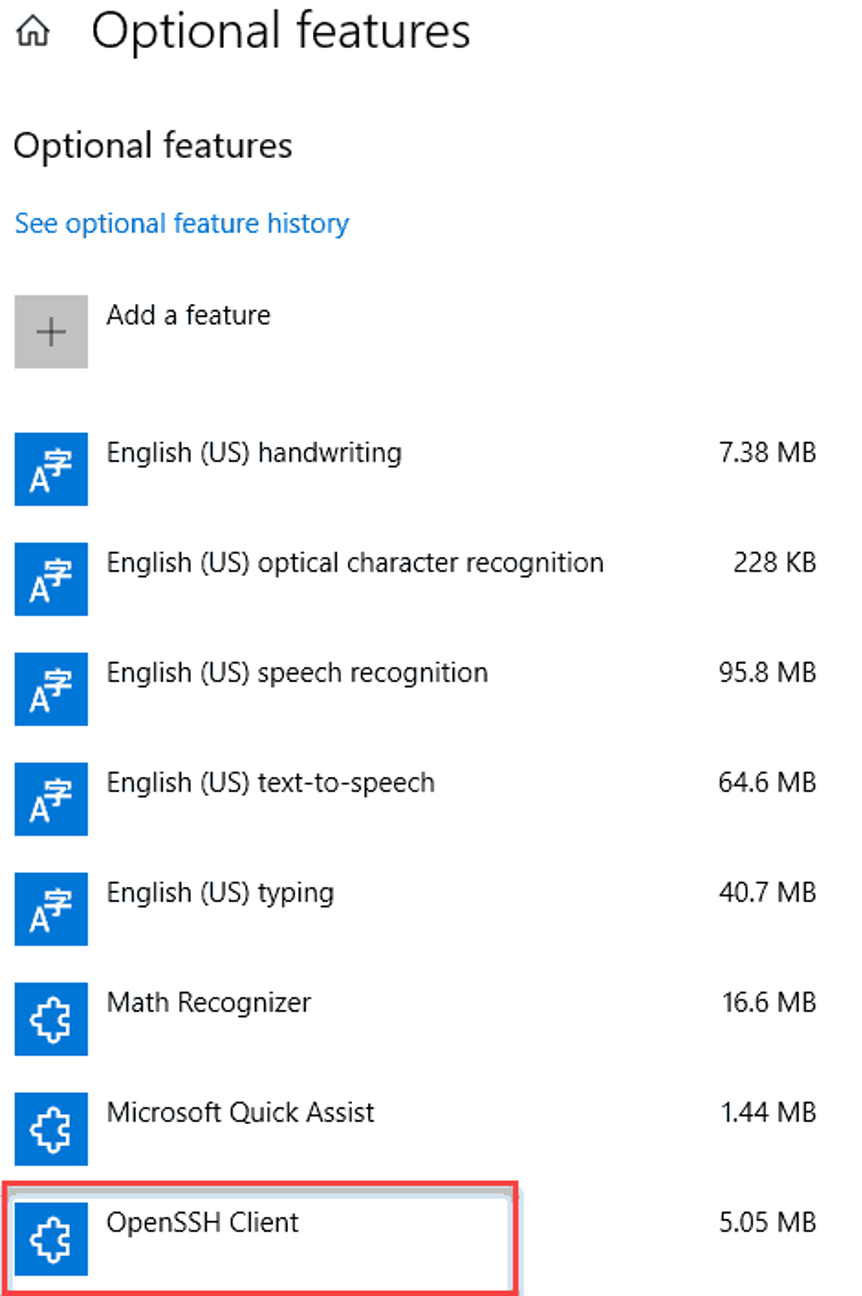
Installing OpenSSH (Windows 10 Only)
- Open the Start menu and search for "Apps & features".
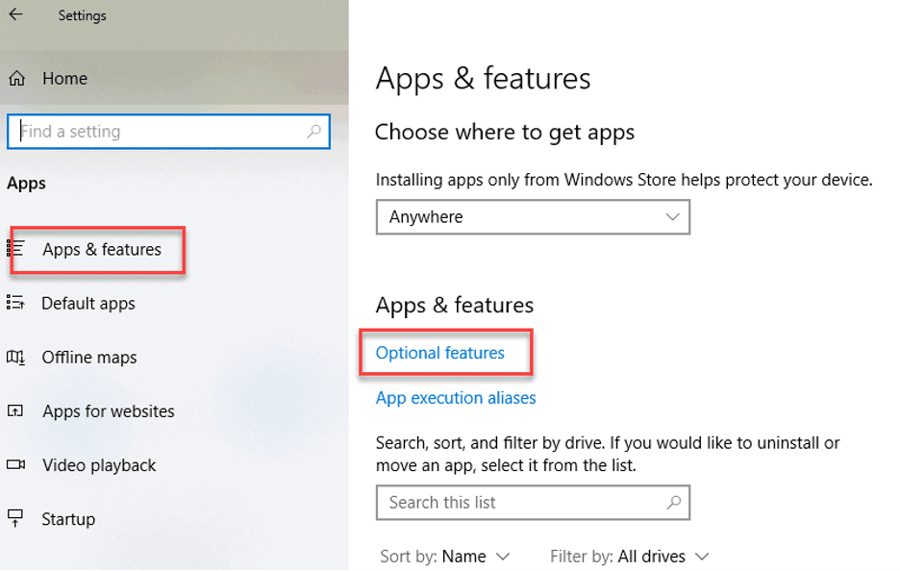
- Click on "Optional features".
- Look for "OpenSSH Client" in the list.
- If it's not there, click the "+" sign next to "Add a feature".
- Select "OpenSSH Client" and click "Install".
Generating the Keys
- Press the Windows key or open the Start Menu.
- Type "cmd" and launch "Command Prompt" from the search results.
- In the command prompt, type `ssh-keygen`. Press Enter.
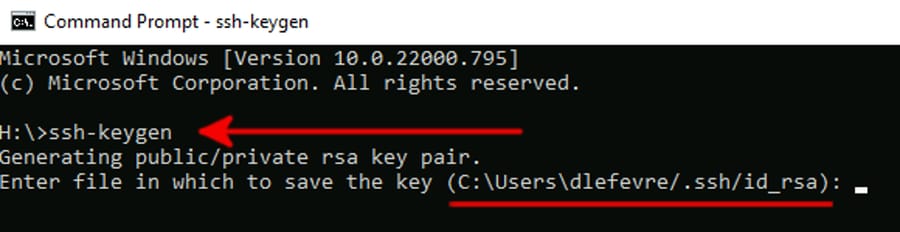
- By default, the keys will be saved in `C:\Users\<your username>\.ssh`. Press Enter to accept this location (unless you're an advanced user).
- The system will prompt you for a passphrase (optional but highly recommended) to secure your keys. Enter a strong passphrase twice if desired. You can skip this step (by pressing Enter twice), but it's strongly discouraged.
Finding Your Keys
- Open File Explorer.
- Enable viewing hidden files and folders (refer to a separate guide if needed).
- Navigate to `C:\Users\<your username>\.ssh` (or the location you specified).
- You should see two files:
- id_rsa (private key - never share this)
- pub (public key - upload this to servers for authentication)

Generate SSH Keys with SecureCRT (Not recommended for most users)
While SecureCRT offers key generation, using the built-in command-line tool (`ssh-keygen`) is generally recommended for its simplicity and wider compatibility. This guide is provided for informational purposes only. Purdue students, faculty, and staff can download SecureCRT for free from the Purdue Community Hub.
Generating Keys
- Open SecureCRT.

- Go to "File" menu or press Alt-Q to open the "Quick Connect" window.
- Under the "Authentication" section, select "PublicKey". Click the "Properties" button.
- In the "Public Key Properties" window, click "Create Identity File" in the bottom left corner. This launches the "Key Generation Wizard".
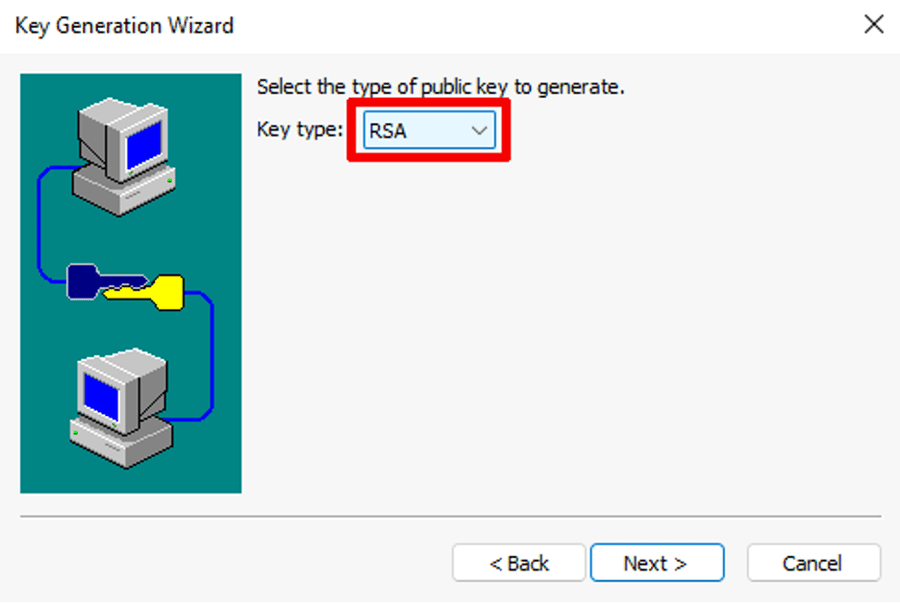
- Click "Next" in the wizard window.
- Select "RSA" as the key type and click "Next".
- Security warning: It's strongly recommended to add a passphrase for extra security. Leaving the passphrase boxes empty weakens your key protection.
Saving Your Keys
- Click "Next" (assuming you chose a passphrase).
- The default key length is sufficient for most cases. Click "Next".
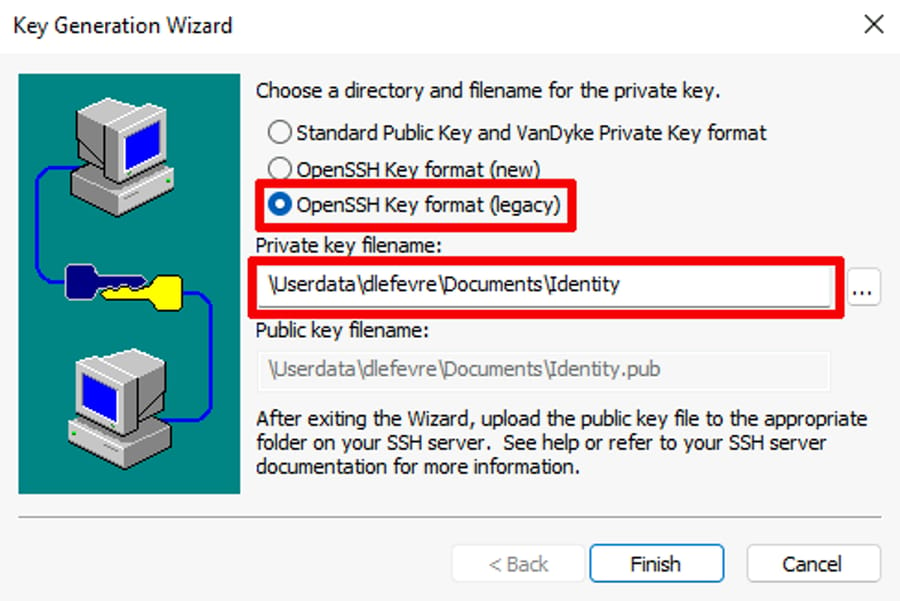
- In the "Save As" section, choose "OpenSSH Key format (legacy)". Note down the filename and location of both your private key (without ".pub" extension) and its corresponding public key (with ".pub" extension).
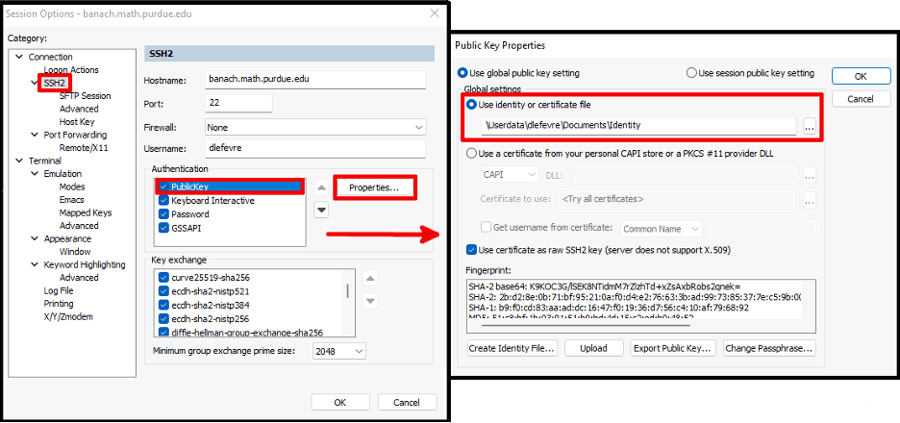
Adding Keys to Sessions (Optional)
- The wizard might ask if you want to add the key to a specific host. Select "No" for now. Refer to the guide on "Copying your public key to a host" for adding keys to remote servers.
- Click "Finish". SecureCRT will attempt to use this key by default for future sessions. You can change the key used in the "Session Options".
Generate SSH Keys with PuTTY
While the command-line method is generally preferred, PuTTY offers another way to generate SSH keys on Windows, especially if you already have it installed.
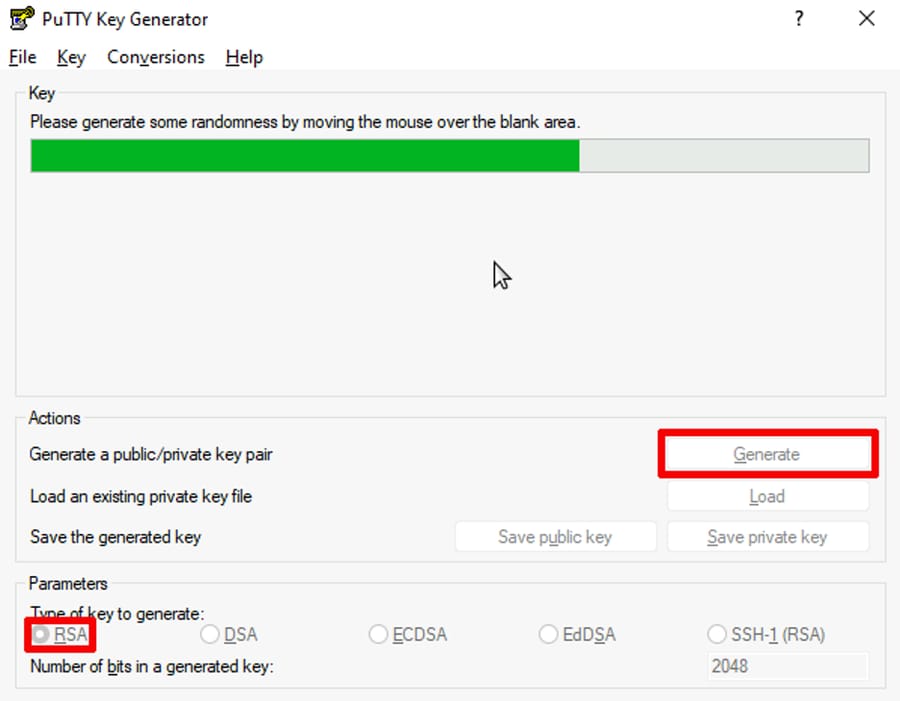
Step 1. Opening PuTTYgen: Search for "puttygen" using the Windows key or Start menu search.
Step 2. Choosing Key Type: At the bottom of the PuTTYgen window, select your desired key type:
- RSA: For most users, choose "RSA" and enter "4096" in the "Number Of Bits" field.
- EdDSA:Select "EdDSA" and ensure "Ed25519 (255 bits)" is chosen in the dropdown menu.
Step 3: Generating the Key: Click "Generate". Move your mouse around the window to contribute randomness to the key generation process.
Step 4. Saving Keys: Click "Save Public Key" and save it with the filename "id_rsa.pub" or "id_ed25519.pub" depending on your chosen type.
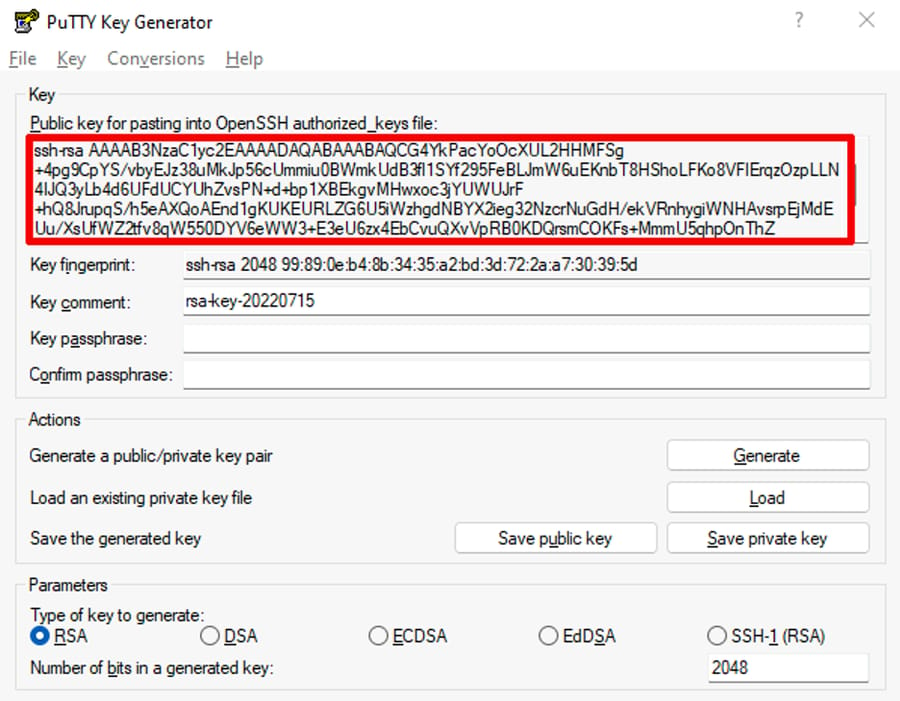
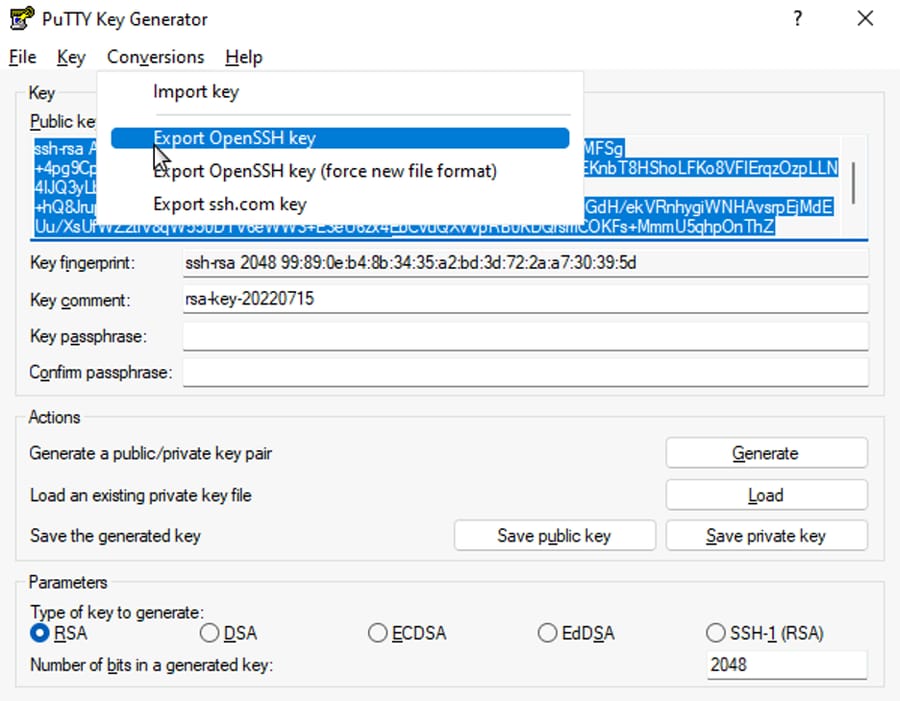
Step 5. Export the private key: in OpenSSH format go to "Conversions" > "Export OpenSSH Key". Save the file as "id_rsa" or "id_ed25519" (without a file extension).
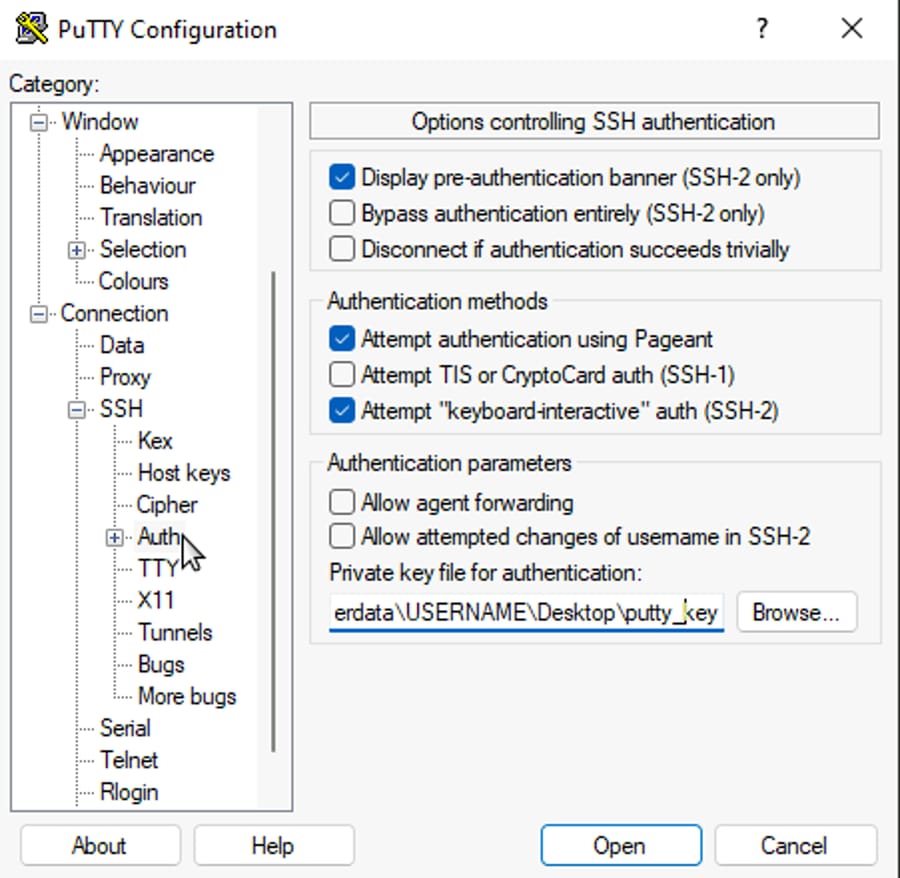
Step 6. Open connection: Once your keys are generated, close PuTTYgen. To use the private key with PuTTY, navigate to the "Connection" and "Auth" settings. Under "Private key file for authentication," select the private key file you just saved (e.g., id_rsa or id_ed25519).
Recommendation: Unless you already use PuTTY or prefer the Linux-like interface, consider the command-line method for its simplicity and wider compatibility.
Locating Your Generated SSH Keys in Windows
The location of your SSH keys depends on the method you used to generate them:
Default Location (PuTTY & OpenSSH)
- Open File Explorer.
- Navigate to `C:\Users\<your username>\.ssh`.
- Replace `<your username>` with your actual username.
- You should find two files:
- `id_rsa` (private key - keep this secure)
- `id_rsa.pub` (public key - upload this to servers for authentication)
WSL Generated Keys
Accessible from two locations:
- Ubuntu Terminal: Look for the files in the `~/.ssh` directory.
- Windows File Explorer: Navigate to `\wsl$\Ubuntu\home\.ssh`.
Note 1: The `.` at the beginning of `.ssh` indicates a hidden folder. You might need to enable viewing hidden files in File Explorer to see it.
Note 2: Public keys are identified by the `.pub` extension.
Note 3: Use a text editor like Notepad to view the contents of both keys, but remember, never share your private key!
How to use SSH keys?
After the key pair is generated, you'll see two fields: "Public key for pasting into OpenSSH authorized_keys file" and "Private key for pasting into SSH client". You'll need the public key to add to your remote server's authorized_keys file. The private key should be kept safe and secret; if someone obtains your private key, they can access your servers without needing a password.
To copy the public key, click the "Public key for pasting into OpenSSH authorized_keys file" field and press Ctrl+C (Windows)
or Cmd+C (Mac). Then, log into your remote server and open the ~/.ssh/authorized_keys file in a text editor. Add a new line at the end of the file and paste it into your public key (which should start with ssh-rsa). Save and close
Conclusion
Creating an SSH key in Windows is a pretty easy process, and it's something that everyone should do to improve their security. You can generate an SSH key that will keep your data safe and secure with just a few simple steps. So what are you waiting for? Go ahead and give it a try!

I'm fascinated by the IT world and how the 1's and 0's work. While I venture into the world of Technology, I try to share what I know in the simplest way with you. Not a fan of coffee, a travel addict, and a self-accredited 'master chef'.